I just wanted to take a moment to say THANK YOU for subscribing to my YouTube Channel. I just blew past the 75,000 mark and I’m thrilled that so many of you like my content. Having over 75,000 subscribers and over 13 Million Views is no small accomplishment and again thanks.
My Learn the Adobe Creative Suite with Terry White App has now been rebranded to “Learn the Adobe Creative Cloud with Terry White” as well as some bug fixes. Be sure to download the update. (note – I did have one person tell me that he’s having issues with it on iPad 1. So if you have an iPad 1 you might want to hold off till I confirm).
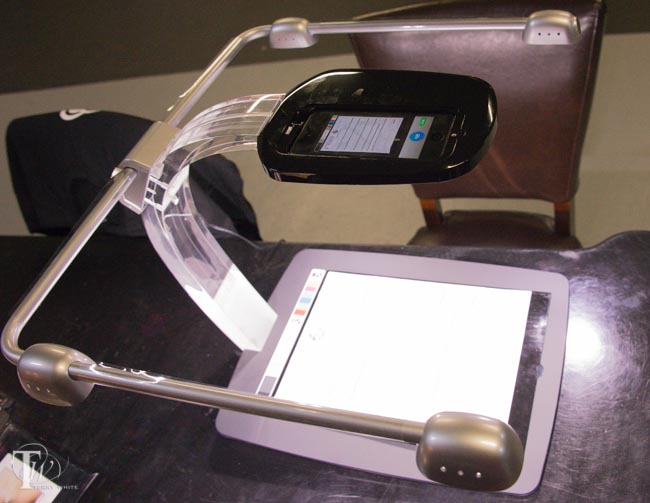
I have been using my iPhone to scan documents for a long time now. My App of choice is Scanner Pro. However, no matter what phone you have or which App you like, the problems of scanning documents are universal. You have to deal with lighting and positioning the document in just the right spot. Also if you’re scanning multiple pages chances are each one is going to be slightly off in terms of orientation, cropping, etc. due to not being able to hold the phone in the same spot for each page. Atiz, the makers of Scandock, want to solve this problem.
Scandock turns your smartphone into a document scanner
This combo hardware device and App will turn an ordinary iPhone or Android camera into a fast, efficient document scanner. I must admit that when I received my review unit that it was way more than I expected in terms of size, craftsmanship and design. I thought “whoa! They’re serious!” It took me about 5 minutes to put it together, plug it in and download the free Scandock App. Once I had the App, I placed a document on the bed and immediately noticed that they have a mat that’s designed to smooth out/hold down folded papers. I tapped the scan button on the App and like with any photo, it only takes a second and you’re on to the next page. Certainly faster than the fastest sheetfed scanners out there because it literally takes a second. It takes more time to position the paper than to do the scan. If you are scanning more than a few sheets then it will probably be on par with the time it takes to do it in a sheetfed scanner, but way faster than a flatbed scanner.
As you would expect, the App allows you to convert the document to PDF and share it. The one feature that blew me away was the multiple-doc feature. This feature allows you to place multiple items on the bed at once, such as several receipts or business cards, and it will auto-detect and scan each one as a separate document. I’ve not seen a smartphone App do that before. The built-in LED lights are the key to this device. By evenly lighting your documents you never have a shadow of YOU holding the phone over the document. There are trays for both iPhones and Android smartphones. You can even get it in Black or White.
The Bottom Line
Sounds great! Does everything that I would expect and more. What’s the downside? The only real downside to this solution is the asking price. At $499 (B.Y.O.D.) it will be out of reach for many and puts it in direct competition with other document scanners. Granted, other document scanners require a connection to a PC/Mac (which probably costs more than your smartphone) and perhaps the newer “Post PC” generation will see the benefit of this kind of solution.
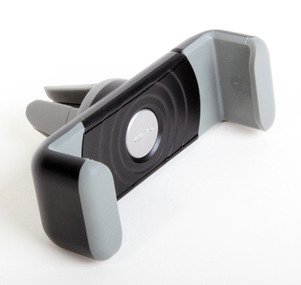
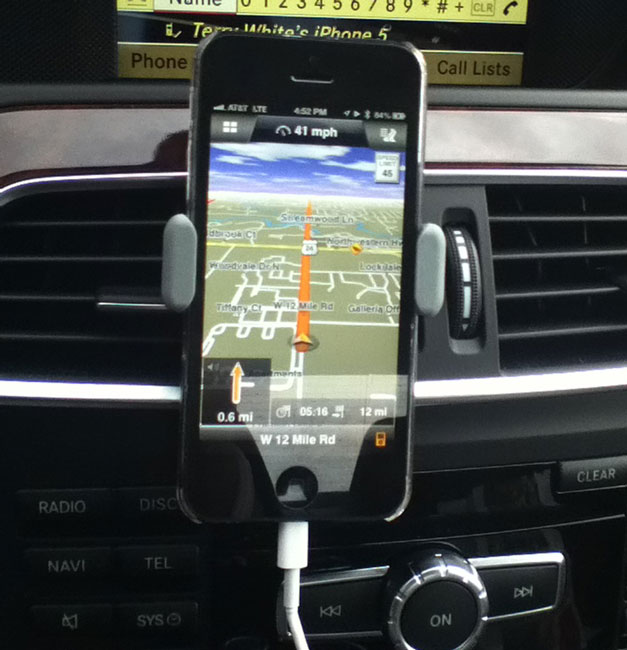
iPhone 5 mounted to the air vent via the Kenu Airframe and running Navigon North America turn-by-turn GPS App.
I have been searching for the perfect car mount for my iPhone 5. All the ones I’ve seen or used to date were either too big or too cumbersome. Let me first explain that I also want a mount that I can travel with and use in rental cars. Most mounts fall into four categories. They either attach to the windshield, dashboard, cup holder or air vent. While the air vent ones I’ve used fit the bill for the most part they usually don’t travel well because they are too delicate or have too many pieces or are simply too big. I like air vent mounts and dashboard mounts best as they position the phone at a comfortable eye level to minimize distraction.
The Kenu Airframe is exactly what I was looking for
1. It mounts my iPhone 5 on the air vent. 2. It accommodates most phones even with their cases on. 3. It’s easy to clip the phone onto it and remove it (spring loaded). 4. It rotates to either vertical or horizontal. 5. It works on just about any vent style (round, rectangle, horizontal vents or vertical vents). 6. It slides right onto the vent in 2 seconds. 7. It’s small and very easy to travel with.
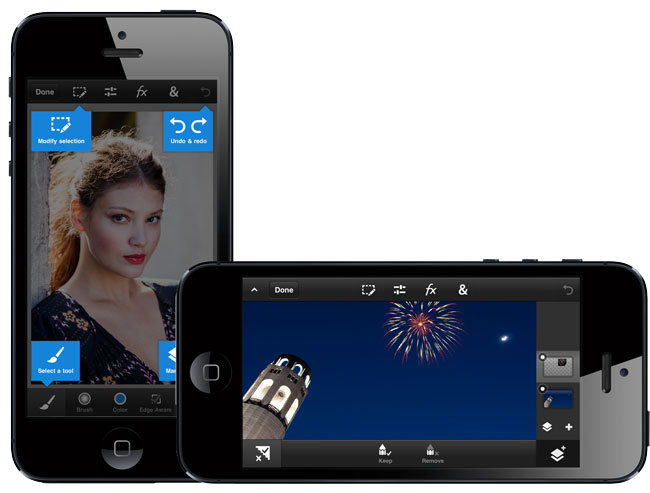
Just in case you missed my post over at bestappsite.com, I wanted to give you a heads-up that Photoshop Touch has just been released for iPhone and Android Smartphones.
Adobe Photoshop Touch for phone offers powerful new capabilities for smartphone users:
· Enhance images using popular Photoshop features such as layers, selection tools, filters, tonal and color adjustments
· Apply effects and add graphical text for endless creative possibilities
· Edit images as large as 12 megapixels with layers
· Combine images together quickly using the Scribble Selection feature, and easily refine your selection with the Refine Edge tool
· Automatically sync images to Adobe Creative Cloud™ with free 2GB of storage
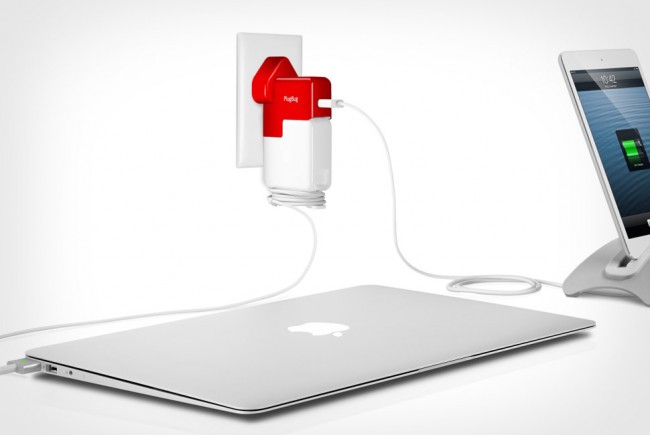
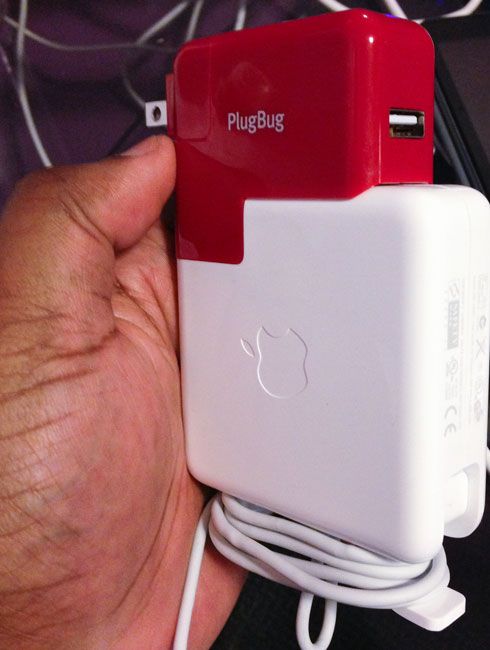
As a frequent traveler I’m always looking for ways to charge my multiple devices with fewer chargers or taking up less outlets in a hotel room. I saw an ad for PlugBug and decided to order one and see if I liked it or not. The idea behind PlugBug is that it replaces the standard plug of your MacBook Pro or MacBook Air Adapter with one that has a USB (2.1 Amp) port built-in. This way you can charge both your laptop AND any USB power device at the same time. The concept is simple and it takes all of 2 seconds to install. I opted for the PlugBug World, which comes with all the necessary adapters to plug into various outlets around the globe. It works as advertised and although it’s “short” on the 85w MacBook Pro adapter, it doesn’t hender its use.
How could it be better?
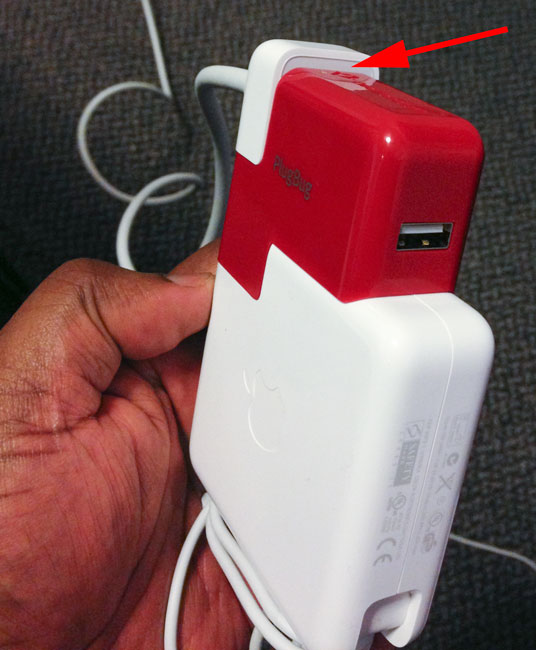
The 1st thing that I wasn’t crazy about was that it replaces the “extended cord” on the MacBook Pro adapter. I know that you can simply plug the adapter into the wall with or without a PlugBug, but I prefer using the optional extended cord that comes with the MacBooks so that I don’t take up so much space on a power strip and I get a longer cord.
That’s a personal thing with me, but the product works as advertised. Although I CAN use the extended cord, it’s clear by the way it sticks up over the PlugBug that they didn’t design it to be used this way. While we’re at it, I’d also like to see TWO USB ports instead of just one. It would make it much more useful to me if I could use one plug to charge my MacBook, iPhone and iPad at the same time. So make it a little taller to accomodate the extended cord AND a second USB port and I’d “love” it.
One of the lessons that Hurricane Sandy taught us is that Mother Nature can strike at any time and as a result you could be without power for days. My heart and prayers go out to those affected by the hurricane. To make matters worse another storm is bearing down on the northeast. While generators are great, there could be situations where there is no gas to run them. In those cases you are probably going to want to at least keep your cellphone going at a minimum.
K-TOR Pocket Socket Hand Generator Can Save The Day
Having a portable hand crank generator may be the difference between a charged cellphone battery and a dead one. The concept is simple. Plug in your USB charger in to the standard AC outlet on the Pocket Socket and plug in your phone. Then start cranking. Unfortunately there is no free lunch. If you stop cranking the handle, then you stop generating electricity and therefore you stop charging. You will definitely get a good workout for the time it takes to charge your battery, but I’d be willing to bet there were some folks out there that had no power and therefore a dead phone who would have had no problem cranking this handle for as long as it took to charge up there devices.
The K-TOR Pocket Socket generates 10W 120v DC at 2 cranks per second. How long does it take to charge your phone? The answer is the same amount of time it takes to charge your phone now. If you can get a decent charge in 10 minutes, then you will have to crank for 10 minutes.
You should definitely make one of these part of your emergency preparedness kit!
I also keep one of these charged for shorter power outages.
UPDATE
Some of my readers were asking about or suggesting solar options. A solar charger is a great way to go too as long as you’ve got access to the sun 🙂 The nice part about this particular one is that you can charge it during the daylight and charge your phone each evening even if the sun has gone down.
There is no doubt in my mind that smartphone photography is here to stay and in particular iPhone photography has become a category in and of itself. With that said, people are always asking me about various mounts to mount their iPhones and other smartphones to tripods. I’ve reviewed different ones here in the past and with each one there were pros and cons. In the past the problem was that in order to have a really good mount you really needed one that your iPhone would go into like a case. However, the downside to this is that if you already have a case you would have to take your case off in order to put your iPhone into the mount-case. The other problem is that the iPhone changes form factor every couple of years. The iPhone is different from the iPhone 3G/3GS is different from the iPhone 4/4S and different from the iPhone 5.
iStabilizer is more universal
The iStabilizer Mount isn’t designed for a specific type of smartphone. Instead it’s more like a universal clamp that holds your iPhone or other smartphone in place. It’s spring loaded. Just pull the top up, slide your smartphone in and gently release it. The great part about this mount is that you can leave your smartphone in its case. Another great thing is that it’s fast. No need to put your smartphone in a special case or holder first before mounting. It has a standard tripod mount on the bottom. Below is a pic of my iPhone 5 in the Caze 0.5mm clear case mounted on my Sony tripod.
What’s the downside?
The only downside to this mount is that it doesn’t allow for vertical mounting. The clamp isn’t tall enough to mount a smartphone in the portrait position. However, since it does hold the smartphone very firmly in place if your tripod head can tilt then you could potentially take portraits by simply rotating the tripod itself. It’s now a permanent fixture in my laptop/travel bag.
If you doubt that iPhone photography is real, check out this cover of Time Magazine that was shot with an iPhone by photographer Ben Lowy. See the story here:
When I wrote my iPhone 5 review, I indicated that I was waiting for the case that I really wanted to arrive. Well it did and I love it. I can probably count the number of times that I’ve dropped my iPhone (all models) on one hand. I tend to be pretty careful, but as the saying goes S*it happens. Also the black iPhone seems to scratch more easily than previous models. For that reason alone I tend to protect my devices with either a Gelaskin, a case or both. I will ultimately put a custom Gelaskin on the back of my iPhone, but I also wanted “some” protection in case I drop it too. I’m not a fan of cases that add bulk and weight. Therefore I was looking for something really thin and if possible CLEAR. The Caze Zero 5 iPhone 5 was exactly what I was looking for. This is the thinest case I’ve seen and being clear it doesn’t detract from the beauty of the device. Also being so thin means that it fits in my holster.
If you’re an early iPhone adopter like me, then chances are you are grandfathered in to AT&T’s “Unlimited” data plan. AT&T has taken a lot of heat (and deservedly so) over playing games with this plan and doing things like throttling users back that use a lot of their “unlimited” data and holding back features ie. Data Tethering and FaceTime over Cellular, from users still on these plans.
Never gonna give it up!
Like many of you I have no plans of giving up my unlimited data voluntarily. Actually I don’t have a choice as my AT&T plan is through work. I do use a lot of data when I travel. I’m on this plan until they take it away (cold dead hands) or until work changes to something else. However, I also have a family plan with family members on it. Many of those iPhones and iPads were on unlimited plans too. A couple of months ago I decided to look not only at my bill, but to also look at usage and I found that most of these family members don’t use a lot of iPhone 3G/4G data at all. They are on WiFi most of the time either at home, work or school. I also had 3 iPads on various monthly pay-as-you-go plans. I decided to bite the bullet and move everything over to one of AT&T’s Shared Data Plans. Doing the math it would save me about $30/month and everyone (but me) would get the benefits of tethering and FaceTime over 3G/4G. I went with the 10GB/month plan because for 5 iPhones and 3 iPads the math you don’t really save anything by going with a lower plan as the cost per phone goes up!
How’s it going?
This is my first full month after the switch and as I suspected they didn’t go anywhere near the 10GBs of allotted data. Again remember this is for 5 iPhones and 3 iPads.
The Bottom Line
While I like the idea of buying data and using it anyway that I want, I still don’t like AT&T’s tactics here of not allowing you to use your device to fullest if you were an early adopter on an unlimited data plan. If you use the data (especially video streaming) then by all means stick to your unlimited plan. Stick it to the man! However, if you could save a few bucks and you’re not using that much data you might be actually better off on one of the new shared data plans. These plans also include unlimited voice and unlimited texting.
Apple’s iOS 6 includes a great new Panorama feature for shooting panos on the iPhone 4s, iPhone 5 and 5th generation iPod touch (dual core iOS devices). The interface is really easy to use. You start shooting from the left of the scene and simply pan to the right with a visual arrow and line to keep your shots lined up (or tap the screen to go in the opposite direction right to lef). It feels more like shooting a video than it does the typical multiple still shots and then stitching them together.
The other advantage to this interface is that you can shoot at your own speed and that means that once you’re past the area on the left (like a person in the shot), that person can walk around you and get in the same shot on the right before you get there. Admittedly this is not a new idea and has been done before, but the pano feature in iOS 6 really makes this easy. Give it a try.