Mophie Power Reserve – More smartphone juice in your pocket

wpid13432-IMG_1628_sm.jpg

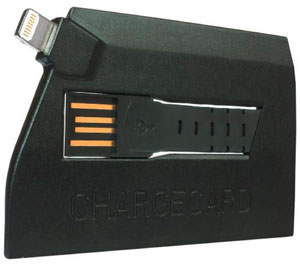
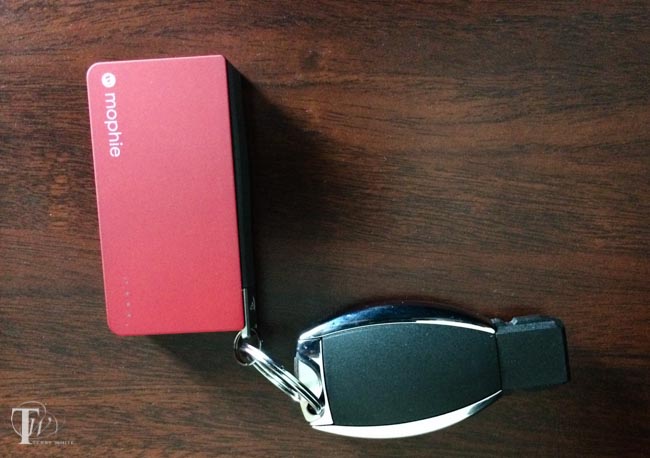
Since more and more people are using power hungry smartphones more and more each day it’s not uncommon to think about portable batteries to charge your smartphone on the go. If you’re always at your desk or in your car, this is probably less of a concern. However, if you’re a frequent traveler or simply spend several hours a day away from an outlet you can start to get nervous around 3pm as you see that you have less than 30-40% battery remaining. I seem to be amassing a collection of these batteries in all shapes and sizes. Recently the Mophie Power Reserve caught my attention. What stood out to me was the relatively small size, the fact that it attaches to your keys with a supplied keyring and it has a built-in Lightning (or Micro USB) connector. All my other batteries with the exception of the Mophie Juice Air require that I also carry a charging cable. However, the Power Reserve has the cable built right onto the side of it.

What I like about it

wpid13430-IMG_1629_sm.jpg

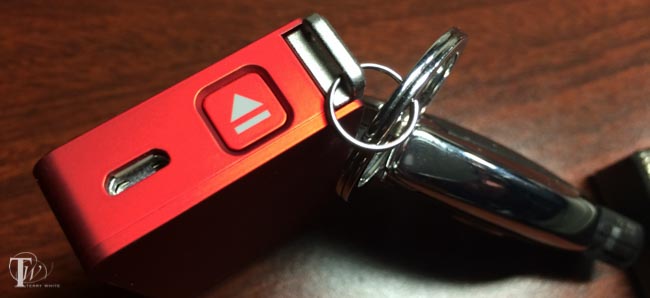
I’ve already pretty much covered  the things I like about it above, but a couple more things make this a nice battery to have. Although it attaches to my keys with a built-in keyring, they were smart enough to build in a “quick release” button. Just press and hold down the button and the battery detaches from the keyring and exposes the charging cable. Very nice design. Also it’s nice having the small LED (not too bright) status lights to let you know how much juice you have left. Lastly it’s really light weight. My car key weighs more than this battery. It’s also nice to have a choice of colors: black, Product RED and white. It charges via a Micro USB port and comes with a charging cable. You have to supply the charger though (like the one you use for your phone).

wpid13435-IMG_1632_sm.jpg

What I’m not too crazy about

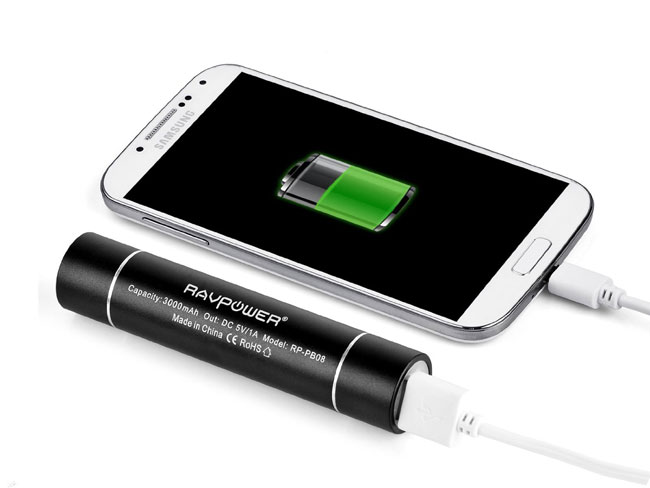
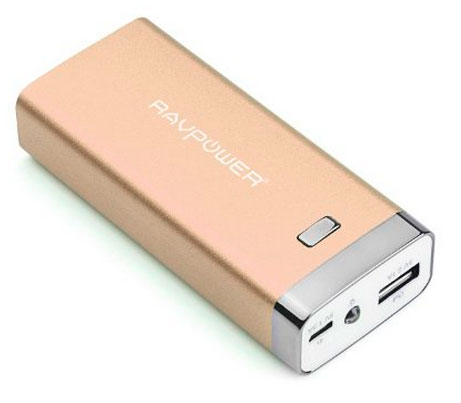
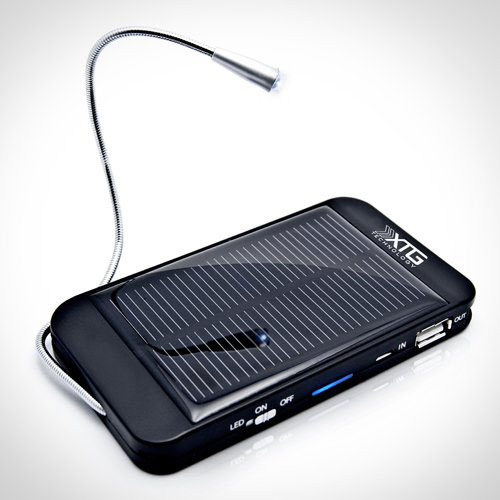
Like I said, I’ve got a collection of different batteries now and even my smallest one is 3,000 mAh. That means that it has enough battery in it to charge my iPhone 5s all the way up to 100% from dead/near dead. The Mophie Power Reserve only has a 1350 mAh battery in it which they claim will get you about 60% more battery. This is fine in those emergency situations where you need a charge just to get you through the rest of the day or to make that call home or emergency Facebook status update ;-). However, Mophie is charging top dollar for this battery! It’s $49.95. That’s a LOT for a battery this small (in capacity). At first I thought well maybe they have to charge more for the Lightning connector. That was until I checked and saw that the Micro USB version is the exact same price. I normally don’t complain about price in my reviews, but when I look at batteries like this one and this one, that give you a lot more juice for less than/almost half the price, I realize that with the Power Reserve you’re paying a premium for the “design” and integrated cable. The other thing is that the Power Reserve only has a 5V 1 Amp output, which means that it’s really only good for your smartphone and not your tablet. Again, not a big deal since it’s designed to be a smartphone charger, except for when you look at the price.


The Bottom Line

Overall I really like this product. I normally just carry my car key in my pocket, but now it’s a car key plus Mophie Power Reserve. I would love to see Mophie upgrade this product with a higher capacity battery even if it means adding a little more weight to it. I would want 3000 mAh minimum. If not an upgrade then simply cut the price to $24.95 and they won’t be able to make enough of them.

You can get the Power Reserve from Mophie here.

An AWESOME Microphone for your Mac, iPad and iPhone – Apogee Mic 96k

apogee_mic96k

I’m on the road and I realized that I’m going to be doing more tutorials for my YouTube channel and Creative Cloud TV.  While I have a great microphone in my studio, I really didn’t have a good one that’s small enough to travel with. I was in the Apple Store in San Francisco and decided to check out their selection. I was with my colleague and musician Jason Levine. I picked up a small microphone by Apogee and Jason immediately recognized the name and said “you can’t go wrong with them.” Apparently they are well known for professional audio equipment. He saw that it was 24-bit and was again very impressed. Since I trust Jason’s opinion when it comes to audio gear I knew I was holding the best one. I was also intrigued to see that this particular microphone not only had GREAT specs, but it was designed to work with a Mac, iPad, or iPhone! That made this a win-win purchase. I could have a great quality mic for recording on any of my devices.


Setting up the Mic 96k

One concern I had before leaving the store was that it was unclear if it included the stand that was pictured on the box. It stated that it included a “mic adapter” (which it does). The Apple Store rep didn’t know either. I was pleasantly surprised to see that once I opened the box it not only included the little tabletop stand, but also three cables. I expected to have a USB cable for the Mac and one for the Lightning connector on the iPad/iPhone, but it even included the older cable with the 30pin connector for older iOS devices. Setting up the Mic 96 is really easy. Just attach the appropriate cable for your device and plug it in. That’s it. No software to install. The light will go on blue at first. This lets you know that it’s on but not ready. It will then turn green when it’s ready and red if your gain is too high.

I screwed up my first recording

mic96k_MacBook_Pro
I mistakenly positioned the capsule up instead of facing me.

OK sometimes I’m an idiot when it comes to things like this. I didn’t pay attention to the capsule location so I had the mic pointing at me like a singer would hold a mic instead of straight up and down. It worked, but boy what a difference it made once I put it in the proper orientation. I did a quick test into Screenflow and the sound quality was outstanding. Sadly it was too late to re-record my latest episode as it was already posted.

Testing on the iPad Air

MiC96k_iPad

Since I blew my chance to get a real world recording for this week’s episode, I decided to do a quick test on the iPad using Adobe Voice. You can hear the results below or here:

The Bottom Line

Overall I’m very happy with the quality of the hardware itself as well as the audio quality. My only complaint is that for the price I feel it should have come with a carrying case, especially since they tout it as a solution for iPad/iPhone. This means that they expect people to carry it. Other than that I love it!

You can get the Apogee Mic 96k here or here

You can get the Apogee Mic carrying case here.

You can get Adobe Voice for iPad here and tell your story for free:

.

3 Connected Devices That Monitor My Health

The older I get the more reminded I am about the importance of taking better care of myself. As with most things, the easier the task the more likely you are to do it. That’s why I use these three devices on a very regular basis to keep me in check. The first one is the Nike+ Fuelband. I originally got one as a gift, but have since upgraded to the current model


The Nike+ Fuelband SE Rose Gold Edition

Nike+Fuelband_SE_Rosegold
I can not only see the time at a glance, but also the dots going across the top show me where I stand towards my daily goal

The Fuelband is my choice for wearable “motivator”. The idea behind the Fuelband is that you wear it throughout the day or 24/7 and it monitors your “activity” such as walking, running, and sleeping. It can track the number of steps you take and convert them into Nike Fuel Points. It will also show you calories burned. Not to mention that the built-in display can also show you the time, making it a watch as well. The reason I like the Fuelband over other such gadgets like the Jawbone UP and Fitbit is that besides having a better display to show you information even if you don’t sync with your smartphone, it simply has a more stylish, less cheap look to it. If the idea is to wear it all day everyday, then I want something that looks as good as it functions. When Nike introduced the SE versions and added a “Silver” and “Rose Gold” model I was sold! Although the Rose Gold version was $20 more than the standard Fuelband SE colors, I wanted it because it matched my other gold accessories. The SE is also a huge improvement over the original model when it comes to battery life. With the old one I used to get about 2-3 days of battery life before needing to charge it. Now I easily go a week without thinking about it. It also incorporates Bluetooth 4.0 which means that it can stay connected continuously to your smartphone while using less juice. The iPhone App is also updated on a regular basis with new features and now you can even track your sleep.

You can get the Nike+ Fuelband SE here

You can get the Nike+ Fuelband SE Silver or Rose Gold here.


Next up is my Withings Smart Body Analyzer Scale

withings_wifi_scales

This is the device that I love some mornings and hate on other  mornings. In any case it gives me a weight measurement that is automatically and wirelessly sync’d to my Withings.com account. I can either track my progress from their website or easily from their free iPhone/Android App. I also love this device because it’s supported by my favorite health app, “LoseIt”. The scale monitors your weight, fat mass, and BMI.

You can get the Withings WS-50 Smart Body Analyzer here

They also sell a less expensive model that only tracks Weight and BMI here.


Lastly I use the Withings Blood Pressure Monitor

BPM

This one is cool because the device is completely controlled by the Withings App running on your smartphone. Wrap the cuff around your arm, fire up the app and tap the start button. Once you get your reading you can even email it to your doctor right from within the app. I have the older model pictured above and it works fine with the Apple Lightning Adapter. However, if you get the current model you don’t have to worry about the cable because the new model uses Bluetooth and is therefore wireless.

You can get the Withings Wireless Blood Pressure Monitor here.


The Bottom Line

I can certainly use non-connected devices and enter everything into my apps manually and still keep track of my progress. However, because these devices are connected and wireless it’s a no-brainer. I step on the scale in the morning, step off and go on about my day and getting ready. I fire up the the Lose It app over breakfast and see how I’m doing. My Fuelband alerts me when I need to MOVE MORE because I’ve been sitting too long and lets me chart my progress as well as see how I’m doing compared to my other Nike+ friends. I’ve lost 35lbs since January 6, 2014. So something is working! More to lose and these devices will help me with my goals. Also see the “3 Apps That Monitor My Health

4 Cool Ways to Charge Your iPhone, iPad and other Mobile Devices on the Go

lightning_wall_outlet

If you have a smartphone and you use it throughout the day chances are your battery won’t last from the time you wake up til the time you go to bed. If you work in an office or other stationary place then you probably charge your device at your desk. If you drive around you probably charge your device in the car. However, what if you’re out and about all day, take trains and are just not near a wall outlet? There are ways to charge on the go. Here are a few of my favorite accessories:


ChargeCard

chargecard

First off even if you can get to a charger or USB port and you’re an iDevice user then you’re going to need a cable. Good luck if you are borrowing a charger from your friends that use Android and other platforms. This is why I love the “ChargeCard” it’s a credit card size “cable” that I keep in my wallet. Pop out the USB plug, plug it into any standard charger or USB port and the other end into your Lightning port on your iPhone, iPad or iPod touch. Away you go…

Get the ChargeCard for Lightning devices here

Yep, they make one for Android here and older 30pin connectors on iDevices here.


RAVPower Flashlight Battery

RAVpowerFlashlight

I have a variety of different portable batteries. However, this is one the coolest ones I have because of its size and form factor. At first glance it looks like a standard small LED Flashlight and it is! However, on the other end is a standard USB port so that you can plug in your smartphone and charge it back up. What more can I say? A device that serves more than one purpose effectively is always going to be a favorite of mine!

Get the RAVPower Lipstick External Power Pack here.


RAVPower Luster 6000 mAh Battery Pack

RAVPowerLuster

Need more juice? If you want to be able to charge either a smartphone or a tablet then you’re probably going to want 2.1A output. That’s why I carry a RAVPower Luster 6000 mAh Battery Pack. This one has enough juice to charge either my iPhone 5s or my iPad Air. Even if you’re only going to want to charge a smartphone, then you might want to get this one because the higher output will charge your smartphone faster!

Get the RAVPower Luster 6000 mAh Battery Pack  (in multiple colors) here.


Premium Solar Charger

solor_smartphone_charger

A battery is great, but what about those times when even the external battery goes dead? Well there’s always the sun as a backup. This is a battery pack similar to the ones above that can be charged up via a wall outlet, but it also can be charged via solar energy.

Get the Premium Solar Charger here for your next power outage!


Have Another Look At Adobe Revel

adobe_revel_iPad

Adobe Revel (originally known as Carousel) got off to a shaky start. There were features missing that many saw as a show-stopper and originally the only way to use the service was to pay for it. A LOT has changed since then. First off, what is Adobe Revel? Adobe Revel is a photo sharing and storage service. Imagine having access to all of your photos no matter if you’re on your computer or your iPhone or iPad. With Adobe Revel you can upload an unlimited number of photos to the cloud. You can share them with others and have shared albums with family members and friends. Best of all (at least for me) you can use the Adobe Revel iPhone/iPad app to show your photos off.

How do I get my photos into Adobe Revel?

There are a couple of ways to do it. You can import photos using the Adobe Revel desktop App. You can import photos using the iPhone and iPad app or you can upload to Adobe Revel directly from Lightroom 4 or 5 using the Adobe Revel publish service (the method I use).

How many photos can I store on Adobe Revel?

adobe_revel_mac

Unlike other services, Adobe Revel doesn’t have a photo limit. You can upload as many as you want. This is important and makes Adobe Revel better than many other services because your photo library is only going to get larger, not smaller.

Once my photos have been uploaded to Adobe Revel how do I view them?

You can view your photos in the desktop app, iPhone App, iPad App or via the web. Since you’re logging in to each app and the web with the same Adobe ID, your photos are instantly available on all your devices.

What if I’m offline, can I still view my photos on my computer or iPad?

Yes, Adobe Revel caches your photos to your device and they are available even if you’re offline.

Terry, why do you like Revel so much?

adobe_revel_publish

Adobe Revel gives me the thing I’ve always wanted. An easy way to have my portfolios with me and always up to date. Once I hit the publish button in Lightroom 5 on any of my published collections, I don’t have to think about it anymore. The next time I fire up Adobe Revel on my iPhone or iPad those photos are there. Sure there are more full featured portfolio apps out there, but all of them are a pain in the butt to keep photos updated in. Also the Revel team did a great job in redesigning the iPad App. It looks very elegant now.

If I share an album with others can they add photos/videos to it?

Yes, if you share albums with others they can add photos/videos from their devices. This is great for families on vacations or event photos.

Sounds too good; this must cost a fortune right?

This is why I said it’s time to take another look at Adobe Revel. You can start off with a 30-day trial and during those 30 days you can upload as many pics as you want. After that you can keep using Adobe Revel for free and have a limit of 50 new uploads a month. However, if you want to continue to have unlimited uploads it’s only $5.99/month for Revel Premium.

OK how much are the iPhone and iPad Apps?

They’re free to download. Actually it’s a Universal App and you can get it here:

iTunes.

OK, I want to try it. Where do I sign up?

You can try out Adobe Revel here.

7 New Things You Can Ask Siri in iOS 7

siri-IOS7

This seems to be an annual thing  for me as each new iOS version lets you do more with Siri and each year there are more and more new iPhone and iPad users. Siri lets you do so much with simple voice commands and most people have no clue what you can ask Siri to do. For quick reference here’s my original 25 Fun Things to Ask Siri post and the follow up 25 New Things To Ask Siri when iOS 6 came out. Well iOS 7 is here and of course you can Ask Siri even more things now. Here are a few of my favorites – 7 New Things You Can Ask Siri:

AirPlane Mode (you tell Siri to control your settings, Bluetooth on, make the screen brighter, etc.)

siri-iOS7-airplanemode

Play iTunes Radio

siri-iOS7-playitunesradio

FaceTime My Sister

siri-iOS7-facetimemysister

Post to Facebook (or write on my wall, or Tweet)

siri-iOS7-posttofacebook

What’s trending on twitter?

siri-iOS7-trendingontwitter

Read my email

siri-iOS7-readmyemail

What planes are flying over me right now?

siri-iOS7-whatplanesoverme

Now for a little fun

Siri definitely has a sense of humor. Ask Siri these 5 questions and see what she comes back with:

Can you make me a sandwich?

Beam me up

What’s the answer to the universe?

Is Santa Claus real?

Who’s on first?


Kick Full Color Video Light Review

kick

As a photographer I’m always looking at the latest and greatest lighting gear. Most of the lighting I buy is geared towards professional photographers and videographers. However, today I’m reviewing a product that is geared towards non-professionals. Just about everyone takes pictures and videos with their smartphones and point-and-shoot cameras. However, most amateurs rarely think about lighting until after the fact. Also most smartphones and small cameras don’t really do well in low light settings. Therefore, off camera lighting is nice to have, but rarely convenient or cheap. This is where the Kick LED Full Color Video Light comes in. Beyond being a nice, small, light-weight, bright, battery powered LED light, it has a built-in WiFi network. You can control it with the free Kick App for your iPhone and Android smartphone. Not only can you control the brightness, but you can also control the color too. There are even special effects such as strobe effects and effects that will continuously change the hue. You can even use the camera on your device to sample the color of the walls or lights around you to have the Kick automatically emit the same colors.

Rather than tell you more about it, I’d rather show you in this video:

before-kick-web
Sample photo taken before adding the Kick light
after-kick-web
Sample photo taken after adding the Kick light

You can get the Kick Full Color Video Light here.


.

CamRanger Review – Wireless Camera Control

camranger

I’m finally getting to my CamRanger Review. This is a product I saw several months ago and always wanted to do review of it. I get the question all the time: “Is there a way to wirelessly shoot to my iPad?” I’ve covered many ways that the iPad can fit into a digital photography workflow here and another wireless solution here, but at the time CamRanger wasn’t out yet. CamRanger offers a complete wireless camera control solution for your Nikon or Canon DSLR. It’s a small lightweight box about the size of a smartphone that plugs into your compatible DSLR via a supplied USB cable. It creates a wireless network on its own and therefore doesn’t need a computer or other wireless hotspot. You can connect to it with your iOS devices (such as an iPad or iPhone), Android devices, or a Mac or PC. For my testing I used an iPad Air. Set up was very easy and only required about a minute of reading the instructions. I tested it with my Nikon D600. Once it was set up I was able to work in either direction. I was able to use the iPad to control most aspects of my camera including picking focus points, ISO, shutter speed, f/stops, white balance, etc. and I was able to take shots using the camera and have them show up as I was taking them on the iPad. The latter mode is probably the one I’d use the most out in the field because I really don’t need the remote control functions as much as say a landscape or wildlife photographer would.

Rather than continue to write about it, I recorded this short video of how it works:


The Bottom Line

CamRanger works exactly as advertised. It has a range of 150 feet and a battery life of about 5-6 hours. It allows the most control over your DSLR than any other solution I’ve seen and it allows you to shoot directly to your mobile devices. Many of the newer Nikon and Canon DSLR are actually coming with optional wireless connectivity. So if you have a new camera you probably have more options to choose from. However, if you’re working with a slightly older model like the Nikon D700 or Canon 5D Mark II for example, then this may be your only option. CamRanger comes with all the cables, chargers, etc. necessary to get started including a pouch to easily put it on your camera strap or belt.

You can get CamRanger here.

Use Any Smartphone on any iPod Dock

dock_boss_iphone5

I’ve reviewed several iPod music docks here over the years. Starting with the Bose SoundDock I’ve had an appreciation for these music devices to dock my iPods back in the day as well as my iPhones over the years. As a matter of fact I used to smile when I’d walk into a hotel room and see an iHome or other similar device on the nightstand. This meant that at a minimum I could dock my iPhone and charge it overnight even if I had no plans to listen to music via the dock’s speakers. Well those days are over, or at least I thought they were when I got an iPhone 5. Apple has aggressively phased out the 10+ year old 30 pin dock connector found on several of these music docks and in most modern cars. While Apple does sell Lightning Adapters to adapt older 30 pin connectors to the new Lightning connects found on the iPhone 5, newer iPods and current iPads. The problem is that compatibility can be hit or miss. Some may still play music, but not charge the device.

Enter the CableJive dockBoss 5

The dockBoss is an adapter for the older 30 pin based docks and on the other end is a standard USB port and 3mm audio-in jack. Instead of simply converting the older 30 pin connection to a Lightning connection, the dockBoss 5 converts to a standard USB port for power and a standard audio-in port for music. This means that not only can I use my iPhone 5 on any of these devices, but I can use my iPad or any other handheld device or smartphone. I now travel with a dockBoss 5 in my luggage. When I arrive to an iPod dock equipped room I just plug in the dockBoss and one of my regular USB-to-Lightning cables. Now my iPhone is charging without me have to search for a plug by the bed (some hotels still don’t get this need) and if I want to listen to music I can plug in the supplied audio cable that comes with the dockBoss 5 (as pictured above). If I don’t care to listen to music then it’s just a single cable connection. Also note that the dockBoss 5 includes both an audio cable and standard micro USB cable for connection to most other smartphones and other portable devices.

The Bottom Line

dockboss-cables

Since Apple retired the 30 pin dock connector most portable music player manufacturers are now leaning towards bluetooth and wi-fi for connectivity for there new devices. However, if you’ve got an older music dock that works perfectly there’s probably no reason to throw it away! With the dockBoss 5 you can get more life out of it and make it compatible with other devices that it never worked with before.

Order the dockBoss 5 here.

One of my NEW photo sharing workflows is powered by Adobe Revel

iPad_with_DSLR

Sometimes you can be so focused on what you do professionally that you totally overlook what’s out there for fun. Both Adobe Photoshop Lightroom 5 and Photoshop CC are at the heart of my day-to-day photography workflows. Many of you have heard me talk about Adobe Revel in the past. I had begun using it as my portfolio App on iPad. I loved that it sync’d my photos from Lightroom to the cloud and instantly to my iPhone and iPads. However, the one BIG THING that was missing from the iOS apps was a “slideshow” feature. Sure you could swipe the images, but you couldn’t simply hit play and let them run. The beautiful new redesign of Revel 2.0 changed all that. The app is gorgeous and has many new features that has me using it as my Portfolio app again. Let me share some of the other updates with you that you may have missed…

adobe-revel2-ipad


What’s Adobe Revel?

adobe-revel-mac

Adobe Revel is Adobe’s “consumer” based photo sharing service. It’s FREE to use for those with modest needs. With the FREE account you can upload an unlimited number of photos in the 1st 30 days after setting up your account and then 50 photos a month after that. If you “need” more than that you can go UNLIMITED for $5.99/month. Yes, that’s unlimited imports, no limits ever. Once you upload your images to Revel they are instantly available on your Mac, iPhone, iPad and iPod touch (Windows and Android is in the works, but no timeline for when they will be available). As with other services like Flickr. com, most will only need the FREE account, but if you want to handle a lot of photos each month you can go unlimited whenever you want.

Download Adobe Revel for Mac here:

Adobe Revel - Adobe

Download Adobe Revel for iPhone, iPad and IPod touch here:

Adobe Revel - Adobe

Why isn’t this a part of Creative Cloud?

Adobe Revel is on the consumer side of the house and the consumer offerings from Adobe (like Photoshop Elements) will remain separate from the professional offerings in Creative Cloud.


What do the Mac and iOS Apps let you do?

adobe-revel-iPhone5-editing

In addition to uploading your photos, the Mac and iOS Revel Apps allow you to do non-destructive edits to your photos. Think of it as a Light version of the Lightroom develop module for consumers. It’s all slider based and like I said, 100% non-destructive. Once you make edits on one device those edits are automatically sync’d to all your other devices. This means that you always have the most up to date photos with you. You can also use the App to display your photos on screen or via AirPlay to say an Apple TV.


How does this work with Lightroom 4 and 5?

adobe-revel-LR

Lightroom 4 had a Revel Publish Service built-in and Lightroom 5 has a plug-in that you can download for free that does the same thing. Get it here. When I sign in to the Revel Publish Service I see my Revel libraries and I can create collections (or better yet, Smart Collections) that represent my portfolios. This means that I can publish my best/favorite images from Lightroom directly to Adobe Revel. I have created a Smart Collection in the Revel Publish service for each of my portfolios. When I update the regular Lightroom collection with new images, all I have to do is hit the Publish button in the corresponding Revel Publish Service Collection and my images are uploaded and my iPhone, iPad and Mac are updated. This has been the easiest way for me to carry my “CURRENT” portfolios around with me on my various devices. Yes the images can be viewed offline too. Actually if it weren’t for the Lightroom tie in I wouldn’t be half as excited about Revel. Since all my photos live in Lightroom it’s the hub of all my photographic workflows.


You mentioned a NEW photo sharing workflow. What’s NEW?

adobe_grouppix_iphone5

Everything I mentioned above is pretty much old news to Revel. The 2.0 iOS Apps and rate plan changes have been out for a while. What’s new is a couple NEW iPhone Apps. The 1st one is called Grouppix. I reviewed it here last week. When you and your friends download this FREE App, one of you can create a “shared” Album and invite the other to it. At that point anyone that has access to the album can upload pics to it and you all see them. This is GREAT for events such as parties, weddings, conferences, etc. Now everyone will have access to all the photos. That’s pretty cool, but what I didn’t realize right away is that those albums are powered by Revel! If you’re a Revel user those Grouppix shared albums show up in your Revel account. This also means that they show up in the Lightroom Publish Service. This makes it really really really easy for me to not only share photos I’ve taken with my iPhone, but also the ones I’ve taken with my DSLR. I can import my DSLR photos into Lightroom 5, select my picks, Develop them and add them to a Revel collection (Grouppix album), hit Publish and everyone that’s on the shared Grouppix album now has access to them. I did this last week during the Adobe Create Now Tour in APAC and it worked GREAT! If you’re into video there’s also a consumer based video editing app for iPhone called Video Bite. Yep it’s free too. It’s basic, but hey it lets you put clips together quickly and output a final movie right on your iPhone. Also did I mention that it’s free?

Get Adobe Grouppix for iPhone here:

Adobe Grouppix - Adobe

Get Adobe VideoBite for iPhone here:

Adobe® VideoBite - Adobe


Learn more about what Adobe Revel has to offer here.