Review: iPad 2

It appears that by all measures the iPad 2 launch was a success! iPad 2 officially went on sale in stores at 5PM local time on Friday, March 11, 2011. Online ordering opened up at 4AM ET the same day. When I woke up around 7AM and placed an order, my delivery time was set at 5-7 days. Apparently I missed the window of 3-5 days earlier in the morning. About an hour later the wait time went to 1-2 weeks for new orders and currently sits at 3-4 weeks for any new orders. This translates to Apple is selling iPad 2s as fast as they can build them and new orders will see a 3-4 week wait time. Placing an online order first thing in the morning for many served as a backup plan in case they didn't get one that evening locally.

Luckily, I was able to snag two at my local Apple Store. I got the 64GB black Wi-Fi+3G and the 32GB white Wi-Fi+3G (both on AT&T). I think the thing that surprised me the most was that even though there was a long line at most Apple stores throughout the US, Apple employees were still taking the time to offer a "personal" setup and walkthrough of the device. For many waiting in line, this meant that it was going to be a long night.


First Impressions

When I picked up the original iPad out of the box, my first reaction was "it's heavy". It was heavier than I expected it to be and I knew from that moment that it would not be comfortable for one handed reading for long periods of time. When I picked up the iPad 2 out of the box my initial reaction was "wow, it is lighter." On paper the iPad 2 is not that much lighter at all (1.34 lbs vs. 1.6 lbs). However, it is noticably lighter in reality. I still think it's probably too heavy for long periods of one-handed reading and the Kindle wins in that scenario big time, but for those of you who wished the iPad were lighter to hold and use, I'm happy to report that it is. Also with the new flatter back and rounded edges it's just more comfortable to hold in general. 

While I know that it now has a dual processor A5 chip and significantly faster graphics, I haven't actually felt the effects yet. This is largely due to the fact that I never felt that the original iPad was slow. The iPad 2 is fast and Apps open quickly and graphics display beautifully and fast. Again, I haven't been wowed by the speed increase though. I also have always said that we quickly assimilate speed. You don't really realize how much faster something is until you go back to something that was slow. So perhaps if I spent a day back on my "old" iPad I would notice it more.


Smart Covers

I opted for the red and black leather Smart Covers as well as an Orange polyurethane Smart Cover. I know that it's the little things in life that really matter sometimes and this is one of those times. During the keynote and introduction of the iPad 2, the thing that I was most excited about was actually the NEW cover. Don't get me wrong, I've wanted the cameras since day one, but we all knew that the cameras were coming. What we didn't see coming was the new Smart Cover design. Although I have a few different cases for the iPad 1, I was never really in love with any of them. I liked the Apple case the least, which is what lead me to buy the other two in the first place. I liked the Macally Bookstand Case (the one I used the most) and Incase Convertible Book Jacket, but while the Macally case was nice and thin, it never felt stiff enough and while the Incase offered the most support for standing it was too thick. So I alternated between them constantly.

The Smart Case is perfect for me! It keeps the iPad 2 nice and thin for travel. It attaches and detaches in a second. Also it's integrated in that opening the cover turns the iPad 2 on and closing it turns the iPad 2 off. By not covering the back it also makes it very easy to use with accessories such as docks and keyboards. 

Continue reading “Review: iPad 2”

Review: My New Jawbone Era Headset – It’s Jack’s Fault :)

I've been totally happy with my Jawbone ICON headset (see my original review here). I did notice a new model called the Jawbone Era, but I didn't really get around to looking at it. Then my buddy Jack did his review of it and I read it. There was one thing in his review that caused me to place an order on the spot. Well actually it was two things. The first thing and probably the one that stood out the most was actually a little thing. When I receive a call on the Jawbone ICON it rings in the headset, but it also reads off the phone number from the caller-ID. While that's fine, in most cases I'm not going to know whose number it is because I don't commit phone numbers to memory. This means I either just take the call or look at the display on my phone first. The Jawbone Era has a feature that lets you enter up to 20 favorite numbers with names via the MyTalk website and it will actually read off the name aloud when that person calls. This makes an already great headset that much more "handsfree". The next thing was the Noise Cancellation. According to Jawbone, this headset has their "Military-grade NoiseAssassin 3.0" and while I never had a problem with people hearing me with the ICON, there have been times I've been in noisy environments and better noise reduction would have been nice. 


But wait, there's more

Those reasons might not be enough for the general population to upgrade. So Jawbone didn't stop there. This new version while it's slightly longer than the ICON is also slightly thinner. It appears that this configuration allowed them to use a bigger or better battery. So now instead of 4 hours of talk time I get 5 hours. This is also the first headset with a built-in accelermeter. That's right! You can shake to answer a call. I didn't say it wouldn't make you look strange, but the feature is there if you want to enable it and use it. I much prefer the new "doubletap" to answer feature. Like the Jawbone ICON, the Jawbone Era is software upgradable with firmware updates as well as software add-ons. My favorite voice is "The Ace". If you have an iPhone or Blackberry the headset's battery indicator will display right on your phone. I also commend Jawbone for including several different ear gels at different sizes. It also supports A2DP which allows you to use this headset for your music and App playback as well.

I can't think of a single feature that I would add to this headset. It does it all and is a great step up from the ICON.

You can get the Jawbone Era here for $129.99 or less.

Review: U-Socket is here!

I remember about a year ago when FastMac teased us with this product. I'm sure they wanted to release it sooner, but they went back to the drawing board and redesigned a better product! The U-Socket is designed to replace your standard US 110V outlet with one that also has two powered USB ports. This way you can charge two standard USB devices and still have access to both outlets for other devices. I ordered three of these and while I didn't expect them until February, they surprisingly showed up yesterday. I was like a kid on Christmas day. I don't know why I was so excited to see such a simple product, but I just think these things are cool.


Before you do it yourself

Electricity doesn't really frighten me. Plumbing and Natural Gas on the other hand do. Although this device has standard electrical wiring like most outlets, it is an electrical installation and if you are the least bit squimish please please please hire a licensed Electrician to install yours. I'm not responsible if you, your devices or your house get fried! I warned you! I'm warning you again. Let a professional do it! With that said, I've been installing replacement outlets and light switches in my house for years. So I was not afraid to TURN OFF the circuit at the circuit breaker and then proceed with the installation. Although the wiring is very straight forward it took a little longer than usual. The biggest problem is that outlet is about twice the depth of a standard outlet. Yes it's designed to fit in a standard box, but it will be tight. The one that I replaced had a little plaster around the box that I had to take my time and chip away first. I also had to be more careful about how I ran the wires around the outlet itself as there is very little wiggle room. To this point I went to install the other two in a newer part of my home and the wiring was more complicated. While I could certainly do it, I would rather pay the electrician to do it as I don't feel like playing trial and error with the connections that are already in those boxes.


Success

Once I got it installed and restored power to the outlet I couldn't wait to test it. First I tested the regular AC plugs and they worked. Then I plugged in a USB cable and my iPhone 4 and heard the familiar tone the indicated that it was charging. 

What about the iPad? As you may or may not know the iPad wants 10v of USB power instead of the standard 5v required by most USB products. I expected to get the "not enough power" message when I plugged in the iPad, but to my surprise it gave me the same tone that it was charging. This is actually no different than using an older iPhone charger with your iPad. While it works, it will definitely take LONGER to charge it than the 10v power adapter that comes with the iPad So if I had to give it any strikes that would be the only one. I wish that the ports were 10v instead of 5v. Other than that I think these are really cool.

Correction: The iPad wants 10w, not 10v. FastMac notes iPad "compatibility" . So we're good here!

OLDER USB 2.0 ports only supplied 0.5 amp which would only charge an iPad while it's off or very very slowly while it's on.

Newer USB ports can supply the 1.5 amps that the iPad wants. The U-Socket has enough power at:

  • 2.4A-5V USB 3.0 Power Ports @ 2400 mA (total)
  • Charge 4 Devices Simultaneously


You can get the U-Socket here for about $24.

I Just Became An UPstrap Fan

I recently talked about the OPTECH strap that I was using and a few of my photographer buddies suggested that I also look at the UPstrap, so I did. I ordered an UPstrap and finally got a chance to try it out. I gotta say that I was a little skeptical about any strap claiming to not slide off your shoulder. I've heard those claims before. However, I have to say that the UPstrap lives up to its claims. I put it on my Nikon D7000 and no matter what I did (jumping, dancing around, running, etc.) it stayed in place. Wow! While it's not the prettiest strap out there (it's really plain and rubbery looking), it's now my new favorite! Can't wait to do my next photowalk with this one.


Check out the UPstrap here.

Review: Upgrading to a TiVo Premiere XL

For years TiVo has been my favorite set-top box! There's no question about it I'm a TiVo fan. However, even as a TiVo fan that doesn't mean I like upgrading just for the sake of upgrading. When I upgrade ANYTHING I weigh the pros and cons and decide if the upgrade is necessary or will benefit me. I encourage EVERYONE to do that!  When TiVo introduced the TiVo Premiere I looked at it and decided that there wasn't really anything there to justify an upgrade for me. My TiVo HD's were (are) working just fine and although for anyone NEW to TiVo the Premiere is a great choice, it just didn't offer "enough" things for me to spend the money. As a matter of fact the only real advantage for me would be the larger hard drive (which I could do to my existing units). See TiVo's own comparison here. If you look at that comparison you'll see that most of the differences between the new Premiere boxes and the HD boxes revolve around the user interface and searching. The New TiVo Premiere definitely has better searching and suggestion features than the older model. However, I'm not usually trying to discover "new" shows.


So what changed my mind?

You're going to laugh! Actually I replaced one of my TiVo HD XLs with a TiVo Premiere XL because I was forced to! No I'm kidding. No one can "force" you to upgrade. However, there was something that TiVo announced that I've been wanting and waiting for for years and that's…here it comes…an iPad App!

httpv://www.youtube.com/watch?v=s6w3RUE8mhY

I was both excited and ticked off at the same time when I saw their announcement (and cool video by the way) of their upcoming TiVo iPad App. I've been beating up TiVo for a while now for not having an iOS App for scheduling, remote control, account management, etc. and when they finally announced it I cheered until I saw that it will only support the TiVo Premiere and Premiere XL. ARGGGHHHHHHHHH! While it's easy for me or anyone else to say c'mon! Really? You can't make that app work with the thousands of TiVo HD's out there? I know how these things go from a development standpoint. You want this really slick experience that takes complete advantage of your new UI on your new box, that will take twice as long and twice the development effort to make work with a box that you don't even sell anymore. Anyone who has been using a computer for more than a couple of years has faced this already. Some new OS or piece of software you want won't work on your older hardware. If you want those capabilities you "have to upgrade". So here we are! I want those capabilities and "I" decided to upgrade ONE TiVo HD to get them. 


Two Upgrades for the Price of One

After I got over the emotional part of upgrading something that was working fine, I decided to plan a box swap. I have an existing TiVo HD XL with a larger drive in my theater. The XL has the larger drive which means it can hold more shows without having to delete as often. I decided to move that one to the living room (which is always running out of storage space) and eBay the TiVo HD from the living room. The New TiVo Premiere XL would go in the theater. This plan made me feel a "little" better about it as I would be solving two problems with one purchase. I would also recoup some of my money on selling the perfectly working TiVo HD. That brings me to another point. TiVo.com offers UPGRADE pricing to existing customers. This means that you don't lose out on your Lifetime subscription and you get a bit of a price break. I'm feeling even better now. 


The Comcast CableCARD Factor

The other thing that always makes me think twice about a TiVo upgrade is the fact that I have to get Comcast involved. Since Comcast is my cable provider I have to get a CableCARD from them to go inside the TiVo. My experience with CableCARDs has been hit or miss. Sometimes everything works on the first try. Other times I've had to have the tech come back multiple times before it worked. The problem is that they don't deal with them often and not many reps know how to configure them on your account. I planned and scheduled my appointment for one day after the TiVo Premiere XL was to arrive and in typical (sorry but I have to say it) Comcast fashion they screwed up the appointment. Let's just say they went to the wrong house! As they called to apologize and reschedule it dawned on me that I had a CableCARD sitting in my hands. I had the one from the old (now factory reset) TiVo HD that I was going to turn in. I figured I could just swap them myself, but I've had bad experiences trying that in the past. The CableCARD must first be UNPAIRED before putting it into a different TiVo. I know that now after having to send two TiVos back in the past. Luckily since I went through the factory reset process I saw on screen where it said that it was going to unpair the cableCARD during the process. This made me feel a little safer in suggesting to the Comcast rep on the phone, "well I have a card from the old one can someone just configure this one over the phone and then you won't have to send anyone out?" She informed me that she could and away I went to the Premiere XL to plug the card in. The result: A happy ending! It WORKED! No problems whatsoever. She knew what she was doing (rare when dealing with Comcast and CableCARDs). I was up and running without having to have a tech/contractor come out . Rant alert: By the way (Comcast if you're reading this) I never understood and still don't understand why Comcast has to come out for this anyway. Why can't I pick up a CableCARD from the office? When you order a CableCARD the tech comes out and plugs it in! That's all he/she can do anyway. This brings up a dialog on screen with the necessary ID numbers. The rest has to be done over the phone anyway (by anyone that can read off numbers!) I can go to my local Comcast office and pick up a Cable Modem or Comcast DVR but not a CableCARD , which is the EASIEST thing to install. You just PLUG IT IN and READ OFF NUMBERS. End of Rant. 


Online Season Pass Manager: Gotcha!

One of the recent additions to TiVo.com is the new online Season Pass Manager. One of the things that TiVo brags about during the upgrade process. They say you'll be able to easily copy over all your Season Passes (show scheduling) from the old TiVo to the NEW one. Great! Except for one problem. When I ordered the new Premiere, it was done as an upgrade. Therefore replacing one on my account. TiVo in their infinite wisdom replaces the box on your account with the New one even before it arrives at your door. When I logged into my account the new one was there and the old one (along with its Season Passes) was GONE! When I called TiVo to complain about this to their credit the tech rep was able to temporarily put the old TiVo back on my account long enough for me to copy over the Season Passes. I will admit that this feature definitely makes it much easier to upgrade, but TiVo you should think about upgraders and the way your process works now. The old TiVo should go in an inactive state so that the user can grab the info they need for the new one!


Now that I have it and it works, how is it?

The TiVo Premiere XL has a much more modern looking interface! It's hands down easier on the eyes than the previous UI (user interface). Being a visual guy, I love the movie poster art all over the place. TiVo HD already had integration with Netflix, Amazon Ondemand, YouTube and Blockbuster, but the TiVo Premiere interface brings that content closer to the surface and makes it easier to get to. I still think that the new Apple TV has the best Netflix integration, but the TiVo Netflix integration works just fine.

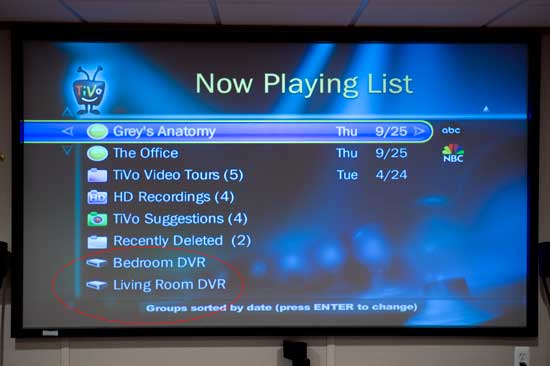
The "old" TiVo HD interface

A couple less ports. The Premiere drops the S-video out port, which probably won't be a big loss to many. It still has Component, HDMI, Optical audio and Composite, which are all active at the same time. There is also only one cableCARD slot so you'll definitely have to get a Multistream CableCARD. Again not a problem as there probably aren't very many single stream cards being handed out these day by the cable companies. 

1080p is here! Another nice update is that the Premiere goes up from 1080i to 1080p. I'm happy to see this for sure, but not sure how often I'll see it in use. My cable service still maxes out currently at 1080i. Perhaps some of the online ondemand content will stream at 1080p at some point if not now. My old TiVo HD XL was THX certified and so is the NEW Premiere XL. This new one even comes with a set of glasses to allow you to tweak your TV for optimum THX performance during the setup process. I love the THX trailer that plays at the end! They even suggest that you "crank up your sound system" before it plays. Nice! Lastly I like the smaller physical footprint of the Premiere. The case is noticeably smaller than the HD and leaves me more room on the stand I have it on.

It is very smart! As you know famous actor/comedian Leslie Nielson recently passed away. One of the "finds" at the top of my TiVo Premiere Screen was the "The Best of Leslie Nielson". It's basically a list of every movie that he has been in. While you could go through and choose individual favorites to buy or search for recording, my favorite feature in this case was a ONE BUTTON add all to my To Do List. In other words if ANY of these movies come on TV in the future TiVo will now automatically record them. Now that is freakin' sweet!


Why not just get a DVR from your service provider?

Continue reading “Review: Upgrading to a TiVo Premiere XL”

I Have One Number Now Thanks To Google Voice

Late last year one of my colleagues was telling me about Google Voice (in private beta then) and I had him send me an invite so I could check it out. I signed up, got a Google Voice Phone Number and played with it, but I never really used it. However, recently I decided to go ahead and use it. As I began traveling more abroad this year and being in so many different time zones it became pretty much impossible for all my friends, family and colleagues to know which number to try to reach me on and worse, which time of day to call. As you might imagine I got some middle of the night (my time) phone calls from people that just didn't know what time it was where I was. Of course I could have turned off my cellphone, but I just never felt comfortable doing that in case there was an emergency back home. So I really got going on Google Voice. Recently I sent out an email to all the people that call me regularly and gave them the ONE new number to reach me on no matter what. This way I could control which number(s) the Google Voice number would ring (Work, personal cell, work cell, VoIP, Hotel Front Desk, etc.) and setup different rules and greetings by individual or group. I could also use the "Do Not Disturb" feature for those times when I would be asleep. This way everyone except immediate family members (that still knew my direct phone number) would be sent to voicemail during those times when I couldn't answer. Also if I don't have you in my contacts you're greeted with a request to say your name. This cuts telemarking calls way down.


Simultaneous Ring and other coolness

One of the features I like most is the fact that you can have the one Google Voice number forwarded to multiple numbers simultaneously. So for example, when I'm at home I have it forwarded to my office line (Vonage) and my cellphone. That way when the phone rings I can pick up whichever phone is closest. Voicemail is killer! Not only can you record multiple greetings that stay in the system and assign them to individual contacts or groups, but you can have the voicemail messages received forwarded to your email. You can also play them back on the web and you can have them transcribed as text automatically. SMS Texting/Forwarding: You can also do SMS via your phone or via the website. Once you log into Google Voice you can either import your contacts or sync them. You can select a contact and start doing SMS texting right there on the website (both sending and receiving). 

Continue reading “I Have One Number Now Thanks To Google Voice”

Solmeta Steps Up to A Pro Model Geotagging GPS

It wasn't long ago that I declared the Solmeta N2 GPS as my choice among Nikon DSLR compatible GPS units. Solmeta has stepped up its game to win my heart over even more with a new "Pro" model. Their NEW Solmeta Geotagger Pro offers the same features as the N2 model that I've come to love, but it adds something that I wasn't even thinking of and that's an LCD to display the information that it's tracking. At first I thought, "do I really need that?" After all, the current model Nikon DSLRs have a great GPS menu display that shows this information whenever you need it. So at first glance I wasn't impressed that this info would be on the GPS itself until I actually got one in to test. I'm totally hooked now! It's soooo much nicer NOT having to navigate to the GPS menu on the back of my Nikon camera and instead concentrate on shooting. I can see at a glance that not only has the GPS unit acquired a signal, but exactly what my Longitude, Latitude, Altitude, Heading, Time, Battery Level, etc. are. Do I need to know what my longitude and latitude are on screen? Nope! I really don't. At that point they might as well just be random numbers. However, it's the other stuff that's helpful like seeing the battery level and the fact that I do have longitude and latitude (even though I don't really care what the numbers themselves are) to let me know that it's functioning properly. Having the heading info is also important to see sometimes. So yes, it's GREAT having an LCD on the GPS itself! Oh and yes, the LCD also has a backlight feature so that you can see it in the dark if need be.


Field Tested in Singapore

I wanted to give this new unit a real world test so i brought it with me to Singapore and India. Satellite acquisition time was great and accuracy seems to be dead on. The shot above was taken in…… why not just Click it to see it on Google Maps?

Continue reading “Solmeta Steps Up to A Pro Model Geotagging GPS”

Apple iPad Review: WiFi+3G Model

When the Apple iPad WiFi model shipped I did a pretty in-depth review of it, which you can see here. Therefore the purpose of today's review is focus primarily on the 3G capabilities. (and yes that's a custom Gelaskin on the back because that's just how I roll 🙂 )


Which model did I go with?

I had planned all along to go with the 16GB WiFi model for testing and reviewing and then get the 64GB WiFi+3G model for my own use. That's exactly what I did. Although I don't "need" 64GB's of space for my info and media content, I do plan to use the iPad for field backup of my photos and instant touch up and sharing using the iPad Camera Connection Kit. I typically shoot to either 8GB or 16GB memory cards and almost never fill them up in one day. After loading everything on the iPad that I wanted to have on it  (including a couple of movies), I still had over 32GBs of free space. That will be plenty for photo backup each day of shooting. My wife claimed the 16GB WiFi version in case you were wondering.


What's different on the outside?

Not much. The only two visual differences on the outer case are the black bar across the top for the antennas/GPS support and the MicroSIM tray on the left side. Otherwise it's visually identical to the WiFi model. 


What's different on the inside?

The obvious and biggest difference on the inside is that the WiFi+3G models include 3G wireless technology to allow you to connect to the internet pretty much anywhere there is GSM cell service. The other difference is that these models also include a real GPS chip. So while the WiFi mode can detect your location based on available WiFi signals, the WiFi+3G model can do so based on GPS satellites, cell towers AND WiFi signals. This also means that it's capable of running turn-by-turn GPS navigation apps although it may be a bit conspicuous on your dashboard. 🙂

Continue reading “Apple iPad Review: WiFi+3G Model”

Wacom Intuos 4 Wireless: Video Review

When I'm in Photoshop and I don't have my Wacom Tablet I feel naked! I've become so used to it that I won't retouch a photo without one. One of the things I've always wanted was a WIRELESS Version. As a matter of fact during my part of the Adobe Creative Suite 5 launch I was walking around with a Cintiq 12wx.

It was really wired to a Mac Pro, they green screened it out to give the allusion of it being wireless. Although we're probably still a ways off from having enough wireless bandwidth to do a wireless Cintq, we are at a time where we can have a wireless Intuos 4! Here's just a few minutes of video featuring the Intuos 4 Wireless Edition:


httpv://www.youtube.com/watch?v=X8AytkRxFJc


The Particulars

The tablet is using Bluetooth and therefore it's Mac and PC compatible. I'm using it above in the video with a NEW MacBook Pro 15" and Photoshop CS5. Most of the Creative Suite design tools support pressure sensitivity. It has 2048 levels of pressure and an 18 hour battery life per charge. It charges over USB with the same supplied cable that can also be used for a wired connection if the battery dies. The Battery is user replaceable. The wireless range is 10 meters. More specs here.

Continue reading “Wacom Intuos 4 Wireless: Video Review”

iPad Camera Connection Kit Review

httpv://www.youtube.com/watch?v=EFtx9HzM-lE


As a photographer one of the iPad accessories I was most anticipating was the iPad Camera Connection Kit. This kit consists of TWO adapters that connect right to the iPad's Dock connector. The first one is a standard SD (SDHC) Memory Card reader. You connect it to your iPad and then insert a memory card with images/videos on it and transfer those images to your iPad. No software to install because the iPad already has this ability built-in to the Photos App. The second adapter has a standard USB port on the oppositie end of the Dock connector. With this one you can not only connect your camera via USB and transfer images directly, but as my video above shows you can even use a Card Reader with it! This overcomes (although not as elegantly) the problem of wanting to use Compact Flash or other card formats. 


How does it work?

Continue reading “iPad Camera Connection Kit Review”