

I just wanted to take a moment and update you on two things. First off I'm enjoying my time off and having a ball with my photography hobby. As I stated in my "I'm on Sabbatical" post, I'm in the process of moving into a new larger studio and for the most par the move is complete. I'm thrilled with the way everything turned out and although at times it felt like "work", I am enjoying the break from my day job "work". 🙂 With that said, I updated my Photography website with pics of the new studio AND a NEW Portfolio look/template.

The Turning Gate Horizon CE Plug-in

I wrote a post a while back about using The Turning Gate (TTG) Lightroom Plug-ins to generate and update my website completely from within Adobe Lightroom 3. While I dabble in web work with my day job, I'm not a web guy and I don't have one on staff either. This means that I either have to do the work myself or pay someone each time. While I certainly see the value in paying a pro (like Erik who designed my blog templates), when it comes to my photography website I need the ability to update it as frequently as I want to. This means doing the updating myself. That's why I'm glad that The Turning Gate plug-ins exist.
The New Horizon CE Plug-in is what I'm now using for the Portfolio pages. I first saw this "scrolling" kind of web gallery on Scott Kelby's site and back then Scott did a post on how his was created by the very talented "RC Concepcion". While Scott's site is great, I don't have an "RC" on staff 🙂 . At first I wasn't sure that I would like the Horizon plug-in. It was just so different from the ones I've used in the past in terms of navigation being a simple scroll bar. However, after I loaded my images in and tested it I got used to it right away. Also it's important to me that my site work on mobile devices like smartphones, iPads, iPhones and other tablets. The Horizon CE Plug-in generated pages are mobile compatible and use the device's built-in scrolling capabilities. This means no need for Javascript or plugins when viewed on non-desktop browsers.
While my old TTG plug-ins worked both on the desktop and on mobile devices, I was using the AutoViewer galleries for desktop viewing and they are Flash based. I liked the way they worked, but it was a two step process to update them. I'd first have to export the container/mobile gallery and then the AutoViewer gallery. With the Horizon CE plug-in I only have to do one export for each gallery and replacing it is as easy as doing another export with new pics.
Check out The Turning Gate Lightroom Plug-ins here. Thanks again Matthew for making my life a little easier.
The Plug-ins That Created My Site:
TTG Pages CE, TTG Stage CE, TTG Auto Index & TTG Horizon CE
The New Studio

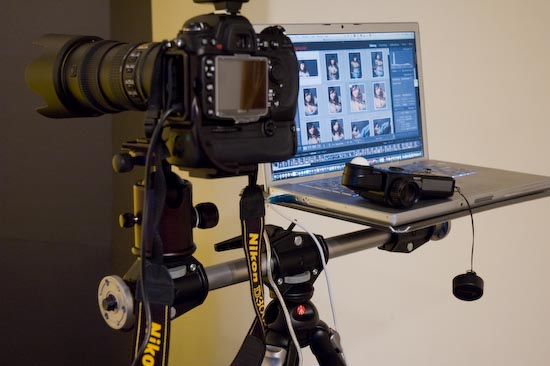
Like I said, I'm having a blast now that I get to use the studio. Above is a production shot of the Westcott Spiderlite TD6 and the 54"x72" LARGE shallow softbox.

You can check out the Studio pics and my updated photography website here.