Adobe Lightroom 4.1, Camera RAW 7.1, DNG Converter 7.1 Now Available

Lightroom 4.1 is now available as a final release on Adobe.com and through the update mechanism in Lightroom 4.  The goal of this release is to provide additional camera raw support, lens profile support and address bugs that were introduced in previous releases of Lightroom. In addition, Lightroom 4.1 introduces the following new features:

  • The ability to process HDR TIFF files.  (16, 24 or 32-bit TIFF files)  This can be useful if you have merged multiple exposures into a single 32-bit image using Photoshop’s HDR Pro.  Using the new basic panel controls can be a very effective and straightforward method of achieving an overall balance across the tonal range.
  • Additional Color Fringing corrections to help address chromatic aberration.  Click here to learn more
  • Save photobooks created in the Book Module as JPEG files
  • Publishing photos to Adobe Revel is now accessible via a Publish plugin

Bugs Corrected in Lightroom 4.1

The following bugs that were part the Lightroom 4 releases have been corrected. The team appreciates the very detailed feedback the community has provided on Lightroom 4 and we’re excited to correct a number of issues experienced by our customers. These issues have been FIXED:

  • Point Curve adjustments made in Lightroom 3 have been restored.
  • Edit-in functionality has been restored to external applications including Adobe Photoshop and Nik plugins
  • Addressed performance issues in Lightroom 4, particularly when loading GPS track logs, using a secondary monitor, and the controls within the Develop module.
  • Ability to update DNG previews and metadata for more than 100 photos has been restored.
  • This update allows for improved viewing of subfolders and stacks in folders with a large number of photos.
  • It was possible that a layout of a saved book could be lost after quitting Lightroom 4.
  • Adjustments made in the Develop module were not properly being reflected to photos that have been laid out in the Book Module
  • Postscript Type 1 Fonts do not appear in the Font menu within the Book module.
  • Clarity adds grey tinting to 100% white tones.

Known Issues in Lightroom 4.1:

  • Double byte fonts such as those found in Chinese and Japanese characters are not being exported to PDF or when published to Blurb.
  • The Revel Publish Service will delete photos from a carousel. This occurs when the customer asks Lightroom to delete the carousel and then cancels out of the confirmation dialogue box.

New Camera Support in Lightroom 4.1

  • Canon EOS 1D X
  • Canon EOS 5D Mark III
  • Canon EOS 60Da
  • Canon PowerShot G1 X
  • Fuji FinePix F505EXR
  • Fuji FinePix F605EXR
  • Fuji FinePix F770EXR
  • Fuji FinePix F775EXR
  • Fuji FinePix HS30EXR
  • Fuji FinePix HS33EXR
  • Fuji X-Pro1
  • Leaf Credo 80
  • Leica M Monochrom
  • Leica X2
  • Nikon D4
  • Nikon D800
  • Nikon D800E
  • Olympus OM-D E-M5
  • Panasonic Lumix DMC-GF5
  • Pentax K-01
  • RICOH LENS A16 24-85mm F3.5-5.5
  • Samsung NX20
  • Samsung NX210
  • Samsung NX1000
  • Sony Alpha NEX-F3
  • Sony Alpha NEX-VG20
  • Sony Alpha SLT-A37
  • Sony Alpha SLT-A57

New Lens Profile Support in Lightroom 4.1

Lens Mount Lens Name
Canon Canon EF 35mm f/2
Canon Sigma APO 50-150mm F2.8 EX DC OS HSM
Canon Tokina AT-X 107 AF DX Fish-Eye 10-17mm f/3.5-4.5
Canon Tokina AT-X PRO FX 16-28mm f/2.8
Canon Tokina AT-X PRO FX 17-35mm f/4
Leica LEICA APO-SUMMICRON-M 50 mm f/2 ASPH.
Nikon Nikon AF-S Micro NIKKOR 60mm f/2.8G ED
Nikon Nikon AF Micro-NIKKOR 60mm f/2.8D
Nikon Nikon AF-S NIKKOR 28mm f/1.8G
Nikon Tokina AT-X 107 AF DX Fish-Eye 10-17mm f/3.5-4.5
Nikon Tokina AT-X PRO FX 16-28mm f/2.8
Nikon Tokina AT-X PRO FX 17-35mm f/4
Nikon Sigma APO 50-150mm F2.8 EX DC OS HSM
Nikon Sigma 85mm F1.4 EX DG HSM
Olympus Sigma 19mm F2.8 EX DN
Olympus Sigma 30mm F2.8 EX DN
Pentax Sigma 18-200mm F3.5-6.3 II DC OS HSM
Pentax Sigma 17-50mm EX DC HSM
Sigma Sigma APO 50-150mm F2.8 EX DC OS HSM
Sony Sigma 12-24mm F4.5-5.6 DG HSM II
Sony Sigma 18-200mm F3.5-6.3 II DC OS HSM
Sony Sigma 19mm F2.8 EX DN
Sony Sigma 30mm F2.8 EX DN
Sony Sigma 150mm F2.8 EX DG OS HSM APO Macro

Thank You

A big thanks to everyone who submitted bug reports, posted entries in the U2U forums and blogged their issues so that we could improve the Lightroom 4 experience in this update. Thank you.

Download Lightroom 4.1 here – WindowsMac


Camera Raw 7.1 is now available on Adobe.com and through the update mechanism in Adobe Photoshop CS6. Camera Raw 7.1 adds new Defringe controls to help address chromatic aberration. Defringe is available as part of the Lens Correction panel. Camera Raw can also now read 16-bit, 24-bit, and 32-bit HDR files. Supported HDR formats are TIFF and DNG.  Photoshop CS6 customers can upgrade to Camera Raw 7.1.  Customers of previous versions of Photoshop can utilize DNG Converter 7.1 for raw file support for newly added cameras.

New Camera Support in Camera Raw 7.1

  • Canon EOS 1D X*
  • Canon EOS 5D Mark III*
  • Canon EOS 60Da
  • Canon PowerShot G1 X*
  • Fuji FinePix F505EXR*
  • Fuji FinePix F605EXR*
  • Fuji FinePix F770EXR*
  • Fuji FinePix F775EXR*
  • Fuji FinePix HS30EXR*
  • Fuji FinePix HS33EXR*
  • Fuji X-Pro1
  • Leaf Credo 80
  • Leica M Monochrom
  • Leica X2
  • Nikon D4*
  • Nikon D800*
  • Nikon D800E*
  • Olympus OM-D E-M5*
  • Panasonic Lumix DMC-GF5
  • Pentax K-01*
  • RICOH LENS A16 24-85mm F3.5-5.5
  • Samsung NX20*
  • Samsung NX210*
  • Samsung NX1000*
  • Sony Alpha NEX-F3
  • Sony Alpha NEX-VG20*
  • Sony Alpha SLT-A37
  • Sony SLT-A57*

* denotes that the camera model was supported in DNG Converter 6.7

New Lens Profile Support in Camera Raw 7.1

Lens Mount Lens Name
Canon Canon EF 35mm f/2
Canon Sigma APO 50-150mm F2.8 EX DC OS HSM
Canon Tokina AT-X 107 AF DX Fish-Eye 10-17mm f/3.5-4.5
Canon Tokina AT-X PRO FX 16-28mm f/2.8
Canon Tokina AT-X PRO FX 17-35mm f/4
Leica LEICA APO-SUMMICRON-M 50 mm f/2 ASPH.
Nikon Nikon AF-S Micro NIKKOR 60mm f/2.8G ED
Nikon Nikon AF Micro-NIKKOR 60mm f/2.8D
Nikon Nikon AF-S NIKKOR 28mm f/1.8G
Nikon Tokina AT-X 107 AF DX Fish-Eye 10-17mm f/3.5-4.5
Nikon Tokina AT-X PRO FX 16-28mm f/2.8
Nikon Tokina AT-X PRO FX 17-35mm f/4
Nikon Sigma APO 50-150mm F2.8 EX DC OS HSM
Nikon Sigma 85mm F1.4 EX DG HSM
Olympus Sigma 19mm F2.8 EX DN
Olympus Sigma 30mm F2.8 EX DN
Pentax Sigma 18-200mm F3.5-6.3 II DC OS HSM
Pentax Sigma 17-50mm EX DC HSM
Sigma Sigma APO 50-150mm F2.8 EX DC OS HSM
Sony Sigma 12-24mm F4.5-5.6 DG HSM II
Sony Sigma 18-200mm F3.5-6.3 II DC OS HSM
Sony Sigma 19mm F2.8 EX DN
Sony Sigma 30mm F2.8 EX DN
Sony Sigma 150mm F2.8 EX DG OS HSM APO Macro

Camera Raw 7.1 Release Notes

These items have been FIXED in Camera Raw 7.1:

  • Keyboard shortcuts for the point curve channel on Windows were not functional.
  • Local corrections are not refreshing after applying lens corrections. This occurs on both TIFF and JPEG files with noise reduction disabled.
  • Point curve adjustments made to a single R,G, or B channels in the Tone Curve tab can be reset a channel curve is adjusted.
  • Photoshop and Bridge show different values for the image resolution in certain images. Photoshop and Bridge are not changing the image resolution, but displaying different values.
  • Applying keywords to multiple files can sometimes cause errors when writing the keyword metadata to file. This can occur when the “Save Image Settings in” preference within Camera Raw is set to the Camera Raw database.

Download Links:

Camera Raw 7.1 – WindowsMac

DNG Converter 7.1 – WindowsMac

Lightroom to InDesign to iPad: Interactive Portfolios for Photographers

In this episode of the Adobe Creative Suite Podcast Terry White shows how to use a Lightroom Web Gallery from The Turning Gate in InDesign to make an Interactive Portfolio for your iPad or Android Tablet.

Grab the Photoswipe Gallery Plug-in that I used in the video here.

Are you missing out on my Bonus Content?

See more of my Adobe Creative Suite Videos on my Adobe Creative Suite Podcast and get the App here. It features EXCLUSIVE CONTENT that no one else gets to see. This episode has a BONUS CLIP that is available only in the App! My iOS App is a Universal App for iPhone, iPad and iPod touch. I also have an Android version:

Learn Adobe Creative Suite with Terry White - Wizzard Media

What I’m Teaching at Photoshop World DC

It’s that time of year again. It’s time to head out to one of my favorite shows – Adobe Photoshop World. This year’s east coast event takes us to Washington DC. As usual I have a slew of classes that I’m teaching on a variety of topics. Everything from using the iPad in your Digital Photography Workflow, to InDesign classes for Photographers and Designers, to Importing and Managing your Images in Lightroom 4. Also while I’ve got your attention, the class that I’m doing on creating Interactive Portfolios is based on using InDesign to create Interactive Portfolios for Tablets.

I look forward to seeing you there!

Solmeta Outs a New N3 GPS for Nikon DSLRs


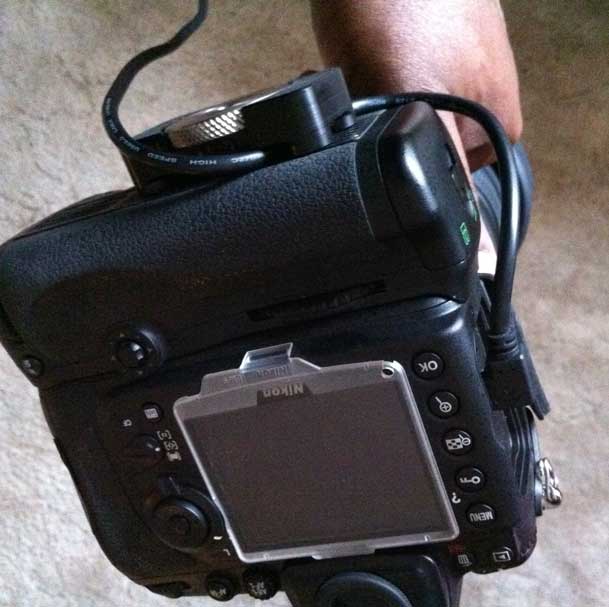
It's been a while since I did my Nikon GPS Smack Down. Back then I chose the Solmeta N2 as the winner for overall best GPS for Nikon DSLRs. Since that time Solemta has come out with another new model, the N3 and I got a chance to try one out. Like previous model the Solmeta N3 plugs right into your compatible Nikon DSLR and geotags (adds longitude/latitude and heading) your photos as you take them (both JPG and RAW support). However, unlike the previous model you now have to choose between the one for professional DSLRs like the D700, D3, D4, etc. and the prosumer models like the D5100, D7000, etc. The reason you have to choose is because the interface cable is now hardwired in. This has it's advantages and disadvantages. The advantage is that the connection is perfectly secure. The N2 allows you to plug in a cable to match your camera, but the connection could easily get damaged if you bumped/hit it the wrong way. The new connection is very well designed. The disadvantage (at least for me) is that if you have multiple camera bodies of different types you'll now need one of each type to go with your camera as opposed to just ordering the additional cable. This will only affect a small percentage of people, but it is a slight step down in convenience for me. Another small but notable cable improvement is that the cable is now coiled instead of being too long or too short. It will be just right for however you attach your GPS (in the hotshoe or on the strap). 


Faster and more accurate

This model uses a 3-axis electronic compass like their top of the line model the Geotagger Pro. The N2 uses a 2 axis compass. The first thing that impressed me was how fast it was ready to go. By the time I tuned the camera on and was ready to snap the 1st picture it had already locked on to a satellite and was providing the location info to my Nikon D700. The other big difference is that this model gets its power directly from the camera. The other models have internal batteries that you charge and then only after they run down will it get power from the camera. While having a built-in battery does provide for potentially longer shooting, the N3 is designed to use less power, sleep and take advantage of the Nikon GPS power saving features. I haven't had it long enough to compare battery life, but I did notice that it went to sleep a few seconds after I turned the camera off and was ready almost instantly when I turned the camera back on.

The GPS data shows in Lightroom 3 and allows you to click the arrow/button to take you to that spot on Google Maps.


New Indoor Fixed Mode

GPS units work best when used outside, but if you are going in and out of buildings a GPS that only works outside isn't much use to you. The N3 has an Indoor Fixed Mode that will use you last known location to continue tagging photos as you take them inside.


Built-in Remote Trigger Support

One of the usual concerns pro photographers have is that the model for the pro cameras use the 10 pin terminal port. That port is also often used for cable releases (remotes). While Solmeta does sell a Y splitter cable so that you can use your existing cable release, the also have a port on the side for use with a basic remote too.


The Bottom Line

I have mixed feelings about this model. I'm happy with the speed and accuracy, but I'm less happy about needing a specific model for your camera. Luckily the N2 and Geotagger Pro are still available as options. Solmeta has positioned the N3 right between the Pro and N2 and it's priced at $189. You can't go wrong with any of these models as they are all solid performers. 

Learn more or order here.

How to Publish Your Photos From Lightroom Directly to Google+

httpv://www.youtube.com/watch?v=W5viFc6MwA4


In this episode of the Adobe Creative Suite Podcast I'll show you How to Publish Your Photos from Lightroom Directly To Google+. Special thanks goes out to Tom Roper for leading me to this tip. 

Get the Lightroom Picasa Plug-in here.

Add me on Google+ Here.

See the resulting Google+ "Recent Work" gallery here.

Also don't forget that Lightroom 3 is currently ON SALE for HALF OFF here.

See more of my Adobe Creative Suite Videos on my Adobe Creative Suite Podcast and get the App here. It features EXCLUSIVE CONTENT that no one else gets to see. This episode has a BONUS CLIP that is available only in the App:

Learn Adobe Creative Suite with Terry White - Wizzard Media

PS. My iOS App just got an update that fixes the iOS 5 video playback problem and adds the following features:

  • Retina Display Graphics
  • A new tab bar interface
  • Swiping to the left and right from the episode detail page will go to the next or previous episode
  • UI enhancements
  • Faster show loading
  • Minor bug fixes


How I use Lightroom and Dropbox Together


I use Lightroom everyday as I'm always doing something with my images. I have multiple catalogs for the various kinds of photography that I do. My images are temporarily captured and stored on my internal hard drive of my MacBook Pro until they've been reviewed, selected, retouched, shared and delivered. After that the keepers are moved to my Mac OS X Server (Drobo) where they are backed up each night to another Drobo and to the cloud via CrashPlan. Once the images are moved from the internal drive on my laptop to the server, i update the catalog with the new location of this folder of images. This way if I ever need to work with or output those images again Lightroom will do so over my network to the server. The catalogs themselves always remain on the laptop drive. That's where the problem comes into play. What if I want to access one of those catalogs from a different computer? Networked Catalog access is not supported or recommended.


My Lightroom Catalogs are on Dropbox

I saw the value in Dropbox long ago and signed up for their 100GB plan. Dropbox basically became my "documents" and "pictures" folder so that I would have cloud backup and access to my documents/pictures no matter which computer or mobile device that I use. That's been working out GREAT! One day it dawned upon me to try it with a Lightroom catalog. I figured if my catalog is sync'd to Dropbox, then I would be able to access that catalog from any of my computers running Lightroom. I put my most frequently used Lightroom Catalogs in my Dropbox folder and I have to say that I love it! I can now go to any of my computers running Lightroom and access my catalog. Also something else works that I wasn't sure if it would or not. The images themselves (except for the most current shoot/work in progress) are on the server, all I have to do is mount the server and Lightroom sees the images too. No relinking necessary. 


Could you put the images in there too?

Sure! I could also put the images from my most current shoot in the Dropbox folder for a true "work anywhere" scenario. The only reason that I usually don't is because of the time it would take to sync hundreds of RAW files relative to the initial time I actually need access to that folder from more than one computer. The other option and the one that I would lean towards would be to immediately copy the current shoot folder to the server when I get home. The only reason I don't do that is because it just works faster overall when the images are on the local drive for the initial edits. If I were to pick either of the above workflows, I would just copy the images immediately to my server right after the shoot. This way I could work on them from any computer in the house.


Side tip

Dropbox is also an easy way to share the final images. You can zip them up, put them in your public folder and then right click on them to get a public link. Simply email that link to your client and they'll be able to download the large file without having to have a Dropbox account or even know what Dropbox is.


The Bottom Line

I use Dropbox for lot's of things (see my 5 Ways to Take Advantage of Dropbox post here). Every time I think of a new way it makes me value the service that I pay for even more. You can get a FREE 2GB Dropbox account here.

How I Broke My D700 By Tethering. Again!

It feels like déjà vu! It was a few days before Photoshop World Vegas and I was in the middle of shoot and all of a sudden I noticed the last couple of images didn't come up on the screen in Lightroom. I looked down at the camera and to my dismay I saw my USB tethering cable was at a 45° angle on the side of the camera. I thought, "that can't be good!" At some point my hand must have applied a bit of pressure to the end of the cable going into my D700 and as I suspected I damaged the port once again. Last time this happened was the week before Photoshop World Orlando. The only difference was in the previous incident I must have tugged on the cable too much. See that blog post here. I solved that problem with a TetherLock:

However, as I painfully found out solutions like TetherLock and the ones from TetherTools only solve the cable "tug" problem. As you can see in the image above the cable plug is still exposed and therefore it has potential to be bumped, pushed, bent, etc.


I need a cage or bracket

I started thinking about ways to protect the actual port with some sort of cage or cover that surrounds the port/cable connection itself. Little did I know at the time that such solutions already exist. Blog reader and friend Ken Toney suggested this "Cable Relief Spacer" from Really Right Stuff. I thought "PERFECT!"

However, there was a small problem. All of my tripod heads and plates are by Kirk. I bought them long ago and while I do plan to switch to Really Right Stuff at some point (just for compatibility with all the people I shoot with), I hadn't planed on doing it right now. I wondered if Krik offered a similar solution for the L-Brackets I already own and fortunately they do! I ordered the Kirk LBA-1 USB Spacer Block immediately While these solutions basically offer the same solution, I would give the nod to the Really Right Stuff one because it appears to do both: Protect the port AND keep the cable from being tugged. Nevertheless, I'm now using the Kirk Spacer Block and my existing TetherLock for the ultimate "Terry proof" solution.


The Bottom Line

These extra pieces add cost to tethering. However, I couldn't imagine not tethering to Lightroom during my studio shoots. Now if only the camera manufacturers would wake up and build fast wireless tethering right into these expensive camera bodies (or at least the battery grips) this breaking the usb port, tripping over the cable, stuff would be a thing of the past.

Printer Rebates Lexar Rebates Sandisk Rebates Tamron Rebates Olympus Rebates Nikon Rebates Canon Rebates B&H Rebates & Promotions

What I’m Teaching at Photoshop World This Week

It's time for Photoshop World! It's this week in Las Vegas and I'll be teaching once again at this year's show. I've added two new classes and for whatever reason they didn't make the web schedule (hoping to get them corrected as we speak) I've also updated the information for my Intro InDesign & Facebook classes too.

  • Introduction to Adobe InDesign CS 5.5 
  • Creating Interactive Portfolios for iPad, Android & Blackberry Tablets in InDesign CS5.5 – NEW
  • Why you should be on Facebook (will talk Google+ too) Updated
  • Using the iPad in a Photography Workflow – NEW (this class replaces my Importing Images into Lightroom class that's incorrectly listed on the schedule)

Don't forget to see me on the show floor as well. I have sessions scheduled in the Adobe booth as well as partner booths such as Westcott and Manfrotto. 

See you this week and if you have an iOS device don't forget to grab the free PSW App here from the iTunes

Follow Me on Twitter, Add me on Google+ and Like me on Facebook for my live and up to the minute show updates!


Happy Labor Day!

My Photography Website & Studio Updates


I just wanted to take a moment and update you on two things. First off I'm enjoying my time off and having a ball with my photography hobby. As I stated in my "I'm on Sabbatical" post, I'm in the process of moving into a new larger studio and for the most par the move is complete. I'm thrilled with the way everything turned out and although at times it felt like "work", I am enjoying the break from my day job "work". 🙂 With that said, I updated my Photography website with pics of the new studio AND a NEW Portfolio look/template.


The Turning Gate Horizon CE Plug-in

I wrote a post a while back about using The Turning Gate (TTG) Lightroom Plug-ins to generate and update my website completely from within Adobe Lightroom 3. While I dabble in web work with my day job, I'm not a web guy and I don't have one on staff either. This means that I either have to do the work myself or pay someone each time. While I certainly see the value in paying a pro (like Erik who designed my blog templates), when it comes to my photography website I need the ability to update it as frequently as I want to. This means doing the updating myself. That's why I'm glad that The Turning Gate plug-ins exist. 

The New Horizon CE Plug-in is what I'm now using for the Portfolio pages. I first saw this "scrolling" kind of web gallery on Scott Kelby's site and back then Scott did a post on how his was created by the very talented "RC Concepcion". While Scott's site is great, I don't have an "RC" on staff 🙂 . At first I wasn't sure that I would like the Horizon plug-in. It was just so different from the ones I've used in the past in terms of navigation being a simple scroll bar. However, after I loaded my images in and tested it I got used to it right away. Also it's important to me that my site work on mobile devices like smartphones, iPads, iPhones and other tablets. The Horizon CE Plug-in generated pages are mobile compatible and use the device's built-in scrolling capabilities. This means no need for Javascript or plugins when viewed on non-desktop browsers. 

While my old TTG plug-ins worked both on the desktop and on mobile devices, I was using the AutoViewer galleries for desktop viewing and they are Flash based. I liked the way they worked, but it was a two step process to update them. I'd first have to export the container/mobile gallery and then the AutoViewer gallery. With the Horizon CE plug-in I only have to do one export for each gallery and replacing it is as easy as doing another export with new pics. 

Check out The Turning Gate Lightroom Plug-ins here. Thanks again Matthew for making my life a little easier.

The Plug-ins That Created My Site:

TTG Pages CE, TTG Stage CE, TTG Auto Index & TTG Horizon CE


The New Studio

Like I said, I'm having a blast now that I get to use the studio. Above is a production shot of the Westcott Spiderlite TD6 and the 54"x72" LARGE shallow softbox.

You can check out the Studio pics and my updated photography website here.

My New Lightroom Tethering Display

When I shoot in studio I'm usually shooting tethered to Lightroom 3 99% of the time. While my 15" MacBook Pro has been adequate all these years, I decided to go with an external display in my new studio. The question was, "which one do I get?" Right about the time I asked this question, I saw that Dell (yep, Dell) had just introduced a NEW 24" Display. You might be asking why would I get a Dell monitor for my Mac? Good question. The main attraction for me to this particular display is that it "rotates!" The display can be used in either portrait or landscape orientation. 

It has all the latest bells and whistles including: LED, IPS (in-plane switching) for wider viewing angles, Display Port, USB Hub, DVI, Adjustable Height and a 3 Year Warranty. 

For those of you old enough to remember the Radius Pivot Displays, you'll probably remember that back then the display would auto adjust based on the rotation and the driver on your computer. In the case of this new Dell there is no such magic for the Mac. However, manual display rotation is built-in to Mac OS X's Display Preferences. While it would be a slight pain to have to manually switch this setting every few seconds I find that I leave it in Portrait "most" of the time. If I shoot a wide shot, it displays it, but it just doesn't fill the screen. If i'm going to be shooting a long series of landscape oriented images then I'd make the System Pref adjustment.


Lightroom's 2nd Display Feature

Lightroom 3 natively supports dual displays. This means that I can set the second display to Loupe view, full screen with no overlays. It works GREAT!  This also means that I DON'T mirror the displays. I treat the Dell as a second display/virtual desktop.


Why not just shoot to an HDTV?

That question comes up a lot and I've tried it. My Nikon DSLRs have HDMI out and I could plug right into a nice big HDTV. The problem I find with this mostly is that the colors, brightness, contrast, etc. don't look the same. This means that after doing a shoot and importing the images into your computer they could look really different than what you adjusted for during the shoot. Since my shots are going to end up on a computer more often than a TV, I'd rather tether into my computer to begin with.


Dell? Really?

If you know me, you know that I've rarely if ever mentioned Dell on my blog (or anywhere else), but this time I gotta say that I'm currently a happy Dell customer. I'm actually surprised with all the accelerometer tech that Apple uses in iDevices that they haven't done this with their computer displays. Oh well, for now "it's a Dell."

You can check out the Dell UltraSharp U2412M "W Display here.

I also bought this Display Port to Mini Display Port cable. Of course after I ordered it I remembered that monoprice.com probably has it cheaper and they do.