Dual Nikon, Canon, Panasonic & Minolta Battery Charger

One of the major keys to digital photography is being able to take the shot. Sounds like a "duh" statement I know, but what I’m referring to is having a charged battery. Nothing is more frustrating than running out of power in the middle of a shoot. So as digital photographers we’ve learned to carry extra batteries. I use a battery grip with my Nikon D300 (and my Nikon D80 before that) which allows me to put two batteries in my camera at once. This does a great job at practically doubling my shooting time, however, there are still times where shooting a lot will drain the batteries. Therefore I carry at least two extra batteries at all times. However, when it’s time to swap out batteries, I don’t want to charge them one at a time. That’s where the Impact Dual Battery Charger comes in.

I’ve used the Impact Dual Battery Charger for over a year now. It’s been working out great. I found out about it when I bought a couple of their (Impact) batteries for my D80. While the charger has been working great, one of the two batteries no longer works (there goes my $10 savings). So I don’t recommend their batteries, but the charger will charge your original batteries so you’re good to go. Now keep in mind that most companies will recommend that you only charge their batteries with their chargers. So if you have warranty concerns, then I guess you can stop reading here. However, like I said, I’ve charged my Nikon brand batteries for over a year with the charger with no issues.

It charges the following battery types:

Canon: BP-208, BP-308, BP-315
Minolta: NP-400
Nikon: EN-EL3, EN-EL3a, EN-EL3e
Panasonic: CGA-S303

The Impact Dual Charger goes for $69.95 at B&H Photo & Video

You can use your universal remote with your PS3

As I have written in the past, I use the Sony Playstation 3 (PS3) as my Blu-ray player in my home theater. It works great, however the one complaint that I had with it was that I couldn’t control it with my favorite universal remote (which happens to be a Sony remote). The problem is that the PS3 uses Bluetooth for its wireless game controllers AND for the Sony DVD remote.  I have the Sony PS3 DVD remote and as you may have guessed, it only works with the PS3 and controls nothing else. Also I have say that it kind of sucks as a remote in general. In typical Sony fashion the PS3 DVD remote is BLACK and impossible to see in the dark. There is no light on it and it doesn’t even have glow in the dark buttons. The Sony PS3 DVD remote is Bluetooth based which is why it doesn’t work with anything else but the PS3.

The good folks at Nyko have created a remote that uses IR instead of Bluetooth. Their Playstation 3 Blu Wave Remote comes with a USB dongle that plugs into the PS3. Then you can use their remote to control the PS3. So here’s what I did. I plugged in their dongle and then I put my Sony Universal Remote in "Learning mode" and I used the supplied remote to teach my universal remote the commands to control the DVD/Blu-ray playback of my PS3. Next I put their remote in a drawer. That’s it! I now have ONE REMOTE that controls my home theater environment again. So if you have a favorite universal remote that can learn commands and you have a PS3, this will be the best $14 you’ve ever spent. Now also if the PS3 is not in a great location for IR line of sight, you might also want to get a USB extension cable so that you can place the dongle in a better location.

The Playstation 3 Blu Wave Remote goes $13.99 at Amazon.com.

Have tripod will travel

Although I travel with a digital camera almost everywhere I go, I almost never traveled with my tripod. Don’t get me wrong, I recognize the value of having a tripod in various situations, but the problem is that my tripod (a professional level Bogen-Monfrotto) was always too big to fit in my luggage. I also never check my photo gear for fear of theft/damage. So I would forego the tripod and in many cases miss certain shots that you just can’t get handheld.

Well that all changed over the holidays when I got the Gitzo Traveler 1540T  super lightweight and small tripod. Gitzo’s unique patented 180º folding mechanism accommodates the head inside the folded tripod legs and makes this the smallest folded tripod for its open size and number of sections. I was amazed at how small and lightweight it was. It weighs just two pounds! (one pound lighter than a MacBook Air) Yet it still accommodates up to 9.9 lbs. I weighed my Nikon D300 with battery grip and L-Bracket and I still had a few pounds to spare. The Gitzo Traveler 1540T doesn’t come with a ballhead and since I’m using the Kirk BH-1 ballhead on my Bogen tripod, I went with the Kirk BH-3 ballhead to go with the with Gitzo. The BH-3 weighs a mere 19 ounces. This combination works perfectly and I now have no problem flying with a tripod. As a matter of fact I gave it its first workout in San Francisco when I shot from Coit Tower during Macworld Expo. I was able to do the long exposures that you can only do with a tripod.

Any professional photographer will tell you that tripods and ballheads are expensive. The rational is "Do you think it’s wise to use a $20 tripod to hold a $1,800 DSLR + the $1,600 piece of glass you have on it?" Using that logic, I have to agree. However, professional tripods are outrageously expensive (IMHO). Carbon fiber lightweight ones are even more expensive. Good ballheads aren’t cheap either. The Gitzo Traveler 1540T goes for $560 at Amazon.com ($559.95 at B&H Photo). The one thing that keeps me from thinking about the price so much is that unlike digital cameras, once you get a good tripod, it will last you for years and years and years without the temptation or need to "upgrade."

If you think $560 is a lot of money for a tripod (and it is!), check out the Gitzo GT90TT 90th Anniversary Limited Edition Titanium Traveler Tripod. They only made 390 of this collectors item, so you might be a little stunned by the price 🙂

If you’re looking for the lightest, smallest professional level tripod, the Gitzo 1540T is the best in its class! I hope to be using this tripod for many years to come.

Take your DVR with you – Slingbox Pro Review

I’m late to the party on this one! Slingbox has been out for a couple of years now and while I had heard about it in passing and kinda knew what it was, I was never that interested in it. What I surmised was that Slingbox was a device that hooks up to your TV setup at home and lets you stream live TV over the internet to your computer or your PDA. I was right. I wasn’t that interested because I rarely have time to watch "live" TV. However, what I didn’t realize was that it wasn’t just limited to "live" TV. Sometimes it takes a good demo to get someone excited and that’s exactly what happened to me. A friend showed it to me at Macworld Expo and I was floored. Not only was she able to show me what was playing live from her NY home, she showed me what was on her DVR. This 5 minute demo was all it took and I couldn’t get to Best Buy fast enough to get one (could have saved money by ordering online, but hey I was excited!)

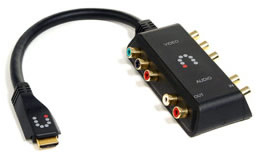
Although there are a few different Slingbox models, I was really only going to choose between two: Slingbox Solo and Slingbox Pro. There is a Slingbox AV, but it’s limited to just Composite and S-Video ports so it wasn’t even in my thoughts. The Slingbox Solo allows you to hook up to one source such as a Cable Box, DVR/TiVo, Satellite box, Coax Antenna Cable/Antenna, etc. The Solo has Composite, Component and S-Video connections. My other choice was the Slingbox Pro and the difference between the Solo and Pro is that the Pro can allow up to 4 sources to be connected at once. So it has the full complement of ports (Component can be added for $39-$49 via a dongle) and you can plug multiple devices into it. Although I could have gotten by with the Solo, the Pro wasn’t that much more in price so I went for it (I hate those "I should have bought the next model up" regrets).

The main connection I wanted to make was to my Comcast DVR or my TiVo HD. Since the Slingbox has to be connected to an Ethernet connection, the most convenient spot was on a TV with a Comcast (Motorola) DVR on it. This particular TV also has an older DirecTV TiVo on it and having the Slingbox Pro allowed me to connect both of these. Overkill? Yeah probably.


How does it connect?

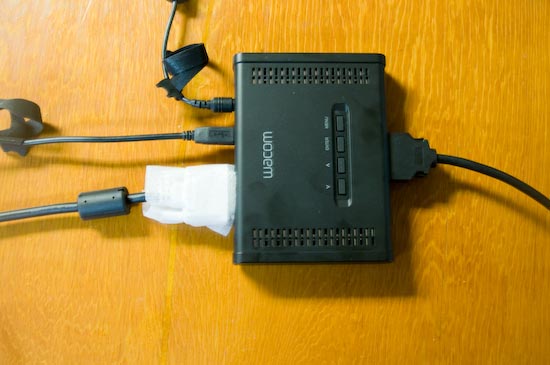
The Slingboxes have both in and out ports. So no matter which connection method you you use, you’re connecting out from your source (such as a DVR), into the Slingbox and out of the Slingbox back to your TV. So it sits in between your source and your TV and therefore you don’t need any extra ports which is great. I connected my DirecTV TiVo via S-Video and my Comcast DVR via the optional Slingbox Pro HD Component dongle along with the appropriate audio ports. Unfortunately none of these units have HDMI yet. I was impressed and pleased that all of the necessary cables were supplied. As I mentioned above, you will need an Ethernet connection from your router. If your router is NOT close by, they do sell a SlingLink Turbo which allows you to route the necessary Ethernet connection through a standard electrical outlet by just plugging in one near your router and one near your Slingbox. I didn’t need this accessory, but it is getting good reviews on Amazon, so I assume it works. No drilling holes through your walls to run Ethernet cables. The last part of the setup is placing the IR emitters over your existing boxes. This allows you to control your devices from your onscreen SlingPlayer remote.

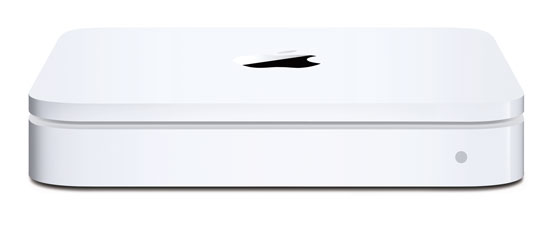
back of a Slingbox Pro

the optional Slingbox Pro HD Component connection

back of a Slingbox Solo


After you get it all connected up, then what?

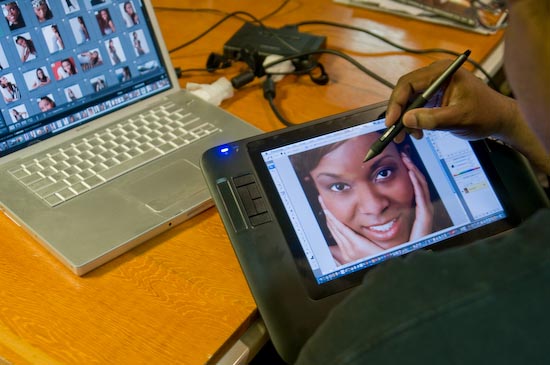
There is a CD in the box for PC users to install the SlingPlayer. For Mac users you just download it from their website. Once you download the SlingPlayer, it walks you through setting up your Slingbox to be accessed over the internet. Although the setup assistant claimed to be able to configure my router automatically and claimed it did so successfully, it didn’t work when I tried to access my Slingbox from outside my network. So I just opened up the necessary port on my router myself and it works like a charm.


How well does it work?

Your ability to watch YOUR TV or DVR while you’re on the go is going to greatly depend upon available bandwidth. As you might imagine, streaming live video requires a pretty beefy internet connection. So your mileage (read picture quality) will vary depending on how you’re connecting to the internet. Some public/pay-as-you-go internet connections expressly prohibit this kind of use. For example, Verizon’s EVDO service prohibits streaming of live video and some users have had their accounts permenantly suspended as a result. Someone told me that a hotel they stayed at had high speed internet and right in the terms of service they spelled out "No Slingbox use". However, if you are on a speedy internet connection and you are not restricted from this kind of use, then slingbox performs extremely well. My connection at home is Cable Modem with very good throughput and I tested connecting back to my Slingbox over a DSL connection that was much slower (and under heavy use at the time) and the experience was more than adequate. I was also happy to see that it played nice with the different aspect ratios of my sources. My Comcast DVR is setup for 16:9, but my DirecTV TiVo is 4:3 and it remembers that in the player.

Also if you have a compatible Palm Treo, Symbian OS or Windows Mobile PDA, you can buy a SlingPlayer Mobile app for those too. They have also announced a SlingPlayer for Blackberry due out later this year. I have high hopes that once Apple releases the SDK for the iPhone next month that Sling Media will develop a SlingPlayer for iPhone! Fingers crossed.

Also keep in mind that while the Slingbox has to be connected to Ethernet, your computer that you’re running the SlingPlayer on doesn’t. So I can stream over my Wi-Fi connection with no problems. This would also allow you to watch TV in rooms that you don’t have a TV in in your own house via your laptop.


Having access to my DVR makes all the difference in the world

I wouldn’t call myself a TV junkie, but there are a few shows that I really like to watch. I can remember a few times last year of being on the road and getting back to my hotel room too late to catch "24" or "LOST". Now with Slingbox, I would be able to fire up my MacBook Pro, launch the SlingPlayer, go to the "My DVR" menu and start playing the episode that I recorded at home. What’s even better is that I would be able to fast forward through the commercials and pause it as needed. DVRs allow you to "Time Shift" your TV viewing. Slingbox allows you to "Place Shift" your TV viewing. Forgot to set your DVR to record something before you left the house? No problem, fire up the SlingPlayer on your laptop and just use the onscreen remote to setup the recording remotely.

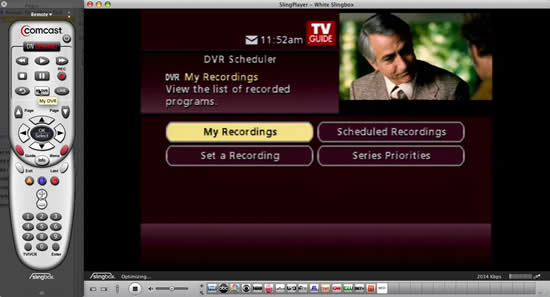
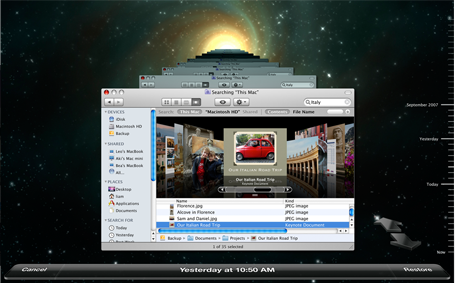
my Comcast DVR showing through the SlingPlayer on my MacBook Pro. They even match the remote. The little squares at the bottom of the screen are station presets that you can configure to jump to your favorite channels.


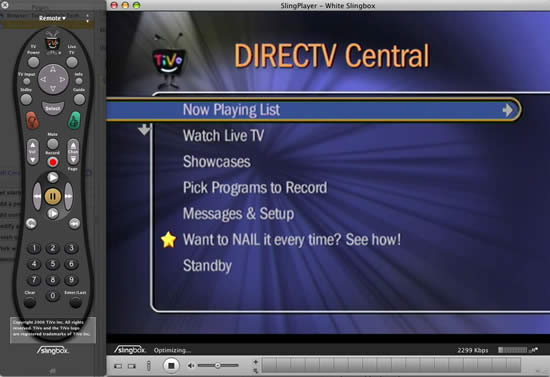
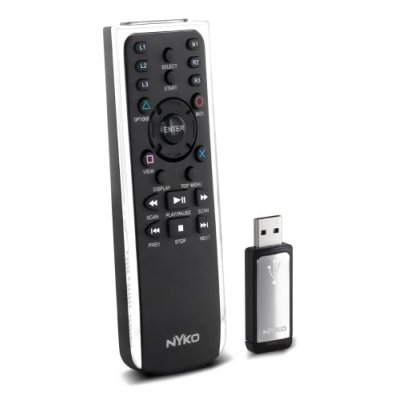
my DirecTV TiVo showing through the SlingPlayer on my MacBook Pro. Complete with an onscreen TV Remote.


How much does it cost?

If all you want to control or watch is one device such as a DVR or cable box, then I would go with Slingbox Solo which Amazon has for $144.99 with free shipping (regular price $179). If you want to have two or more sources, then you want Slingbox Pro which Amazon has for $179.99 (regular price $229.99). Keep in mind that with Slingbox Pro, if you want to connect via Component cables you will need the optional Sling Media HD Connect Cable for $38.99 at Amazon (regular price $49.99). If you just want a basic unit with composite connections, then you could go with the Slingbox AV for $109.72. Sling Media did announce a Slingbox HD that will be coming out in Q3 of this year and will go for $400. I’m not sure it would be worth the wait for most. I have the Slingbox Pro connected right now to an HDTV and there is no downside that I can see. Since bandwidth will be an issue, I’m not sure how effective you will be streaming HD anyway (outside of your home network).

There are no monthly service fees or contracts involved. It’s just a box that streams over your existing broadband internet connection.


The bottom line

If you not only want to watch TV on your schedule, but also in the location of your choosing, then there is no better solution that Slingbox! For me it was a no brainer and it works as advertised. I would have gotten one of these a year ago if I had seen it in action. Sling Media, you need better marketing!

Wacom Cintiq 12WX rocks!

I really took vacation over the past couple of weeks and just really shut down to recharge. However, I did pursue one of my passions and that was digital photography. I worked in a couple of model shoots and of course that meant that I had some retouching to do. Right before the holidays the great folks at Wacom were kind enough to ship me a New Cintiq 12WX to play with and demonstrate at my upcoming Macworld Expo sessions. I was already a big fan of the Wacom Cintiq 21UX and the Intuos line of tablets. However, as much as I love the 21UX, I just don’t find myself at my desk as much as I’d like to be. I’m on my MacBook Pro in different rooms depending on my mood. So until now I would mostly use my Intuos 4×6 which is also a great size to travel with. However, that all changed for me on Friday. I fell in love with the new Cintiq 12WX. It’s just the right size and the built-in LCD is gorgeous! The best way to describe it is to take a Intuos 6×11 and replace the tablet area with an LCD display that is also a pressure senstive tablet and you have the Cintiq 12WX.

I spent all day (and I mean ALL DAY) with it Friday retouching photos in Adobe Photoshop CS3. I had the Cintiq connected to my MacBook Pro via DVI and USB (for the tablet functions). I used it as my main display and the display on my MacBook Pro as the secondary display (yes it also supports mirroring). I kept Adobe Photoshop Lightroom open on the MacBook Pro display and Adobe Photoshop CS3 open on the Cintiq. Although it comes with an easel type stand, I found it most comfortable to just hold it in my left arm while I used the pen in my right hand. There were times also where I just laid it flat on the table and worked.

As with all the latest professional tablets from Wacom, I found the touch strips and side buttons to be indispensable. I configured the left touch strip to change brush size and the right one for zooming in and out. I configured the left buttons to the Brush Tool, Healing Brush, Clone Stamp, Space bar (for quick panning) and Undo. I configured the pen rocker switch for Option-Click. This setup meant that I rarely had to touch the keyboard and NEVER had to touch the trackpad.

The Cintiq performed FLAWELESSLY throughout the day. It did get a little warm, but nothing alarming and no where near hot. My only minor criticism (c’mon you know me. There would have to be at least one, otherwise you wouldn’t think I was doing an honest review) is that the breakout box seems a little cluttered. I don’t necessarily have a better design in mind and I do appreciate the fact that there is only one cable attached to the display itself, but when I looked at the box laying on my table it looked like an octopus. The breakout box is where you connect power, the display, the DVI/VGA cable and the USB cable. These are all necessary, so like I said, I don’t know of a better way to do it. OK, I lied there is one other small thing. I would like to see a way to connect this to a projector at the same time. I have to call the folks at Wacom and see if there is a way to be connected to the Cintiq AND a projector at the same time. Otherwise, I won’t have any way of demoing it to the masses. The breakout box connects to the video out on your Mac or PC, but doesn’t provide a pass-through or video out to go out to a another display or projector. Other than those two minor things (and the second one really won’t affect most), this new Cintiq is PERFECT!


The Bottom Line

If you need (OK, want) an integrated display and tablet, there simply isn’t a better choice! I love the Intuos line and the bigger Cintiq, but this new Cintiq 12WX hits the sweet spot on portability AND price. Amazon has it for $985.70 (list is $999). I couldn’t imaging retouching another image without it!

My 1st Favorite Gadget of the New Year!

First off let me start this by saying Happy New Year to all of you and your families! I’m looking forward to another exciting tech year and I will try to cover as much of it as I can here. So let’s get started.

I woke up this morning (well actually more like this afternoon), to this wonderful snow (not really! I’m not really a fan of snow, but let’s play along). Shrugging my shoulders, I knew it was time to go fire up the Toro and plow the driveway. Then I remembered that I had gotten in my brand new 180s Tec Stretch Earmuff Headphones for just such a day! So I grabbed them and my iPod nano and I was gone. This otherwise mundane chore went much quicker with warmer ears filled with my jams (I’m dreaming of a White Christmas – NOT!).

My Toro isn’t very quiet (read loud) and I was still able to hear quite well. If you’re into winter activities and music, these are a must have! $24.95 at Amazon.com


Happy New Year!

So what’d you get?

OK, so what new gadgets, tech, photography gear, cool stuff did you get this year?

I know I haven’t posted anything in a few days and I do have a couple cool pieces of gear to review, however, I’ve just been spending time with family and friends and resting up. I was getting pretty burned out and once I just stopped doing stuff, I could really feel it. I do feel much more rested now and wil get back in the game soon. Enough about me, let’s hear what you got and what’s exciting in your world? Hit me with some comments below. I feed off your energy and excitment.

Your popup flash doesn’t have to suck

One thing I learned quickly in this digital photography game is that the popup flash on most digital cameras is for emergency use only. Ask any professional how often do they use the built-in flash on their digital SLRs and they will look at you as if you’ve just grown a thumb in the middle of your forehead. There are several problems with the popup flash, two of which are it’s location (on top of the camera near the forehead) and it’s too much of a harsh spotlight.

The folks at Lightscoop.com hope to change all that with their $30 Lightscoop. I ordered this after a recommendation from Lesa King. When it arrived, I was thinking "this is never going to work." So of course I fired off a couple test shots (before and after) and I was stunned by the difference. Yes, it does work!


How does it work?

It works by sitting in your hot shoe in front of your flash. There is a mirror in the front that bounces your on camera flash off the ceiling/wall up and behind you back down onto your subject.


As with most things there are a couple of caveats. For one, it’s not as compact as I wished is was. Yes, it’s small and very light weight, but it doesn’t fold down. Not big enough to fit over a lens (for storage in your camera bag) and a little too big to fit in a pocket. It takes up a lot less space than an external flash, but I’m hoping the next version could fold down flat. The second caveat is that they recommend very specific settings: Manual mode, ISO 800, Spot Metering, widest lens aperture (f2.8, f3.5, or f4.0 depending on your lens), shutter speed of 1/200th, Exposure Compensation set to +1, no curtain sync, slow sync, or red-eye reduction. Some of these settings are a no-brainer, but others seem a little restrictive. However, they are suggestions and not the law. You can experiment and see which settings you like best. Also since it bounces the light off the ceiling/wall it won’t work in all settings such as outside, cathedral ceilings, gymnasiums, churches, etc. All-in-all, it performs as advertised and is a great solution for $30. They models for Nikon, Canon and Pentax as well as a Standard version and a Warming version (I’m using the Standard version). It’s also smaller than most other types of on camera flash workarounds. On camera flashes still suck, but this makes them suck a whole lot less. I took a few test shots with my Nikon D70 (yes, I could have used the D300, but the D70 was closer – lazy, I know).


with the built-in flash on a Nikon D70 shot in RAW (hot spots and some blown out highlights)

with the built-in flash on a Nikon D70 shot in RAW and the Lightscoop

with the built-in flash on a Nikon D70 shot in RAW and the Lightscoop and a simple exposure adjustment in Adobe Camera RAW

Digital Picture Frames

Another hot holiday gadget gift idea is a digital picture frame. I’ve been a digital photographer ever since the first Apple QuickTake camera back in 1994 (yes, I know it wasn’t a real camera by any comparisons today). However, unlike many digital photographers, I’m not really that interested in printing my photos. Sure I have a nice Epson Stylus Photo R1800 printer that does a phenomenal job and I do have some nice framed shots around the house, but I just don’t do a lot of printing on a regular basis. When I want to look at a photo, I look at it on my computer or on my iPhone.


I bought my first digital picture frame back in 1999 when Sony introduced a (gasp) $900 PHD-A55 CyberFrame digital picture frame. Although I paid less than sticker price it was still up there. It was one of the first of it’s kind in that you loaded your shots on a memory stick and you could do a slideshow right on the frame without any computer connected to it. The only other frame I remember at the time was Cieva and they were set on selling frames a service which would allow you to download your images to it over the internet. I just wanted to "own" the frame and put my pictures on it directly. The frame was small, but innovative. For example, just waving your hand in front of the frame would turn it on and start the show. At that price, you better believe that I still use it to this day. Other than a restriction on the JPEGs not being able to have resource forks (a Mac issue), the frame has always worked great and I still get a lot of enjoyment out of it.

Now fast forward to 2007-2008. The weekend after Thanksgiving I caught the Staples sale on the 11.3" Omnitech Digital Picture Frame for a mere $99. Now keep in mind that this is an off brand (read cheap) frame and there some really good ones out there that may cost you closer to $200-$300. However, at that price and size I couldn’t resist. My plan is to put one of these at my parents house (they don’t use computers) and simply swap out the memory card on each visit. This way they can enjoy my latest shots (and some old classics) without having to print a bunch of photos and store photo albums that fade.


So what don’t you get with a $99 (regular price $199) frame?

It only comes in one color, black. Other frames offer different color inserts to match your decor. Although this frame is large it’s LCD has a relatively low resolution of 800x480ppi (480×234 ppi on the 7" model). It’s got a 16×9 display and comes with a pretty dorky looking (1970’s feel) remote. No cross dissolves or animation of any kind. Also other frames will play the little movies that some still cameras can capture. However, it does have a USB port for either a computer or thumb drive. It has both SD and Compact Flash slots (other formats via adapters). This is a no frills frame. One of the oddest attributes about this particular frame is that if you display a portrait (tall) image it will be cropped off as opposed to scaled down (letter boxed). So you would need to crop/resize your photos first to the proper dimensions to display their best on this frame. For the price I paid and the intended use, I’m willing to put up with things minor inconveniences. However, if you are looking for a quality frame, with more features and with support, you might want to look elsewhere.


The Bottom Line

Digital Picture Frames have come way down in price. They allow you to enjoy your digital captures without having to print a bunch of prints. They are easy to use and once they are setup, you can easily load them up with additional or different shots whenever you like. There are some bargain choices out there and some really nice models. So compare and get the right one for you.

The 2007 hottest holiday gadget gift

For the past few years, the Apple iPod has been the hottest holiday gadget on just about everyone’s wish list. While I still think the iPod and iPhone will be hot sellers this year, I think an even bigger seller will be portable GPS navigation units. I wrote a review of one that I bought as a gift, the Navigon 2100 and the response to that review has been overwhelming. It’s taken a life of its own and the number of comments dwarf my very popular iPhone review. Now that GPS units have fallen well below the $200 mark, they are much more attractive to casual buyers. I plan to give away at least 3 this year. Everyone I know (or at least one ones on my list) are all set with iPods. So it’s all about GPS’s.


My top picks in this category are the:

Garmin Nüvi 660 (for the one you REALLY love 🙂 )

Garmin Nüvi 360

Garmin Nüvi 200 (great entry level unit)

Navigon 2100

TomTom One 3rd Edition


There are deals to be had out there! So do some shopping around.