Another hot holiday gadget gift idea is a digital picture frame. I’ve been a digital photographer ever since the first Apple QuickTake camera back in 1994 (yes, I know it wasn’t a real camera by any comparisons today). However, unlike many digital photographers, I’m not really that interested in printing my photos. Sure I have a nice Epson Stylus Photo R1800 printer that does a phenomenal job and I do have some nice framed shots around the house, but I just don’t do a lot of printing on a regular basis. When I want to look at a photo, I look at it on my computer or on my iPhone.
I bought my first digital picture frame back in 1999 when Sony introduced a (gasp) $900 PHD-A55 CyberFrame digital picture frame. Although I paid less than sticker price it was still up there. It was one of the first of it’s kind in that you loaded your shots on a memory stick and you could do a slideshow right on the frame without any computer connected to it. The only other frame I remember at the time was Cieva and they were set on selling frames a service which would allow you to download your images to it over the internet. I just wanted to "own" the frame and put my pictures on it directly. The frame was small, but innovative. For example, just waving your hand in front of the frame would turn it on and start the show. At that price, you better believe that I still use it to this day. Other than a restriction on the JPEGs not being able to have resource forks (a Mac issue), the frame has always worked great and I still get a lot of enjoyment out of it.
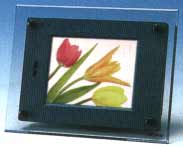
Now fast forward to 2007-2008. The weekend after Thanksgiving I caught the Staples sale on the 11.3" Omnitech Digital Picture Frame for a mere $99. Now keep in mind that this is an off brand (read cheap) frame and there some really good ones out there that may cost you closer to $200-$300. However, at that price and size I couldn’t resist. My plan is to put one of these at my parents house (they don’t use computers) and simply swap out the memory card on each visit. This way they can enjoy my latest shots (and some old classics) without having to print a bunch of photos and store photo albums that fade.
So what don’t you get with a $99 (regular price $199) frame?
It only comes in one color, black. Other frames offer different color inserts to match your decor. Although this frame is large it’s LCD has a relatively low resolution of 800x480ppi (480×234 ppi on the 7" model). It’s got a 16×9 display and comes with a pretty dorky looking (1970’s feel) remote. No cross dissolves or animation of any kind. Also other frames will play the little movies that some still cameras can capture. However, it does have a USB port for either a computer or thumb drive. It has both SD and Compact Flash slots (other formats via adapters). This is a no frills frame. One of the oddest attributes about this particular frame is that if you display a portrait (tall) image it will be cropped off as opposed to scaled down (letter boxed). So you would need to crop/resize your photos first to the proper dimensions to display their best on this frame. For the price I paid and the intended use, I’m willing to put up with things minor inconveniences. However, if you are looking for a quality frame, with more features and with support, you might want to look elsewhere.
The Bottom Line
Digital Picture Frames have come way down in price. They allow you to enjoy your digital captures without having to print a bunch of prints. They are easy to use and once they are setup, you can easily load them up with additional or different shots whenever you like. There are some bargain choices out there and some really nice models. So compare and get the right one for you.