People have been cutting the cord from their cable TV provider for years. With the explosion of smart TVs and streaming services, it’s pretty easy to get by with just internet service and stream the content you want on your TV. I’m late to the game, but earlier this year, I finally decided that I no longer needed and barely watched Cable TV anymore.
There are multiple ways to cut the cord
Some people opt for a digital antenna to pull in their local channels. Others forgo having local channels, and people like me who still want to have local channels but don’t need them from their cable providers go with a different streaming service that offers local channels.
YouTube TV was the one I chose
I figured YouTube has been in the video streaming business for decades, and if anyone could get streaming TV right, it would be them. They didn’t disappoint. I signed up for the trial, which lasts 21 days. I initially planned to go through the whole trial before dropping my Xfinity TV. I ended up canceling Xfinity TV the next day. I saw no reason that I would need to go through the whole trial period.
Calling to cancel your existing service can be a lot of pressure
Apple Vision Pro is Apple’s entry into the world of spatial computing. While people will be quick to compare it to all the existing VR headsets, that’s like comparing all 2007-era cellphones and early smartphones to the original iPhone in 2007. They are not the same. Apple Vision Pro is a different device with some VR features and capabilities just like early cellphones could make calls, text, and browse the internet. The iPhone did these things in innovative ways. I’ve spent the last four days taking the Apple Vision Pro through its paces.
No matter which reviews you read or watch about the Apple Vision Pro, they really can’t do it justice. It would be like describing what it’s like to go to the beach to someone who has never been on a beach before. You can describe the feeling and even show them pictures and videos, but they won’t know what it’s like until they experience it. Apple Vision Pro (AVP) is like that. Rather than trying to describe it in words, I recorded my review and demo here:
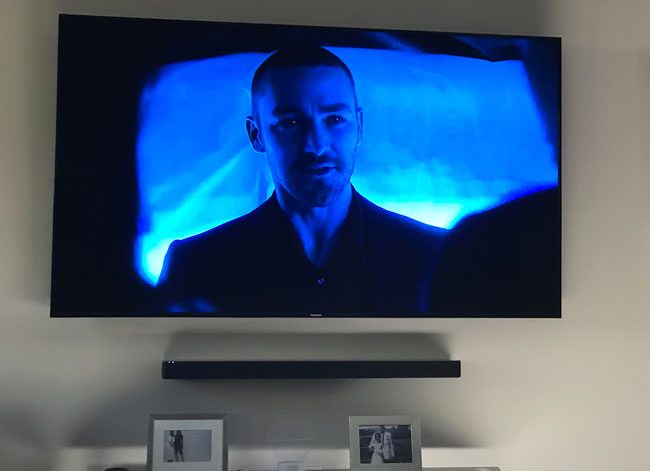
Have you ever bought something with one use in mind and then later you realized that you could use it for another purpose too? That’s exactly what happened to me when I bought my Bose SoundTouch 300 Soundbar. I was looking for a 5.1 WIRELESS surround sound system. I’m a fan of Bose gear and when my neighbor told me that Bose had just the system I was looking for I ordered it on the spot. Yes there are other wireless systems out there and I even had one. I had a Vizio soundbar with wireless subwoofer. However, with the Vizio soundbar the satellite speakers plugged into the subwoofer. In my family room I don’t have a back wall to run wires. Therefore the Vizio system presented a wiring challenge. The Bose SoundTouch 300 is actually sold piece by piece or you can buy the whole setup. You can just buy the soundbar. You can add on the wireless subwoofer (Acoustimass). You can add on the rear speakers. They are all wireless. Each speaker needs to be plugged into an AC outlet for power, but they don’t need to be wired to the soundbar or any central point. This was exactly what I was looking for. I am completely happy with the performance of the Bose SoundTouch 300.
What I didn’t realize at the time was that you could add additional SoundTouch speakers for music in every room
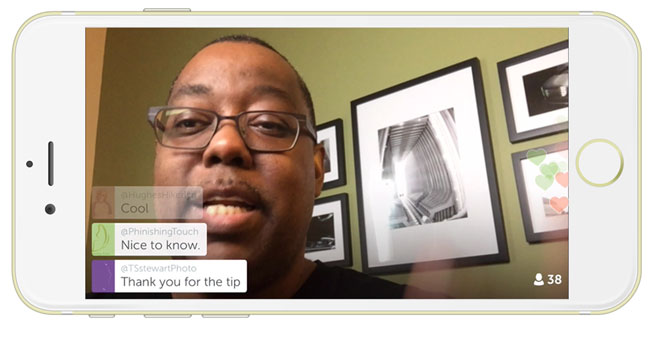
The latest update to Twitter’s live broadcasting app, Periscope brings the long awaited landscape orientation that it so desperately needed. I have a renewed interest in using Periscope and now have the choice to broadcast in portrait or landscape based on what’s best for the content I’m showing. I’m also noticing more and more people getting on board. That’s why I created this NEW video that goes into detail about How to Get Started on Periscope and it even includes a live Periscope broadcast to show how much fun you can have using Periscope:
I shared some tips in the video, but here are some tips that every Periscope user should know:
Make sure you have sufficient bandwidth. The Periscope app itself does a test before even allowing you to start your broadcast, but I like to know even earlier. So I run the Speedtest App to check my speed. You probably want at least 2mbps upload speed to have a good experience.
Create a compelling title for your broadcast. Remember that you’re competing for the attention of your viewers. If they see an Untitled broadcast or a title that is weak or not very descriptive then they will likely not tap on it to watch. For example I could have titled this post “Periscope tips and tricks”, but “The Ultimate Cheat Sheet On Periscope – 10 Killer Tips” sounds way better. Bonus Tip: Add a few emojis to the title so that it stands out even more.
Time to Break Your Egg. When you first sign up to Twitter or Periscope your profile pic will default to a picture of an egg.
You need to change it before doing your first broadcast. Unless I know your name, I will likely never tap to watch or follow anyone with an default profile pic. I will dismiss you/it as spam.
Introduce yourself every time you broadcast. This is one that I have to remember to do each time. You might think “why do I need to introduce myself? These are my followers.” That’s true, but what you have to remember is that a lot of people may be watching you for the first time that have not followed you yet. They saw your tweet, they saw someone else’s share, or perhaps they saw your broadcast on the Periscope map. They don’t know you!
P.S. don’t tease me with screenshots of movies that aren’t actually available on my flight…
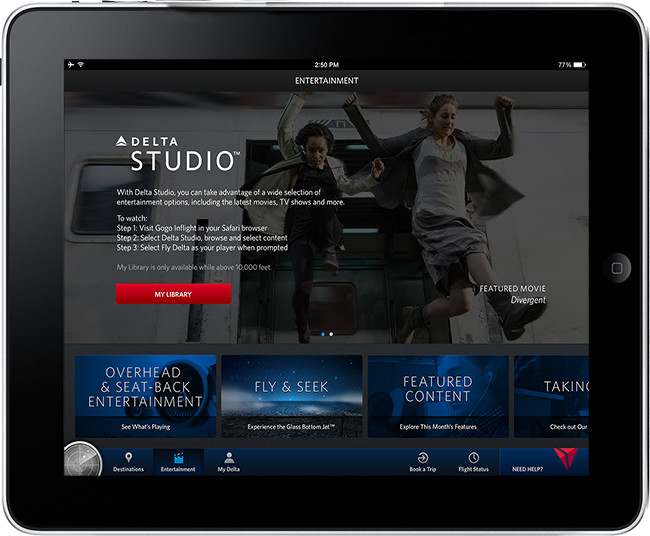
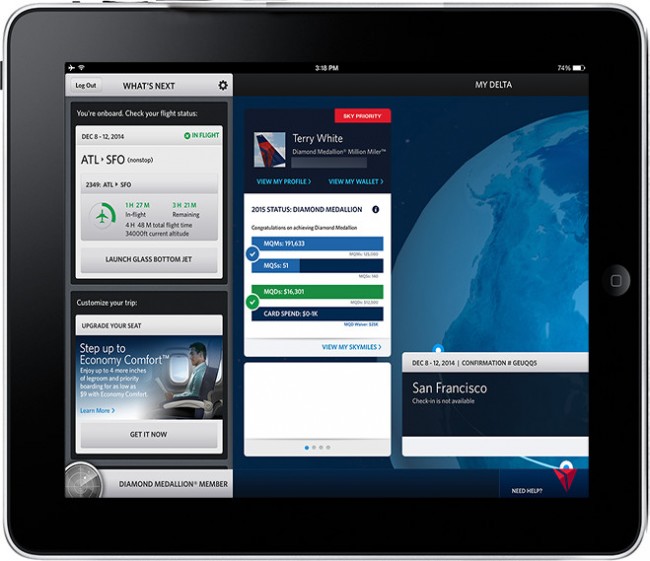
As a frequent flier (Diamond Medallion – Million Miler) on Delta I’ve always applauded them for their firsts in making air travel a tad bit more enjoyable. It’s tough to please fliers these days because airlines tend to care more about profits these days than making the flying experience more enjoyable for its customers. However, Delta tends to come out on top when it comes to overall customer satisfaction and that’s largely in part due to the fact that they invest in their planes and try to offer a bit more than the others. Delta for example has more domestic planes equipped with WiFi than any other carrier. So much so that when I’m sometimes forced to fly other carriers I feel like I’ve stepped back in time. One of their latest perks recently introduced is Delta Studio. The idea is simple. Using your mobile device, say an iPad you can launch the Delta App and choose various video entertainment to stream over the plane’s WiFi. This content would play from the plane’s on board systems rather than streaming over the relatively slow Gogo Inflight internet. Sounds simple right? It should be, but Delta (and Gogo) chose a really bazar way to make this work. I’ve tried it twice now and have yet to be able to watch anything!
Here’s how it works currently…
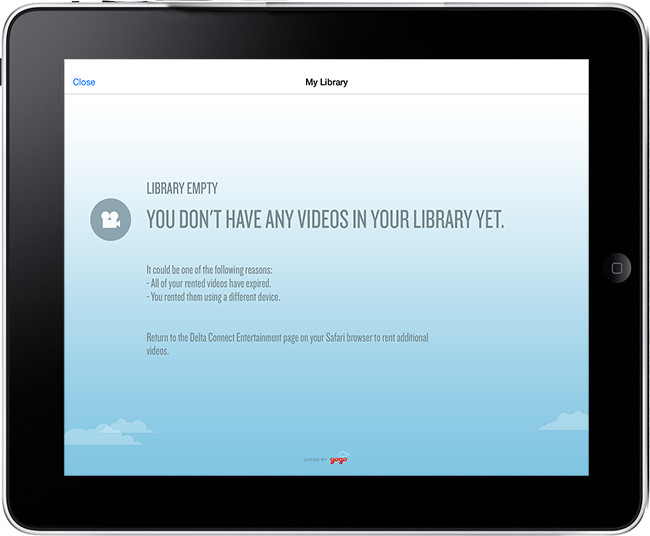
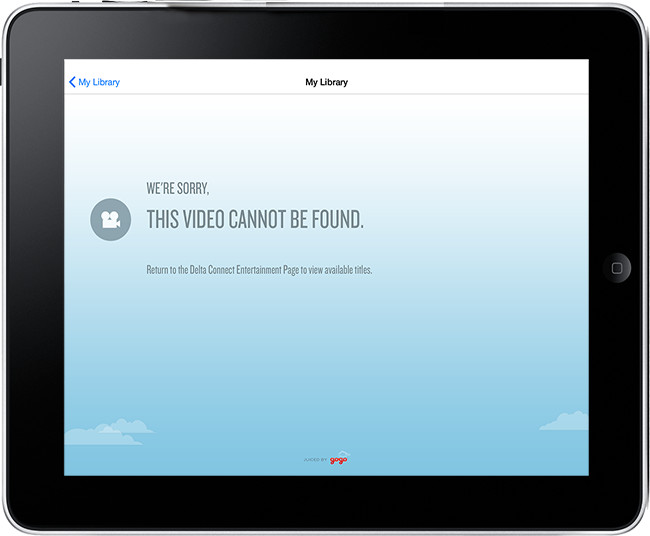
You might think that you fire up the Delta App, choose a movie or tv show and watch it right? Nope. It’s not that simple. If you do fire up the Delta App first it will simply tell you that you don’t have anything in your library. Well OK, that kinda makes sense a little.
Fine, let’s add something to “My Library”. Here’s where it starts to get strange. The Delta App tells you that you must leave the app and launch Safari to add content to your Library via the GoGo website. This one really boggles my mind. First off, Apple for years has allowed developers to build a browser (Safari) into their apps. So if the Delta App needed to go to a browser it could simply just bring up a window right in the App. No need to leave.
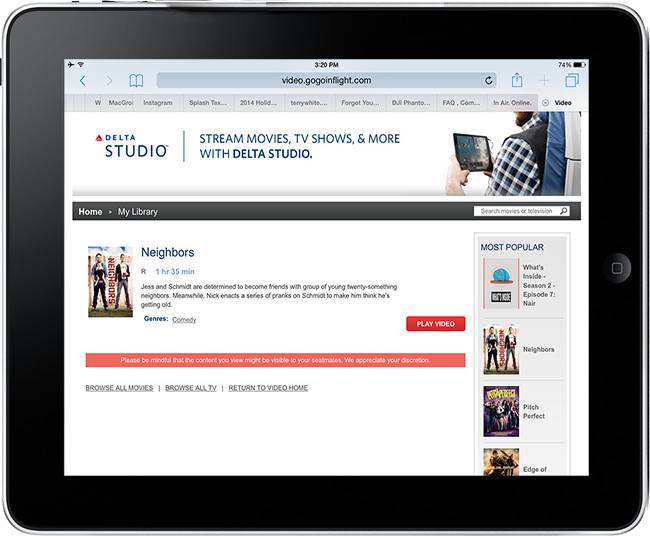
Nonetheless I launched Safari and navigated to the GoGo website. I signed into my account. I went to the entertainment tab and I found a movie that I wanted to watch and it was free. Awesome! I added it to my library and then tapped to watch it now. The website asked me to pick an app to watch it with and of course I picked the Delta app. It took me right back to the Delta App only to tell me that the movie was unavailable. WTF?
Sure, there could have been a problem with that selection. No problem, I went back to Safari and this time (silly me), I picked a movie that I had to rent. The cost was $6. I paid it and once again I tapped to watch it in the Delta app and I’m sure you’ve guessed by now that this movie was also unavailable and no there was no apparent way to get a refund.
I was at a loss for words since the Gogo site knows which plane you’re on when you’re logged in and therefore should know what’s available and what’s NOT. Alas, I went back to work on my iPad and needless to say I wasn’t entertained. You actually allowed me to choose a movie, pay for it, only to tell me after the fact that it’s not available.
Delta and Gogo, if you’re reading this, you’re current implementation is screwed up at best. It appears that Gogo is collecting the money for the content and that’s fine, but there is absolutely no reason that this transaction shouldn’t be transparent to the user and the entire process should happen within the Delta App. I’ve been on two flights thus far and have yet to see any of this wonderful content. The first time was on a flight without the entertainment system and therefore there were no videos available but at least it told me that up front instead of wasting my time having me browse selections that I would never be able to actually view.
BTW: Will I ever get my $6 back?
UPDATE: Gogo reached out to me on twitter to tell me that they found my purchase and refunded it. Thanks!
The way it should be
I can’t help but think about the iTunes model. If I buy/rent a movie on iTunes then it’s available to me on all of my devices at any time when I have a connection. I have the ability to download the video to my device or simply stream it. If we apply this to the Delta/Gogo model then I would envision something similar. I’m a Delta customer with a “my library”. I would be able to browse content and make choices up to 24 hours before my flight for streaming. Once I make my choices those files are download to the plane that I’m going to be on (with the 24 hour window before my flight). I fire up my device in the air and the content is streamed locally from the plane’s servers. If someone else rents/buys the same content/movie then great. You only have to download it to the plane once and stream it to both of us saving you money. Until it’s this seamless I think I’ll stick to my TiVo and iTunes content downloading to my devices the night before the flight as usual.
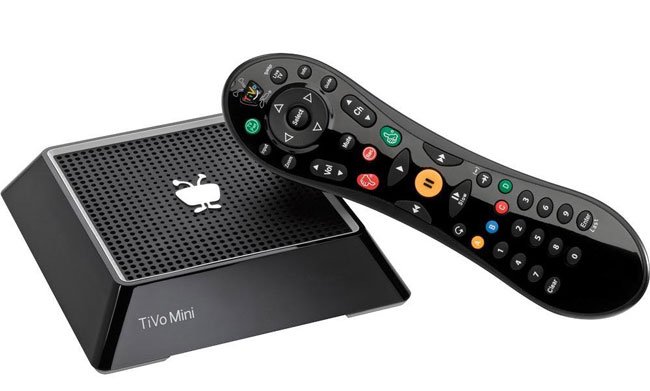
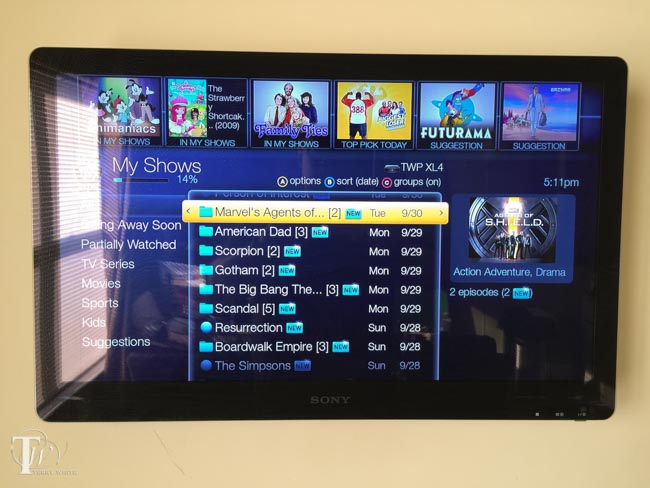
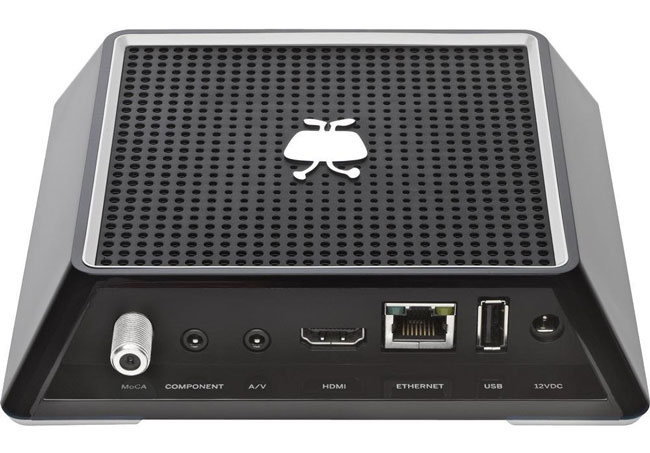
If you’ve followed my blog for a while, you’ll know that I’m a fan of TiVo DVRs. Not long ago I relocated and it was time to rethink my multi-room viewing experience. In the past I had DVRs in each room. This of course is redundant and costs more than other options. Since I was starting over in a new location I decided that I only needed ONE TiVo DVR and I would explore options for viewing that content in other rooms. In the past I used this setup from Actiontec and while it worked OK, I wanted to see if there was something better? My search led me to the TiVo Mini. TiVo Mini is a smaller box designed to be used on another HDTV in your home. It connects to your HDTV via HDMI and not only streams live TV from your existing TiVo DVR, but it also can stream any recorded content from your TiVo DVR. The big advantage here is that unlike the Actiontec or other solutions, each HDTV can view something different. In other words if someone is watching a recording or live TV in the living room, another viewer can be viewing something totally different in the den, office or bedroom.
The Good
It works GREAT! The setup was pretty straight forward and once setup I’m able to enjoy my TiVo in another room as if I was sitting right in front of it. The quality of the stream is as good to my eyes as watching the content on the main TV. There is a small lag that would only be noticed if you had the same live broadcast showing in both rooms at the same time. It does exactly what I needed it to do. It comes with an additional TiVo remote that allows you to control the TiVo mini as well as the TV.
It could be a lot Better
In order to use a TiVo Mini you have to have all the right stuff in place or you simply can’t use it. First off it requires the later generation 4 Tuner TiVo Premiere or Roamio. Luckily I got a TiVo Premiere 4XL on close out and little did I know at the time that going with the 4 tuner model would pay off now. The 4 tuners are necessary so that the main TiVo can still record while the other tuners are being shared with the the TiVo Mini(s) in your home. The next requirement is that it can only work over Ethernet! That’s right it has to be hard wired and there is currently no built-in wireless option. In my opinion in 2014 this is dumb! Most people will not have a wired ethernet connection in bedrooms, family rooms, etc. If my Apple TV can stream HD quality content from the internet via WiFi, there should be no reason that TiVo Mini shouldn’t be able to stream content wirelessly from another room in the same home! There is another option that works via a coax connection if you happen to have the other rooms wired for cable. You can use a set of MoCA adapters to do ethernet over coax or if you have a TiVo Roamio Plus or TiVo Roamio Pro those models have MoCA support built-in. This is probably the best way to go if you can’t run ethernet AND you have the coax cable connections in each room. Luckily I could run “flat” ethernet cables and hide them from room to room. Aside from the connection hurdles, the one and probably biggest problem that people will have with this solution is that TiVo charges a monthly charge to use TiVo Mini. Wow! I can see paying for TiVo service for the DVR, but why on earth is there a need to pay for TiVo service on the TiVo Mini? The TiVo Mini technically is just a bridge to the main TiVo DVR. You can opt to pay a one-time Lifetime Service fee and be done with it, but I can’t see why there is a need to charge for a service for this box at all?
The Bottom Line
Despite the problems, it was the best and most elegant solution to allow me to have my TiVo in 3 rooms and only having one TiVo DVR. The fact that each room can view something different is great and the product has worked perfectly for me so far. Rumor has it that TiVo is working on a newer model of the Mini with wireless capabilities. There’s no formal announcement at this point. TiVo if you’re listening, this product screams to be connected wirelessly and you should ditch the service fees for it even if it means charging a little more for the box itself. Keep in mind that it can’t do anything without a TiVo DVR, so paying a fee for the Mini seems a bit much.
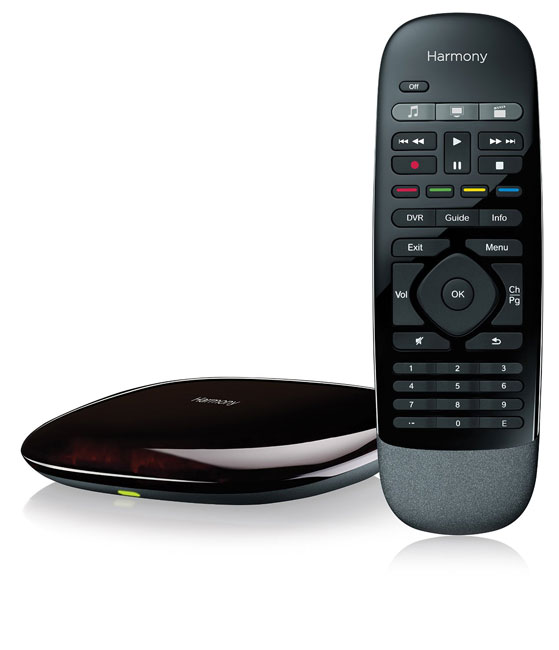
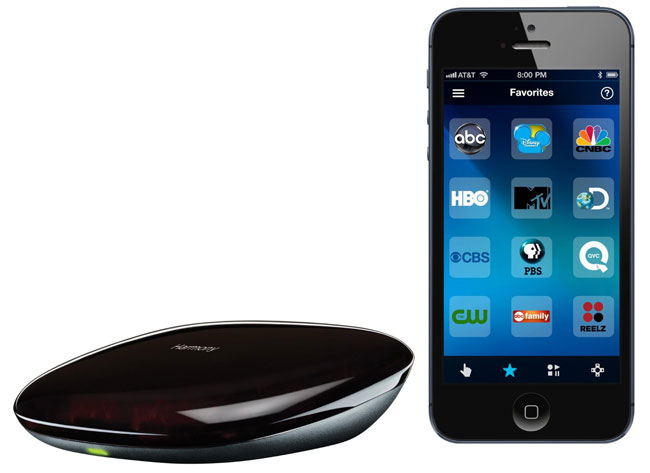
It has been a while since I’ve looked at smart universal remotes. I’ve been happily using my Harmony One for years. However, it was time to setup a new room with HDTV, Apple TV and TiVo Mini. This means either using 2-3 remotes or just ONE! However, I didn’t want to go with another high-end Harmony, yet I wanted something that was still very good. This lead me to check out the Harmony Smart Control. This setup offers the best of both worlds. You get a regular remote control with physical buttons as well as a “hub” that allows you to control everything with your iOS or Android based smartphone or tablet. While I’ve used this hub before, I like the option of having a physical remote for those times when my iPhone is in use or not handy.
How to set it up
The setup was pretty straight forward. You plug in the hub to AC power and then download the Harmony Control app. Since there are no controls on the hub you first have to get it on your WiFi network either via your computer via a USB connection to the Hub or wirelessly to your smartphone via bluetooth. I opted to set it up via my iPhone 5s. The App found the hub and allowed me to key in the password to my WiFi network. Once it was setup on the network the App continued to allow me to set it up. The setup was very typical to Harmony remotes. You simply enter the brand and model names/numbers of the devices you wish to control. Believe it or not, that’s the hard part. Who remembers the model number of their TV? Once I tracked down the info I needed to enter, it was easily able to control each device. Then I setup “Activities” such as “Watch TV” and “Watch Apple TV”. Activities allow you one button options to turn on all the appropriate devices and switch to the appropriate inputs on your TV or receiver. Lastly I added my “Favorite” channels.
How does it work?
Once I set up the Harmony Smart Control, I now have the option of controlling my TV and components via the supplied physical remote OR via my iPhone or iPad using the Harmony Control App. It definitely beats having to have the TiVo remote, TV remote (to properly switch inputs) and the Apple TV remote. Either the App on my iPhone or Harmony remote can control it all. The App is pretty slick too. Not only do you have multiple screens for various controls, you even have a “gesture” screen that allows you to swipe up or down to control TV volume or left or right to change channels. I also like the one touch access to my favorite channels.
The Bottom Line
Logitech has hit the right combination of hardware and software with this combo. You have a physical remote that anyone can use AND the ability to use your mobile device to control it via WiFi from any room. I’m happy with this setup and I’m considering getting another one for another room of gear.
I’m a fan of AirPlay Speaker Systems. To date my favorites are the Bowers & Wilkins Zeppelin Air and the iHome AW1. Just recently the Gear4 AirZone Series 1 crossed my desk. I decided to give it a try. I grade AirPlay speakers on 3 criteria: Ease of setup, No skipping and of course sound quality. Let’s get started:
The out of the box experience
The AirZone Series 1 offers a decent out of the box experience. Much easier than the Zeppelin Air, but not nearly as easy as the iHome’s Setup App. With the AirZone you simply turn it on and navigate to the WiFi menu using the wireless remote. From there you can scroll through the available networks and then hit the enter button on the one you want to connect to. Sadly to enter your network password you have to scroll through the alphabet letter by letter like many game console onscreen setups. Fortunately this is the most difficult part of the setup. After I entered my password, the AirZone connected to my WiFi network and showed up immediately on my iDevices and iTunes.
No Skipping
So far, I haven’t had a single skip. The music has been continuous. This is probably due to the fact that the AirZone has a physical external antenna for the WiFi connection. I hate AirPlay speakers that skip or have dropouts due to weak connections.
Sound
The sound is as good as the iHome iW1, but not as good as the more expensive Zeppelin Air. In other words you get what you pay for. I do however appreciate the fact that the AirZone does have a built-in EQ.
The Bottom Line
The AirZone offers decent competition in this $200-$300 range of AirPlay speakers. It also offers a built-in dock, AM-FM radio and Audio In port so that you can listen to other sources besides those on AirPlay. I also appreciate the fact that the AirZone displays the name of the current track on the LCD.
You can get the Gear4 AirZone Series 1 AirPlay Speaker here.
It seems that I’m always on the look out for the ultimate portable travel speaker and I’ve reviewed quite a few here. With each one I think I’ve found the right one, that is until I find the next one. The Jambox is not a new product. However, for some reason I resisted it until recently. I was in my local Apple Store picking up something else and I saw the Jambox on the rack. I was immediately drawn in by the compact size. It’s much smaller than I thought it would be. Next thing you know I was doing the self check out using the Apple Store App on my iPhone and I was out the door.
I got back to my office and charged it up. One thing I appreciated right off the bat over previous speakers that I’ve reviewed here was the minimal amount of cords/cables. Other speakers that I’ve tried that separate and have a cable attached between them kinda bother me. The Jambox comes with a thin stereo cable to attach to your computer, mobile device or other music source. However, since this is a Bluetooth speaker that cable is totally optional. The only other cable is the standard micro USB cable for charging. Once you charge it up and disconnect the USB cable there are no other cables required to listen to your tunes wirelessly.
How does it sound?
I expected the sound to be good and it was. However, the bass was better than I expected for such a small box. I had no problem pairing it with my iPhone and iPad and the music playback from the Music app and Pandora app was flawless. No skips or drop outs.
Speaker phone bonus
If you do pair it with your smartphone you can also use it as a bluetooth speakerphone. There’s a dedicated answer call button right on the top of the Jambox. My iPhone 4s rang while the music was playing. It paused the music and I just tapped the button on top to answer the call via the built-in speaker phone. Nice!
The Bottom Line
I know I’ve said this before, but this time I really mean it (until I find a better one 🙂 ), this is hands down my favorite portable speaker for travel. It’s small, sounds good, charges via USB, works wirelessly, and can be used for my conference calls.
When the original AR.Drone came out I have to admit that I immediately dismissed it as a “toy” and I had very little interest in it. Sure, like any toy it would be fun to play with for a while. However, like many other toys you could quickly lose interest. Therefore I never bought one. Not even for the “cool (aka geek) factor”. Then the AR Drone 2.0 came along and it added something that I thought would be useful. The AR Drone 2.0 adds a better camera that does video at 720p HD. Yes, this raised an eyebrow and I decided to take a look. I did a pre-order and my AR.Drone showed up a couple of days ago. I figured I might have a use for this on set, especially on location shoots to do fly arounds of the set and the area that I’m photographing.
What’s Great…
The great thing about this little drone is that it’s light weight and very easy to fly. It doesn’t come with a remote control! You actually fly it from your mobile device (iOS or Android). I downloaded the App on my iPad and iPhone. The AR Drone 2.0 has it’s own built-in WiFi network. Once you charge the battery and pop it in, it powers up and starts broadcasting a network. You connect to this adhoc network from your device and then launch the AR Drone App (a free download). You see what the AR Drone sees right on your device. Using the accelerometers in your iPad, iPhone, etc. you tilt the device to control direction. There’s an on screen joystick to turn the drone. If you suddenly lose control, just take your fingers off the screen and the Drone will hover in place.
Since the built-in camera is always running you can tap the record button within the App and start recording/streaming video from the AR Drone right to your mobile device. Very Cool! The App even allows sharing directly to YouTube.
Here’s a sample video I did flying around my photography studio while a friend also video’d the AR.Drone 2.0 itself using my iPhone 4s:
What’s not so great…
Battery life is still relatively SHORT! You get one rechargeable battery and charger and the battery last for about 10 minutes of flying. Then you’ll need about 90 minutes to charge it back up. Unless you plan to do really short flights/videos, you’ll definitely want to have a couple of charged batteries on hand (about $35 each). It’s light weight and while that’s a good thing for travel, it means that a strong wind will take it away. Since it works via WiFi you’ll also have limited range. Like most small cheap HD cameras, this one doesn’t do well in low light. With a small lens/sensor comes lower quality video in low light. However, with enough light the video is more than acceptable for my needs.
The Bottom Line
The AR.Drone 2.0 is an improvement over the original! Adding 720p Video Recording makes it useful as a tool. On a calm day I can really see some great outdoor uses for it.


 Soundbar. I was looking for a 5.1 WIRELESS surround sound system. I’m a fan of Bose gear and when my neighbor told me that Bose had just the system I was looking for I ordered it on the spot. Yes there are other wireless systems out there and I even had one. I had a Vizio soundbar with wireless subwoofer. However, with the Vizio soundbar the satellite speakers plugged into the subwoofer. In my family room I don’t have a back wall to run wires. Therefore the Vizio system presented a wiring challenge. The Bose SoundTouch 300 is actually sold piece by piece or you can buy the whole setup. You can just buy the soundbar. You can add on the wireless subwoofer (Acoustimass). You can add on the rear speakers. They are all wireless. Each speaker needs to be plugged into an AC outlet for power, but they don’t need to be wired to the soundbar or any central point. This was exactly what I was looking for. I am completely happy with the performance of the Bose SoundTouch 300.