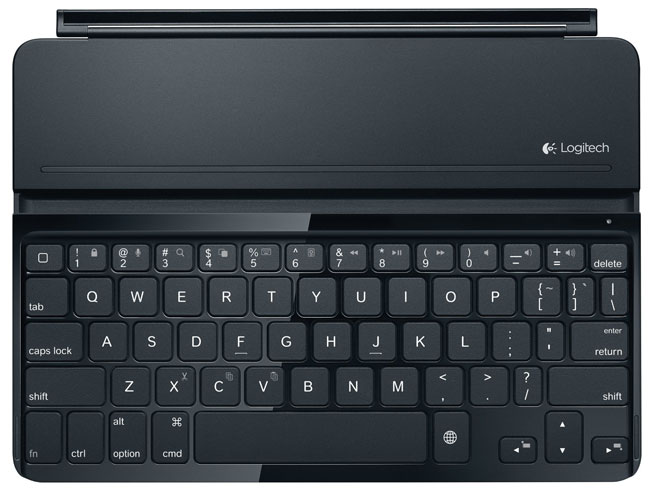
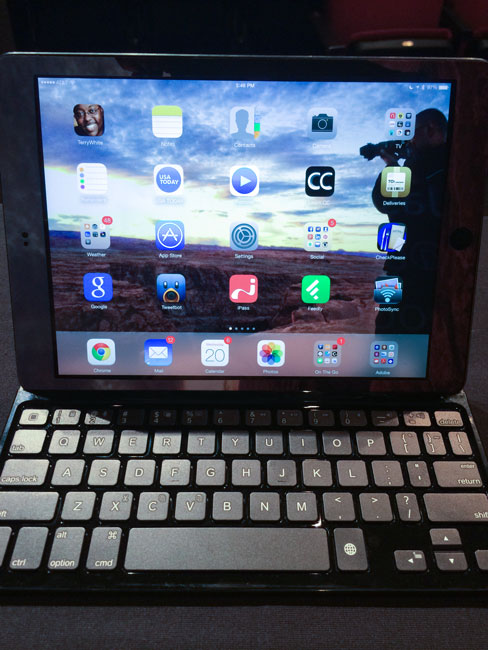
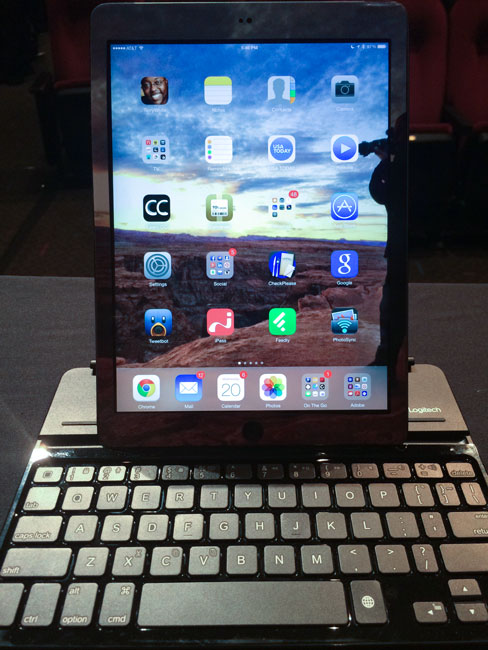
Hands down the Logitech Ultrathin Keyboard Cover has been my choice for iPad keyboards. I had one on my 3rd generation iPad and even one on my iPad mini. When the iPad Air came out I decided it was time to upgrade and of course replace the iPad 3rd generation. The one piece I had already begun to miss was my keyboard. Don’t get me wrong, the iPad’s onscreen keyboard is fine for typing quick, short things. However, I often use my iPad during travel and in flight instead of my MacBook Pro. This usually means I’m responding to email and writing. For these longer sessions, I’m spoiled by a physical keyboard. Logitech wasted no time in getting out the Logitech Ultrathin Keyboard Cover for iPad Air. Just like the previous models it connects wirelessly via bluetooth, but it’s also a smart cover that magnetically attaches to the iPad itself. Once you disconnect the iPad from the keyboard you can stand the iPad Air up in the keyboard in either horizontal or vertical orientation.
Logitech made some refinements from the original model that I had. The first one is that they got rid of the shinny plastic on top. It now has a more matte feel/look to it that will definitely not be as much of a fingerprint magnet. On the bottom they’ve attached very small rubber feet that should help prevent the back from getting scratched up so easily. Unfortunately the cover isn’t any thinner. This means that it will add some thickness to your nice thin iPad Air. It pretty much doubles the thickness when attached and closed.
Overall I’m quite happy with this new version and glad to have a physical keyboard again. I did read some of the other reviews out there that complained about things like the magnet not being strong enough and I’ve no issues so far. As a matter of fact the magnet seems stronger than the previous model I had. My 3rd generation iPad would easily slide apart from the keyboard in my bag, but this one seems to stay in place. The battery life of the keyboard is insane. You can easily go weeks if not months between charges. It’s the best keyboard for iPad period.
You can get the Logitech Ultrathin Keyboard Cover in Black/White for iPad Air Here.
You can get the Logitech Ultrathin Keyboard Cover in Black/White for iPad 2, 3 and 4 Here.
You can get the Logitech Ultrathin Keyboard Cover in Black/White for iPad mini Here.
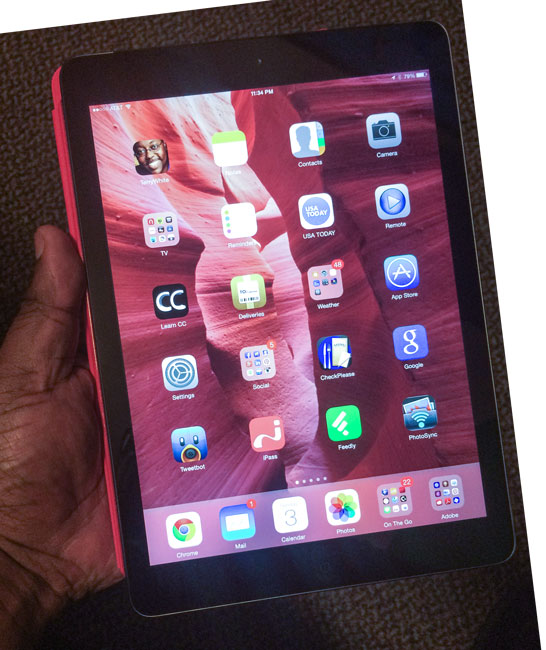
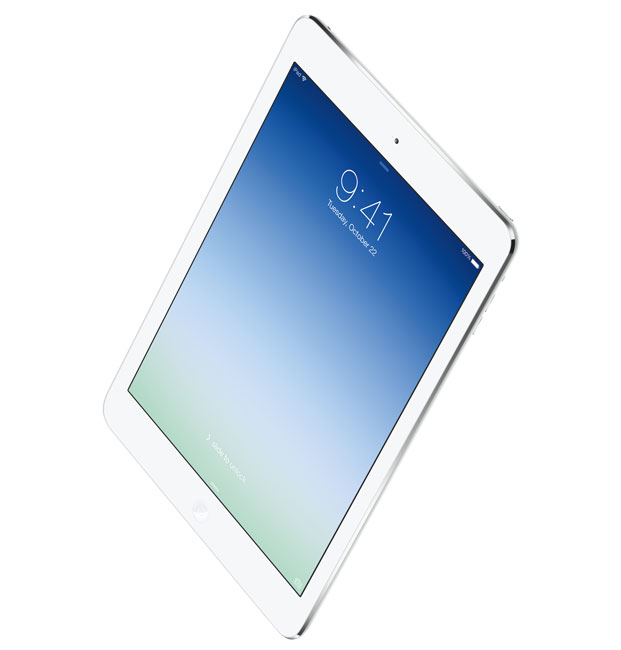
I use my work iPad quite a bit. I had been on an iPad 3rd generation (The New iPad) since it first came out. I skipped the 4th generation iPad since it really didn’t offer much in terms of an upgrade. The 4th generation iPad also came out a mere six months after the 3rd generation. I decided to wait for the next iPad. As you probably know by now, that iPad was introduced on October 22nd, 2013 and available in stores on November 1st, 2013. This iPad is a completely new design for the full sized iPad. While it still has the same size 9.7 inch Retina Display, it’s smaller and lighter in every other way. It’s narrower by reducing the bezel size on the sides. It’s also thinner and noticeably lighter in weight. So much so that I actually no longer feel the need to have an iPad mini. I prefer the larger screen size over the mini and now that the iPad Air is lighter and thinner, my iPad mini envy has come to an end. The other thing I was really interested in was the increase in performance. The iPad 3rd generation was a good performer, but the 4th generation promised twice the performance and the iPad Air even faster than the 4th generation. The more heavy duty apps I was running the more I craved a faster iPad.
First impressions
It’s impossible to pick up the new iPad Air and not notice the difference in weight. It has the feel of the iPad mini due to the form factor and curves, but all the power and full screen size of an iPad Retina Display. Once I got it set up I could immediately see the difference in performance. Apps launch faster and the iPad Air is more responsive over all. It’s definitely much faster than my iPad 3rd generation. Since I never had the 4th generation I can’t really compare against that model (sorry). Since the iPad Air is physically smaller in size you’ll likely need new cases, covers, etc. This means that I’m now anxiously awaiting Logitech to come out with a new Logitech Ultrathin Keyboard Cover. They make the best iPad keyboards on the market. Gelaskins has already announced new iPad Air skins. The other thing I’m pleased by is that the built-in speakers are definitely louder. I use my iPad to watch TV with the HBO Go and Xfinity Apps. On the iPad 3rd generation with the volume all the way up it still wasn’t quite loud enough. Now I can definitely hear the difference in the iPad Air. Apple did the same thing with the iPhone 5/5s over the 4s. Lastly you’ll notice an increase in WiFi speed too.
I went with the 128GB WiFi+Cellular AT&T model. This is a switch for me from Verizon. I had no problems with Verizon, but since I was grandfathered into the original AT&T unlimited plan for iPad and now they allow FaceTime over 4G, I was ready to come back. AT&T has more LTE 4G coverage now than they originally had as well. Also I was running out of space regularly on the 64GB model. The other thing I appreciate is the Lightning connector for charging/syncing. It’s nice to finally be able to use one cable to charge both my iPad and my iPhone 5s.
The Bottom Line
The iPad Air is better in every way over its predecessors. There’s nothing really revolutionary about it though. It’s an iPad and it works just like all other iPads before it. It’s smaller, thinner, lighter in weight and faster. These are all the things we would expect from an upgraded device. Surprisingly though the price is the same and it’s amazing that it hasn’t changed since day one. The iPad Air starts at $499 for the 16GB WiFi version. That was the same price/configuration when the iPad launched back in 2010. If you were looking for a smaller, lighter weight, faster full size iPad, then you can stop waiting. This is the one you’ve been wanting/waiting for. While I wish the price had dropped $100, the iPad Air doesn’t disappoint and lives up the promises made by Apple. iOS 7 runs like a dream on it too. No issues to report so far.
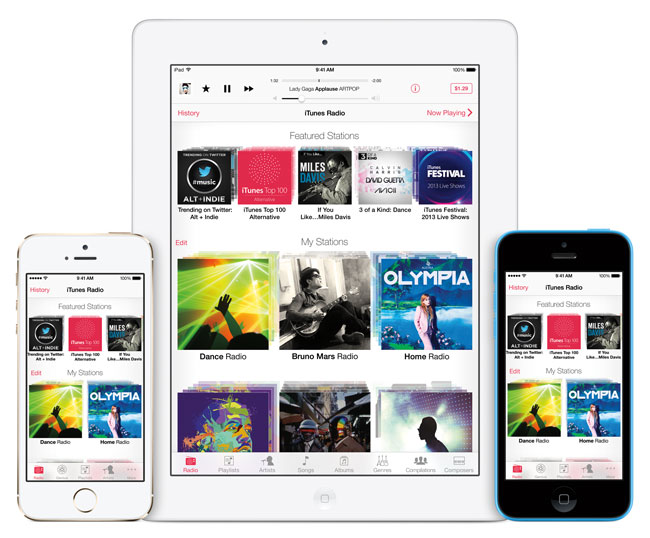
I was one of the ones anxiously awaiting the arrival of iTunes Radio. Before iTunes Radio I was a paid user of Pandora Radio. While Pandora does offer streaming Internet radio for free, I paid to avoid hearing ads. I like Pandora, but the beauty of iTunes Radio is that it would integrate right into iOS 7, iTunes on Mac/PC, and Apple TV. Like Pandora you create stations from your favorite artists, songs, genres, etc. iTunes Radio will sync all your stations to all your devices automatically via iCloud. The interface is pretty clean and consistent for the most part.
Getting Started
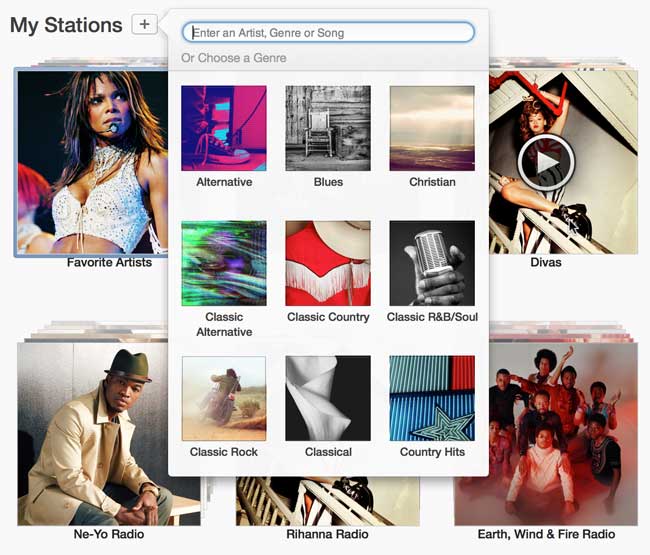
It was really easy to get started. Launch iTunes Radio on an iOS device or go to in iTunes and tap/click the + sign to add a new station. Key in an artist, song, genre, etc. and you’re done. You can add additional artists, songs, etc. if you like. I also LOVE the ability to add artists that I NEVER want to hear! (Justin Bieber). I don’t know if there is a limit on the number of stations you can add, but I was able to add in several with no problem.
Music Playback and Repeats
The audio quality is excellent and I’ve used it both on WiFi at home and 4G on the road and in my car with no problems or skips. I did have one problem station that I ended up deleting and recreating. It actually got stuck playing the same 3 songs in a row over and over again. Once I got my stations sorted out with favorite artists and artists to never hear from, I have been using it every day. I have noticed that it does play a lot of the same songs repeatedly, especially when starting out at the beginning of my day. It seems that only after I’ve listened for a while (at least 3 songs) do I start to hear new songs. Luckily the songs it repeats are ones I really like.
Skipping Tracks and Thumbs Down
You can skip up to 6 tracks per hour per station. This is similar to Pandora. Due to the licensing restrictions from the music industry you can’t just keep skipping songs until you hear the one you want. One of the odd interface things in iTunes Radio is that at first glance there doesn’t appear to be a way to thumbs down or tell it that you never want to hear a particular song again. You CAN do it! However, it’s oddly hidden under the Star icon. At first glance I figured the Star was to mark songs that I like (thumbs up). It wasn’t until I tapped on it on my iPhone and discovered that it’s actually a menu that contains the choices “Play more like this”, Never Play this Song” and “Add to iTunes Wishlist”
Your stations can also be shared with your friends and family or on social media. You can also turn on/off explicit lyrics.
Costs and The Bottom Line
Like Pandora Radio, iTunes Radio is FREE with Ads. However, if you are an iTunes Match ($25/year) customer (and I am) then you won’t hear ads on the devices that you have set up for iTunes Match! This works out to be a cost savings for me ($3.99/month) since I already had iTunes Match and was able to stop my Pandora Radio subscription. If you hear a song you like and want to buy it there’s a button in the upper right corner that lists the price. Just tap it and buy the song. Also each station keeps a “recent” history so that you can go back through and see which songs have played and buy them if you like.
While I like the potential of iTunes Radio and how it’s integrated into all my devices, it will take a little more time to see if the music really works itself out. I have used Pandora Radio for over a year and with the thumbs up and thumbs downs that I’ve done over the past year, I could listen to Pandora for hours on end and hear music that I liked. It will take time to train all my iTunes Radio stations the same way.
As far as improvements go, I’d love the ability to restrict a station to only songs from a particular artist. I’m sure this is probably against the licensing agreements, but it would be nice.
If you’ve upgraded to the latest iTunes (and you’re running on a newer Mac/PC OS – Lion or above on Mac) you’ll have iTunes Radio right in your Music section. If you’ve upgraded your iOS devices/Apple TV you can check out iTunes Radio right in the Music App or main menu.
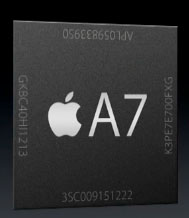
Having been an iPhone user since the 1st iPhone back in 2007, I’ve grown accustomed to Apple’s annual release cycle and the evolutionary nature of the iPhone updates. Apple typically does a redesign and new form factor with each major number iPhone 3g, 4, 5, etc. and under the hood update with the ones that come out in between such as the iPhone 3GS, 4s and now the 5s. Therefore I was not expecting any major changes in the 5s. Apple did most of the work on this model under the hood. As a matter of fact the iPhone 5s and iPhone 5 have the exact same form factor. iPhone 5 cases should fit perfectly on the 5s. However, under the hood the iPhone 5s sports a new A7 chip and 64bit processing. In layman terms the 5s is MUCH FASTER than all previous models of iPhone. Also as with all 32bit to 64bit transitions, the applications have to modified to take advantage of the new speed/pipeline. You’ll notice the new Apps in iOS 7 that are built-in will run faster. I was blown away by how fast Safari runs on the iPhone 5s. I may use it more than I used Chrome on the iPhone 5.
What’s New?
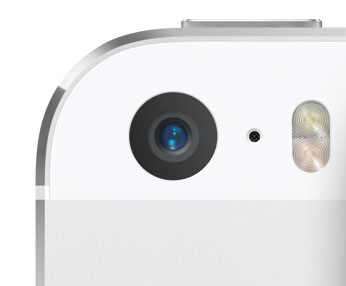
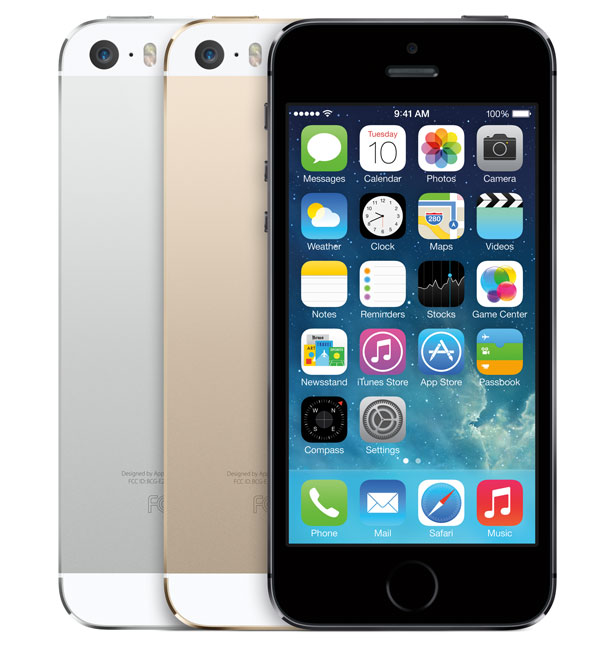
Like I said above most of the work went into the inside of the iPhone 5s. On the outside you’ll have three new color choices: Gold, Silver and Space Gray. I had always gone with a Black iPhone and this time I was looking forward to getting the Gold one. However, Gold sold out instantly and by the time I got a chance to get mine it was Space Gray. The Home button is now a finger print scanner as well as a physical button. The little white iconic square on this button is gone now. The only other thing you’ll notice on the outside is the new dual LED flash near the camera on the back. More on that in a moment. I opted for the 64GB model as I was constantly running out of room with my 32GB iPhone 5. As a matter of fact I was looking to upgrade regardless of what the new features were just to get the higher capacity. I have over 400 Apps, thousands of photos and other content. On the inside you’ll find the speedy new A7 processor as well as the new M7 motion co-processor to offload a lot of graphic work and battery saving techniques from the main processor. Lastly the other major improvement is the iPhone 5s camera.
How’s the speed?
The speed is noticeable throughout the phone. You’ll feel the difference right away in all the built-in apps. However, third party apps will really need updates before they feel faster. Aside from third party apps, everything else seems instantaneous.
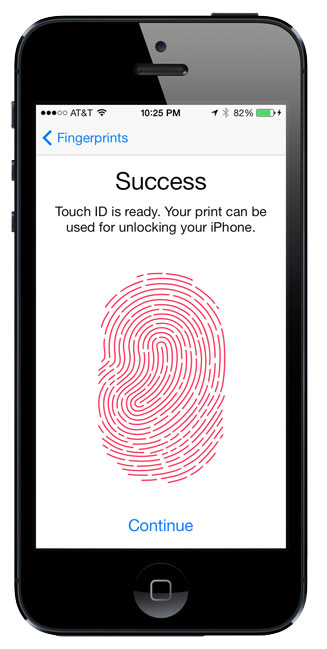
Does the fingerprint scanner really work?
There were two things I was most interested in besides just having more capacity (64GB vs 32GB). The first one was the new camera and the other one was the new fingerprint scanner. When you set up your iPhone 5s you’ll be prompted to set up the built-in fingerprint scanner to recognize your fingerprint/thumbprint. You can configure up to 5 different finger/thumb prints. The process is very easy and it records your fingerprint at multiple angles so that you don’t have to place your finger/thumb on the sensor at the same spot each time. Once you have it set up, you will then be able to unlock your iPhone 5s just by holding your finger/thumb on the sensor for a couple of seconds. There’s no need to even swipe to unlock. You can also use your finger/thumb print for iTunes purchases. No need to enter your Apple ID password. I have to say that I’m really impressed with just how well it works. I had to record one of my prints over again, but after that it works every single time now. People ask me things like what if you have a cut on your finger? Or your finger is wet, dirty, etc? Keep in mind that you have up to 5 fingers to use. Lastly if all else fails you can simply enter your passcode. So to answer your question, does it really work? The answer is YES! It works great! Better than I expected and better than other fingerprint scanners I’ve used in the past.
How’s the new Camera?
The iPhone is the most popular camera in the world! There are more images posted online that were captured with iPhone than any other camera. As a photographer I’m always taking pictures with my professional Nikon DSLR bodies. When I have my pro gear I use it. However, there are many more times that I’m out and about and the only camera I have with me is my iPhone. The camera on the iPhone 5 was already pretty good, so any improvements are/were welcome. The new iPhone 5s camera features a lower f/2.2 aperture. It has the same 8 megapixel resolution, but it also has larger pixels 1.5µ in size. While there are smartphones out there with more megapixels, most photographers know that more megapixels don’t automatically equal better quality. There are several factors and Apple gets it. The new f/2.2 aperture and larger pixels means better low light performance. Couple that with a industry first of a dual LED flash that flashes warmer or cooler depending on the lighting conditions of the room and you have the potential to have better photos from here on out. The new iPhone 5s camera also features both a burst mode (thanks to iOS 7, yes it works on the iPhone 5 as well) that can shoot up to 100 stills by simply holding down the shutter button and a new slow motion video capture feature.
Here’s a sample I captured using the slow motion feature:
The iPhone 5s comes in the same 3 capacities of 16GB, 32GB, and 64GB and is available on all the major carriers in the US starting at $299.
What are my favorite features in iOS 7?
Even if you’re not getting a new iPhone, you can still benefit from upgrading your current iOS device (if it meets the minimum specs) to iOS 7. See My 7 Favorite iOS 7 Features here.
The Bottom Line
As with every iPhone review I do, at the end I tell you whether or not the new iPhone is worth the upgrade? You should be used to hearing this by now, but here goes. If you’re currently on an iPhone 5, especially if you’re under contract, you can probably sit this one out and wait for the iPhone 6. Yes the iPhone 5s is better than the iPhone 5, but not enough to spend more than you have to to upgrade. Now if you’re on a 4s on down, then yeah it’s time! The iPhone 5s is leaps and bounds better than the iPhone 4s or iPhone 4. You may also be wondering about the iPhone 5c. I have to admit that other than knowing that it comes in colors and it’s cheaper than the iPhone 5s, I really don’t know much about the 5c. I saw it and knew that it wasn’t for me so I didn’t spend any time checking the features of it.
I’ve reviewed several iPod music docks here over the years. Starting with the Bose SoundDock I’ve had an appreciation for these music devices to dock my iPods back in the day as well as my iPhones over the years. As a matter of fact I used to smile when I’d walk into a hotel room and see an iHome or other similar device on the nightstand. This meant that at a minimum I could dock my iPhone and charge it overnight even if I had no plans to listen to music via the dock’s speakers. Well those days are over, or at least I thought they were when I got an iPhone 5. Apple has aggressively phased out the 10+ year old 30 pin dock connector found on several of these music docks and in most modern cars. While Apple does sell Lightning Adapters to adapt older 30 pin connectors to the new Lightning connects found on the iPhone 5, newer iPods and current iPads. The problem is that compatibility can be hit or miss. Some may still play music, but not charge the device.
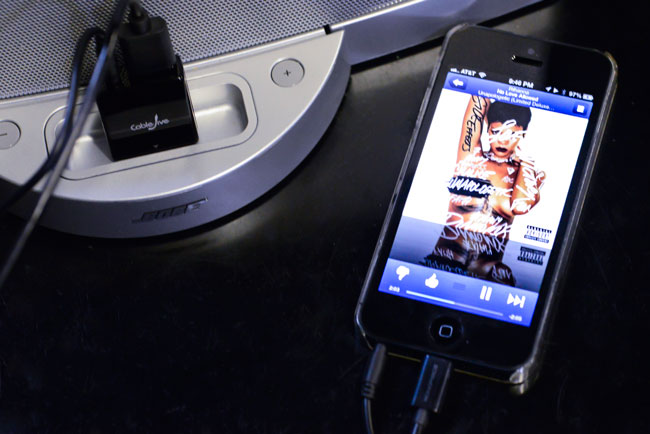
Enter the CableJive dockBoss 5
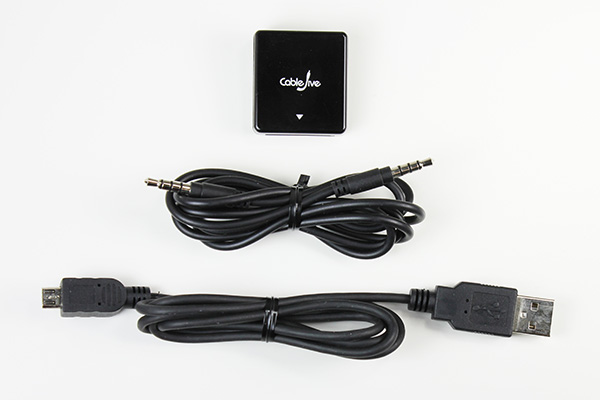
The dockBoss is an adapter for the older 30 pin based docks and on the other end is a standard USB port and 3mm audio-in jack. Instead of simply converting the older 30 pin connection to a Lightning connection, the dockBoss 5 converts to a standard USB port for power and a standard audio-in port for music. This means that not only can I use my iPhone 5 on any of these devices, but I can use my iPad or any other handheld device or smartphone. I now travel with a dockBoss 5 in my luggage. When I arrive to an iPod dock equipped room I just plug in the dockBoss and one of my regular USB-to-Lightning cables. Now my iPhone is charging without me have to search for a plug by the bed (some hotels still don’t get this need) and if I want to listen to music I can plug in the supplied audio cable that comes with the dockBoss 5 (as pictured above). If I don’t care to listen to music then it’s just a single cable connection. Also note that the dockBoss 5 includes both an audio cable and standard micro USB cable for connection to most other smartphones and other portable devices.
The Bottom Line
Since Apple retired the 30 pin dock connector most portable music player manufacturers are now leaning towards bluetooth and wi-fi for connectivity for there new devices. However, if you’ve got an older music dock that works perfectly there’s probably no reason to throw it away! With the dockBoss 5 you can get more life out of it and make it compatible with other devices that it never worked with before.
Sometimes you can be so focused on what you do professionally that you totally overlook what’s out there for fun. Both Adobe Photoshop Lightroom 5 and Photoshop CC are at the heart of my day-to-day photography workflows. Many of you have heard me talk about Adobe Revel in the past. I had begun using it as my portfolio App on iPad. I loved that it sync’d my photos from Lightroom to the cloud and instantly to my iPhone and iPads. However, the one BIG THING that was missing from the iOS apps was a “slideshow” feature. Sure you could swipe the images, but you couldn’t simply hit play and let them run. The beautiful new redesign of Revel 2.0 changed all that. The app is gorgeous and has many new features that has me using it as my Portfolio app again. Let me share some of the other updates with you that you may have missed…
What’s Adobe Revel?
Adobe Revel is Adobe’s “consumer” based photo sharing service. It’s FREE to use for those with modest needs. With the FREE account you can upload an unlimited number of photos in the 1st 30 days after setting up your account and then 50 photos a month after that. If you “need” more than that you can go UNLIMITED for $5.99/month. Yes, that’s unlimited imports, no limits ever. Once you upload your images to Revel they are instantly available on your Mac, iPhone, iPad and iPod touch (Windows and Android is in the works, but no timeline for when they will be available). As with other services like Flickr. com, most will only need the FREE account, but if you want to handle a lot of photos each month you can go unlimited whenever you want.
Download Adobe Revel for Mac here:
Download Adobe Revel for iPhone, iPad and IPod touch here:
Why isn’t this a part of Creative Cloud?
Adobe Revel is on the consumer side of the house and the consumer offerings from Adobe (like Photoshop Elements) will remain separate from the professional offerings in Creative Cloud.
What do the Mac and iOS Apps let you do?
In addition to uploading your photos, the Mac and iOS Revel Apps allow you to do non-destructive edits to your photos. Think of it as a Light version of the Lightroom develop module for consumers. It’s all slider based and like I said, 100% non-destructive. Once you make edits on one device those edits are automatically sync’d to all your other devices. This means that you always have the most up to date photos with you. You can also use the App to display your photos on screen or via AirPlay to say an Apple TV.
How does this work with Lightroom 4 and 5?
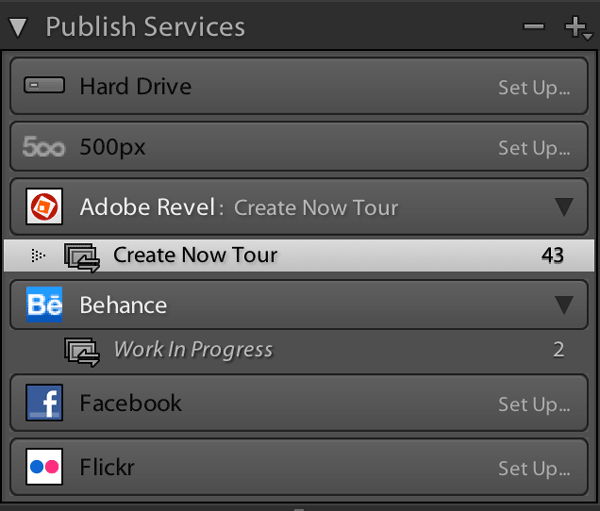
Lightroom 4 had a Revel Publish Service built-in and Lightroom 5 has a plug-in that you can download for free that does the same thing. Get it here. When I sign in to the Revel Publish Service I see my Revel libraries and I can create collections (or better yet, Smart Collections) that represent my portfolios. This means that I can publish my best/favorite images from Lightroom directly to Adobe Revel. I have created a Smart Collection in the Revel Publish service for each of my portfolios. When I update the regular Lightroom collection with new images, all I have to do is hit the Publish button in the corresponding Revel Publish Service Collection and my images are uploaded and my iPhone, iPad and Mac are updated. This has been the easiest way for me to carry my “CURRENT” portfolios around with me on my various devices. Yes the images can be viewed offline too. Actually if it weren’t for the Lightroom tie in I wouldn’t be half as excited about Revel. Since all my photos live in Lightroom it’s the hub of all my photographic workflows.
You mentioned a NEW photo sharing workflow. What’s NEW?
Everything I mentioned above is pretty much old news to Revel. The 2.0 iOS Apps and rate plan changes have been out for a while. What’s new is a couple NEW iPhone Apps. The 1st one is called Grouppix. I reviewed it here last week. When you and your friends download this FREE App, one of you can create a “shared” Album and invite the other to it. At that point anyone that has access to the album can upload pics to it and you all see them. This is GREAT for events such as parties, weddings, conferences, etc. Now everyone will have access to all the photos. That’s pretty cool, but what I didn’t realize right away is that those albums are powered by Revel! If you’re a Revel user those Grouppix shared albums show up in your Revel account. This also means that they show up in the Lightroom Publish Service. This makes it really really really easy for me to not only share photos I’ve taken with my iPhone, but also the ones I’ve taken with my DSLR. I can import my DSLR photos into Lightroom 5, select my picks, Develop them and add them to a Revel collection (Grouppix album), hit Publish and everyone that’s on the shared Grouppix album now has access to them. I did this last week during the Adobe Create Now Tour in APAC and it worked GREAT! If you’re into video there’s also a consumer based video editing app for iPhone called Video Bite. Yep it’s free too. It’s basic, but hey it lets you put clips together quickly and output a final movie right on your iPhone. Also did I mention that it’s free?
Get Adobe Grouppix for iPhone here:
Get Adobe VideoBite for iPhone here:
Learn more about what Adobe Revel has to offer here.
I just wanted to take a moment to say THANK YOU for subscribing to my YouTube Channel. I just blew past the 75,000 mark and I’m thrilled that so many of you like my content. Having over 75,000 subscribers and over 13 Million Views is no small accomplishment and again thanks.
My Learn the Adobe Creative Suite with Terry White App has now been rebranded to “Learn the Adobe Creative Cloud with Terry White” as well as some bug fixes. Be sure to download the update. (note – I did have one person tell me that he’s having issues with it on iPad 1. So if you have an iPad 1 you might want to hold off till I confirm).
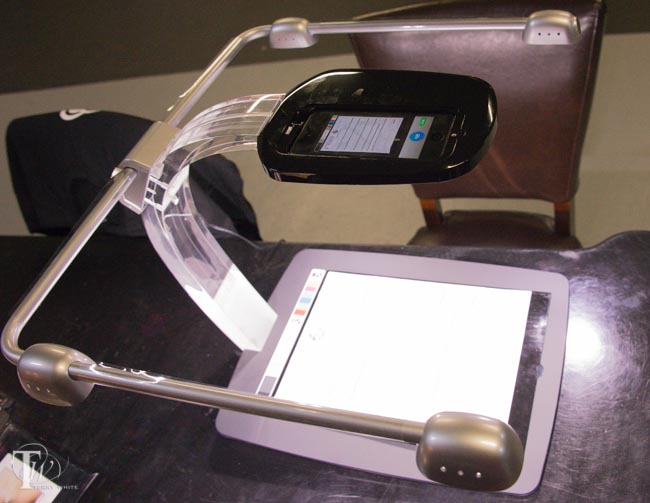
I have been using my iPhone to scan documents for a long time now. My App of choice is Scanner Pro. However, no matter what phone you have or which App you like, the problems of scanning documents are universal. You have to deal with lighting and positioning the document in just the right spot. Also if you’re scanning multiple pages chances are each one is going to be slightly off in terms of orientation, cropping, etc. due to not being able to hold the phone in the same spot for each page. Atiz, the makers of Scandock, want to solve this problem.
Scandock turns your smartphone into a document scanner
This combo hardware device and App will turn an ordinary iPhone or Android camera into a fast, efficient document scanner. I must admit that when I received my review unit that it was way more than I expected in terms of size, craftsmanship and design. I thought “whoa! They’re serious!” It took me about 5 minutes to put it together, plug it in and download the free Scandock App. Once I had the App, I placed a document on the bed and immediately noticed that they have a mat that’s designed to smooth out/hold down folded papers. I tapped the scan button on the App and like with any photo, it only takes a second and you’re on to the next page. Certainly faster than the fastest sheetfed scanners out there because it literally takes a second. It takes more time to position the paper than to do the scan. If you are scanning more than a few sheets then it will probably be on par with the time it takes to do it in a sheetfed scanner, but way faster than a flatbed scanner.
As you would expect, the App allows you to convert the document to PDF and share it. The one feature that blew me away was the multiple-doc feature. This feature allows you to place multiple items on the bed at once, such as several receipts or business cards, and it will auto-detect and scan each one as a separate document. I’ve not seen a smartphone App do that before. The built-in LED lights are the key to this device. By evenly lighting your documents you never have a shadow of YOU holding the phone over the document. There are trays for both iPhones and Android smartphones. You can even get it in Black or White.
The Bottom Line
Sounds great! Does everything that I would expect and more. What’s the downside? The only real downside to this solution is the asking price. At $499 (B.Y.O.D.) it will be out of reach for many and puts it in direct competition with other document scanners. Granted, other document scanners require a connection to a PC/Mac (which probably costs more than your smartphone) and perhaps the newer “Post PC” generation will see the benefit of this kind of solution.
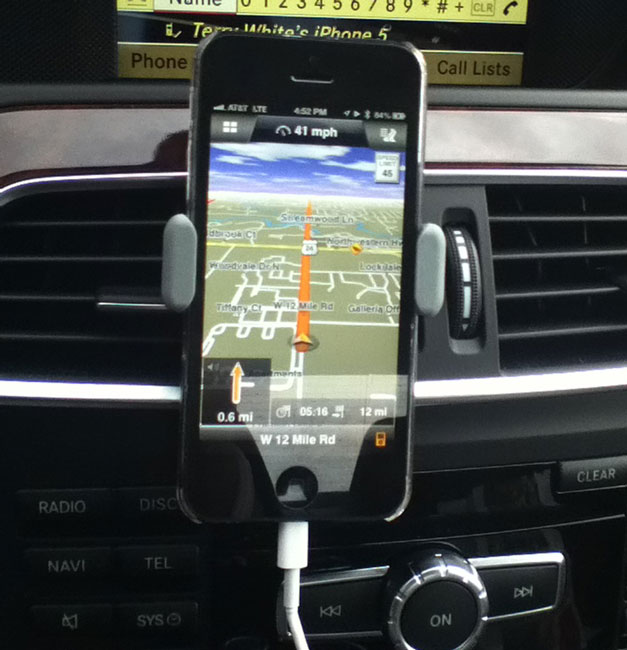
iPhone 5 mounted to the air vent via the Kenu Airframe and running Navigon North America turn-by-turn GPS App.
I have been searching for the perfect car mount for my iPhone 5. All the ones I’ve seen or used to date were either too big or too cumbersome. Let me first explain that I also want a mount that I can travel with and use in rental cars. Most mounts fall into four categories. They either attach to the windshield, dashboard, cup holder or air vent. While the air vent ones I’ve used fit the bill for the most part they usually don’t travel well because they are too delicate or have too many pieces or are simply too big. I like air vent mounts and dashboard mounts best as they position the phone at a comfortable eye level to minimize distraction.
The Kenu Airframe is exactly what I was looking for
1. It mounts my iPhone 5 on the air vent. 2. It accommodates most phones even with their cases on. 3. It’s easy to clip the phone onto it and remove it (spring loaded). 4. It rotates to either vertical or horizontal. 5. It works on just about any vent style (round, rectangle, horizontal vents or vertical vents). 6. It slides right onto the vent in 2 seconds. 7. It’s small and very easy to travel with.
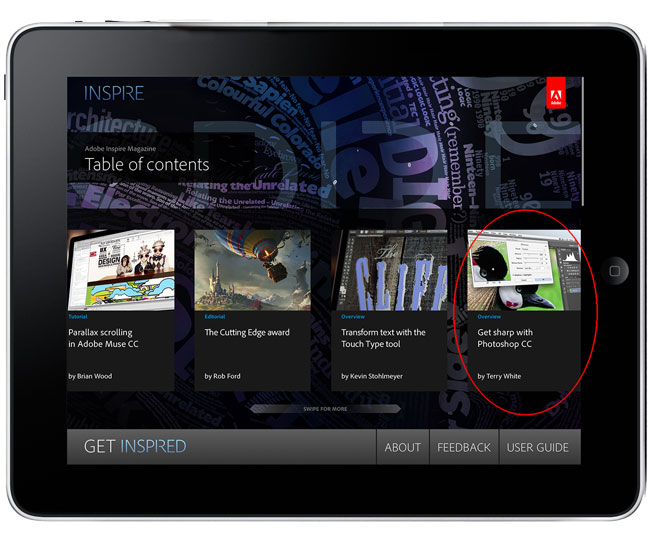
The June 2013 issue of Adobe Inspire Magazine is here! This month’s issue contains articles on Adobe Muse CC, Photoshop CC, the CSS Designer in Dreamweaver CC and more. There’s even an article and video from yours truly on Photoshop CC’s new Sharpening and Upsampling capabilities.
Adobe Inspire is a FREE digital publication created with the Adobe Digital Publishing Suite (DPS) and you can get it here: