
When I got my DJI Mavic Pro drone
Your Mavic Pro settings will make or break your images
Continue reading “The Best DJI Mavic Pro Drone Photography and Video Settings”


Welcome to my technology blog!
When I got my DJI Mavic Pro drone
Continue reading “The Best DJI Mavic Pro Drone Photography and Video Settings”
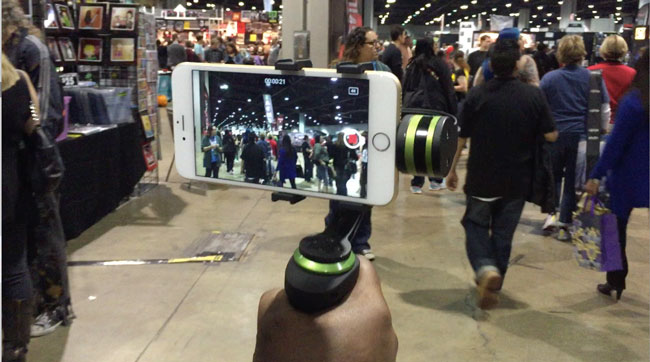
A good video has great light and good sound. A great video is short, great content, good light, good sound AND STEADY. A shaky unstabilized video may cause your viewers to stop watching for fear of getting motion sickness. While smartphones can capture great video quality these days, the small form factor is hard to hold steady if you are moving or walking. The iPhone 6s Plus can shoot stabilized video and I can stabilize it in post with Adobe Premiere Pro CC. However, if you’re walking your video may be so shaky that the stabilization methods above may not be enough. That’s where a gimbal comes in…
Continue reading “Improve your smartphone video recording with the BEST 3 axis gimbal”
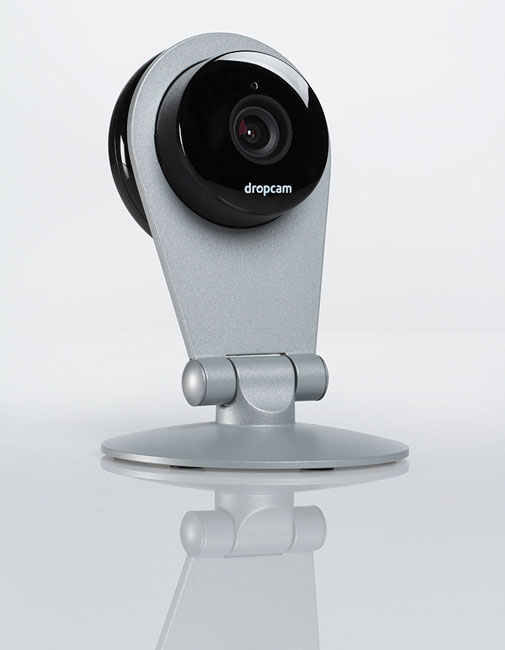
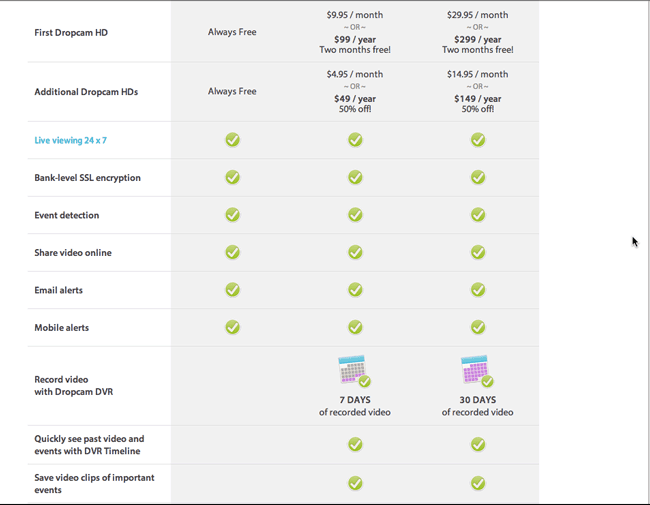
I’ve been using Panasonic IP webcams for years to keep an eye on things at home and at my studio. However, Panasonic has gotten out of this business and therefore it was time to look at newer cams to recommend to people that ask. I was intrigued by the Dropcam HD and finally got a chance to try one out. Dropcam HD is a 720p HD WiFi enabled video monitoring camera. It also broadcasts sound. Unlike the Panasonic cameras, Dropcam is both a hardware solution and service. During the setup process you configure a Dropcam.com account along with setting up the hardware. You have a choice of a “free” live viewing only account or a paid Plus or Pro account that not only allows you to view your Dropcam live, but also see either 7 or 30 days of recorded video respectively. The idea is that if you’re using it as a security camera that you’re not going to be watching it 24 hours a day. Therefore Dropcam will automatically record and keep the last 7 or 30 days of video so that you can review it if need. However, even with the Free account you can setup motion detection that can alert you that something is moving in front of your camera so that you can tune in immediately and watch.
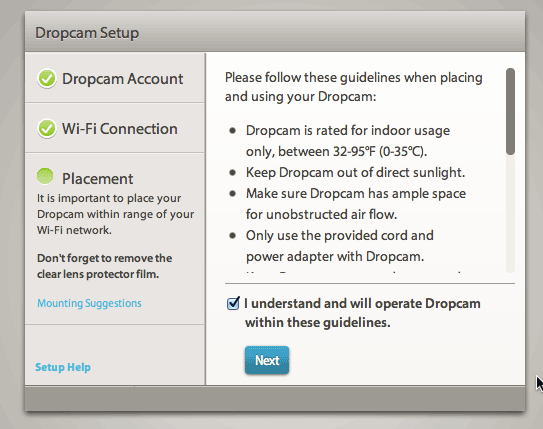
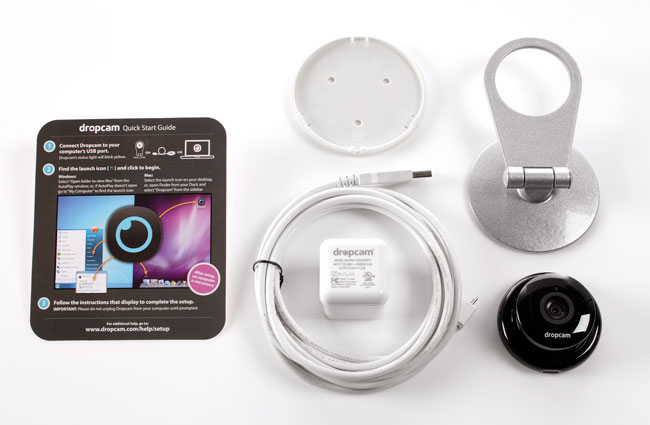
The initial setup couldn’t have been easier. Dropcam HD comes with a stand/mount, 10 foot long USB cable and USB power adapter. You plug the Dropcam HD into your Mac or PC initially and it mounts on your desktop as a volume containing the setup utility. No need to even download anything. During the setup you join the Dropcam HD to your existing WiFi network including password protected ones. You also setup your account on Dropcam.com during this process. Once you’ve got it setup, unplug it from your computer and place it where you want to monitor (indoor use only) and plug it into a AC wall plug. Once the camera powers up and connects to your network the setup completes. The mount can be either used on a desk, bookcase, etc. or you can wall/ceiling mount it. It even comes with the screws and anchors. Also the camera can easily be removed from the mount. It just pops in and out. Also the indicator light can be disabled for more discretion.
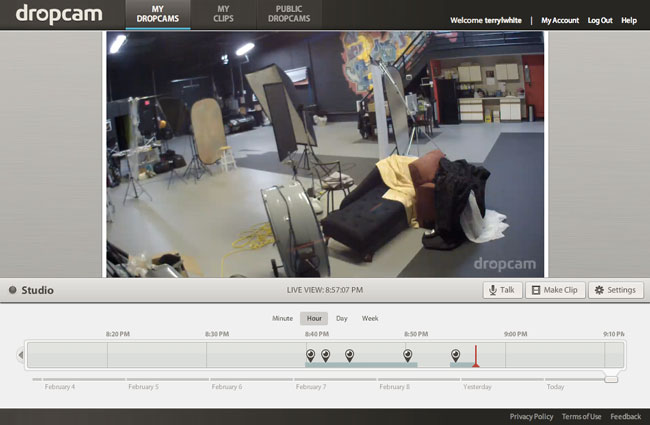
I was really impressed with the image quality. Definitely much better than the standard def/low def Panasonic cameras I’ve been using. You can watch the image in a Flash enabled web browser on your Mac or PC or you can download their mobile App and watch the stream live on your iOS or Android devices. See my review of the iPhone/iPad App here.
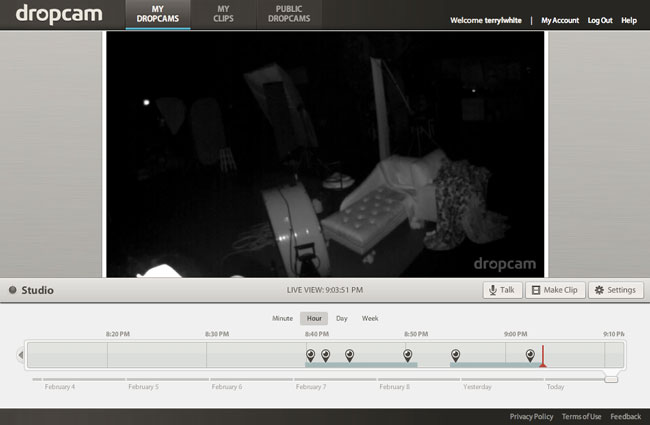
Unfortunately the room you’re monitoring may not always have the lights on especially if you’re not home. I was happy to see that Dropcam HD uses infrared technology to show you what’s going on even in the dark. It automatically switches to night vision when the lights go off and off again when the lights come back on.
Dropcam HD is a very well thought out process and the company doesn’t rely on any other company or software to make their solution work. This is a good thing as many other solutions lack things like mobile apps or online recording. The image quality is exceptional and exceeded my expectations. You can setup multiple Dropcam HD units. You can do two way audio and it has digital zoom. While this hardware/service solution works as advertised there are a couple of things that would make it better. First off there’s no way to rotate/swivel the Dropcam. It’s a fixed camera and therefore can only cover the range that the built-in lens covers. With that said, the lens covers up to 107° field of view, so this may not be an issue for most. The next thing is that while it comes with a USB power adapter, it’s unnecessarily wide and you may have an issue plugging it in to an multiple plug outlet next to another plug. There’s no reason why it couldn’t be skinnier. The only other thing you might consider is that Dropcam uses about 60GB of bandwidth a month. Depending upon your ISP/plan this may be an issue. Comcast for example thinks anything over 300gb a month is excessive! As you can see I can’t find a whole lot wrong with Dropcam HD. I’m impressed and will look to replace my older Panasonic units with Dropcam HDs.
You can get Dropcam HD here.
You can also check out Dropcam on Facebook here.

Adobe InDesign CS 5.5 improves in the areas of Digital Publishing to devices. It addresses the number one request from our ePUB authors and that is the ability to embed video in your exported ePUBs and yes those videos play on the iPad (or any other ePUB 3.0 standards compatible device). We've also made some improvements on allowing you to layout your publications for print, but also dictate the order in which elements are exported to ePUB using the new Articles Panel. Another major improvement is the ability to either have InDesign generate your ePUB cover from the 1st page of your document or linking to a specific image that is optimized for a small size "bookshelf" on a device such as the iPad's iBooks App. Here's a video on how some of these features work:
httpv://www.youtube.com/watch?v=5bBNrMoKz0Q
The video below walks you through some of the enhancements to the Digital Publishing Suite in InDesign CS5.
httpv://www.youtube.com/watch?v=4HR_LdlM31s
See Greg Rewis' post on what's new in Dreamweaver CS5.5 for HTML 5 and Mobile Authoring here.
See Jason Levine's post on what's new in Production Premium CS5.5 here.
See Paul Trani's post on what's new in Flash Professional and Mobile App development here.
Learn more about Creative Suite 5.5 including a New Subscription pricing option for those that don't want to or need to "buy" Creative Suite Products here.
Also see more CS 5.5 videos on Adobe TV. In case you missed it, Adobe TV can now be viewed on your iPad.
As you know Creative Suite apps have typically reved every 18-24 months. The world is moving faster than that and many of our publishing customers need solutions for publishing to new devices and in new formats sooner. Now you will see Adobe introduce a major milestone release ever 24 months and a mid-cycle release every 12 months. Johnny L is here to tell us all about it:
httpv://www.youtube.com/watch?v=niE9VT8Yjbo
We will be hosting a live Q&A Today (4/11/2011) on Facebook at 12:00 noon EDT (GMT -4). Join me and the other Adobe Creative Suite Evangelists, Jason Levine, Greg Rewis, Paul Trani for an hour to answer your Creative Suite questions.
Here's the link for the live Q&A

I'm about to head off on the CS5 Evolution Tour with my Adobe Evangelist colleagues!
Details here.
Schedule:

Adobe Photoshop Lightroom has had web galleries since day one. You can either export out an HTML gallery of your images or a Flash Gallery of your images. Each one of course having its advantages and disadvantages. I find that photographers in general like Flash galleries because of two things: 1) they're (pardon the pun) flashy. You get transitions, animations, zooming, automatic slideshows etc. 2) they offer one more level of image protection by making it harder for people to just right click and download the images. The disadvantage is that not every device can display Flash galleries. If you go with an HTML gallery it can be seen on just about any device, but you lose the flashy appeal.
Up until yesterday my photography website was all Flash with an HTML fallback. I loved the features of my template. I loved the animations, image fading and slideshows and while I did have an HTML fallback for those that couldn't see the Flash site the biggest problem was keeping them BOTH up to date. The Flash site was driven by XML and was pretty easy to update with new images.. The HTML part was driven by a Lightroom web engine (more on that later) and required a separate export and upload each time I needed to do an update. It wasn't the end of the world to update them both, but I found myself updating the Flash site more often (because it was faster), which meant that people on non-Flash devices/computers wouldn't see my latest images. Not good!
What's this HTML 5 thing anyway? HTML 5 is next standard of HTML and it's still very much a WORK IN PROGRESS. This is why you don't see a ton of tools for it yet. Also and probably the biggest thing to note is that HTML 5 may never do all the things that Flash can do. This means that it's not a direct one to one replacement. At least not today for sure. HTML 5 authoring isn't just one thing. It's using HTML 5, CSS3 and Javascript. . Actually it's CSS3 that's the really interesting part. If you're really interested in developing in HTML 5 Adobe has already released the HTMl 5 pack for Dreamweaver and Illustrator. Check them out on Adobe Labs. More tools are in the works! Back to the photographers…
I started thinking about my site and the fact that it was a pain to update and therefore I wasn't updating it as often as I'd like to. Then I started listing the ideal things that I would want to have to make it easier:

Once again The Turning Gate has come through for me. You might remember my post on using one of their web engines for my client review galleries. Since that review went live I've been working with Matthew Campagna at TTG on the ultimate solution to my goals. After countless emails back and forth (he's a great guy!) on what I wanted and tweaks to his engines based on my feedback I was able to create my entire site from scratch using Lightroom 3 and three TTG plug-ins.
Continue reading “Creating an HTML 5 Website for Photographers in Adobe Lightroom 3”
httpv://www.youtube.com/watch?v=eD8rIl2JKg0
In the final installment of this series, Adobe Worldwide Evangelist Jason Levine takes you through the process of exporting/rendering your DSLR video/stills creations using the 64-bit Adobe Media Encoder. He'll talk about some of the most common formats for going to mobile devices, iPods, blu-ray discs as well as common formats for Web delivery. You'll learn about background rendering and the ability to 'queue' multiple versions of your video edits. Also featured: using *presets* in the Media Encoder for your favorite destinations (like YouTube, Vimeo, HDTV, etc)
Download a FREE fully functional 30 day Trial of Adobe Premiere Pro CS5 and work right along side Jason.
Continue reading “Getting Started with DSLR Video for Photographers – Part 5 of 5”
Last week I mentioned that Adobe Illustrator 5 got a NEW HTML 5 pack. This week you can see the video on how it works:
httpv://www.youtube.com/watch?v=B2VXeqwlZF8
Adobe's Worldwide Evangelist for Video and Audio, Jason Levine is back once again to give us his second installment on Getting Started With DSLR Video for Photographers.
Download a FREE fully functional 30 day Trial of Adobe Premiere Pro CS5 and work right along side Jason.
Continue reading “Getting Started with DSLR Video for Photographers – Part Two”
httpv://www.youtube.com/watch?v=4-jLuMgeALY
Adobe's Worldwide Video Evangelist Jason Levine is back to give us his multi-part video series on Getting Started with DSLR video for Photographers. Jason gives photographers a step-by-step tutorial on how to get going with video without being a video editing guru.
Adobe's Worldwide Web Evangelist, Greg Rewis returns to give us his 3rd installment on Creating HTML 5 and this time it's how to Get Started with HTML 5 Video. Greg shows how to use the HTML 5 Pack for Adobe Dreamweaver CS5 to create HTML 5 video that reaches the largest audience of viewers.
httpv://www.youtube.com/watch?v=r3xYyxLP9Ec