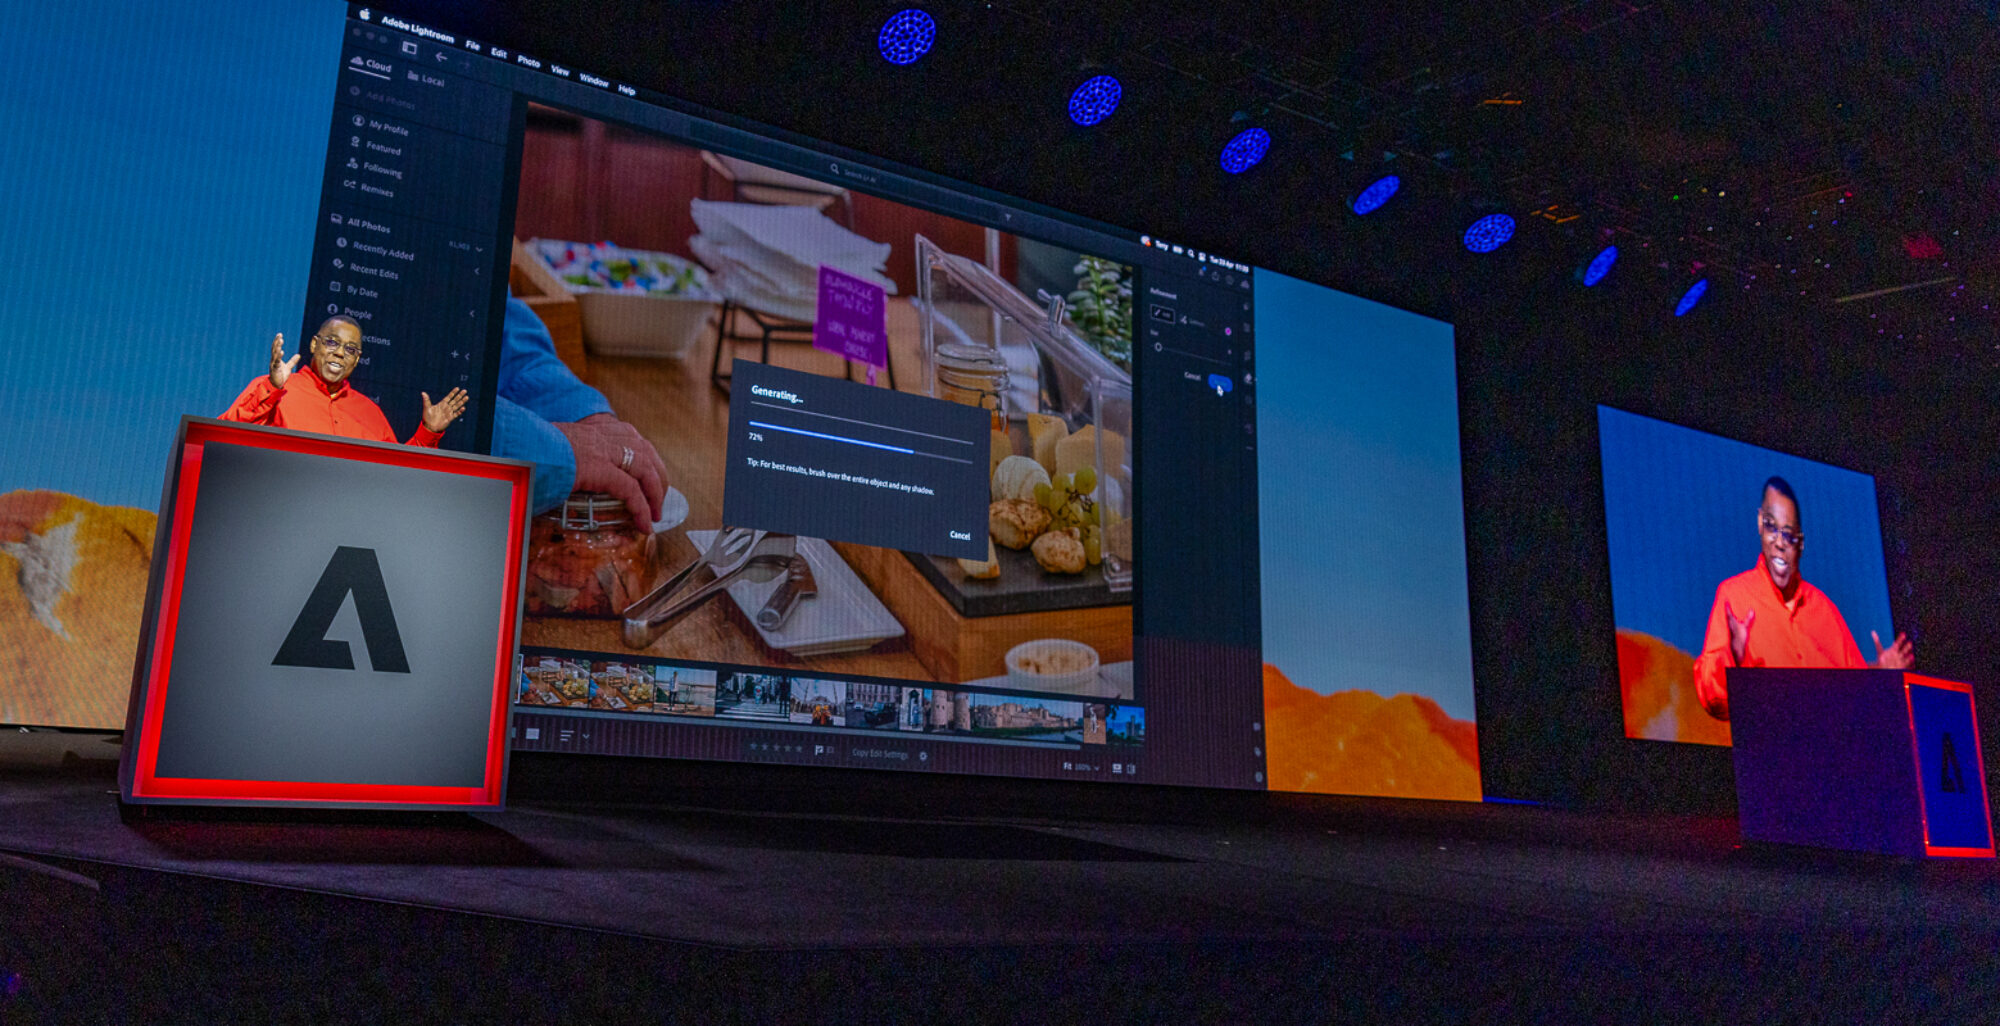
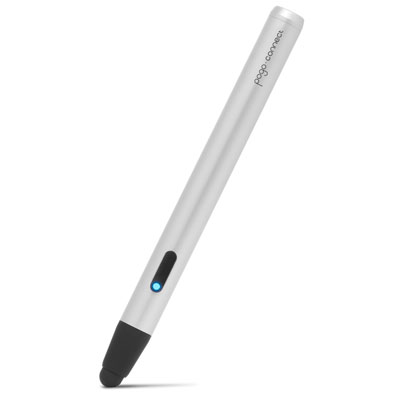
What could make Photoshop Touch on an iPad even better? Pressure Sensitivity! I wouldn’t dare retouch a photo on my computer without a Wacom tablet or Cintiq. Needless to say that means that up until now I haven’t done a lot of work in Photoshop Touch on my iPad. However, that may all change with the new Pressure Sensitive Stylus support now in Photoshop Touch and the Pogo Connect by Ten1Design.
Each year I put together my picks for the best Gadget Gifts to get that special someone on your Holiday Gift List. This year I decided to practice what I’ve been preaching and I’m releasing the guide as an iPad App as well as the web version. I built the App using Adobe InDesign CS6 and Adobe Creative Cloud. It’s interactive with videos, links and animation. The iPad App is a free download and while it’s focused on my top picks, you can access the full guide in the App as well.
Download it here:
I’ll be releasing the full version of my 2012 Guide on the web next week.
Anyone that follows me and follows my photography knows that I’m a fan of shooting tethered. Last week I had the good fortune of meeting with a TetherTools rep. She showed me some samples of their newer products for mounting iPads to various things such as tripods and tables. As you know I recently reviewed the clamps from TripodClamps.com. A product that I’m quite pleased with. However, I try not to put on blinders and I’m usually willing to look at other solutions. I’ve followed TetherTools for some time now as they relate to Digital Photography, but it was neat to check out their iPad products too. I left that meeting with a few samples: Wallee iPad Case for iPad 3 – Black, Wallee iPad Connect Bracket, Wallee Connect Lite BracketRock Solid Mini ProClampRock Solid Articulating Arm with Center Lock 7″ and the Handstrap. Now keep in mind that a couple of these pieces have overlapping functionality. For example you wouldn’t use the Handstrap and Articulating Arm at the same time. Nor would you use the Connect Bracket and the Connect Lite Bracket at the same time. I left with solutions for mounting an iPad in a variety of different situations.
Using Tether Tools in a way that they hadn’t thought of
On the flight home I decided to test a theory that RC, Brad, Pete and I had during the meeting. I decided to use the Tether Tools Wallee iPad Case, Wallee Connect Lite Bracket, Rock Solid Mini ProClamp and Rock Solid Articulating Arm to mount my iPad on my tray table. The idea was to get the iPad up and at a comfortable viewing angle and freeing up the table for the in flight meal. It worked great! As a matter of fact, had I had these for sale the flight attendant would have bought one from me on the spot. Actually that brings me to the problem with using it this way. If you’re buying this gear as a professional photographer and plan to mount your iPad as part of your digital photography workflow, then this makes a great solution. However, if you were buying this just to mount your iPad for inflight use then it would be a tad bit pricy and cumbersome to travel with. This solution could work very well for mounting your iPad as an inflight entertainment system, but it would need to be streamlined a bit. It would need to be sold at a lower price and as perhaps a single kit. There’s no doubt that you could use this solution in a variety of settings. Just last week I used it to record the video on the Pocket Socket generator that I reviewed. Yep, that was an iPad video with the iPad mounted to my desk. However, for the personal looking for a single solution for iPad travel then it would be overkill unless Tether Tools repackages it for that audience.
Be sure to check out Tether Tools’ other solutions for digital photography and iPad mounting here at tethertools.com.
The Adobe Creative Cloud offering just got a whole lot sweeter! Adobe has made the Digital Publishing Suite Single Edition (DPS SE) available to Creative Cloud Members offering them the ability to create an UNLIMITED number of iPad Apps at no additional cost. Build your Folio in InDesign CS6, use the newly update “Create App” feature of the Folio builder, which generates a .ipa (iOS App) file, upload your App to Apple or simply deploy on your provisioned iPads.
In this episode of the Adobe Creative Suite Podcast Terry White shows how to use InDesign to create iPad Apps without writing code. See the complete process from InDesign to the App running on my New iPad.
Are you missing out on my Bonus Content?
See more of my Adobe Creative Suite Videos on my Adobe Creative Suite Podcast and get the App here. It features EXCLUSIVE CONTENT that no one else gets to see. This episode has a BONUS CLIP that is available only in the App! My iOS App is a Universal App for iPhone, iPad and iPod touch. I also have an Android version on the Amazon App Store:
Adobe Revel is Adobe’s Photography Cloud Service. There’s currently a desktop Mac version and an iOS Version. With the Revel Service you can add photos from any device, do non-destructive enhancements and see those photos on any device. While Revel isn’t new, the 1.5 update adds the one feature that I’ve been waiting for – ALBUMS! Now that I can organize my photos in Albums (I know, simple concept right?) It just became much more useful to me.
The Lightroom Integration is the Key
Adobe Revel as a stand alone product/service isn’t that interesting for my workflow. However, with the updated Lightroom 4.2 (RC) Publish Collection plug-in I can now create Smart Published Collections that mirror my Portfolios (Collections) in Lightroom.
This means that when I update any of my portfolios (collections), all I have to do is press the Publish button in the Revel area and those portfolios are sync’d to the cloud and therefore my iPad, iPhone and other Macs.
The Syncing is the Key
There are some really great Portfolio apps for the iPad out there that do all kinds of cool things. Many let you customize them with your own brand, they have nice transitions and they allow for music to play during the show. GREAT! However, where most of them fall down is the difficulty in updating or keeping the portfolios current. For example, one of my Portfolios called “Recent Work” It has 24 images in it and after each shoot I put 1-3 images in and remove the oldest ones keeping it at 24. This takes two seconds in Lightroom. Now getting most Portfolio apps to reflect that update is often a very manual process. With Revel, I hit the Publish button on my “Recent Work” smart collection and my iPad is updated!
Is it perfect?
Well no! Most things aren’t perfect. Revel on iOS was not designed to be a portfolio app! It doesn’t have branding, music, transitions, etc. However, those kinds of things are much easier to add over time than getting the workflow right and getting the workflow right is the most important thing for me. Lightroom 4.2 with Revel 1.5 Album support is just about there.
Hands down, my favorite iPad Keyboard/Smart Cover is the Logitech Ultrathin Keyboard Cover. However, the one problem with it is the back (the surface that will be on the table/desk) is susceptible to scratches and the front really shows off fingerprints.
iCarbons.com answered my call and designed skins to cover both the front and back of the Logitech Ultrathin Keyboard Cover. You have a choice of colors and even a couple of simulated wood tones. I went with the dark wood and it works great. These skins are not permanent and can easily be taken off or repositioned as needed.
They also make skins for the iPad itself. Thanks iCarbons for answering my needs here and being the 1st to market with a cover for my favorite iPad accessory.
The more I travel, the more I see people using iPads (and to a much smaller degree Android tablets) in lieu of laptops. This is especially true on planes.
On my recent flights I’m seeing iPads out number laptops by about 5 to 1
In some cases I myself have gone on short trips and used just my iPad instead of my laptop. With more and more useful iPad Apps coming to market each day, I find that I don’t require a laptop nearly as much as I used to for day to day communications and social media activities. The iPad may never replace my need for a “work” laptop, but it certainly goes a long way towards reducing that need for things like email, web, expense reports, blogging, etc. That being the case I can see times where carrying just my iPad in my laptop bag is overkill.
Skooba Design has the answer with their New Skooba Tablet Messenger v.3
This new bag is designed from the ground up to be a tablet bag, not a laptop bag. It has a special pocket inside for a 10″ tablet.
It has plenty of room for the tablet and accessories such as a charger, sync cables, headphones, keyboard, Jambox speaker, etc. I was also pleased to see that it was large enough to also accomodate a 13″ MacBook Air. This makes it a great bag for me because I can really go light with just the iPad or if I think I may need a computer, I can still bring my MacBook Air without totally weighing it down. Since most TSA checkpoints don’t require that you remove your tablet from your bag, you can just send the whole bag through the x-ray machine.
I would say the only disadvantage that this bag has over my Skooba TSA Friendly Backpack is that it’s not large enough to carry my DSLR, but that’s OK because it’s so small that I can still carry a small camera bag and fit both under the seat in front of me.
Can you get by with just an iPad on a trip?
This question comes up all the time and my buddy Calvin Carson had a great suggestion: Before going on your trip, try using just your iPad for a day or two while you’re still at home. Do the same things that you would do on your trip. Then you’ll have a pretty good idea of whether or not you can get by without your laptop.
One of my favorite road warrior gadgets is the AirPort Express. I have several of them for AirPlay streaming around the house and studio as well as at least one with me at all times when I travel (it lives in my bag). See “What’s In My Laptop Bag.” I never had an issue with the design of it. I actually appreciated the simplicity of it being a compact self-contained router with flip out prongs to plug it into a wall outlet for power. It was fast, easy to setup and it just worked. Now that I not only have to demo cloud services for living, but also mobile Apps, I really appreciate being able to setup my own WiFi network on stage as well as my hotel rooms. The previous generation AirPort Express had 802.11n support as well as AirPlay and supported up to 10 devices simultaneously connected. It even supports connecting a USB printer for easy wireless printing. Yep, it was just about perfect what it was.
Apple changed it!
The new AirPort Express on top now comes with a freakin’ cord! Noooooooooo!
Apple quietly introduced a brand new AirPort Express model on Monday at the WWDC (along with new MacBooks and iOS 6 – yeah there was a speed bump to the Mac Pro too – sad that it’s virtually the same chassis as the Power Mac G5 and got no Thunderbolt or USB 3 love…). Although I was most excited about the new MacBook line up, I was quick to take a look at the New AirPort Express too. While the specs looked great, I cringed when I saw the back of it. Apple has gone away from the all-in-one design to one that is almost identical of the Apple TV. By that I mean that it now requires a power cord. This may not seem like a big deal and maybe it isn’t (I’ll be on the road with it next week), but I certainly will miss just flipping out the prongs and plugging it in!
The new one is slightly wider, but also slightly thinner.
On the plus side Apple added a second Ethernet jack so that you can connect not only the ethernet cable to your internet connection, but also plug in a device via ethernet for speed. Sadly though these still aren’t gigabit ethernet ports. Not sure how much I’ll need that second port on the road, but it’s nice to have. The new AirPort Express is also dual band (like the AirPort Extreme) simultaneously supporting 5Ghz and 2.4Ghz WiFi connected devices. It still has AirPlay and a USB port for printers as well as support now for up to 50 devices. It’s that last one that pushed me over the edge. While I personally don’t need more than 10 connections on the road, there are times when I’m using the AirPort Express on stage and sharing it with other presenters and perhaps a colleague or two in the audience. With laptops, tablets and phones connecting to it, it’s much easier to go past 10 devices than it was back in the day.
Setup
The setup is a piece of cake as usual with the AirPort Utility. You can even do the setup from your iPhone, iPad or iPod touch with the iOS version of the AirPort Utility. Now you can even setup a guest network like you can on the AirPort Extreme granting those users just internet access instead of access to your entire network.
The Bottom Line
New AirPort Express on the Left, Old AirPort Express on the right.
The 2012 AirPort Express is overall a nice upgrade at the same price as the old one. It’s about the same size as the old one being a little thinner, but a little bigger overall. I wished they had kept an all-in-one design as I don’t want to have to have one more cord to carry, but I’m sure I’ll be able to adjust. If you have a recent 802.11n model then there probably isn’t much of a reason to upgrade. However, if you’re on an older 802.11b/g model or you use one at home as your primary router, then you’ll want the new stuff in this one.
Leave it to my buddy Scott Diussa from Nikon to give me an option. Apparently the plug adapter for the Nikon D7000 battery charger will fit the New AirPort Express and work in a pinch. It’s not elegant. It’s not pretty, but it does work. Now if it were only white. 🙂
Update #2 While the Nikon plug does fit (so does the original Apple one), it slightly blocks the WAN port making it a non-starter. 🙁
I’ve been using Gelaskins for a couple of years now to customize my various devices. As a photographer I’m always looking for ways to display my work. Put the two together and now my “Creative Portfolio” is on my MacBook Pro, iPad and iPhone.
P.S. I love it when the TSA agents are so busy looking at my photos that they forget to make me take off my belt! 😉
Check out Gelaskins here. You can buy existing designs or upload your own!
Sometimes I get comments here, jokingly about how much money I just cost you because I reviewed something cool that now you must have. Well you’ll take pleasure in knowing that it just happened to me too. My colleague and gadget buddy Dave Helmly just showed me his latest gadget and in about 3 seconds I knew I’d have to have one.
The Logitech Ultrathin Keyboard Cover for iPad 2 and the New iPad
I’ve tried other iPad keyboards and while they work, I usually just ended up carrying my Apple Bluetooth Keyboard. The problem I had with the ones that are designed to be a case for the iPad is that they typically added more weight and bulk to the iPad than what I was willing to carry. At that point I figured I might as well carry my MacBook Air. That all changed when I saw the Logitech Ultrathin Keyboard Cover! First of all the “ultrathin” part is key. I use Apple Smart Covers now and I don’t want any cover that’s much thicker than those. Logitech brilliantly designed their Keyboard Cover as a “Smart Cover”. That’s right, it magnetically snaps on to the iPad 2 and the New iPad just like Apple’s Smart covers do. Just snap it on and close it. It maintains a very low profile and is very thin when attached. The next smart thing they did was they made a magnetic slot to dock the iPad in to prop it up either vertically or horizontally while you use the keyboard.
The keyboard is bluetooth as you would expect and rechargeable via a standard USB micro cable. Speaking of the keyboard itself, the first key I looked for was the import Shift Key on the left side! The other keyboard I tried (Brookstone) didn’t have a Shift Key on both sides and that really bothered me. Typing on this keyboard seems very natural. I can’t speak to battery life yet as I’ve only spent a few hours playing with Dave’s, but I’ve already ordered one for myself. Damn you Dave you just cost me money (again)! 🙂
You can get the Logitech Ultrathink Keyboard Cover for iPad 2 and the New iPad here for about $99.