Need more room?

I like to keep at least 20-30 GBs free on my MacBook Pro hard drive. Lately I’ve been working with less than 10 GBs free. It really started becoming a problem over the weekend as I started getting "out of space" errors right in the middle of a photo shoot and while working in Photoshop.


I started wondering "what could be taking up so much space?"

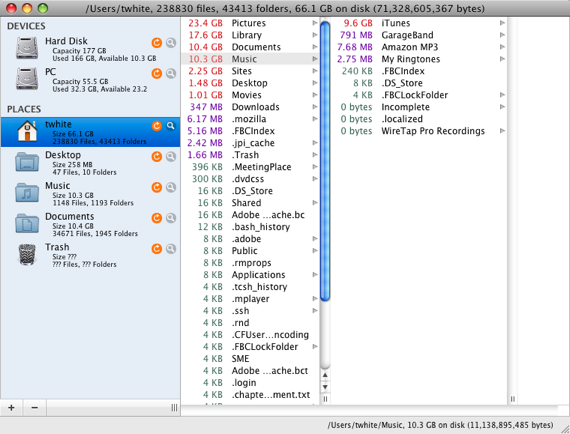
I know that the Mac OS X Finder can list the size of your items and folders and sort that way, but it’s too slow. So I downloaded the really cool shareware app – WhatSize. This was the best $12.99 I’ve spent in a while. With this little gem I was able to immediately identify about 7 GBs of files that I either no longer needed at all (like two very large podcasts) or files that didn’t need to be on my internal drive. This app is amazingly FAST! I could quickly drill down on those large numbers and see exactly "WHAT" was taking up so much space? Within about 10 minutes I had over 13 GB free and I’m still cleaning stuff off and I probably will upgrade to a larger drive soon, but for now this app rocks!

My favorite movie cataloger just got a major update

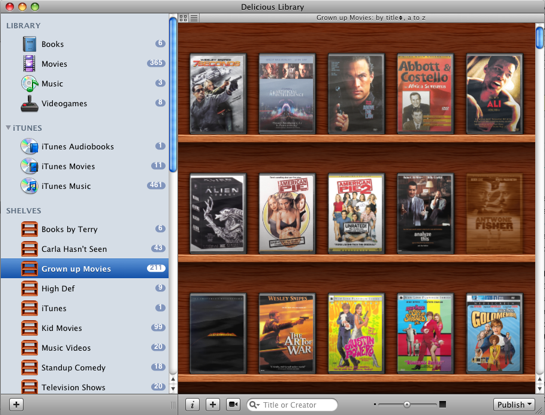
Although I don’t buy movies like I used to, I do have a 350+ DVD collection. As I get older I often times don’t know which movies I have and which ones I don’t. That’s where Delicious Library comes in. My colleagues turned me on to Delicious Library a few years ago and I’ve used it ever since to catalog my DVD collection. The one thing (as a gadget junkie) that really turned me on to it at first was the ease of entering your info about your stuff. You simply scan the barcode! Yep, that’s it! Using your iSight camera (it’s a Mac only app), you scan the barcode on the back of your book, DVD, game, etc. and it does a look up on Amazon and pulls down the title, artwork and description. I was able to catalog my entire collection in an evening. The other thing I really liked about Delicious Library is that it also keeps track of stuff you loan out. I would loan out DVDs all the time and forget about them until I went to go watch them myself. Then I would think, "who did I loan that to?" I have even been known to call around looking for something I’ve loaned out. Delicious Library integrates with Address Book and to loan something out, you simply drag the item to the contact you’re loaning it to. Then it even sets up a proposed reminder in iCal as to when the item is due back.

Although I use Delicious Library primarily for DVDs, it’s not just for movies. It can keep track of your books, video games, music CDs and just about any other media you have.


The most Mac like app outside of Apple

Delicious Library has to be one of the most Mac like apps I’ve ever used outside of Apple’s own apps. It looks and feels like an app from the iLife package. Delicious-Monster prides themselves on taking advantage of as many features as they possibly can in Mac OS X. Version 2 goes even deeper and takes advantage of Mac OS X 10.5.3’s core services to the max.


What’s new?

Delicious Library 2 (DL2) has taken things up a notch or two. The interface has been refined and sped up quite a bit (Version 1, could be a dog with a lot of items in it). This new version is much snapier. They integrated directly with iTunes now. So your iTunes items such as movies, audio books and music show up right in DL2. See an album you want to play, click on it right in DL2 and it will start playing it in iTunes. It even works with your Apple Remote.

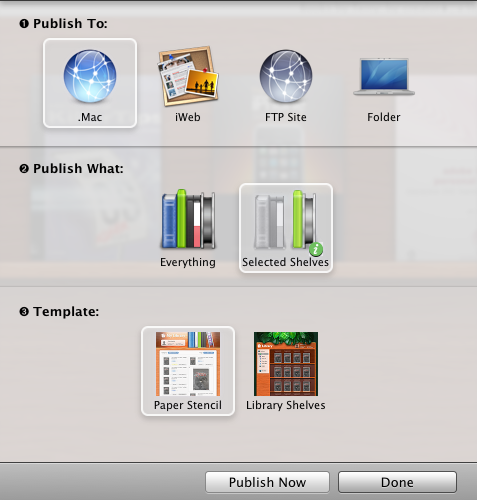
DL2 also sports a new web publishing feature that allows you to take your catalog (or specific shelves) to the web. It works directly with .Mac or iWeb and can upload directly via FTP or simply publish to a folder. The FTP upload feature didn’t work for me. I put in all my FTP info and every attempt to publish just sits at 0% complete with no progress bar or errors. So I just published to a Folder and used my favorite FTP app, Transmit to publish my DVD collection here. If you have an iPhone or iPod touch, they’ve even put in the extra code to take advantage of the mobile version of Safari on those devices. It’s pretty impressive! This way if you were out and about and were about to buy a movie or CD that you may already have, you could whip out your iPhone and check right there on the spot. Don’t have an iPhone? No worries, they also do exports and syncs to regular iPods too.

DL2 also incorporates one of the features I’ve wanted for a while and that’s Library Sharing. This allows others on your local network to use their copy of DL2 to see your Library. I keep my main Library on my iTunes iMac and now the family can see what we have from their Macs.


DL2 introduces "Smart Shelves"

I haven’t quite figured out if and how I’m going to use this feature yet. Like iTunes’s Smart Albums, Smart Shelves allow you to set up criteria such as "Actor contains "Denzel Washington" and any movies you have with Denzel in them will automatically populate the shelf. That’s just the tip of the iceberg. You could do book authors, genres, formats, etc. etc. There’s a mile long list of Smart Shelf criteria to use.

All and all, this update is well worth the $20 upgrade ($40 entry price). As soon as I get my FTP upload working, I’ll be 100% satisfied (I know, I know)! To see a complete list of features or download the trial, go to Delicious-Monster.com.

Are you backed up?

Like many of you, I used to take backing up for granted. That was until an unfortunate Norton Utilities mishap screwed up my hard drive beyond recovery. That was years ago and needless to say, I’ve been backing up ever since.


What if your main hard drive died right now?

What would you lose? That was the question I used to ask myself to remind me to do backups. I do backups daily now and feel pretty secure. I have multiple backups and some offsite backups too. Before we get into my backup methods, let me tell you about an interesting thing that happened just the other day:

I have a Power Mac G5 that I use on occasion. Needless to say, I don’t use it everyday. Sometimes I go days without touching it. This is the Mac that I do most of my scanning on and I needed to scan something, so I woke it from its screen saver only to see a warning message that Time Machine (Apple’s automated backup technology) hadn’t successfully completed a backup in 10 days! I then noticed that my external hard drive was no longer mounted on the desktop (which is why Time Machine hadn’t backed up). After a lot of unplugging and re-plugging and restarting, I determined that the drive had actually CRASHED! I could feel the drive making a thumping sound when I powered it back up.

This was a backup drive, so no problem right? Just buy a new backup drive and move on. Well, kinda. You see, this was an external Maxtor drive that I had been using for "Archiving" before I even started using it for Time Machine.

We all have files that we probably won’t need again, but like to hang onto just in case. That’s what was on that drive in addition to the Time Machine backups. I’m not too worried about it because I can’t remember the last time I needed any of those files. As a matter of fact, I can’t even remember what files were on that drive. People ask me all the time: "Can I use my Time Machine Backup Drive for other files?" Technically the answer is yes. Time Machine stores its backups in folders as disk images. So there is nothing stopping you from using the rest of the drive for other things. However, it’s just not smart to do. If you put other files on the drive, those files are not being backed up! I knew this and took that chance. Well guess what? It died!


What’s the point?

The point I’m trying to make here, is that Archiving and Backing Up are TWO DIFFERENT things. If your archives are important to you, then you should back them up too! The bottom line is that you can’t keep every project that you’ve ever done on your main drive. It will eventually run out of room. So if those projects are important to you to hang on to, then archive them onto other drives, BUT also back those drives up too. In my case I’m not feeling any great loss here. However, it was an important reminder to me that ALL important files need to be backed up. Hard Drives are mechanical devices that will eventually FAIL!


What about archiving to CDs and DVDs?

Admittedly I do have some files archived on to DVDs that are in a safe deposit box. Mostly these are wedding photos from friends and family weddings who I’ve long since given them their copies or prints. I don’t ever expect to need these shots again, however I just didn’t feel comfortable trashing them completely. I’m not a fan of archiving to optical media because they can become unreadable over time due to a variety of factors. Nothing changes here though. If you’re going to use optical media for archiving, then back it up too! I made multiple copies of those DVDs just in case.


How do I backup?

I thought you would never ask! Each of the computers in my house is backed up via Time Machine to either an external hard drive or my Time Capsule. I have a file server (running Mac OS X Server) that has my most critical documents on it (photos, movies, financial stuff, etc.). It’s backed up each night using SuperDuper which clones to an external Firewire hard drive. I rotate the external hard drive backups of the server to a safe deposit box at the bank so that If my house burns down I can still recover from my offsite backup. One of my most important files is my Quicken data file. So it’s backed up in several places. After each use it automatically backs up to the server AND to my .Mac account. So at any given time I have no less than 5 current copies of that file in different locations (one on the iMac that it resides on, one on the server, one on the server’s backup, one on the iMac’s Time Machine backup and one on .Mac). I can not ever afford to lose this file!

My main computer is my MacBook Pro. Since it’s a laptop and I travel with it, I’m not always on my home network to do Time Machine back ups to my Time Capsule. Therefore I travel with an OWC Mercury On-the-Go 500GB external hard drive. Before each trip I do a Time Machine backup to the Time Capsule AND a SuperDuper! backup to the OWC drive which provides me with a bootable clone. This way if my MacBook Pro died right before a presentation I could simply boot another computer from my drive and keep right on going.


Time Machine is Great, why do I still use SuperDuper! then?

Mac OS X 10.5 Leopard’s Time Machine is great! Accidentally trashed a file two days ago? No problem, fire up Time Machine and within about a minute or two you’ve got your file back. However, if the whole drive crashes, you can’t boot from your Time Machine backup. You’ll have to put in the new drive and do a complete restore from scratch. This could take hours! If I crash on the go, I need to be back up and running within minutes. That’s why I carry an external bootable backup with me!


More travel tips

If your job involves doing presentations on the go, then you have even more to worry about if something dies. If you have to deliver a slide presentation, convert your slides to Adobe PDF and put the PDF file on a thumb drive. You won’t have all the fancy animations, but you’ll be able to present from any computer in the building running a copy of the Free Adobe Reader. If you’re demoing other software, put a copy of your demo files, the necessary fonts, the installer for the software and the serial number on a thumb drive. This way, all you would need is a colleague’s computer to continue the show. Don’t forget about online store either. You could use something like your .Mac iDisk or Adobe’s Acrobat Share (a FREE service) to store backups of your critical files so that they can be pulled down from any computer with an internet connection.


I hope that you never become victim of a hard drive crash! Just remember: "there are two kinds of computer users: those who have lost data and those who are about to." The more we go digital, the more you stand to lose (cherished photos, purchased music, movies, etc.) Backup! Also be sure to check out Scott Kelby’s blog on his use of the Drobo for backups.
Memorial Day – A Time for Thanks and Remembrance

I would like to take this opportunity to thank the men and women that currently serve or have served in our US Military Service! Your sacrifices to protect our freedoms are greatly appreciated.

As we observe this solemn day, we must remember all the brave men and women in uniform who gave their lives in the service of our country.

Again, Thank You!

Terry White

Underwater Fantasea

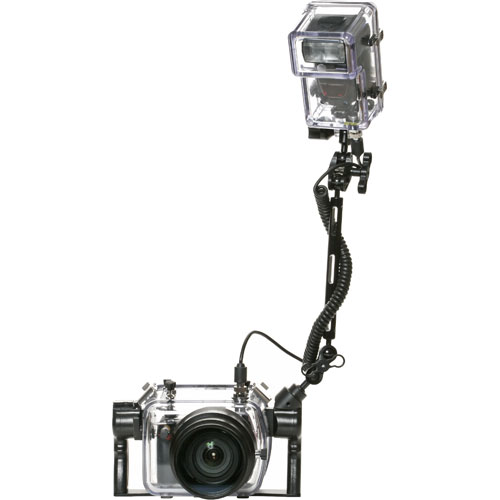
I wanted to take a more serious look at underwater photography, so I did! I LOVE WATER! I also love photography and I’ve always wanted to mix the two. After much research I decided to go with the Fantasea Underwater Housing for my older Nikon D70 DSLR camera. Sure I’ve got newer better cameras like my D300, but none that I was willing risk taking underwater for the first time (even with the included flood insurance). If I lost my D70 it wouldn’t be the end of the world, but if I lost my D300 I’d cry real tears.


The first thing I found out…

Like everything else, you can spend a little or you can spend a LOT! If you’ve never priced underwater housings before, you’ll quickly find that in most cases, they cost more than the cameras themselves. Even the older housing for the now discontinued Nikon D70 still fetches a hefty price of over $1,300. That’s more than the D70 costs when it was NEW! I could have gone cheaper with the point and shoot route and I even seriously considered the Canon G9 with an underwater housing. I could have gotten both the camera and housing for less than the price of the one for the D70, but I really wanted an DSLR if I was going to be serious about this. The Fantasea housing lets you control just about every feature on the camera while it’s in the housing. So there wasn’t anything that I needed to control or adjust that I couldn’t do while it was enclosed. They also have excellent controls for the SB800 too. The standard housing accommodates my original Nikkor 18-70mm lens.


The next thing I found out…

Like most everything else in photography, lighting is the key! That’s one of the things that also attracted me to the Fantasea housing. It came with an optional (included in my kit) off camera housing for the Nikon SB800 speedlight. I figured that I’m getting pretty good with the SB800 and it would be a good fit for this adventure.

How does it work?

I did a couple of dry (actually wet) runs in my pool before bringing in my model. I quickly learned that I was going to need to buy a couple more accessories before the big day. The one thing I needed was a weight belt to allow me to more easily stay down underwater. So I made a quick trip to my local scuba shop and $300 later, I was out with two weight belts (one for me, one for the model), a snorkel and a waterproof (bright) LED spotlight.

Everything worked as expected except the connection to the SB800. For some reason, even though I could see it firing, it seemed to be off sync. In other words, the SB800 was either firing slightly before or after the shutter causing my shots to be underexposed. I poured over the settings again and again before doing a Goole search to find that someone else was having the exact same issue. He never posted a resolution for his problem. I emailed Fantasea and they offered a few tips, none of which worked. I’ve determined that it has something to do with the sync cable they supply. If I attach the SB800 directly to my D70, it works as expected. So I know it’s not the camera, the flash or the settings. This was disappointing, but I didn’t let that stop me.

I have a lot of natural light coming into my pool area. I also setup a Westcott Spiderlite TD5 and pointed it into the water (weighted down of course). Also remember the LED spotlight I bought? I used that as a continuous light. The results were good, but not perfect. I plan to continue to work on the SB800 sync issue and possibly even add a slave flash accessory to the housing to get two lights going.

Shay underwater


Now that I have this housing, I’ll also be able to use it in conditions such as rain, waterfalls, etc. that I would never have attempted before.

DirecTV responded to me!

DTV Logo


You may remember my issue from a week ago regarding a $35 Pay-per-view charge that was added to my account that I never ordered or watched. Well it turns out that my blog post made its way to Will from DirecTV and he contacted me:

“I’m a tech-blog reader who happens to work for DIRECTV. Your recent post about your account (http://terrywhite.com/?p=623) was brought to my attention earlier today and I’d like to offer my help in resolving this situation for you. I’d like to find out where the pay per view charge came from and of course make sure you’re not being charged for something you didn’t order. If you’re interested please email me hisemailaddress@directv.com or call me at XXX-XXX-XXXX.

I look forward to hearing from you. Thank you. ”

Of course I responded to him and the charge was credited to my account within hours! I’m happy to have the credit on my account and that’s all I asked for in the first place was to not have to pay for something that I DIDN’T ORDER! However, I’m still saddened that it took me blogging about it to get results. Hopefully, they will have a talk with their customer service folks and loosen up a bit.

“Thanks again Mr. White, I’ve located the account and the PPV charge in question. I’ve put in a request to have the pay per view charge and the phone transaction fee removed, you should see a credit on your next bill. I’m also looking into why these charges appeared on your account and will follow up with you in the next few days.
Thanks for the chance to resolve this; I hope to have more info for you soon.
Let me know if you have any questions.
Will”

Thanks goes out to all of the folks that responded to my original post. I’m sure your comments also had an impact on this getting resolved too.

Never underestimate the power of ONE!

A Snowball in May?

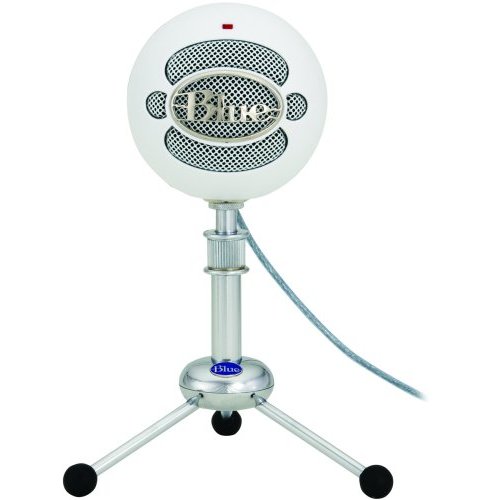
I’ve always used a headset mic when recording my Adobe Creative Suite Podcast episodes. However, now that I’m experimenting with ScreenFlow and doing more "on camera" stuff, I don’t want to have the headset show in the video. So I decided to give the Blue Microphones Snowball Mic a try.

This USB mic puts you in the mind of the old radio style mics. It’s very stylish (kinda big – think softball) and draws stares by anyone who walks by my desk. Setup was as simple as it could be. Just plug in the USB cable and then choose it as the audio input source. That’s it!

The first time I used it, I wasn’t as happy with the sound quality as I was with my noise canceling headset mic. However, this time I tried it with my latest episode and I’m quite pleased with the results. It’s nice because you don’t have to be right up on it. As a matter of fact it sounds better when you’re back away from it a couple of feet. This makes it great because it doesn’t have to be in my shot.

Now this is one of those, "you get what you pay for" kind of things. This is a $100 mic. It’s not a $500 mic, so my audiophile buddies out there may not think it’s all that great, but for my needs and probably the needs of most of the readers here, it would be great.


What about travel?

There’s no way that I’m going to travel with this thing. It’s designed for your desk, not your laptop bag. While I was in Portland a couple of weeks ago, I stopped by the downtown Apple Store (had to take advantage of the "no sales tax".) I went in for a couple of things and then my buddy Dave pointed out another much smaller mic (wait for it:………), the SnowFlake! I haven’t had a moment to test this one yet, but I will try to get to it this week and review it here. The SnowFlake ($45) is very compact and folds down neatly to fit in a notebook bag pocket.

So in a nutshell, I’m snowed in! 🙂

My ScreenFlow issue has been FIXED!

I have to really hand it to Brian Novak over at Vara Software (the makers of ScreenFlow). I sent them a tech support email explaining my crashes upon export and Brian quickly responded. He requested the crash logs from my system and within minutes narrowed the problem down to a conflict with my Nvidia card/drivers. Turns out that the "Show Keys Pressed" feature was the culprit. As soon as I turned that off, the export went fine!


Now I really DO like ScreenFlow!

This App is amazing at what it does and is backed by a company that wants it to work properly. I’ll be using it again when I record my next podcast episode. Although I don’t like the fact that it has to export/render the finished video (which for my 28 minute video too 30 minutes to export), the extras such as callouts and simultaneous DV camera recording are worth it.

I want to like ScreenFlow

A couple of weeks ago while attending the ADIM conference my buddy Colin Fleming turned me on to a new (well new to me) screen recording app called ScreenFlow (sorry PC users, this is Mac only). As you know, I’m always recording tutorials, podcasts, online classes, content for instructional DVDs, etc. So I depend upon my screen recording software weekly. My current choices are iShowU, which has become my primary app and SnapzPro X which not only does screen recording, but also does screen grabs in various formats with pro level controls.

The thing I absolutely love about iShowU is that once you’re done recording, that’s it! There is no post processing/rendering. The QuickTime movie pops up instantly. So it’s going to be hard to get me to go back to an app that has to render the final movie out after you record it.


Then why would I consider ScreenFlow?

Although ScreenFlow does require post process rendering, it may be worth it because of all the editing capabilities it has. Unlike iShowU and SnapzPro, ScreenFlow allows you to do post process editing right in the app. It also has a major advantage in that it also allows you to simultaneously capture your video via your iSight camera or other camera source. While all the apps capture your audio and computer audio (if you like), only ScreenFlow captures your video too. I really like that feature. ScreenFlow also adds several other enhancements like being able to cut out mistakes! Last night I recorded my most recent Creative Suite Podcast episode and I made a mistake during the recording. Once I was done recording, I was able to scrub to the mistake on the timeline and cut it right out. Not only can you make edits, you can have multiple tracks. So you can add in graphics and other recordings after the fact. Let’s say you mention a URL during the recording, you can add that URL as a graphic the pops up in the lower portion of the screen during the time that you mentioned it.

While these features are great, the other thing that really attracted me to ScreenFlow was the fact that it allows you to put in "Callouts." Callouts allow you to do things like zoom in on your cursor during post editing. You can add a click sound so that people know when you clicked your mouse. You can even add a radar type flashing circle so that people can see your pointer on screen and know exactly where you clicked. With Callouts you can also have your keyboard shortcuts displayed automatically on screen at the point you typed them. Very cool!


Putting ScreenFlow to the test!

Like I said, I wanted to see if ScreenFlow would be worth the post process rendering (during export). So I recorded my latest Adobe Creative Suite Podcast episode using it. This episode is a little longer (ok, a lot longer) than my average ones. It was almost 30 minutes long. That’s OK, because that’s as real world as it’s going to get for me. The recording worked GREAT! Editing on the timeline worked great. I was able to do a Ripple Delete and cut out a mistake I made during the recording (something iShowU and Snapz, don’t allow). I even took the time to add in some of the Callouts. After I was done editing, I did an export and that’s where the disappointment came in. About 3-5 minutes into the export process, the app crashed! I fired it back up (luckily I had saved my work) and tried it again. It crashed again at the same spot. I tried changing my export options several times and it crashed each time. Now I was annoyed that I wouldn’t be able to get my beautifully recorded podcast episode out of this thing and worse I’d have to record it over again using iShowU. However, I was persistent. I thought to myself, "it must not like something that I’ve added to this video." So I started turning off the fancy Callouts. Eventually I must have turned off the right one, because the export finally worked! I was too tired to try and narrow it down to exactly which Callout was causing the issue. Each time you relaunch the app after a crash it offers to send the crashlog to the developer and I did. So hopefully he’ll be able to fix this little (super annoying) glitch.


All in all, it’s a great app! I’m still not a fan of rendering, but it’s the price I’ll have to pay for the features that I can now add to my recordings to produce better recordings in the end. Although I didn’t use a timer, I would say that my export took about 15 minutes to complete of my 30 minute recording on my MacPro. ScreenFlow goes for $99.99 and you can download the demo and try it for free. Also check out the ScreenFlow demo video to see what’s possible.

Has my DirecTV account been hacked?

I happened to open my DirecTV bill this morning just because it was sitting there and well, I had nothing else to do in that moment. I expected to see the normal monthly charge and since my bill is on auto pay, I was about to toss it in the "to be filed" pile. However, I noticed a $34.95 PPV (Pay-per-view) charge on there for Boxing Chavez/Loriga – LIVE. The date was 4/26/08 (the day I was flying back from Portland). While I do enjoy a good boxing match every now and then, I haven’t ordered a PPV in a year or two (maybe longer). Even when I have done PPV’s in the past it was via my remote, never over the phone! So I hopped on the phone with DirecTV "customer service" to get this obvious mistake taken off my account. That’s when the fun began (NOT!):


Has my account been hacked?

Apparently when you call to order a PPV, DirecTV verifies account information. Things like the billing address, account holder’s name, etc. While I don’t think it’s too far fetched for someone to come up with this info, what makes this whole ordeal even more strange is that DirecTV then sends the signal to a specific receiver ID (the box in your house) to watch the PPV. So even if someone knew my account info, they wouldn’t be able to watch the event unless they were sitting in my living room OR unless they found a way to fake receiver ID’s in DirecTV’s system. So I asked for a supervisor and the supervisor came on the line and told me that the caller had everything they needed to place the order and she even gave me the phone number that the call was placed from (602)-575-2077. Well gee, that’s not even my area code, let alone my number. "Let’s call it now while I have you on the phone shall we?" Of course when I dialed the number, I got a recording saying that "the call could not be completed as dialed" which leads me to believe that this person/hacker did this intentionally. Even though I have been a loyal DirecTV customer for YEARS, and I’ve never called with any kind of account problem before. They still would NOT issue me a credit for this. After all, I must be lying because the person who called this in from a number not my own and not on my account had my information and therefore it must be legit! I went to my DirecTV TiVo and checked purchases and it doesn’t even show up there. I also verified the receiver number and it was the one used. The mystery continues…


Needless to say, I’m PISSED! For now, I have setup a password on the account and nothing else can be ordered or looked up without it. It would have been nice to see the fight that I’m having to pay for. Too bad the criminal/hacker didn’t have a way to record it for me on my box. DirecTV, I will be looking to move OFF of your system in the not too distant future (I almost yelled, “WELL CANCEL MY ACCOUNT THEN!”, right on the spot)! Thanks for the trust, customer service and the love you’ve shown me today. I’ll never forget it. I’ll also be sure to let everyone know how great you guys are (starting here and now!)