Scottevest Wearable Tech

Got Gadgets?

Of course you do. Why else would you be reading my blog? I routinely walk around with iDevices, Android devices, cameras, gps units, chargers, cables, batteries, etc. Normally these items are in my pocket if they are small enough or in my computer bag if they are larger items. When I travel I almost never check my luggage. If I do check a bag, it's a bag of clothing and never a bag with gear in it. At the same time my carry on bag has to be small enough to fit under the seat in front of me. Since I'm now tasked with carrying more and more devices for work and having to carry a smaller bag due to the ever decreasing space under the airline seats I'm always looking alternative ways to carry stuff. I read a review from a friend of mine on the Scottevest line of clothing. I've seen "geek wear" before and had no interest in integrating gadgets into my clothing. I still don't have any interest in "wearable tech." However, I am very interested in clothing that is simply designed to carry more of my tech gear. That's exactly what Scottevest jackets/vest are to me.
 

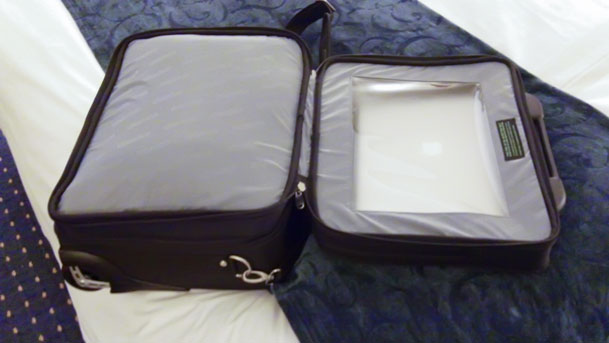
It's my 3rd carry-on

Scottevest jackets have on average 20+ pockets in them. They are designed to carry today's portable electronic gear and at the same time not showing visible bulges. That last part was pretty hard for me to believe. That was until i got one. The Scottevest clothing doesn't just have a bunch of pockets, It has a bunch of pockets that are carefully laid out to provide optimum storage and accessibility while providing minimal visible bulge. They thought of the little things. For example the two inner breast pockets are see through on the inside so that you can see and operate touch screen devices. Also you can run a set of earbuds through the inside of the jacket up to the collar where there is a special set of flaps to completely hide them when you're not listening to music/making calls. They put a screen cleaning cloth in one of the inside pockets on a string to allow you to quickly wipe your touch screens or camera lenses. There's even a pocket large enough to carry a tablet like the iPad. I first thought: "NO WAY will that not show from the outside!" While I don't really plan to carry my iPad 2 in my jacket, I did have to try it. OMG! It actually does fit and doesn't show from the outside.
 

What's in my pockets?

To date I have carried my: Kodak Zi8, Motorola Atrix, Mophie Air iPhone 4 Backup Battery, Holux GPS module, iPad stylus, keys, iDevice sync cables, iPad charger, boarding pass, passport, business cards, 2 ink pens, cash, and yes on occasion an iPad 2 🙂
 

Added security

While on my latest international tour I realized that the Scottevest has an additional benefit. It allows you walk around with gear that isn't showing to the general public. Granted, it doesn't hide a DSLR, but it can hide just about every other valuable that you're carrying.
 

The Bottom Line

Is that while I have jackets that I like to wear, the Scottevest has become my new favorite travel jacket. They come in a variety of styles and materials for both men and women.
You can check them out here.

Continue reading “Scottevest Wearable Tech”

International Power! Revisited

Image compliments of iStockphoto.com

Last year I wrote a post called "International Power" and the purpose of that post was to recommend adapters and accessories that you might use when you travel abroad. Since that time though I have been experimenting with different solutions and have just about completely revamped my list of travel adapters and plugs. The first goal was to reduce the amount of adapters needed and the second goal was to accomodate the ever increasing number of mobile devices that I'm traveling with. Since my job now not only involves showing Adobe Creative Suite on the desktop, I now show tablet and mobile apps on both iOS and Android devices too. On my current trip I'm traveling with a MacBook Pro, iPad 2, iPhone 4, Motorola Atrix and Motorola Xoom. Not to mention a Nikon D7000 DSLR, iPod nano watch and camera GPS device. That's a LOT of batteries to keep charged each night. One of the other big problems is that many hotel rooms can have as few as one single accessible AC outlet for you to use! Here is my current crop of adapters and gadgets to accomodate charging and powering on the go.


The Universal Adapter

All of my devices either can accomodate the higher voltages in other countries or charge via USB. Therefore I only need a couple of "adapter" plugs to adapt the US prongs to the sockets of foreign outlets. The one above is one of my new favorites. I like it because the prongs fold into it so that they don't protrude in your bag. I typically have at least two of these in my suitcase to leave in the hotel while I'm out and about and one in my computer bag for meetings and presentations.

Get one here.


The Universal Power Strip

I don't want to have to adapt every single charger to a foreign plug and as I mentioned you may not even have the luxury of multiple outlets in the room. So just like at home I would love to use a power strip that plugs into the Universal Adapter above. This Power Strip not only works on US current and the higher European 220v outlets. Also the plugs work for both US and European based prongs.

You can get one here. I use this one in my computer bag.


Retractable Extension Cord

Another common problem is that the single available power outlet in the room may be located across the room. This is when I pull out my retractable extension cord. Granted it's only 5' long, but it can make all the difference in the world.

You can get one here.


Charge 4 USB Devices At Once

My phones, camera GPS and iPod watch all charge via USB. Therefore I can get away with one of these multiple USB charging devices. Yes they work on the higher 220v current too and deliver standard USB power to up to 4 devices simultaneously and yes I've charged 4 devices at once without issue.

You can get one here. I also like this flater one too.


The iPad Power Adapter

While the iPad will charge over standard USB, it will do so at a slower rate. In this case I always travel with an iPad 10W adapter to charge the iPad/iPad 2 at top speed. This adapter also works at the higher voltages.

You can get one here.


Longer iOS and USB cables

Since the only available outlet in the hotel room is sometimes behind furniture or across the room it may be necessary to have longer USB and iDevice cables. I found some nice long ones here.


The Bottom Line

When I have all these things plugged into a single outlet, it's not pretty! However, it works. I can easily charge 6 devices without any problem. It definitely cuts down on the number of little adapters I have to carry and I don't have to worry about not having enough of the right adapters for the country I'm in .

I want a 15″ MacBook Air

I've always been a fan of the size and weight of the MacBook Air. However, due to the low end performance that they typically have I could never use one as my primary notebook. It's rumored that we will see New MacBook Pros sometime in March and it's also rumored that Apple will take some design cues from the MacBook Air and implement them in the MacBook Pro. For example, eliminating the optical drive. That got me to thinking about what I would want in my next MacBook Pro? Here's my wishlist:

  • 15.4" ANTI-GLARE Display (I could live with a 13" display, but I really like the 15.4" size)
  • Intel Core i7 level of performance <-this is probably the hardest to do and the biggest deal breaker for me on the current Airs
  • 2 USB Ports
  • 4GB RAM minimum, expandable to 8GB of RAM or more (If i can't get Core i7 performance, then I definitely want 8GBs of RAM
  • 1 FW 800 Port (I'd be willing to give up the FW 800 port in favor of USB 3.0)
  • 1 Gigabit Ethernet Port (not  a deal breaker if it had to be 10/100)
  • 1 SD card slot (I would give this up in favor of the other ports though)
  • Audio in/Audio out
  • iSight Camera
  • 512GB SSD
  • 802.11n WiFi/ Bluetooth of course
  • a built-in 3G data option would be nice, but I'd probably use my MiFi anyway
  • 4-5 hours of REAL battery life (does anyone ever get the 8-9 hours they claim on the current model, ever?)
  • Fast Nvidia Graphics Card <-a wish, I know
  • Display Port video out

I really could live without the optical drive. I only use it every blue moon these days and as long as there was an option to use the external SuperDrive when I needed to, I'd be fine.

What really attracts me to the MacBook Air is that it's so darn light! If Apple could build a MacBook Pro with the above specs and have it come in under 4 pounds I'd order one without blinking.


Call it a MacBook Prair 🙂  – thanks Lukas for that!

24 Hours Without Using My Laptop

When I got my iPad back in April I questioned whether I could get by sometimes with just using my iPad instead of my MacBook Pro. Since that time a lot more Apps have come out and a lot more functionality is there. I don't see the iPad replacing my laptop any time in the near future, but I could certainly see using it solo on short (non business) trips where running my full range of Creative Suite desktop apps is not needed. Last week I took a pleasure trip to New York for a day. Before I left I thought about what I would be doing on this trip and figured that there was technically nothing that I would "need" my laptop for. I knew I would be checking email, social networking, responding to blog comments, browsing the web, reading my RSS feeds, etc. I couldn't think of a single thing that I would "need" to do that I couldn't do on the iPad. So I decided to force myself to use just the iPad the entire, albeit short trip. Just in case: I did bring my MacBook Pro too. However, my goal was to never take it out of the bag. 


I did it

I got through the entire trip without touching the MacBook Pro. I have the WiFi-3G version and I was able to be connected anywhere I went. However, AT&T service in the Times Square hotel I stayed in was horrible. For this reason I pulled out my AirPort Express and connected it to the room's ethernet cable. This gave me much better wireless internet in the room. The only time I was tempted to pull out my MacBook Pro was when I need to type large amounts of text in responding to an email. While I can use the onscreen iPad keyboard just fine, I don't enjoy using it for more than a few words at a time. I was thinking that I should have brought along my keyboard dock.


The next thing I bought

Although this little experiment was a complete success, I saw the immediate need for a keyboard. While I already own the Apple Keyboard Dock, it's not really designed for travel. Then I remembered a Bluetooth Keyboard/Case that a buddy (Mike) showed me and I thought, this is the one I would want to use on my next trip.

I bought it in the airport Brookstone (yes I paid too much) on the way home! They even offered to sell me one that was charged up. I declined as I wasn't going to use it right then and there, but that is a great thing that you do for your customers. Kudos!

I didn't test it until I got home and charged it up. It connected/paired as advertised. However, I hit an immediate snag on the very first thing I typed. I went to repsond to a Twitter comment with "Thank You" and I noticed right then and there that there is no Shift Key on the right side of the keyboard. I thought, "you've got to be kidding me?" Sure enough there are arrow keys, a return key and all the other keys you would expect, but no right side Shift Key. I happened to be on the phone with Scott Kelby (a popular writer/author) and I thought for sure he would share in my shock and frustration and he said "I never use the right Shift key." That floored me! I wondered was I the only one using both Shift Keys on a standard keyboard? Anyway, I can certainly train myself to use just the one on the left, but I thought it was an odd sacrifice for space. Otherwise the keyboard is comfortable and easy to type on. It rocks an impressive 90 hour battery life on a single charge! 

While this case/keyboard is GREAT, it does add a little extra weight onto the already slightly heavy iPad. This will not be my day-to-day case. It will definitely become my travel case!

Brookstone charges $99 for their version of this keyboard/case, but you can get it here for only $69.

Downsizing My Carry On Laptop Bag

I do a fair amount of Travel for work. I hit Delta's Diamond Elite status by the end of June this year. I typically travel with two carry ons. One is  standard Swiss Gear 20" rollerbag (that happens to have a laptop compartment) and the other is my favorite laptop bag of all time. It's the Skooba TSA Friendly Check-through rollerbag.

While this combination has worked great for me and my travels all over the world, it looks like I'm going to have to give up my Skooba rollerbag for now. The bag is great. The problem is having less space under the seat in front of me these days. Delta Airlines (I live in a hub city) has given us a mixed blessing. On the one hand I applaud them and THANK Delta for the swift move to outfitting the vast majority of their domestic fleet with Gogo inflight Wi-Fi. I use it all the time when I fly domestically and now I pretty much expect to see it when I board my flight. While this is great, Delta has also been busy upgrading their fleet with an in-flight entertainment system. This upgrade hasn't been getting much press and even Delta seems to be pretty quiet about it. 

The new system gives each passenger an LCD on the seatback in front of them and access to movies, TV shows, satellite TV, music, games, etc. AWESOME! Great, what's the downside? The downside to this upgrade is that the electronics for this system at each seat is being housed under the seat itself, significantly reducing the storage space under the seat for carryons. With my last few flights I've had to resort to putting both of my bags in the overhead bin because my laptop bag simply just won't fit under the seat anymore. So far I haven't been yelled at. However, I want to be fair to my fellow passengers and put my second bag under the seat as everyone should. Unfortunately for me this means going with a smaller bag. 


Time for a NEW Skooba TSA Friendly Bag!

Luckily Skooba does make a smaller TSA Friendly Laptop case. I swore I would never carry a shoulder bag again. I still don't want to and the good news is this bag is designed to slip over the handle of your rollerbag. You can still carry it with the supplied shoulder strap or the built-in handle. Although this bag is about half as thick as the Skooba rollerbag, I should still be able to carry my usual amount of gear give or take a DSLR body/lens. 

The beauty of these bags is NOT having to take your laptop out when going through a TSA checkpoint. I could never go back now after zipping right through for a year!

You can get the Skooba Checkthrough Executive Brief Small (for 15/16" or smaller laptops) here on sale for under $100 or

You can get the Skooba Checkthrough Executive Brief Large (for 17" laptops) here on sale for for about $105.

You should also check out the ThinkTank 50 Cable Management Bag for all that little stuff that causes you to get a "bag check" by TSA.

How Papyrus is Made in Egypt – a longer Nikon D7000 HD clip

httpv://www.youtube.com/watch?v=jX4xaQkgaIo

I took the liberty of posting this longer clip that I shot in Cairo at the Papyrus Museum giving a demo of how Papyrus Paper is made. 

I shot it with the Nikon D7000 at 1080p 24fps. Yes it's handheld. Yes it's onboard audio. Yes it was shot with my Nikon 28-300mm lens at around f/5.6. Yes I was fiddling with the controls and focus a couple of times during recording. Yes she does reveal some top secret information at the end when she asks me to stop recording 😉

If this is the worse case scenario of HD video on this camera then I'm going to be very happy using it on a tripod with an external mic. 

You can get the Nikon D7000 here from B&H Photo. This is one hot camera!

Photos from the trip here

The Adobe CS5 Pharaohs Tour in Cairo – Photo Trip Report

I'm headed back from Cairo as I write this quick post to thank everyone who showed up and supported the CS5 Pharaohs Tour in Egypt! It was an amazing turnout with standing room only. I had a blast, took lots of pictures, met some great new friends and was photographed more in one day than I have been in 10 years 🙂 I'm totally wiped out and therefore I decided to wrap this trip up with more photos than words. Enjoy…

click the images to enlarge


Yes I managed to work in a Fashion Shoot 🙂 – ok back to work!


The turn out was absolutely incredible with some traveling as far as South Africa to see this event!


They treated us like Rock Stars! I was floored by the number of fans that were on hand to have the photos taken with us and to take photos of us. I'm truly humbled by the response!


Yes we made it to Historic Old Islamic Cairo. This is a "must visit "if you're in the area.


Special thanks goes out to the Adobe User Group Managers in Cairo! You guys are awesome. Thanks for making me feel so welcomed.


That's all I have time for now, I'm about to board my next flight. See more of my photos here and once again THANK YOU CAIRO! I shall return 🙂

Nikon D7000 First Impressions

This is going to be an easy one! First off I've been waiting for this camera for a long time. I was waiting for it before I even knew it existed. What I was waiting for was a camera that met the specs I wanted for a second body that I would use primarily for travel and DSLR video. When I saw the rumors of the D7000 I salivated because if those rumors were true I would have the exact camera I wanted. When the D7000 was officially announced I almost couldn't believe it. Although my needs are actually quite simple for this camera, this is the first time that Nikon has shipped a model meeting those requirements. I love my D700 for my studio work. It's a full frame body and I get fantastic results. I got the NEW D7000 for use as my travel camera and for DSLR Video. 


What I wanted

Like I said, my needs for this camera were pretty simple. I wanted a Nikon body to support the lenses that I already have. Canon makes great DSLRs and their DSLR video features are legendary (I've never shot Canon so I can't compare this one to a 7D – sorry). However, in order for DSLR video to make sense it's best if you can use the lenses you already own. That means I need great DSLR video from Nikon. While I originally got the D5000 for this need it fell short in one important area. The audio on the D5000 is,…well….awful! It has a built-in mic that only supports 11hz mono audio. While that might be ok for a simple interview (talking head), it's not good for events, live shows/concerts, anything loud with bass, etc. The built-in Audio on the D7000 probably isn't much better, however it has the one thing you need to over come this and that's an audio/mic input! This way you can plug in whatever mic you want to get great audio. The next thing I wanted was 1080p HD. The D5000 only supported resolutions up to 720p for video. Not only does the D7000 have 1080p 24fps video, but it also supports face detection/auto focus to keep the shot in focus automatically. I was skeptical at first, but this actually works well as long as the subject isn't moving around frantically in the shot.


Here's a sample clip

I shot this clip in Cairo with the D7000 and 28-300mm VRII lens. There was no post production or editing applied to this. In other words shot, transferred to the computer and uploaded to YouTube (as is) as a 1080p clip.

httpv://www.youtube.com/watch?v=Tg_71brozxU


What about the camera?

Oh yeah, it's a great camera too 🙂 That almost goes without saying. While video is important to me I will most likely always be shooting stills more than video with this camera.  The minute I took it out of the box I smiled because it had a GREAT FEEL to it. Bigger than my D5000 and smaller than my D700. Probably more in line with the D300s. It definitely feels less "consumery" than the D5000. The next thing I appreciated was the dual SD card slots. You can configure these to work in a few different ways. For me I set it to capture the stills to card 1 and the movies to card 2. Also by default if card 1 fills up it will start capturing to card 2. After about 15 minutes of tinkering with the settings I was all set with how I wanted the camera to work. Another new feature that I absolutely love is the user customizable settings "U1" and "U2" are on the main dial. You can set those up anyway you want. For example, to go into Bracketing Exposures on the D5000 was 2-3 steps. Now I just switch the dial to U1 and I'm all set! When I'm done taking the shot, I switch back to manual or aperture priority. While the megapixels have gone up to 16.2 from 12mp, that really doesn't matter a lot to me. I was quite happy with 12mp images. However, for those in the megapixel race, you'll be happy to have more. 

Continue reading “Nikon D7000 First Impressions”

My New ThinkTank Streetwalker HardDrive Backpack

While planing my trip to Egypt I figured I'd be carrying a little more camera gear than usual to capture this amazing location and while I love my Kata backpack it just wasn't big enough for this trip. My need was to have a backpack that would carry two camera bodies, all the lenses I wanted, my Wacom Intuos 4 Small Tablet, accessories and oh yeah my MacBook Pro 15" and my iPad. I HATE checking luggage and I would never check my gear anyway. However, if I can carry one bag of gear (my smaller personal item that must fit under the seat in front of me) and the larger bag for clothes (going in the overhead bin, wheels inward) then I'm a happy guy. Having been totally satisfied with my larger ThinkTank Airport International 2.0  Roller bag I decided to look to ThinkTank for a backpack this time. I ordered the Streetwalker HardDrive Backpack and when it arrived I was a little freaked out at how long it was. Sizewise it was perfect in that it could hold everything I wanted to take on my trip. However, I just wasn't sure if it would fit under the seat of a domestic flight. I took the chance and headed out with the bag figuring worse case scenario would be that I would check my clothes/suitcase. 


It fits!

I had no problem fitting it under the seat. As a matter of fact it even fit in that skinny area under the seat that my normal laptop bag never fits in. I was also able to fit the MacBook Pro and iPad in the laptop area. However, had it been an inch longer the flight attendants may have complained of it being a potential tripping hazard. Although this backpack can accommodate a tripod on the front I didn't push my luck 🙂


What's in it this week?

I brought along a few goodies for the trip 🙂

Yes I can still lift it and wear it comfortably on my back. 


How would I redesign it?

No product is perfect for all users. Although I'm really digging this bag I would make a couple of changes in the next version (again to fit my needs). First off tablets (both computer and graphics) are becoming more and more popular. The outside pocket on the front would be perfect for an iPad if it were just a little wider and deeper. Although the main camera compartment zippers can be secured with a lock (optional), the computer area doesn't have any security features at all. Granted I'm traveling with more valuable photography gear this time than computer gear (and I never let it out of my sight anyway), but that doesn't mean that my computer gear isn't valuable and crucial to my trip. 


The Bottom Line

If you need a well made backpack that can hold quite a bit of camera gear AND your laptop, look no further. The ThinkTank Streetwalker (the name sounds so…) HardDrive is available here for $179.


P.S. many of you are waiting for my 1st impressions/review of the Nikon D7000. In a word it's AWESOME! More later, but here's my first shot taken last night after walking into my hotel room in the dark at ISO 6400. I'm doing the happy dance with this camera! It's everything I wanted it to be. More  later as I have more shooting to do 🙂