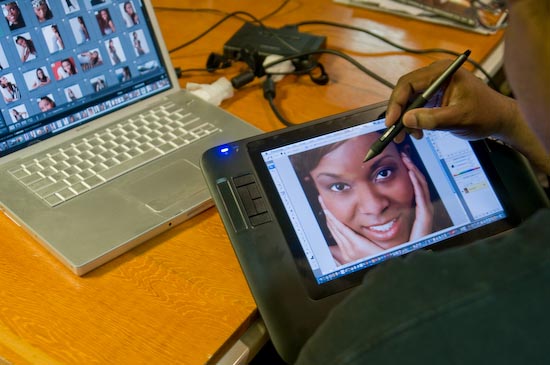
I really took vacation over the past couple of weeks and just really shut down to recharge. However, I did pursue one of my passions and that was digital photography. I worked in a couple of model shoots and of course that meant that I had some retouching to do. Right before the holidays the great folks at Wacom were kind enough to ship me a New Cintiq 12WX to play with and demonstrate at my upcoming Macworld Expo sessions. I was already a big fan of the Wacom Cintiq 21UX and the Intuos line of tablets. However, as much as I love the 21UX, I just don’t find myself at my desk as much as I’d like to be. I’m on my MacBook Pro in different rooms depending on my mood. So until now I would mostly use my Intuos 4×6 which is also a great size to travel with. However, that all changed for me on Friday. I fell in love with the new Cintiq 12WX. It’s just the right size and the built-in LCD is gorgeous! The best way to describe it is to take a Intuos 6×11 and replace the tablet area with an LCD display that is also a pressure senstive tablet and you have the Cintiq 12WX.
I spent all day (and I mean ALL DAY) with it Friday retouching photos in Adobe Photoshop CS3. I had the Cintiq connected to my MacBook Pro via DVI and USB (for the tablet functions). I used it as my main display and the display on my MacBook Pro as the secondary display (yes it also supports mirroring). I kept Adobe Photoshop Lightroom open on the MacBook Pro display and Adobe Photoshop CS3 open on the Cintiq. Although it comes with an easel type stand, I found it most comfortable to just hold it in my left arm while I used the pen in my right hand. There were times also where I just laid it flat on the table and worked.
As with all the latest professional tablets from Wacom, I found the touch strips and side buttons to be indispensable. I configured the left touch strip to change brush size and the right one for zooming in and out. I configured the left buttons to the Brush Tool, Healing Brush, Clone Stamp, Space bar (for quick panning) and Undo. I configured the pen rocker switch for Option-Click. This setup meant that I rarely had to touch the keyboard and NEVER had to touch the trackpad.
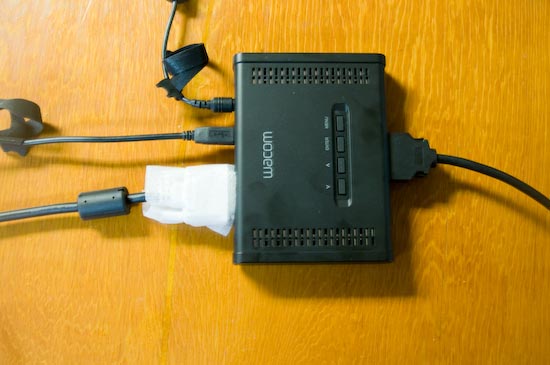

The Cintiq performed FLAWELESSLY throughout the day. It did get a little warm, but nothing alarming and no where near hot. My only minor criticism (c’mon you know me. There would have to be at least one, otherwise you wouldn’t think I was doing an honest review) is that the breakout box seems a little cluttered. I don’t necessarily have a better design in mind and I do appreciate the fact that there is only one cable attached to the display itself, but when I looked at the box laying on my table it looked like an octopus. The breakout box is where you connect power, the display, the DVI/VGA cable and the USB cable. These are all necessary, so like I said, I don’t know of a better way to do it. OK, I lied there is one other small thing. I would like to see a way to connect this to a projector at the same time. I have to call the folks at Wacom and see if there is a way to be connected to the Cintiq AND a projector at the same time. Otherwise, I won’t have any way of demoing it to the masses. The breakout box connects to the video out on your Mac or PC, but doesn’t provide a pass-through or video out to go out to a another display or projector. Other than those two minor things (and the second one really won’t affect most), this new Cintiq is PERFECT!
The Bottom Line
If you need (OK, want) an integrated display and tablet, there simply isn’t a better choice! I love the Intuos line and the bigger Cintiq, but this new Cintiq 12WX hits the sweet spot on portability AND price. Amazon has it for $985.70 (list is $999). I couldn’t imaging retouching another image without it!