Use Any Smartphone on any iPod Dock

dock_boss_iphone5

I’ve reviewed several iPod music docks here over the years. Starting with the Bose SoundDock I’ve had an appreciation for these music devices to dock my iPods back in the day as well as my iPhones over the years. As a matter of fact I used to smile when I’d walk into a hotel room and see an iHome or other similar device on the nightstand. This meant that at a minimum I could dock my iPhone and charge it overnight even if I had no plans to listen to music via the dock’s speakers. Well those days are over, or at least I thought they were when I got an iPhone 5. Apple has aggressively phased out the 10+ year old 30 pin dock connector found on several of these music docks and in most modern cars. While Apple does sell Lightning Adapters to adapt older 30 pin connectors to the new Lightning connects found on the iPhone 5, newer iPods and current iPads. The problem is that compatibility can be hit or miss. Some may still play music, but not charge the device.

Enter the CableJive dockBoss 5

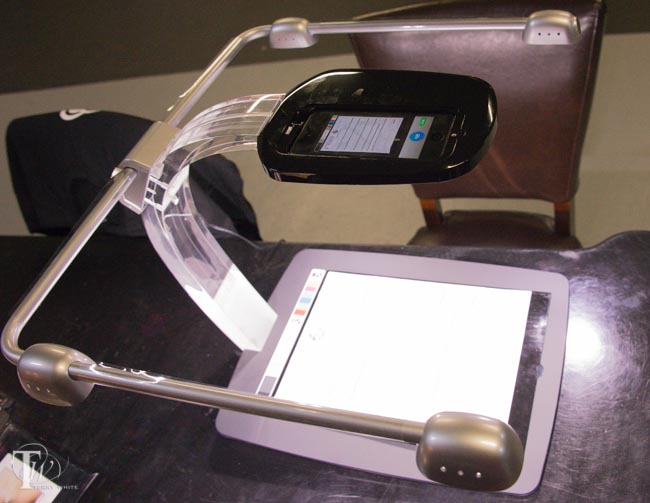
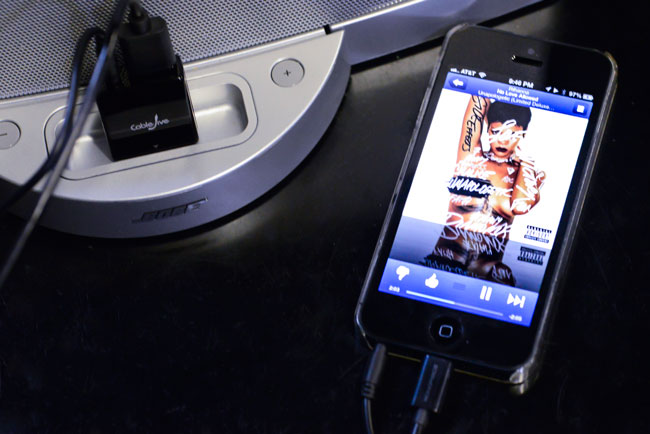
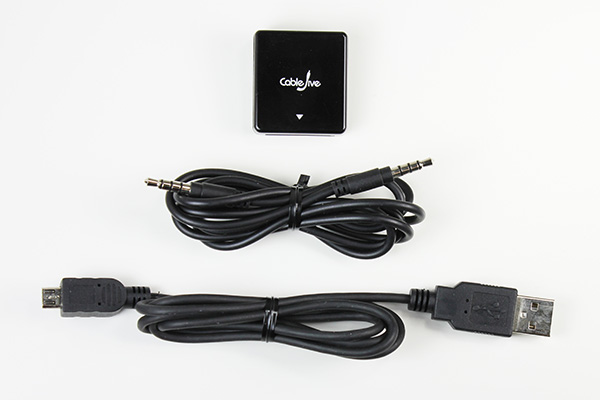
The dockBoss is an adapter for the older 30 pin based docks and on the other end is a standard USB port and 3mm audio-in jack. Instead of simply converting the older 30 pin connection to a Lightning connection, the dockBoss 5 converts to a standard USB port for power and a standard audio-in port for music. This means that not only can I use my iPhone 5 on any of these devices, but I can use my iPad or any other handheld device or smartphone. I now travel with a dockBoss 5 in my luggage. When I arrive to an iPod dock equipped room I just plug in the dockBoss and one of my regular USB-to-Lightning cables. Now my iPhone is charging without me have to search for a plug by the bed (some hotels still don’t get this need) and if I want to listen to music I can plug in the supplied audio cable that comes with the dockBoss 5 (as pictured above). If I don’t care to listen to music then it’s just a single cable connection. Also note that the dockBoss 5 includes both an audio cable and standard micro USB cable for connection to most other smartphones and other portable devices.

The Bottom Line

dockboss-cables

Since Apple retired the 30 pin dock connector most portable music player manufacturers are now leaning towards bluetooth and wi-fi for connectivity for there new devices. However, if you’ve got an older music dock that works perfectly there’s probably no reason to throw it away! With the dockBoss 5 you can get more life out of it and make it compatible with other devices that it never worked with before.

Order the dockBoss 5 here.

Scandock Turns Your Smartphone Into the Ultimate Document Scanner

wpid12392-TLW6221_sm.jpg

I have been using my iPhone to scan documents for a long time now. My App of choice is Scanner Pro. However, no matter what phone you have or which App you like, the problems of scanning documents are universal. You have to deal with lighting and positioning the document in just the right spot. Also if you’re scanning multiple pages chances are each one is going to be slightly off in terms of orientation, cropping, etc. due to not being able to hold the phone in the same spot for each page. Atiz, the makers of Scandock, want to solve this problem.

Scandock turns your smartphone into a document scanner

This combo hardware device and App will turn an ordinary iPhone or Android camera into a fast, efficient document scanner. I must admit that when I received my review unit that it was way more than I expected in terms of size, craftsmanship and design. I thought “whoa! They’re serious!” It took me about 5 minutes to put it together, plug it in and download the free Scandock App. Once I had the App, I placed a document on the bed and immediately noticed that they have a mat that’s designed to smooth out/hold down folded papers. I tapped the scan button on the App and like with any photo, it only takes a second and you’re on to the next page. Certainly faster than the fastest sheetfed scanners out there because it literally takes a second. It takes more time to position the paper than to do the scan. If you are scanning more than a few sheets then it will probably be on par with the time it takes to do it in a sheetfed scanner, but way faster than a flatbed scanner.

As you would expect, the App allows you to convert the document to PDF and share it. The one feature that blew me away was the multiple-doc feature. This feature allows you to place multiple items on the bed at once, such as several receipts or business cards, and it will auto-detect and scan each one as a separate document. I’ve not seen a smartphone App do that before. The built-in LED lights are the key to this device. By evenly lighting your documents you never have a shadow of YOU holding the phone over the document. There are trays for both iPhones and Android smartphones. You can even get it in Black or White.

The Bottom Line

Sounds great! Does everything that I would expect and more. What’s the downside? The only real downside to this solution is the asking price. At $499 (B.Y.O.D.) it will be out of reach for many and puts it in direct competition with other document scanners. Granted, other document scanners require a connection to a PC/Mac (which probably costs more than your smartphone) and perhaps the newer “Post PC” generation will see the benefit of this kind of solution.

You can learn more about Scandock here and order direct from the company.

Seeing is better; check out this video:

I found the perfect smartphone car mount

airframe_iphone5
iPhone 5 mounted to the air vent via the Kenu Airframe and running Navigon North America turn-by-turn GPS App.

I have been searching for the perfect car mount for my iPhone 5. All the ones I’ve seen or used to date were either too big or too cumbersome. Let me first explain that I also want a mount that I can travel with and use in rental cars. Most mounts fall into four categories. They either attach to the windshield, dashboard, cup holder or air vent. While the air vent ones I’ve used fit the bill for the most part they usually don’t travel well because they are too delicate or have too many pieces or are simply too big. I like air vent mounts and dashboard mounts best as they position the phone at a comfortable eye level to minimize distraction.

The Kenu Airframe is exactly what I was looking for

Kenu-Airframe

1. It mounts my iPhone 5 on the air vent. 2. It accommodates most phones even with their cases on. 3. It’s easy to clip the phone onto it and remove it (spring loaded). 4. It rotates to either vertical or horizontal. 5. It works on just about any vent style (round, rectangle, horizontal vents or vertical vents). 6. It slides right onto the vent in 2 seconds. 7. It’s small and very easy to travel with.

It reminds me of my favorite smartphone tripod mount, the iStabilizer.

airframe_2_iphone5

You can order the Kenu Airframe here.


You’re gonna want one of these too

Get it here.

Review: Liquid Image Scuba Mask HD


wpid12253-jamaica2013-0300_sm.jpg

I’m a fan of water and water sports. I love to swim and I love to snorkel. One of these days I’ll take the time to get certified for scuba. Last year I got a chance to do some snorkeling in the Virgin Islands and I remember feeling so unprepared to capture all the underwater beauty that I was seeing. I had no underwater camera of any kind with me. I remember my colleague at the time Greg Rewis telling me about his recent sailing experience and once I spotted the Liquid Image Scuba Mask Series, I knew that it would be on my list for the next time I headed out to a nice area to dive/snorkel. I got the mask and couldn’t wait to try it. The obvious advantage is that this mask has an HD camera in it that records to a micro-SD card (4GB supplied, supports up to 32GB). You can shoot video or stills. This means that your hands are mostly free and where ever you look that’s what you’re shooting. (1080p @ 30fps, 720p @ 60fps, 5MP Still sensor/ 12MP interpolated)

wpid12261-jamaica2013-0253_sm.jpg

How does it work?

I really wish I had taken the time to familiarize myself with the mask more than just a few minutes the night before. I set it up, loaded the memory card and batteries and then took it out for a try the next morning. While I understood the basic operation of the mask, a little more testing up front would have made me feel more comfortable with it. The mask runs on 4 AAA batteries and depending on which model you get you’ll either get 4 rechargeable batteries or 4 Energizers. The memory card is a 4GB card, which is rated at being able to capture up to 2 hours of video. Going in I had no idea how much recording time I had or how long the batteries would last. Again, I could have read all this before hand, but I didn’t. Totally my fault. This made me a little anxious since I was going out with a group, I wouldn’t get a second shot at this (at least not on this trip). I was more interested in capturing video than stills, but wanted to try both. Overall the mask performed as advertised. I was actually very impressed with the quality of both video and stills.  I bought and used their optional red and blue filters. The shots here were with the red filter. I meant to use the blue one, but grabbed the wrong one.

Continue reading “Review: Liquid Image Scuba Mask HD”

The Making of My Adobe Create Now Tour Recording

CreateNow-RecordingSetup-web
photo by Shawn Lee

I got a few questions regarding my setup for recording my last Adobe Creative Now Tour Event.


Here’s what I used:

I did the presentation on my MacBook Pro 15″ Retina. I was connected to the 1080p in house projector via the built-in HDMI port. I had my Wacom Intuos 5 tablet plugged into one USB port and my Logitech C920 HD Webcam plugged into the other one. While the Mac has a built-in FaceTime HD camera, it’s only as good as the angle of your display. By using the C920 I’m able to put it on a tripod and therefore position it anywhere I want.


Networking

I always travel with both a MiFi and AirPort Express. This way I can create my own network either by using the venue’s ethernet cable or via 4G. This is important for when I show Touch Apps and DPS SE so that I can mirror both my iPhone 5 and iPad to the same screen as the audience is seeing AND being recorded with Screenflow. I used Reflector on the Mac to Airplay from both my iOS devices at the same time.


Audio

As my buddy Jason Levine would say “It doesn’t matter how good your video is, if your audio sucks no one will care about your video.” This means using either a really good USB tabletop mic OR a audio recording device. In Cleveland I used a Blue Yeti USB mic and the audio was good. However, I had a Zoom H4N on order that arrived in time for Detroit and I decided to use that instead since it has legendary audio quality. As a backup I had Screenflow recording from the built-in mic on the MacBook Pro since I hadn’t used the H4N before. The H4N records to an SD card in WAV format or MP3 at various quality settings. It uses 2AA batteries and can also be mounted on a stand/tripod. I mounted it onto a Gorillapod and set it on the table.

Continue reading “The Making of My Adobe Create Now Tour Recording”

Nike FuelBand vs Jawbone Up

jawbone_up_vs_nike_fuelband

After reading my buddy Jason’s review of the Jawbone Up over at BestAppSite.com I decided to order one. Like so many of my fellow Americans I’m simply not active enough. I know it. No need to tell me. The idea behind the Up is that you wear it all day (and night) and it monitors your activity/steps. You can sync it with your smartphone and get reports anytime you want. You can see how many steps you’ve taken on a given day as well as how many hours you’ve slept and if you’re diligent about entering the food you eat, it can monitor that too. If you have friends that use the Up you can become buddies and see each other’s progress. This is where my competitive side kicks in as I want to have as many or more steps than my friends on a given day. Having used the Jawbone Up for a couple of weeks now I can give you guys some feedback. Before I jump into the feedback though, I recently received the Nike Fuelband as a gift! Wow! Now I can compare and contrast between the two and tell you which one I like best at the end…

Continue reading “Nike FuelBand vs Jawbone Up”

My Travel Portrait Lighting Setup – Updated

rapid_octa

I usually do most of my photography work in my studio where I have access to great studio lighting by Elinchrom and Westcott. When I go on location locally I tend to use my Elinchrom Quadra Kit. However, when I go on the road traveling by air I usually travel with a speedlight or two and portable modifiers. My new modifier of choice is the New Rapid Box 26″ Octa. I’m a fan of octa shaped modifiers and having a truly portable one is going to be great. I got the chance to try it out this past weekend during my session at the Day of Photography conference and I loved it.

Here’s my setup

wpid11849-TLW4651_sm.jpg

Rapid Box – 26″ Octa

Nikon SB 910 speedlight – any speedlight will work.

2 PocketWizard PlusX Transceivers. While the light is mounted outside the box and therefore can be triggered using the Nikon Commander system built-in to most of their midrange and pro DSLRs, the Nikon system requires line of sight. Therefore, I use the NEW PocketWizard Plus X to give me greater range and positioning.

Lowel Uni-To Light stand 8′ (folds down to 21.5″)

Westcott X-Drop “Slate” Background Kit

Continue reading “My Travel Portrait Lighting Setup – Updated”

New Lower Cost PocketWizard

20130301-103805.jpg

PocketWizard Plus X features:

• Auto-Sensing Transceiver: Easy to use. No settings to make.

• 10 Channels: 1-4 Classic plus 5-10 low-traffic channels

• Backlit Channel Dial: Easy to set channels in the dark

• Internal Antenna: Compact, more rugged design

• Auto-Relay Mode: Trigger remote camera & flashes simultaneously

• Transmit Only Mode: Positive operation in large groups

• Side View Design : Better subject view on camera

• PocketWizard reliability: PocketWizard compatibility

They are now in stock here

Dropcam HD Review

DropcamHD_front_turned_HI-RES

I’ve been using Panasonic IP webcams for years to keep an eye on things at home and at my studio. However, Panasonic has gotten out of this business and therefore it was time to look at newer cams to recommend to people that ask. I was intrigued by the Dropcam HD and finally got a chance to try one out. Dropcam HD is a 720p HD WiFi enabled video monitoring camera. It also broadcasts sound. Unlike the Panasonic cameras, Dropcam is both a hardware solution and service. During the setup process you configure a Dropcam.com account along with setting up the hardware. You have a choice of a “free” live viewing only account or a paid Plus or Pro account that not only allows you to view your Dropcam live, but also see either 7 or 30 days of recorded video respectively. The idea is that if you’re using it as a security camera that you’re not going to be watching it 24 hours a day. Therefore Dropcam will automatically record and keep the last 7 or 30 days of video so that you can review it if need. However, even with the Free account you can setup motion detection that can alert you that something is moving in front of your camera so that you can tune in immediately and watch.


The initial setup

drocam_setup

The initial setup couldn’t have been easier. Dropcam HD comes with a stand/mount, 10 foot long USB cable and USB power adapter. You plug the Dropcam HD into your Mac or PC initially and it mounts on your desktop as a volume containing the setup utility. No need to even download anything. During the setup you join the Dropcam HD to your existing WiFi network including password protected ones. You also setup your account on Dropcam.com during this process. Once you’ve got it setup, unplug it from your computer and place it where you want to monitor (indoor use only) and plug it into a AC wall plug. Once the camera powers up and connects to your network the setup completes. The mount can be either used on a desk, bookcase, etc. or you can wall/ceiling mount it. It even comes with the screws and anchors. Also the camera can easily be removed from the mount. It just pops in and out. Also the indicator light can be disabled for more discretion.


Image quality

dropcam_HD_studioview

I was really impressed with the image quality. Definitely much better than the standard def/low def Panasonic cameras I’ve been using. You can watch the image in a Flash enabled web browser on your Mac or PC or you can download their mobile App and watch the stream live on your iOS or Android devices. See my review of the iPhone/iPad App here.


Works in the dark too

dropcam_hd_dark

Unfortunately the room you’re monitoring may not always have the lights on especially if you’re not home. I was happy to see that Dropcam HD uses infrared technology to show you what’s going on even in the dark. It automatically switches to night vision when the lights go off and off again when the lights come back on.

dropcam_HD_rates

The Bottom Line

Dropcam HD is a very well thought out process and the company doesn’t rely on any other company or software to make their solution work. This is a good thing as many other solutions lack things like mobile apps or online recording. The image quality is exceptional and exceeded my expectations. You can setup multiple Dropcam HD units. You can do two way audio and it has digital zoom. While this hardware/service solution works as advertised there are a couple of things that would make it better. First off there’s no way to rotate/swivel the Dropcam. It’s a fixed camera and therefore can only cover the range that the built-in lens covers. With that said, the lens covers up to 107° field of view, so this may not be an issue for most. The next thing is that while it comes with a USB power adapter, it’s unnecessarily wide and you may have an issue plugging it in to an multiple plug outlet next to another plug. There’s no reason why it couldn’t be skinnier. The only other thing you might consider is that Dropcam uses about 60GB of bandwidth a month. Depending upon your ISP/plan this may be an issue. Comcast for example thinks anything over 300gb a month is excessive! As you can see I can’t find a whole lot wrong with Dropcam HD. I’m impressed and will look to replace my older Panasonic units with Dropcam HDs.

You can get Dropcam HD here.

You can also check out Dropcam on Facebook here.

DropcamHD_parts

Two New Wacom Bamboo Styluses for Touch Screens

wacom_bamboo_stylus_iPad

In 2007 when the iPhone was introduced, I remember many of my colleagues and pundits saying things like “I just wish it had a stylus”. Of course Steve Jobs back then made fun of phones that required a stylus. Fast forward six years later and you definitely see people using most cellphones with their finger and NOT with styluses. Although I do use my finger with my iPhone and iPad there are times where a stylus is just better. The ones that come to mind are signing my signature and drawing/handwriting notes. My signature and handwriting are bad enough. I don’t need them to look any worse because I’m using my finger. I’ve been a fan of Wacom products for many years and felt that their Bamboo Stylus Solo was definitely one of the best! They’ve now added a couple more choices to the product line up.

The Bamboo Duo Stylus + Pen and the Bamboo Pocket Expandable Stylus

My favorite now is the New Bamboo Duo Stylus. Here you get two devices in one. You get a great stylus for your touch screens on one end and on the other end you get a regular ballpoint pen. GREAT! Fantastic and certainly the one that’s now always in my pocket. It also comes in different colors.

bamboo-duo

The next one is cool, just not my 1st choice. The Bamboo Pocket Stylus is actually retractable. Push it together or pull it to expand and you get a full sized stylus. It also has a cap that’d designed to plug-in to the headphone jack on your port as a way to carry it. I definitely couldn’t see doing this on my iPhone, but I could potentially see doing this with an iPad. I’d actually rather see a case that has a slot for a stylus. While it doesn’t come in different colors it does ship with silver, blue and red rings that you use to add a spice of color.

bamboo-pocket

The Bottom Line

There is no requirement to use a stylus with your smartphone or tablet. However, if you frustrated at times with the performance of your finger then you should probably invest in one. The Wacom Bamboo Styluses have a great feel to them both in hand on on screen.

You can get the Bamboo Duo Stylus + Pen here and the Bamboo Pocket Expandable Stylus here.