Today is the day that many have been waiting for. You can pre-order a new iPhone 6 or iPhone 6 plus and have it shipped right to your door. I know that many of you actually prefer the experience of waiting in long lines with others. Also many of you have no interest in the iPhone or will simply stick with their current iPhone for now. Let’s see what you did by clicking the appropriate response below:
In this episode of Adobe Creative Cloud TV, I’ll show you how to use Adobe Photoshop Generator to make webclip icons for your website so that when people bookmark your website to their home screens on iPad, iPhone or iPod touch they’ll get your custom icon.
Are you missing out on my Bonus Content?
See more of my Adobe Creative Cloud Videos on my Adobe Creative Cloud TV and get the App below. It features EXCLUSIVE CONTENT that no one else gets to see. This episode has a BONUS CLIP that is available only in the App! My iOS App is a Universal App for iPhone, iPad and iPod touch. I also have an Android version on the Amazon App Store:
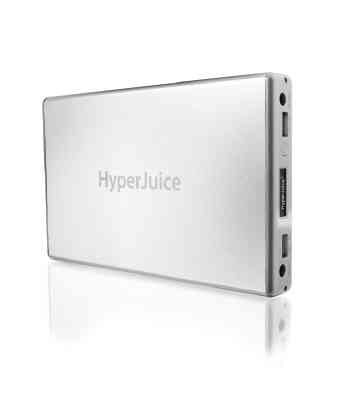
There I am at my desk at 5PM on a Sunday and I can hear the rain outside. Next I hear the wind really whipping by and bam, there go the lights. After a few seconds the lights came back on and then after a few more seconds they went off for good! Sure my APS UPS Systems kept my Server and Internet Router going for a while before they eventually ran out of juice. Since I was headed out of town the next morning I just decided to relax and take it easy for the rest of the evening. However, the one thing that I definitely wanted to keep charged and running the entire night was my iPhone. I have a battery that I keep in my backpack which is good for a couple of charges, but I had never tried to go all night with it. Also while I was sitting at my desk I hadn’t plugged my phone in so it was already down to around 40% battery left. That’s when I remembered my HyperJuice battery that was also in my office and fully charged!
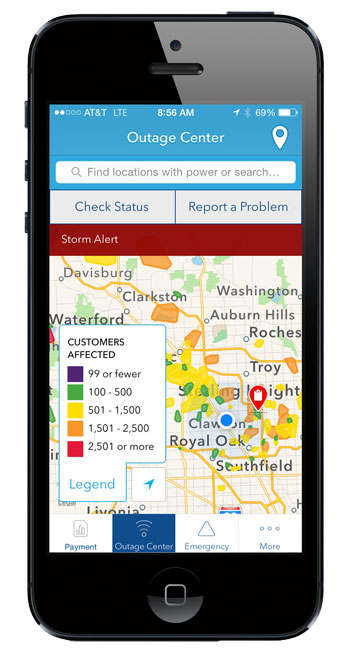
I commend DTE Energy for having a nice App to not only report the outage, but get status updates and see what other areas are affected:
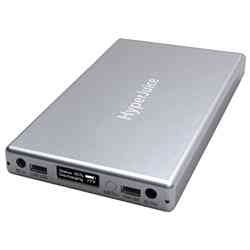
This battery is really designed to power your MacBook for long periods of time when AC power isn’t readily available. However, it also has a USB port for charging/powering phones and tablets. I plugged my iPhone into the USB port and not only did I wake up fully charged 8 hours later, but the HyperJuice still had plenty of juice to top off my MacBook Pro as well! When I originally bought this battery it was for long flights and being at seminars where there were no plugs nearby. I hadn’t carried it in a while and never thought that I’d be using it to get me through the night because of a power outage.
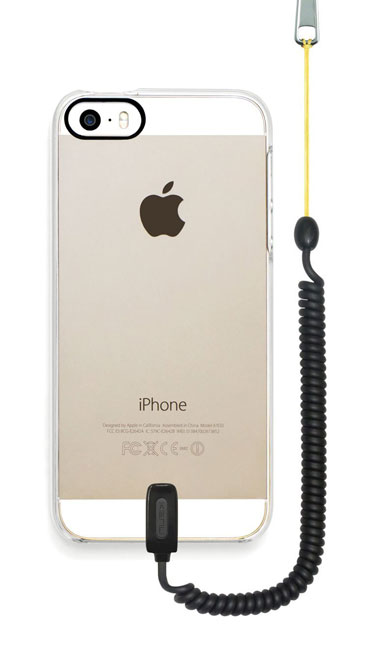
Chances are either you have dropped your iPhone or know some who has. Hopefully the case protected it and there was no damage. Unfortunately more often than not we know at least one person that has a broken screen right now. So far I’ve been lucky. I’ve had every model of iPhone since the original back in 2007 and I have dropped them all at least once, but no broken screens for me to date. Kenu, the makers of my FAVORITE smart phone car mount, the AirFrame have come out with a solution to cut down the chances of you dropping and breaking your iPhone or worse dropping it and not realizing you dropped it and you lose it. This product is called the Keuu Highline. It’s combination clear case (which I love) and a bungee cord that’s designed to attach to the bottom of the case. It has a quick release so that you can easily disconnect your iPhone/case from the cord. The cord can attach to anything from a belt loop to a zipper. Once attached you can drop your iPhone while in a standing position and the cord is short enough so that the iPhone won’t actually hit the ground. This is great especially if you’re going to be out and about, walking, taking pictures or sporting activities.
While I like the whole concept as a packaged product, what I found that I liked the most was the actually case. I love clear cases that don’t add a lot of bulk to the iPhone and this one has become my favorite. It’s just thick enough to add protection and yet then enough to not feel like your iPhone is in a case.
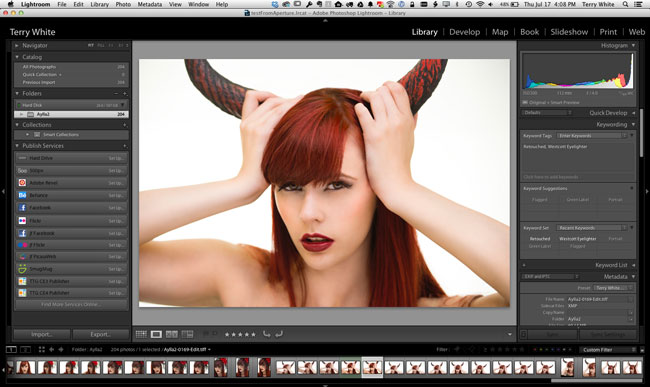
Lightroom has allowed for USB tethered capture from popular Nikon and Canon cameras for several years now. However, I can’t tell you how many people have asked me about tethering directly to an iPad pretty much since the 1st shipped in 2010. Four years later, while there are several shoot to iPad solutions out there, there still isn’t a way to plug your camera directly into an iPad and shoot tethered like you do with your computer and Lightroom.
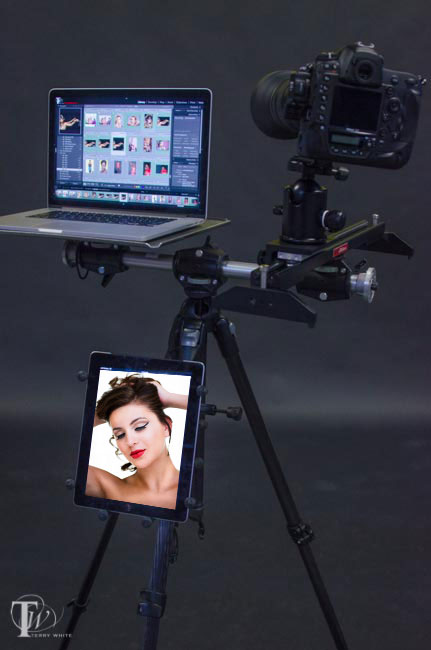
Here’s what’s in my Tripod Rig Setup Above
RAM-B-121-UN9U The RAM X-Grip Universal Clamping Cradle and Clamp
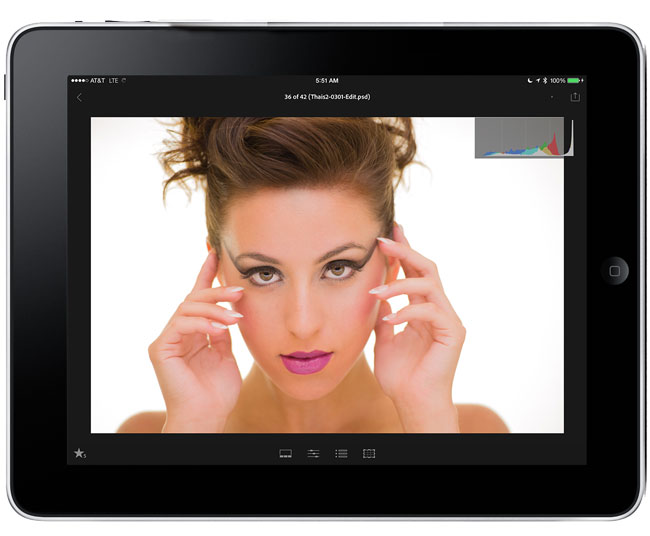
I personally use an Eye-Fi card when I’m out in the field and my iPad then becomes a nice big 10″ display to preview my shots. The Eye-Fi cards create their own ad-hoc network and therefore no hotspot is required. The images wirelessly transfer from my camera to my iPad. Now that Lightroom mobile is here, the question becomes can I shoot tethered into Lightroom mobile and the answer is yes! However, even though the answer is yes, it still involves your computer as there is still no way to connect your camera directly to your iPad via a USB cable and shoot tethered like you do with your computer. In studio I’m shooting either tethered directly to Lightroom via a USB cable, to my computer from my Nikon D4 via Ethernet or via the Nikon WT-5A Wireless Transmitter to a folder where the images are auto imported into Lightroom. There are two ways to shoot tethered to Lightroom mobile:
Before we get into the methods you’re going to need Lightroom 5.5 and a Creative Cloud membership. The Creative Cloud Photography program is affordable at only $9.99/month and includes Photoshop CC, Lightroom, and unlimited syncing to Lightroom mobile.
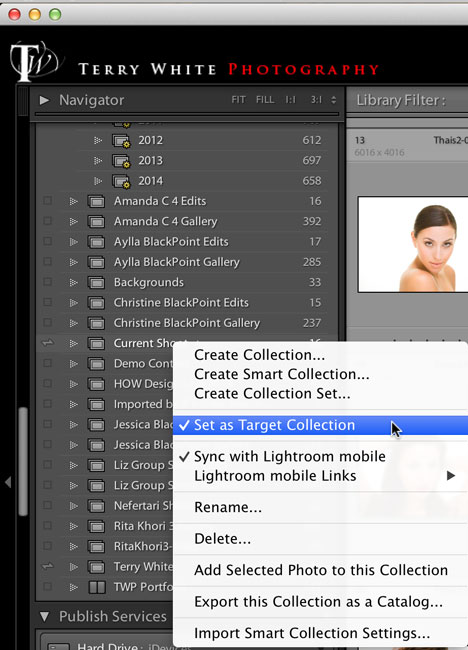
Recently Scott Kelby did a post “My First Studio Shoot Using Lightroom Mobile” during this shoot he was shooting tethered from his DSLR to his computer running Lightroom 5.5 desktop. However, he did a very clever thing. He had a collection marked to sync with Lightroom mobile and his creative director was holding his iPad. He made that collection the “target collection” (a Lightroom feature) so that as he saw images coming in from his camera that he really liked all he had to do was hit the letter “b” on his keyboard to add those images to the collection that was sync’d to Lightroom Mobile. Now the creative director could see the images on the iPad from any location and help direct the shoot, make changes to the wardrobe, etc. Since Lightroom mobile is a two-way communication between the iPad and the desktop version of Lightroom she could also flag or star rate images on the iPad and those flags and ratings would appear in Lightroom on the desktop for Scott to look at further and tweak if needed. This is an awesome way to work and it allows you to show only the BEST images to your client, director, assistant, etc. However, it does require more interaction on your part as you have to hit “b” for each image you want to be added to the collection. I had never thought of using the Target Collection in this way and it makes total sense. This got me to thinking if perhaps there was a way to automate this so that each image would just go into a collection as they come in to Lightroom via tethering? Currently Lightroom mobile doesn’t support Lightroom’s Smart Collections. So I began to look at 3rd party plugins….
The next method “Tethering to Lightroom mobile”
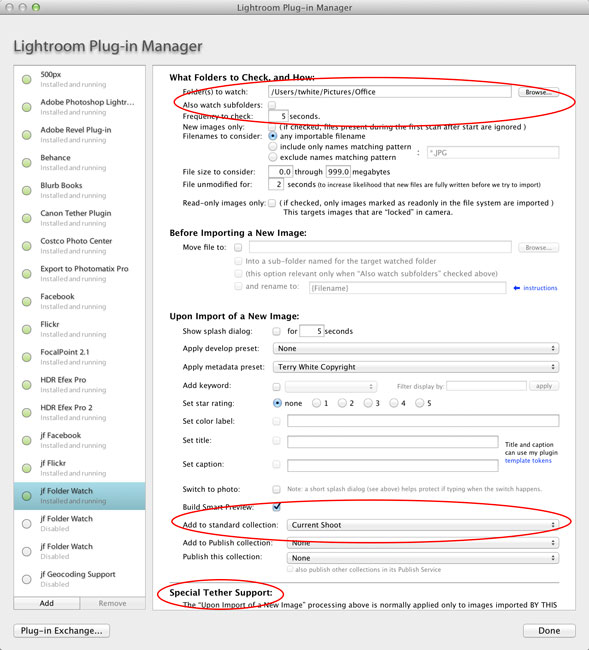
Like I said above, I wanted a way to bring in all the images I’m shooting so I wouldn’t have to touch the keyboard every time I wanted an image added to the iPad/Lightroom mobile. After looking at Scott’s method above this definitely has some downsides to it. As you know not every shot is good. Sometimes the strobe doesn’t fire or the image is out of focus. Sometimes the model isn’t ready or you capture an awkward frame. Chances are you don’t want your client seeing this frames. If that’s the case you’re better off using the “Selective Tethering” method above. However, if it’s you and say an assistant or other person on set that needs to be able to see what you’re shooting via the iPad then you probably don’t care as much if a few bad ones get in. As a matter of fact if it’s an assistant they could be helping by “rejecting” the bad ones for you! My search for a 3rd party solution started and ended with Jeffrey Friedl’s “Folder Watch” plug-in.
This plug-in was originally designed as a more full featured alternative to Lightroom’s Auto Import (what we used before native Tethering) feature. Sadly after I downloaded it I realized it wouldn’t work with Lightroom’s Tether Capture feature because it needed to do the import before it could add the images to a collection.I reached out to Jeffrey and told him what I wanted it to do and guess what? He immediately added the feature for me! Now with this “donationware” plugin you can shoot tethered into Lightroom as you always do and designate a collection to add the images to as you shoot. All you do once you create the collection is sync it to Lightroom mobile.
Share with REMOTE viewers too. On ANY platform!
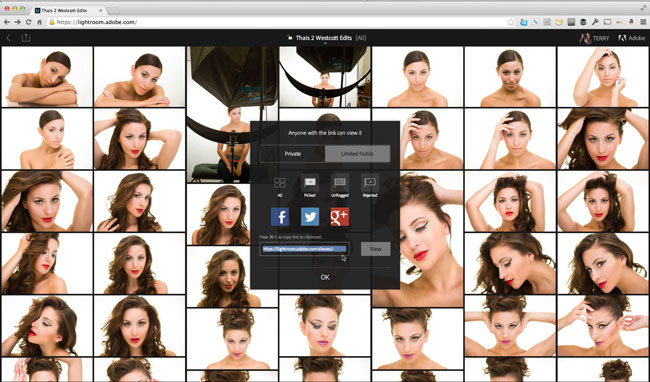
One of Lightroom mobile’s best kept secrets is that it’s not just for iPad and iPhone. There’s also a web component. If you head to lightroom.adobe.com and sign in with your Adobe ID you can all of your Lightroom mobile collection right in a web browser. You can click on any of your collections and grab the link for it and share it with whomever you want to be able to view that collection. This means that you can have a large audience watching your shoot and they will see your new images as you take them (by hitting refresh in the browser) pretty much on ANY platform.
Lastly don’t forget that Lightroom is also on iPhone now
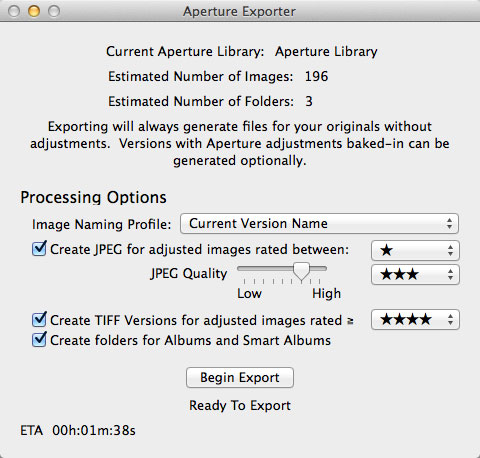
Apple recently announced that they will no longer develop Aperture. While there have been no official plans announced to move Aperture users over to Lightroom, there is a developer (7822383 Canada Ltd) that has released a “beta” utility called Aperture Exporter to help you out. First you have to realize that there is no real way to transfer/translate the adjustments you made to your images in Aperture to the Lightroom and have the images look exactly the same. So the next best thing is to bring over as much of your Aperture Library structure as possible over to Lightroom and render out adjusted files so that they do look the same in Lightroom (or anywhere else). I think this company has done a good job and took a logical approach in doing it and sense it doesn’t harm your original Aperture Library (make a backup anyway!) it’s worth a try.
I tested it on an Aperture library and the results were as advertised. I created a sample Aperture Library and imported images my into it. Then I made adjustments, flagged, keyworded, star rated, labeled, organized, etc. the images. Next I fired up the Aperture Exporter and did the export. Before clicking the “Begin Export” button I went back and star rated my adjusted images as it uses star ratings to determine if your adjusted images should be exported as TIF or JPG with the adjustments rendered in. Once it was done I had folders and subfolders representing the structure I created in Aperture.
Then it was time to import those folders into Lightroom. No issues there. The images came in with the metadata intact. Now keep in mind things like color labels don’t translate. So instead the utility takes any Aperture color labels and adds the appropriate keyword to the images ie. “GreenLabel”. Once in Lightroom it’s easy to filter on these keywords, select all and then actually apply the corresponding Lightroom color label. So yes there is some clean up necessary once you’re in Lightroom, but overall the this utility takes the major work out of moving your Aperture Library to Lightroom.
If you’re looking to make the conversion from Aperture to Lightroom sooner rather than later, you should head over and grab the FREE download here.
Also don’t forget that you can get the NEW Creative Cloud Photography Program which includes Photoshop CC, Lightroom 5 and Lightroom Mobile for only $9.99/month.
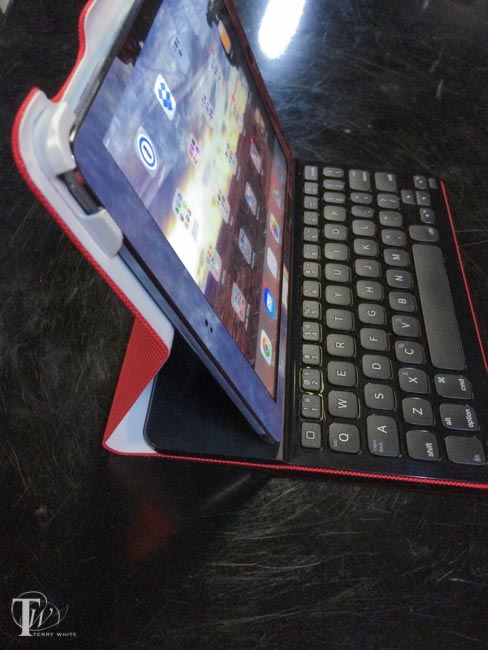
Having been a fan of the Logitech Ultrathin Keyboard Covers for my previous generations iPads, I was more than just a little interested in their new additions. I didn’t even know that this new had come out until my buddy Jason Levine got one for his new iPad Air. I spent a few minutes with his and I could easily see how much of an improvement it was over the older design. While the older designed magnetically attached to your iPad, it really offered no protection to the back whatsoever. This new “folio design offers scratch protection to all sides of your iPad Air (or iPad mini) and gives you a nice Ultrathin Keyboard to boot. The reason I went with the Ultrathin Keyboards from the beginning is because I felt all other keyboard cases were just too bulky and unattractive. The Ultrathin Keyboard Folio feels nice in my hands and is not too thick.
How does it work?
You simply snap your iPad into the Keyboard Folio and turn it on. Mine showed up immediately in the iPad’s bluetooth settings and connected. That’s it. When you stand the iPad up it magnetically snaps to the keyboard and can begin typing. The keyboard keys are layed out about as comfortably as I would expect and gives me the all important Shift key on both sides that many iPad keyboard lack. The number keys also serve dual duty with the Fn button allowing you to do things like change the iPad volume and fast forward or rewind movies. You can even use the Command key as you would on a Mac for things like Command-C to copy or Command-V to paste.
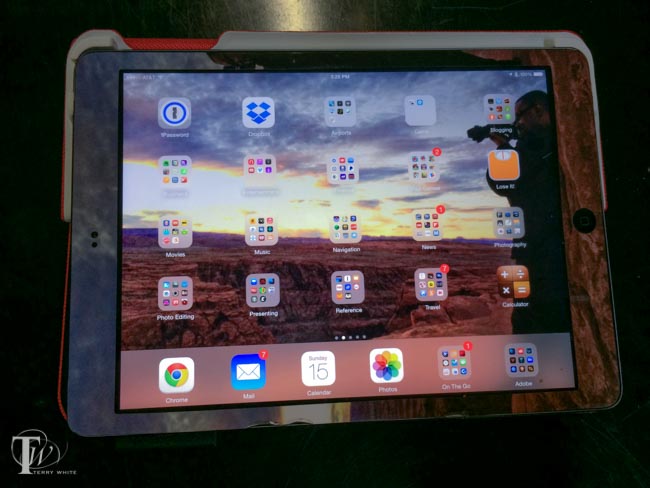
I love the fact that you can lay it down on top of the keyboard for those times when you want to play a game or draw on the iPad and you don’t need a keyboard. With the old Ultrathin cover there was no way to do this other than disconnecting the keyboard and laying it aside. There’s even a holder for a stylus built right in. The battery life is rated at 3 MONTHS per charge! That’s with an average of 2 hours per day of use.
Good, but you can’t have everything
One thing I do miss with the older model is the ability to stand the iPad up on the keyboard in portrait/tall orientation. There’s no way to do that with this folio model.
Did Logitech address a potential design flaw?
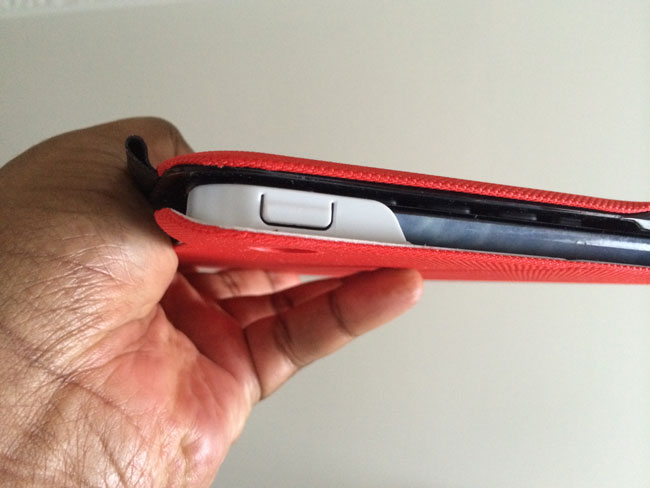
If you go to Amazon and read the reviews you’ll find several that complain about the the upper left support cracking after a short amount of time. I noticed that on some the upper left support is “cut out” revealing the iPad power button (see the very first picture in this post). I’m guessing this is the “newer” model because it’s the one that Logitech features/pictures on their site.
The older perhaps flawed model has a complete cover over the iPad power button. This is the one I have, so I’ll be monitoring it closely. Clearly there are two versions of this model and I’m guessing the one with the cutout (picture’d below from the Logitech site and at the very top of this post on a friend’s cover) is the newer one that solves the problem. There doesn’t appear to be a problem with the version for the iPad mini.
Note the stylus holder on the right in the image below.
They are available in multiple colors.
You can get the Logitech Ultrathin Keyboard Folio for iPad Air here.
You can get the Logitech Ultrathin Keyboard Folio for iPad mini here.
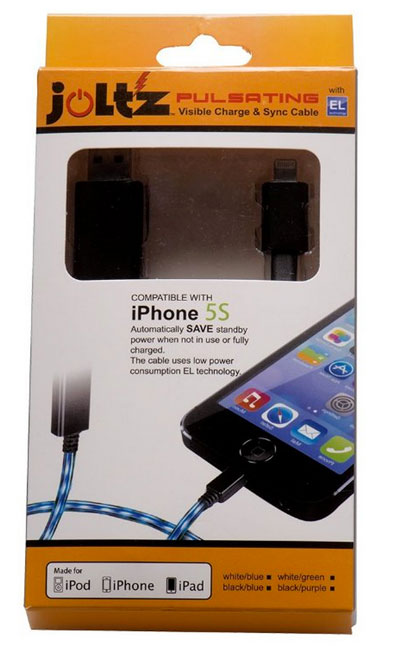
The last time I was in Atlanta for Photoshop World I took an Uber car from the airport to the hotel. I couldn’t help but notice the cable the driver was using to charge his iPhone. The reason it stood out is because it had a stream of pulsating LEDs that animated from the USB power supply to the iPhone. This obviously doesn’t charge the device any faster, it’s just cool to look at. I had forgotten about it for a while and then I remembered the cable and found out who made it. Joltz makes a Lightning cable version of this. On the USB side the connector is longer than usual and I’m guessing it houses a chip to control the animation of the LEDs along the cable.
Here’s how it looks in action:
When the cable is not connected to the iDevice the LED light pattern just sits still and eventually turns off/goes to sleep. I like the cable a lot and my only wish is that Joltz would make a longer version. This one is only 3 feet long. Charge your iPhone, iPad or iPod touch in style.
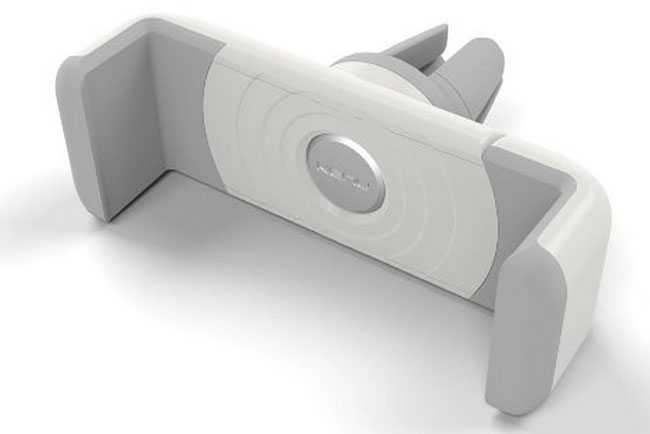
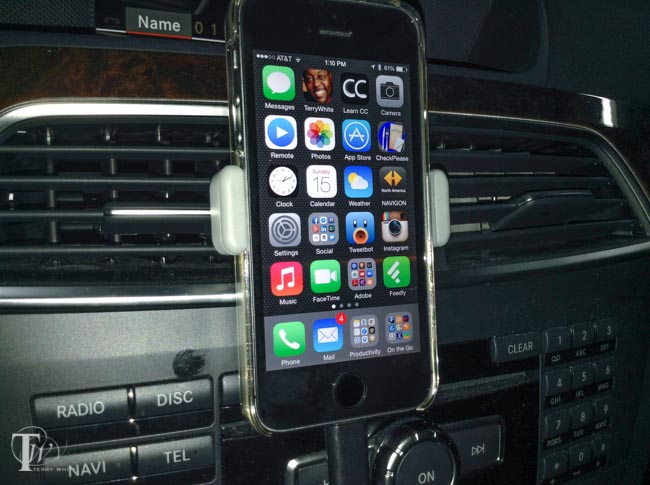
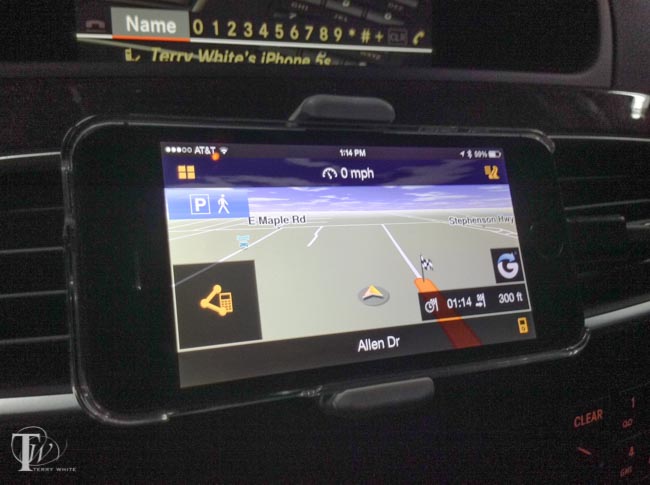
I use the Kenu Airframe everyday in my car. It’s attached to one of my center vents and I’ve been very happy with it since day one. It’s very small, pocket sized and spring loaded to make it easy to place my iPhone 5s or remove it with one hand. I have a second one in my suitcase for travel and use in rental cars. I’ve been able to use it every car I’ve tried to date. When I did my original review last year, some questioned the negative effects of heat coming from the vents. First off I never have heat coming from the top vents. When I use the heat it’s set to blow from the floor vents. In the summer the top vents blow cold air from the air conditioner and I’ve had no problems thus far. Also some were concerned that it would block the vent and that is possible on cars with smaller vents. However, in most cars you can turn off individual vents if you’re concerned with the cold/hot air hitting the back of your phone. As far as blocking the vent there isn’t much you can do about that other than perhaps keeping it in the the vertical position.
As you can see above I have the Kenu Airframe mounted with my iPhone 5s in the vertical position. You can simply rotate the phone as the mount is design to turn 90 degrees to allow for a horizontal display.
The Kenu Airframe opens wide enough to accommodate both my iPhone 5s and its case. This is a must as I would not want to have to take the case off each time I got in the car. The new white model shares the exact same design as the original black one.
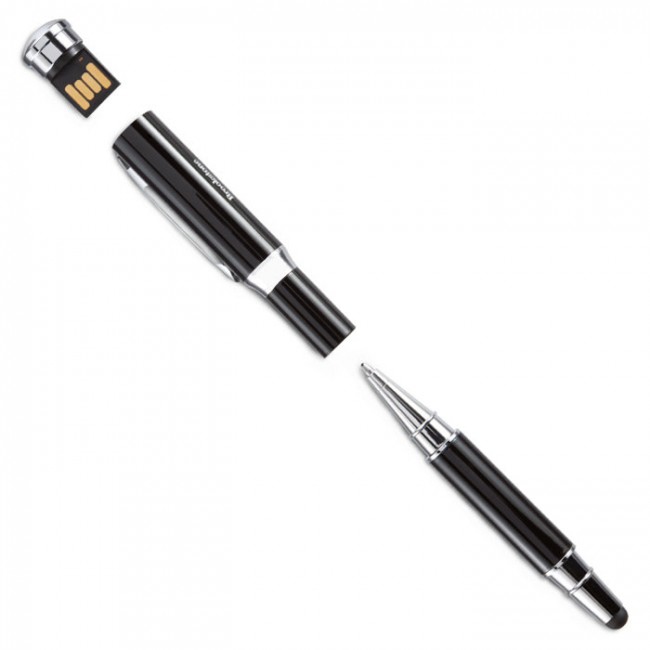
I usually carry my Wacom Bamboo Duo Stylus or Wacom Creative Stylus when I travel for business. The Wacom Bamboo Duo Stylus is a great general purpose stylus for touch screens and the Wacom Creative Stylus takes it up a notch by adding pressure sensitivity with supported apps such as Adobe Ideas. However, on a recent trip to Boston I forgot to pack my usual gear and decided to pick one up from Brookstone in the airport. I really was looking for something basic, but I couldn’t resist the Brookstone 3-in-1 USB Tablet Stylus. Like the Wacom Bamboo Duo it serves both as a stylus for touch screens AND a regular ink pen, but they added a 4GB USB flash drive on the end. I don’t use flash drives much these days, but it’s nice to know I have one for a quick file transfer to a client/colleague.
The Brookstone 3-in-1 USB Tablet Stylus feels good in my hand and definitely allows me to draw and sign more accurately on my iPad/iPhone. I guess my only small nitpick is that if you’re going to including a USB flash drive, it’s probably best to make it at least 8GB these days. 4GB seems so small. Otherwise this was a great emergency buy and I will continue to use it along side my other ones.
You can get the Brookstone 3-in-1 USB Table Stylus here.