Blu-ray + Digital Copy

I don’t buy movies like I used to. I used to buy DVD’s all the time until I realized that I wasn’t very likely to go back and watch a movie that I had already seen unless I absolutely loved it. Even then it was rare. However, there are some (a few) movies that I could watch over and over again. So needless to say when I buy a movie now I have to really really like it. In this age of High Def Blu-ray movies and being able to watch movies on multiple devices such as a computer, DVD player, iPod, iPhone etc, I hate having to decide what format to buy the movie on. For example, If I buy a movie on Blu-ray, then I pretty much limited to watching it at home. If I buy a movie on DVD then I can watch it at home or rip it into a format that’s compatible with my iPhone or computer. However, I don’t get High Def that way.


There is an answer

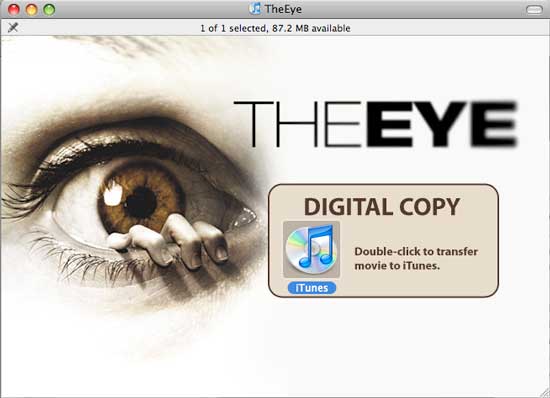
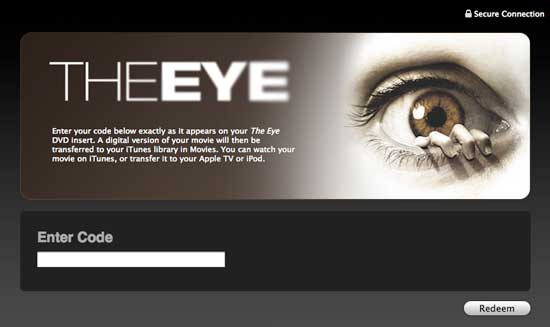
A couple of movie houses have started offering DVD + Digital Copy AND Blu-ray + Digital Copy. When you buy a title that contains a digital copy you get a second DVD ROM for your Mac or PC that contains the movie in a rights managed MP4 format. Once you put this disc in your computer, you can double click on the file and it will launch iTunes. You can then enter the code from the packaging to unlock/license the movie to your iTunes account and the movie will then be transferred from the DVD to your Computer. From there you can either watch it on your computer or sync it to your video capable iPod, iPhone or Apple TV.

Lionsgate is one of the movie houses offering Blu-ray + Digital copy. For me this is the best of both worlds. If I decide that I like a movie so much that I’ll buy it, I won’t be limited to only watching it on a Blu-ray player. I decided to give this a test. The first problem was that their aren’t a ton of titles out yet that are on Blu-ray AND contain a digital copy. So I ordered "The Eye". It’s not a movie that I wanted to own by any means, but it was one that I hadn’t seen yet, that met the requirements for my test. I opened the packing and as promised there was a second DVD-ROM that was clearly labeled for your Mac or PC and will not play in your DVD player.

I popped this disc into my iMac and doubled clicked on the only file on the disc. iTunes then prompted me for the code to unlock the movie. I entered it from the DVD insert page and iTunes then copied the movie to my hard drive. No muss, no fuss. I now have the movie in Blu-ray format AND a digital format that’s compatible with my iPhone and my Apple TV as well as my computer.

Now I just need more of a selection and I’ll be all set. By the way the cost of "The Eye" was $22.95 which is on par with other Blu-ray titles. To buy just the digital copy via iTunes would cost $14.99. So for $8 more you get both a High Def Blu-ray disc and the digital version in Standard Def.


Now I guess I’ll go watch my new creepy movie…

More on the iPhone 3g

Now that the dust has settled a bit on yesterday’s announcement of the iPhone 3g, a few little tidbits are coming to the surface:

  • The iPhone 3g will REQUIRE in-store activation! So no more picking one up, never activating it on AT&T (or whomever) and jailbreaking it just to resell it.
  • The AT&T data plan is going up by $10/month to $30/month instead of the original $20/month. Rod Harlan has an interesting take on that and the price comparison between the iPhone 1.0 and iPhone 3g.
  • As it stands right now, no online orders for the iPhone. You’ll have to go into a retail outlet to get one!
  • See the Steve Jobs WWDC ’08 Keynote introducing the iPhone 3g and iPhone 2.0 software update here.

So it looks like even though the entry price for the iPhone is only $199, Apple has tightened up on making sure you activate your iPhone with the appropriate carrier (and sign up for the 2 year contract). Also for those that ask the question: “why is it that I can get a 16GB iPhone 3g for $299 while an iPod touch 16GB goes for $399?”, the answer is with the iPhone you can’t use it without signing up for phone service. Apple appears to be taking a more traditional method of using the service contract to bring down the entry price of the phone. It will be interesting to see as time goes on, whether they will officially offer an unlocked version here in the states at a higher price?

iPhone 3g coming July 11, 2008

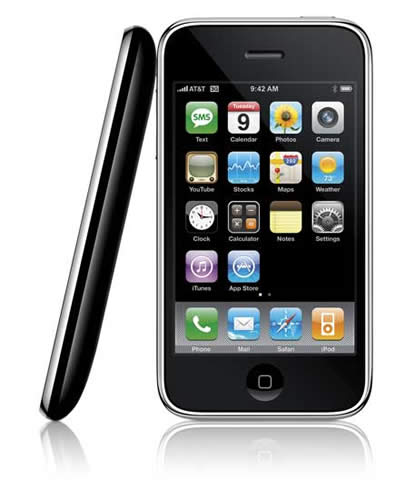
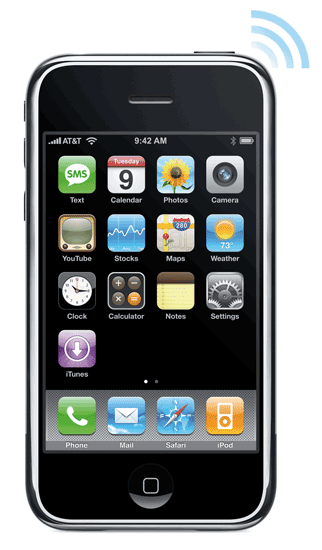
As expected Apple announced the iPhone 3g today! This is the iPhone that takes advantage of faster 3g data networks for near wi-fi data speeds.


It’s the software stupid

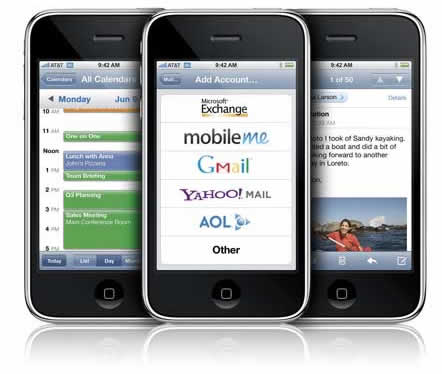
Apple lead their keynote today with lots of talk about software. As with any successful platform, it will live or die by the apps that are available for it. Apple realizes that they can’t do everything that everyone wants. So many 3rd party developers announced and showcased their apps today. Apple also showcased their support for Microsoft’s Exchange syncing which is HUGE in the corporate world. Not to leave consumers out, Apple announced “mobileme“. Mobileme is the successor to Apple’s .Mac service. This service will provide push email, calendar, contacts and photos to consumer users of the iPhone.

3rd party iPhone apps will range in price from FREE on up. You’ll get your apps directly through the iPhone App store on your iPhone running the 2.0 software.


What we know…

  • Shipping: July 11, 2008
  • Software: iPhone 2.0 as a free download to existing iPhone users and $9.95 for iPod touch users
  • Capacity: 8GB (only in black) and 16GB (available in black or white)
  • Speed: 3g data network
  • GPS: YES!
  • Push Data: via Microsoft Exchange and Apple’s NEW mobileme (no announcement of when mobileme goes live)
  • iPhone 2.0 Software and the iPhone App store: a free download to existing iPhone users ($9.95 for iPod touch users) in early July.
  • Terry’s Pet Peeves Addressed: Not sure what else from my list of “50 ways to make the iPhone better” will get solved in the 2.0 version, but one thing that has been added is a Search feature for Contacts. Also we now get Bulk Delete and Move of things like email messages.
  • Other NEW Features: View PowerPoint, and iWork (Pages, Numbers & Keynote) document attachments. New Scientific Calculator. Adding photos from emails to your iPhone Pictures library. Also many more languages are included.
  • Price: 8GB model $199!, 16GB model $299

Learn more here.


iPhone 3G: Twice as fast. Half the price!

Probably one of the biggest shocks of this announcement was the price! You’ll be able to get a iPhone 3g 8GB model for a mere $199. The 16GB model will go for $299. Both models are slated to be available Friday, July 11th (I’ve got to imagine that there is some idiot out there who is already standing in line. Please tell me it isn’t so!) Don’t get me wrong, I plan to upgrade on day one, but camping has never been my thing 🙂

When you think about it, $199 is a STEAL for a touch screen iPhone, with a GPS, that is also an iPod that plays video, does web, email, mapping and allows for 3rd party apps. Wow! The first 5GB iPod was $399 if that gives you some perspective.


Start the countdown…. July 11th can’t get here fast enough!

Too many video cards?

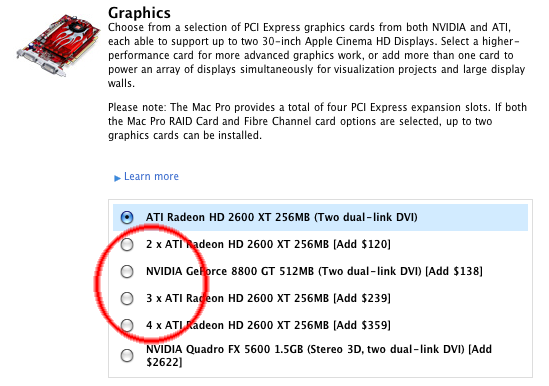
Apple typically makes things easy. However, a couple of buddies have recently pointed out that if you’re not careful you could end up with a extra video cards in your Mac Pro that you don’t need.

The problem seems to be in the way Apple words the video card selection in their configure to order page for the Mac Pro.

Some users are mistaking the 2 x, 3 x and 4 x selections above to mean 2, 3 & 4 times the performance instead of 2, 3 or 4 video cards. I mean after all, if you were spending a few thousand on a New Mac Pro, what’s another $359 for a 4x speed video card right?

The sad part is that if you do make this mistake, there are no returns on custom configs, so you’re stuck with the extra video cards you probably don’t need or you’d have to eBay them.

I know some of you are probably thinking this is no big deal and it’s very clear to you, "how could anyone not see this?" However, I know TWO different people that it’s happened to recently. So obviously it’s not clear to everyone.

My favorite movie cataloger just got a major update

Although I don’t buy movies like I used to, I do have a 350+ DVD collection. As I get older I often times don’t know which movies I have and which ones I don’t. That’s where Delicious Library comes in. My colleagues turned me on to Delicious Library a few years ago and I’ve used it ever since to catalog my DVD collection. The one thing (as a gadget junkie) that really turned me on to it at first was the ease of entering your info about your stuff. You simply scan the barcode! Yep, that’s it! Using your iSight camera (it’s a Mac only app), you scan the barcode on the back of your book, DVD, game, etc. and it does a look up on Amazon and pulls down the title, artwork and description. I was able to catalog my entire collection in an evening. The other thing I really liked about Delicious Library is that it also keeps track of stuff you loan out. I would loan out DVDs all the time and forget about them until I went to go watch them myself. Then I would think, "who did I loan that to?" I have even been known to call around looking for something I’ve loaned out. Delicious Library integrates with Address Book and to loan something out, you simply drag the item to the contact you’re loaning it to. Then it even sets up a proposed reminder in iCal as to when the item is due back.

Although I use Delicious Library primarily for DVDs, it’s not just for movies. It can keep track of your books, video games, music CDs and just about any other media you have.


The most Mac like app outside of Apple

Delicious Library has to be one of the most Mac like apps I’ve ever used outside of Apple’s own apps. It looks and feels like an app from the iLife package. Delicious-Monster prides themselves on taking advantage of as many features as they possibly can in Mac OS X. Version 2 goes even deeper and takes advantage of Mac OS X 10.5.3’s core services to the max.


What’s new?

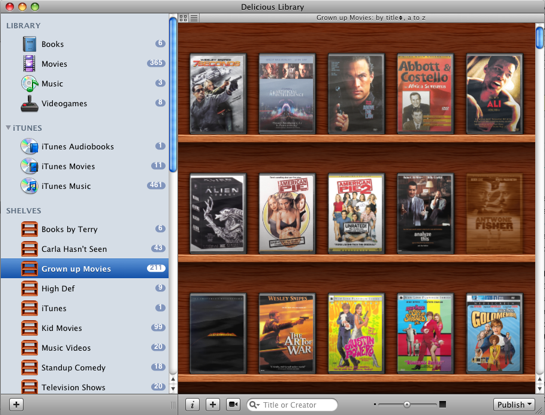
Delicious Library 2 (DL2) has taken things up a notch or two. The interface has been refined and sped up quite a bit (Version 1, could be a dog with a lot of items in it). This new version is much snapier. They integrated directly with iTunes now. So your iTunes items such as movies, audio books and music show up right in DL2. See an album you want to play, click on it right in DL2 and it will start playing it in iTunes. It even works with your Apple Remote.

DL2 also sports a new web publishing feature that allows you to take your catalog (or specific shelves) to the web. It works directly with .Mac or iWeb and can upload directly via FTP or simply publish to a folder. The FTP upload feature didn’t work for me. I put in all my FTP info and every attempt to publish just sits at 0% complete with no progress bar or errors. So I just published to a Folder and used my favorite FTP app, Transmit to publish my DVD collection here. If you have an iPhone or iPod touch, they’ve even put in the extra code to take advantage of the mobile version of Safari on those devices. It’s pretty impressive! This way if you were out and about and were about to buy a movie or CD that you may already have, you could whip out your iPhone and check right there on the spot. Don’t have an iPhone? No worries, they also do exports and syncs to regular iPods too.
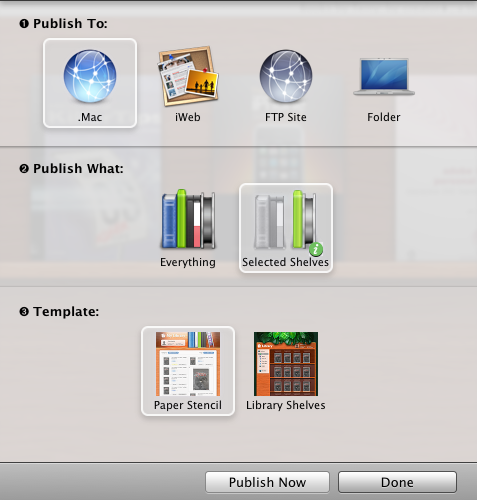
DL2 also incorporates one of the features I’ve wanted for a while and that’s Library Sharing. This allows others on your local network to use their copy of DL2 to see your Library. I keep my main Library on my iTunes iMac and now the family can see what we have from their Macs.


DL2 introduces "Smart Shelves"

I haven’t quite figured out if and how I’m going to use this feature yet. Like iTunes’s Smart Albums, Smart Shelves allow you to set up criteria such as "Actor contains "Denzel Washington" and any movies you have with Denzel in them will automatically populate the shelf. That’s just the tip of the iceberg. You could do book authors, genres, formats, etc. etc. There’s a mile long list of Smart Shelf criteria to use.

All and all, this update is well worth the $20 upgrade ($40 entry price). As soon as I get my FTP upload working, I’ll be 100% satisfied (I know, I know)! To see a complete list of features or download the trial, go to Delicious-Monster.com.

My ScreenFlow issue has been FIXED!

I have to really hand it to Brian Novak over at Vara Software (the makers of ScreenFlow). I sent them a tech support email explaining my crashes upon export and Brian quickly responded. He requested the crash logs from my system and within minutes narrowed the problem down to a conflict with my Nvidia card/drivers. Turns out that the "Show Keys Pressed" feature was the culprit. As soon as I turned that off, the export went fine!


Now I really DO like ScreenFlow!

This App is amazing at what it does and is backed by a company that wants it to work properly. I’ll be using it again when I record my next podcast episode. Although I don’t like the fact that it has to export/render the finished video (which for my 28 minute video too 30 minutes to export), the extras such as callouts and simultaneous DV camera recording are worth it.

I want to like ScreenFlow

A couple of weeks ago while attending the ADIM conference my buddy Colin Fleming turned me on to a new (well new to me) screen recording app called ScreenFlow (sorry PC users, this is Mac only). As you know, I’m always recording tutorials, podcasts, online classes, content for instructional DVDs, etc. So I depend upon my screen recording software weekly. My current choices are iShowU, which has become my primary app and SnapzPro X which not only does screen recording, but also does screen grabs in various formats with pro level controls.

The thing I absolutely love about iShowU is that once you’re done recording, that’s it! There is no post processing/rendering. The QuickTime movie pops up instantly. So it’s going to be hard to get me to go back to an app that has to render the final movie out after you record it.


Then why would I consider ScreenFlow?

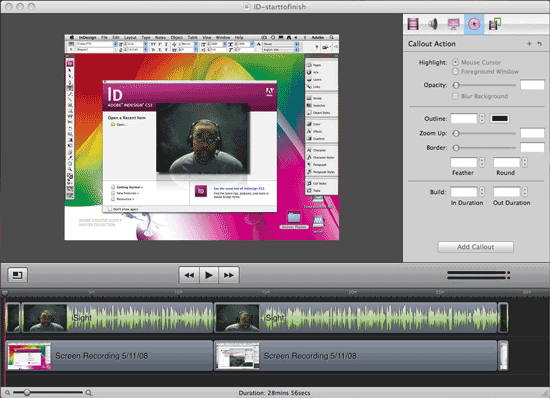
Although ScreenFlow does require post process rendering, it may be worth it because of all the editing capabilities it has. Unlike iShowU and SnapzPro, ScreenFlow allows you to do post process editing right in the app. It also has a major advantage in that it also allows you to simultaneously capture your video via your iSight camera or other camera source. While all the apps capture your audio and computer audio (if you like), only ScreenFlow captures your video too. I really like that feature. ScreenFlow also adds several other enhancements like being able to cut out mistakes! Last night I recorded my most recent Creative Suite Podcast episode and I made a mistake during the recording. Once I was done recording, I was able to scrub to the mistake on the timeline and cut it right out. Not only can you make edits, you can have multiple tracks. So you can add in graphics and other recordings after the fact. Let’s say you mention a URL during the recording, you can add that URL as a graphic the pops up in the lower portion of the screen during the time that you mentioned it.

While these features are great, the other thing that really attracted me to ScreenFlow was the fact that it allows you to put in "Callouts." Callouts allow you to do things like zoom in on your cursor during post editing. You can add a click sound so that people know when you clicked your mouse. You can even add a radar type flashing circle so that people can see your pointer on screen and know exactly where you clicked. With Callouts you can also have your keyboard shortcuts displayed automatically on screen at the point you typed them. Very cool!


Putting ScreenFlow to the test!

Like I said, I wanted to see if ScreenFlow would be worth the post process rendering (during export). So I recorded my latest Adobe Creative Suite Podcast episode using it. This episode is a little longer (ok, a lot longer) than my average ones. It was almost 30 minutes long. That’s OK, because that’s as real world as it’s going to get for me. The recording worked GREAT! Editing on the timeline worked great. I was able to do a Ripple Delete and cut out a mistake I made during the recording (something iShowU and Snapz, don’t allow). I even took the time to add in some of the Callouts. After I was done editing, I did an export and that’s where the disappointment came in. About 3-5 minutes into the export process, the app crashed! I fired it back up (luckily I had saved my work) and tried it again. It crashed again at the same spot. I tried changing my export options several times and it crashed each time. Now I was annoyed that I wouldn’t be able to get my beautifully recorded podcast episode out of this thing and worse I’d have to record it over again using iShowU. However, I was persistent. I thought to myself, "it must not like something that I’ve added to this video." So I started turning off the fancy Callouts. Eventually I must have turned off the right one, because the export finally worked! I was too tired to try and narrow it down to exactly which Callout was causing the issue. Each time you relaunch the app after a crash it offers to send the crashlog to the developer and I did. So hopefully he’ll be able to fix this little (super annoying) glitch.


All in all, it’s a great app! I’m still not a fan of rendering, but it’s the price I’ll have to pay for the features that I can now add to my recordings to produce better recordings in the end. Although I didn’t use a timer, I would say that my export took about 15 minutes to complete of my 30 minute recording on my MacPro. ScreenFlow goes for $99.99 and you can download the demo and try it for free. Also check out the ScreenFlow demo video to see what’s possible.

The best way to enjoy an iTunes movie rental

Although I usually find Apple’s hardware and services to be quite satisfying, I must say that I have been quite frustrated by the restrictions around the iTunes Movie Rental Service. It’s bad enough that you only have 24 hours to watch a movie once you start it. However, it’s even worse that you can’t start it unless you’re connected to the internet at the time. I’ve been burned just about every time I’ve tried iTunes rentals on my MacBook Pro. I either want to start watching a flick when I’m not able to get online to start it or I end up running into the 24 hour limit because I’m not able to finish it within the 24 hour limit.


So I’ve finally figured out that the best way to enjoy an iTunes Movie Rental is on an Apple device other than your computer

That’s right! Forget about your Apple computer for a minute. If you have a compatible iPod or an iPhone or an Apple TV, you’ll have a slight advantage. Here’s why: When you rent a movie on your computer and "move" it to your iPhone or iPod you only need to be connected to the internet at the start of the transfer. Once it’s on your iPhone or iPod you still have 30 days to start watching it. However, you don’t have to be connected to the internet anymore to START watching it. This is perfect for me! Sometimes I don’t know the exact moment when I’ll have the time and feel like watching a movie until that moment arrives. Unfortunately, that moment may arrive at 30,000 feet during a flight. If the movie is on my MacBook Pro and I didn’t start it before I left the ground (because once you start it, you HAVE TO watch it within 24 hours or it deletes itself), I’m hosed. However, if it is on my iPhone (or iPod) I can start it at any time. No internet connection required. So now I can rent and download a couple of movies ahead of time (days or even weeks), load them on my iPhone and then start them whenever the mood strikes me.


Apple TV?

With Apple TV the rules are a little different. You can use the same method above of renting/downloading on your computer and moving the movie to your iPod, iPhone OR Apple TV. However, if you rent/download the movie directly from your Apple TV then you have no choice but to watch it on the Apple TV because you can’t move it anywhere else. Also if you want to enjoy the HD version of the movie, you HAVE TO rent it from your Apple TV. Apple doesn’t allow HD movie rental downloads from a computer. These limits are OK because I just don’t download a rental on my Apple TV until I’m ready to sit down and watch it right then and there. Even HD rentals are ready to watch (streamed enough) within about 5 minutes after hitting the Rent button.


Apple this is cool, but Netflix is still king! When you loosen up your restrictions and offer a subscription model (I know it doesn’t make sense for music, but it absolutely makes sense for movie rentals), I’ll think about letting Netflix go, but not before then.


Apple, here’s a suggestion to make the computer rental watching experience better

Instead of simply deleting the movie from my drive once the rental period has expired, why not offer a "do you want to extend your rental period?" option that let’s me pay again for another 24 hours? The way it stands now if I did want to finish watching something I rented once the 24 hours is up, I not only have to pay again, but I also have to download the whole freakin’ thing again! That bites, especially when you’re traveling and have limited or slow internet access. Steve, think about it!

A really cool idea for the 3g iPhone

While I can’t take credit for the idea (wish I had thought of it), I have never heard anyone mention it before as it relates to the iPhone. I was reading a post on engadget.com about a new phone (I don’t even remember which one it was), but it had a feature that would be KILLER on the 3g version of the iPhone.

Here goes: Most of us that travel with iPhones also travel with laptops. One feature that we hope for on the 3g iPhone is to be able to use it as a wireless modem (tethering/DUN) via Bluetooth. However, what would even be sweeter is having the iPhone itself become a Wi-Fi access point. Having a 3g iPhone means that we’ll have the potential for significantly faster data access than what we now see over EDGE. Since the iPhone already has Wi-Fi built-in, why not just tap a button, set a password and have it broadcast a Wi-Fi access signal that you could tap into with your laptop and surf?

Of course there’s the whole battery life thing and I have no idea if the Wi-Fi radio uses more power than the Bluetooth radio, but it would be pretty sweet nonetheless. It would also allow multiple devices to share the 3g internet connection simultaneously whereas Bluetooth would not.

Either way, the next version of the iPhone should definitely have either Bluetooth or Wi-Fi internet sharing for your laptop! Steve would probably argue that the iPhone is so good that you shouldn’t need to connect to the internet from your laptop and maybe with all the new corporate support (MS Exchange support, VPN access, etc.) that’s coming in iPhone 2.0 he’s right. I can’t wait til June to find out!

You may remember that I have a running list of features that I would like to see come to the iPhone (some of which have either been addressed in recent updates or have been announced for the 2.0 software update due in June) and all of which could be implemented via software updates or 3rd parties. So while were on the subject of the 3g iPhone, here are my:


Top 10 iPhone 2.0.1 Feature Requests

  • Flash Player! – We can’t keep pretending that we don’t need this! With a faster iPhone, there’s no excuse
  • Video Recording – No reason not to have this either
  • MMS Messaging – Can we send some picts and video directly to our buddies without using email?
  • Cut/Copy/Paste – Duh!
  • Contact Search – I’m sure I’m not the only one with hundreds of contacts
  • Note Syncing – No reason not to have this
  • Audio Recording – Taking notes/Voice recorder would be a very popular feature
  • Email Anything – The ability to email anything that’s on the device, ie: contacts, voicemail messages, maps, etc.
  • Voice Dialing – Lesser phones have this basic feature
  • Consolidated Email Box (option) – I have 5 email accounts on my iPhone – my screen is starting to wear out in the spot that I have to keep hitting the Back button on.

Time Capsule Review

As the saying goes, "there are two kinds of computer users: those who have lost data and those who are about to!" Unfortunately, I’ve lost data in the past. Therefore, I’m a firm believer in having a good backup strategy. When it comes to hard drives, it’s not a matter of if they will fail, it’s a matter of WHEN? I was always puzzled as to why Apple never had a backup utility built-in to the OS. However, I couldn’t wait for this to happen so I’ve used various backup utilities over the years and my absolute favorite is SuperDuper! SuperDuper makes a clone "bootable" backup of your drive to another drive. It has a schedule feature so that it can run unattended and it is the way that my server gets backed up every night. However, for my other Macs I wasn’t backing them up nightly. It was more like weekly (or sometimes bi-weekly) when I would think to plug in the external drive and do it. This was especially the case for my laptops which move around and don’t always have an external drive plugged in.

So needless to say I was quite intrigued by Mac OS X 10.5 Leopard’s Time Machine feature. You could call this "backup for idiots." In typical Apple fashion it’s just drop dead simple. You plug in an external drive, Time Machine asks if this is the drive you want to use for backups, you say "yes" and that’s it. There’s nothing to think about from that point on. It manages the backups from that point on automatically and hourly. When the drive fills up with all the incremental backups, Time Machine manages the task of deleting the oldest backups for you. It doesn’t stop there! The Time Machine interface for retrieving data from your backup is equally as slick, showing you cascading folders and allow you to scroll back in time to find the files that you want to bring back. You can even do a Spotlight search for them or bring back the whole drive if need be. Yes, Apple hit a home run with finally making backup so easy that you’d be a fool not to do it now.

This is all good except for one thing, those darn laptops. I have a young teenager that’s now on a MacBook instead of an iMac. Although I have an external drive setup on her desk, she doesn’t always remember to plug it in and of course if the drive is not plugged in, her MacBook is not being backed up.


This is where Time Capsule comes in

Although my desktop Macs are fine, each with their own external drives for Time Machine backups, I wanted an easier more seamless way to backup notebooks. Time Capsule is simply an 802.11n AirPort Base Station (wireless router) with a 500 GB or 1 TB hard drive built-in. I opted for the 1 TB model and used it to replace one of my existing AirPort Extreme Base Stations. It has 1 Gigabit WAN port and 3 Gigabit Ethernet ports for wired devices. So I have my iTunes Server plugged in as well as my Slingbox Pro. I had already set up a separate 802.11n network with my existing AirPort Extreme Base Stations so that I could have a really fast network that wouldn’t drop down in speed when 802.11b/g devices connected to it. They are still on my older wireless network. It all works great! When I plugged in the Time Capsule and installed the updated AirPort Utility that comes with it, setup was a snap. Took less than 5 minutes to put in all the settings I wanted. Although you can hang printers and hard drives off it to share, I don’t have a need for those features. Once I had the Time Capsule set up, I took the first MacBook and plugged it in to my network from my office via Ethernet. It saw the Time Capsule right away and I was able to pick it as my Time Machine drive. I had already figured and heard that the initial Time Machine backup over ethernet would take a long time, so I did this over night and just let it run. When I woke up the next day it was done backing up. I then unplugged it from Ethernet and put it back on Wi-Fi.

In addition to the Ethernet ports Time Capsule is expandable via the USB port which allows you to add external USB hard drives which could also be used for Time Machine backups. It’s also nice having the power supply built-in.


One of the biggest questions on my mind…

was how would it handle subsequent hourly backups. In other words, I knew that my family would NOT remember to mount the Time Capsule drive. If you’ve ever had a kid lose an important term paper or book report due to a drive hiccup, it’s not pretty! Although I had read other Time Capsule reviews, I didn’t find one that mentioned whether or not the Time Capsule drive would automount each hour. I was hoping that Time Machine would do the right thing and mount the drive as needed. I was happy that it does just that. There is no further interaction required on the users’s part. Time Machine automatically mounts the Time Capsule drive each hour (wirelessly), does the incremental backup and then unmounts the drive. Again, this is the solution I’ve waited for for years.


The next Mac to be added to the Time Capsule backup plan was my iTunes server which I had just upgraded to a 1 TB hard drive as well. This Mac is always connected to Gigabit Ethernet. When I switched to Time Machine drives to the Time Capsule I didn’t realize that Time Machine automatically backs up other attached hard drives. So my initial backup was 200 GBs bigger than it needed to be (400 GB in all). Even over Gigabit Ethernet, this took freakin’ forever! I’m not kidding, this took close to 18 hours. So let’s cut that in half and say 9 hours for 200GB. That’s a long time for the initial backup and I can’t even imagine how long that would have taken over Wi-Fi. The next day when I realized that I had backed up the second drive unnecessarily, I added it to the "do not" backup section of Time Machine. However, it didn’t automatically delete the data from Time Capsule. I assume that once the drive fills up that  that will be the first data set to go, but I would think that there would be a way to kill the extra 200GB manually. I tried and got all kinds of permission warnings and just aborted my attempts.

Now that the initial backups are done, Time Machine takes only a few minute to do the hourly backups and of course it does it in the background.


The Bottom Line

I’m happy with Time Capsule so far and have had no problems. It doesn’t get any easier than this and Time Capsule is the BEST/EASIEST way to backup your multiple Macs running Leopard. Although you could also use Time Capsule as a network drive to put data on and share it amongst your users, I don’t recommend this. The reason is, if you get in the habit of using it as a server to store your daily work files, then how will they be getting backed up? If your Time Capsule dies, you’d still have your Mac hard drives. However, if Time Capsule dies and you were using it as a network server, then that data that was on it would be lost.

Time Capsule is bigger than the AirPort Extreme Base Station and while it is quiet, it’s not silent. Like Apple’s other white boxes (AirPort, Apple TV, etc.) it does run warm.

The initial backup takes way too long. So the best way to do it is to plug in and let it run overnight or over the weekend. Don’t forget to exclude things that you don’t want backed up or things that are already backed up in another location and don’t change regularly. This will save on disk space. All in all Time Machine was worth the investment for me. Time Capsule/Time Machine only works with Macs running Leopard. It will not back up PC’s or Boot Camp partitions. For a complete list of specs, go here.

500 GB Time Capsule $299, 1 TB Time Capsule $499