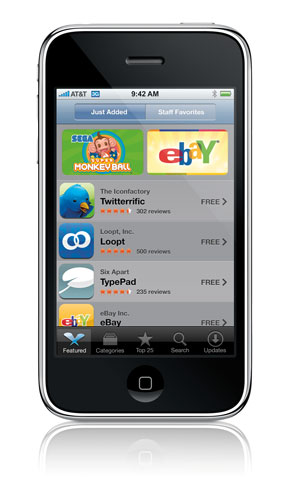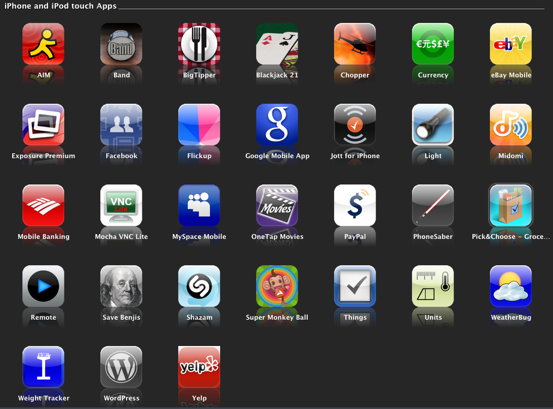
Now that the iPhone software 2.0x and iPhone 3g have been out for a little over a month, I thought I would take a few moments to do a quick review on my favorite iPhone apps. Now keep in mind I currently have 31 3rd party iPhone Apps installed over and above the apps that come with the iPhone. There is something I like about each of them or I would have removed them from my iPhone. As a matter of fact, some of these apps have replaced others that I once thought were great. I have some apps installed like Band and Super Monkey Ball simply because I think they are great uses of technology and show what’s possible with a little creativity. However, when I looked at my list of Apps I asked myself, “name 10 that you use ALL THE TIME!” So here they are:
(also note that many of these will also run just fine on the iPod touch)
Â
#10 – WordPress

The Free WordPress app for the iPhone is useful. It allows me to create blog entries from my iPhone on the go much easier than using the web interface and the biggest plus is that it allows me to use photos that I take with the iPhone’s camera or those already in my photo library. My wishes for an update include the ability to place the images anywhere I want in the post and the ability to do hyperlinks. If they added these two abilities I’d use it a lot more.
Free
Â
#9 – BlackJack 21

Although I’m not a gambler I like to pass the time away on flights or when I’m in a line waiting somewhere by playing a game. Of all the iPhone BlackJack games I’ve tried, this one beats them. It uses finger gestures to enhance the game play. If you want a hit, you swipe down. If you want to stay, you swipe across. If you want to double down, you double tap. If you want to split, you swipe up. Very cool and fun. Also it’s just like when I go to Vegas, the house tends to win way more than I do 🙂 Very realistic!
$4.99
Â
#8 – BigTipper

I’ve tried a couple different Tip Calculators on the iPhone. My choice used to be the free app CheckPlease. That was until I bought BigTipper. BigTipper’s interface is much nicer and I love the fact that there is a numeric keypad right there instead of the other apps that bring up an alphanumeric keyboard. Um, why would I need to type letters? This one also does what some of the others don’t do. It takes Sales Tax into account (optional) and automatically subtracts it so you’re not tipping based on the total which includes tax. It also includes a nice “Round” feature to round up/down the bill to an even number. Its fast, has big easy to use controls and just a better all around UI (user interface). My feature request for this one would be to have it put in the sales tax percentage based upon my current location. Optionally of course. If you’re wanting a freebie, then get CheckPlease. If you want the best then get BigTipper.
$1.99
Â
#7 – Pick&Choose Groceries

This is hands down the best Grocery List app I’ve seen to date! It comes with a database of 1,500 of most commonly purchased items already in place so that you can simply add them to your list without having to key them in. Of course there are going to be things that you buy that aren’t on the list. No problem, you can just key them in as custom items and save them for future use. The one feature that this app has the the other that I tried didn’t have was that it lets you create multiple lists! This is a huge feature for me. We shop at different stores for different kinds of items. This way I can maintain a different list for each store that we frequent. It’s also the little things. For example, you have the option of either having items disappear from the list as you check them off or my favorite, it puts a line through them. The same thing you would do with paper. I love it! If I had a feature request for this app, it would be to have ability to put the prices in as you shop. That way you’d have an idea of what your shopping trip was going to cost you before you headed out. The app works as advertised, stability could be improved.
$4.99
Â
#6 – BOA Mobile Banking

If you’re a Bank of America customer, then this is a must have app. Not only does it allow you have an easy to use interface to access your online banking, but it also takes advantage of the iPhone’s Location Services. So for example, just the other day I needed to go to an ATM and I was in an unfamiliar part of town. No problem, the app was able to find the closest BOA branded ATM and plot a route directly to it. I also used it when I was in NYC last week for the same exact thing (little did I know at the time, all I had to do was turn around and it was right there. Luckily the iPhone doesn’t laugh at you).
Free
Â
#5 – FaceBook

I’m using FaceBook more and more to share photos with friends and family. The Free FaceBook app provides an easy streamlined interface to the site. It also allows me to upload photos directly to my FaceBook account using the built-in camera or photos from my iPhone’s photo library. A must for when I’m hangin’ with my peeps.
Free
Â
#4 – Flickup

Yep, speaking of photos, I’m a photographer and I use Flickr too. I like Flickr.com over many of the other sites out there because of Flickr’s geotagging features. I like being able to plot my photos on a map. Well since the iPhone now geotags photos that you take with the built-in camera, Flickup will upload those shots and include the location information so that they are automatically placed on the map. You can upload shots either from the built-in camera or from the photo library. Now it’s much easier for me to document a trip all from my iPhone instead of having to make time to do it later. Although this app works, I would like it to be a little more stable. After uploading a couple of shots, I often have to restart it or worse restart my iPhone. One addtional point of frustration though is that you need to upload the shots right where you’re standing if you want the location information to be accurate. According to the developer, Apple strips away the location information from 3rd party apps. So if you had a shot say from Hawaii in your camera roll. The location information in that shot will be from where you were in Hawaii. However, if you waited until you got home to upload it with Flickup, the location information that gets uploaded will be from where you are at you home/time of upload. Hopefully, the developer will figure out a way around this in a future update.
$1.99
Â
#3 – Chopper

I love this game! I’m not a gamer, so I don’t like games that are overly complicated. However, I don’t want games that are too easy either. This game hits my sweet spot. It’s challenging enough and entertaining enough to keep me interested, without being so difficult that I just want to give up. I’ve only had this game for a couple of days and I’m already addicted to it. Now I actually don’t mind when I have to spend time in a waiting room or in a line. Works perfectly! Not a single crash (other than my chopper) to date.
$7.99
Â
#2 – OneTap Movies

I’ve always wanted the ultimate Movies App for the iPhone and this is it (so far). OneTap Movies is Location aware so that it will automatically bring up the theaters in your immediate area and show you the movies playing and the movie times. You can also tell it the location to use instead if the theater you want info on is not in your immediate area. It also allows you to see movie trailers and ratings. Also rather than just show a simple text listing, it shows you the movie posters too! Although I really liked this app, I did have a problem with the way it worked. For example, when I’m home I always go to the same movie theater. So It didn’t make sense to me that it would have to look up the theaters in my area every time. Also the closest theater is not the one I go to. So I would have to collapse the listing for that one and scroll down to mine. I wrote the developer a note (right in the app I mind you) and asked for a way to have “Favorite” theaters. He never wrote me back, but I got my wish in a free update 2 days later! Wow! So now you can tap the star next to your favorite theater(s) and it will always be at the top of the list! I would still like a separate “Favorite Theaters” List, but this will certainly do for now.
$1.99
Â
#1 – Remote


The coolest absolutely most useful 3rd party app (for me) is actually by Apple! Apple’s Remote basically turns your iPhone into a Wi-Fi remote for your computer running iTunes or your Apple TV. This app is just killer! I have one computer that serves as an iTunes Server/Jukebox. It has all of my music, my favorite movies, music videos and favorite photos on it. I also have multiple Apple TVs and AirPort Express Base Stations throughout my home. Each AirPort Express is either connected to a stereo system or set of powered speakers. Now with this app I can CONTROL IT ALL from the palm of my hand. If I happen to be out by the pool and want to hear some tunes, no problem. I fire up Remote, see all of my playlists, choose one and I can even direct the sound to the speakers out there (iPod Hi-Fi). Skip songs, pause the music, switch playlists, change speakers, etc. It’s just AWESOME! If you have an Apple TV, the Remote app also serves as keyboard for doing things like searches, entering passwords or flickr contacts. When you’re in the app, the interface looks just like the iPod app. This app works in ways that no other 3rd party remote could and best of all it’s FREE!
FREE
Â
The Bottom Line
I’m always on the lookout for cool iPhone apps. I’ll probably have a different top 10 list in another month. For the most part the 3rd party apps I’ve tried work well. Some are rough around the edges and crash on occasion. However with each update they get better and more reliable. That’s what makes the iPhone so cool is that it’s always changing and I’m enjoying the ride so far. The App Store took in $30 Million in the first 30 days and is looking like it can easily be a $500 Million-$1 Billion/year business. As you can see I’ve found some great FREE apps as well as some fantastic low cost apps. These apps make the iPhone platform just that much more useful to me. While I’m a ways off from not needing to carry my laptop, the iPhone 3g has certainly reduced my dependency on it. There are currently over 1,600 apps available for the iPhone and iPod touch. This is just the beginning. Imagine where we will be in another 6 months!
Also be sure to check out the AWESOME list of iPhone/iPod touch apps that VersionTracker.com maintains.

