Best of 2012: My Top 10 Gadgets

At the beginning of each new year I pause and look back at the gadgets that made the biggest difference in my tech life in the past year. There’s no question about it! These are my Top 10 Gadgets of 2012.

Cintiq 24 HD by Wacom

cintiq24HD

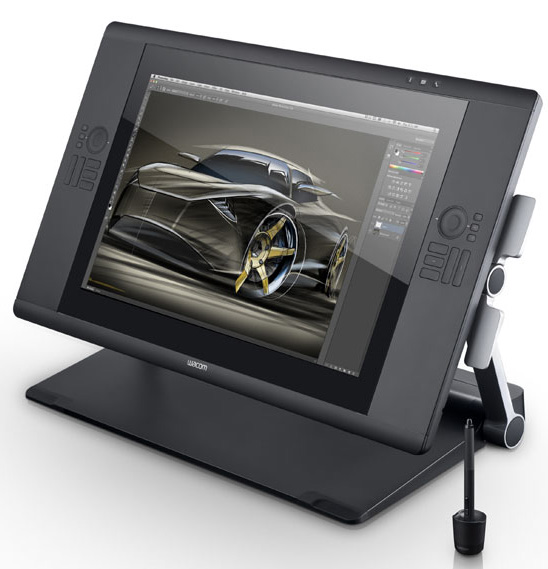
The 1st one that came to mind is the one that sits on my desk that I couldn’t imagine being without and that’s my New Wacom Cintiq 24 HD display/tablet by Wacom. Retouching in Photoshop on this thing is a dream.

See my video review here.

Get one here.


The iPhone 5

holding_iPhone5

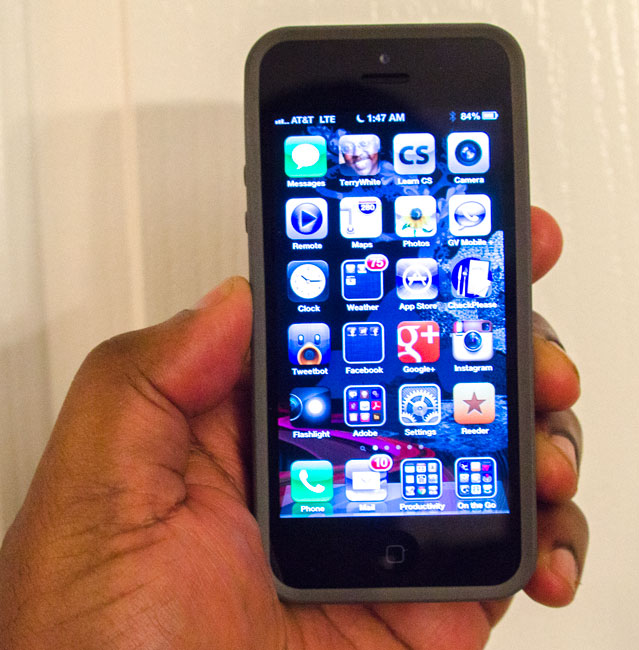
The iPhone makes the list every year if for no other reason it’s probably the gadget that I use the most. However, with the iPhone 5 (while not a radical change from previous models) has the right balance between display size, weight, speed and battery life. My over 400 Apps on the thing get along just fine and it’s definitely a tool that I rely on throughout the day. It’s also my goto point and shoot camera.

See my review here.


Nikon D600

nikon_d600

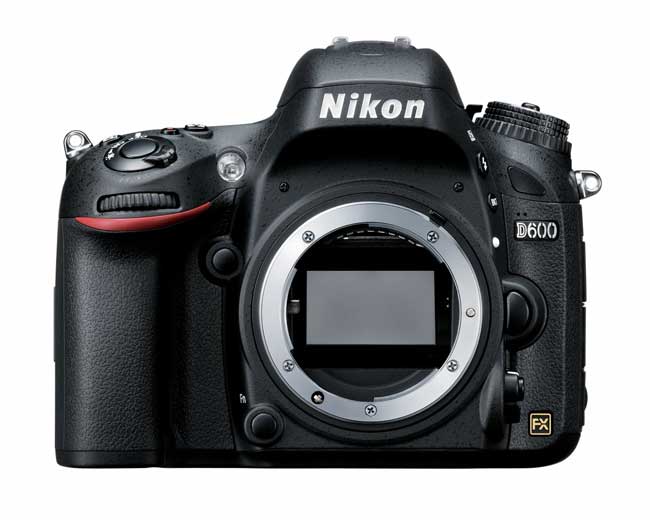
While I did get my Nikon D4 at the beginning of 2012 and I use it in studio the most. I’m most excited about my D600 as my travel/backup body. It was the lowest priced full frame body for most of 2012 (until Canon matched the price with the 6D) and it’s just the right mix of features, size and weight to replace my D7000.

See my 1st impressions here

Get one here or here.


MacBook Pro Retina Display

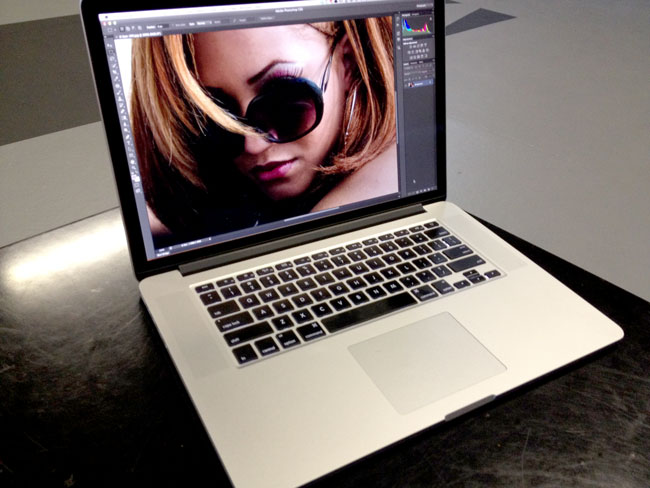
My main work computer is and has been a MacBook Pro for a long time. When I got upgraded to the MacBook Pro Retina display it was as if Apple finally listened to my wishes and ditched the optical drive to make a MacBook Pro that is thinner and lighter. The addition of USB 3, 2 Thunderbolt ports, HDMI out and a beautiful Retina Display were all bonuses! Now that Photoshop CS6, Lightroom 4 and Premiere Pro CS6 have been updated to support it, I’m even happier!

See my 1st impressions here.

Get the configuration that I got here.

The Big Jambox

big_jambox

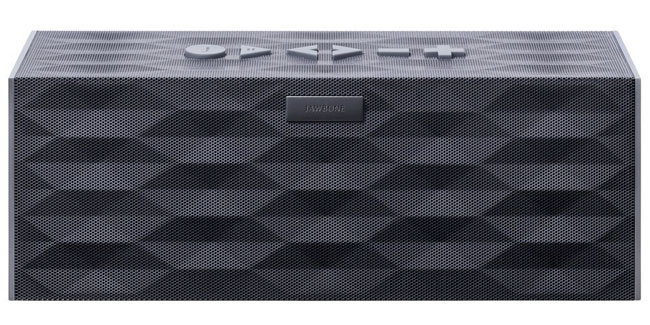
I travel with the original “small” Jambox. I take it to on location shoots as well. However, over the holidays I got to play with someone’s new Big Jambox that they got for Christmas and I’m really impressed. All the same features as the small one with a LOT more sound! Since it’s a Bluetooth speaker it can work with a variety of devices and unlike Airplay speakers there is no network required and that’s what makes it ideal for travel or taking to the park, beach, etc.

Get one here (I plan to!)


iStabilizer for Smartphones

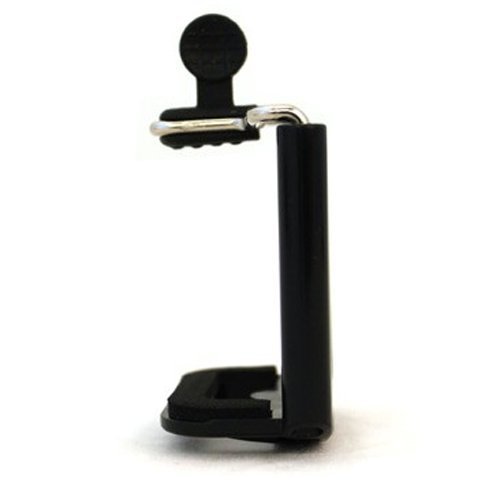
It just goes to show you that not all gagets have to be big and expensive. I use this little gadget way more often than I thought I would because I’m actually shooting more video with my iPhone 5 than I ever thought I would.

See my review here.

Get one here.


Actiontech Wireless HD Streaming Thingy

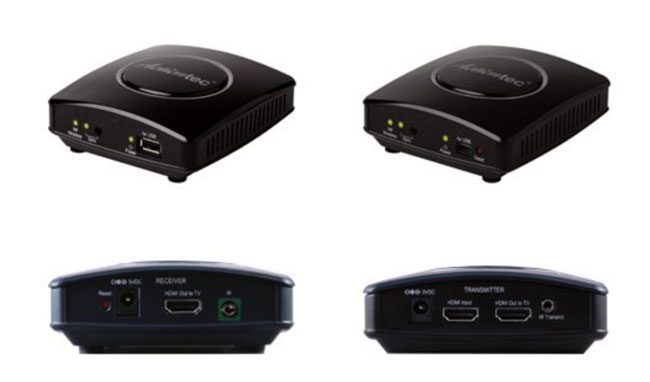
Sometimes it’s the gadgets that blend in so well and that I don’t see, that become my favorites. I got the Actiontech MyWireless boxes to stream the HD signal from a TiVo in one room to an HDTV in another room that doesn’t have a cable connection. The Boxes work flawlessly!

See my review here.

Get one here.


USpeed 7 Port USB 3.0 Hub

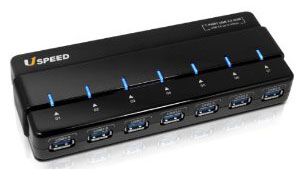
Granted it’s not as exciting as an iPad mini or power strip or anything cool like that, but hey it works and I use it everyday. The Uspeed USB 3.0 Hub works great and has been problem free since I plugged it in.

See my review here.

Get one here.


iPad mini

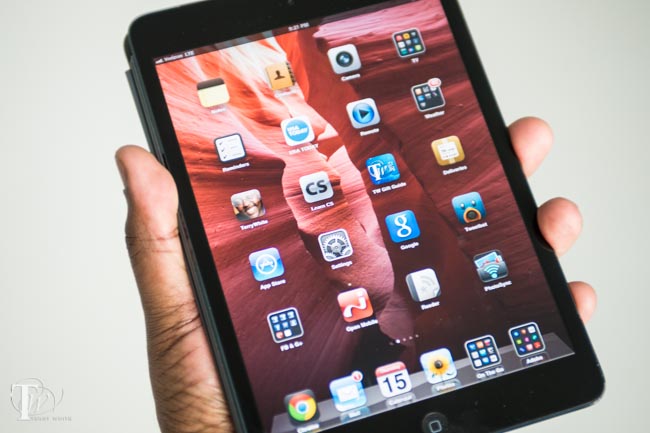
The iPad mini has become a part of my daily tech routine. I find that I’m willing to carry it more than my full sized iPad Retina Display 3rd generation. While I not quite ready to give up the full-sized one yet, I certainly could get by with just an iPad mini.

See my 1st impressions here.

Get the one that I got here.


Logitech Ultrathin Keyboard Cover for iPad 2, 3, 4.

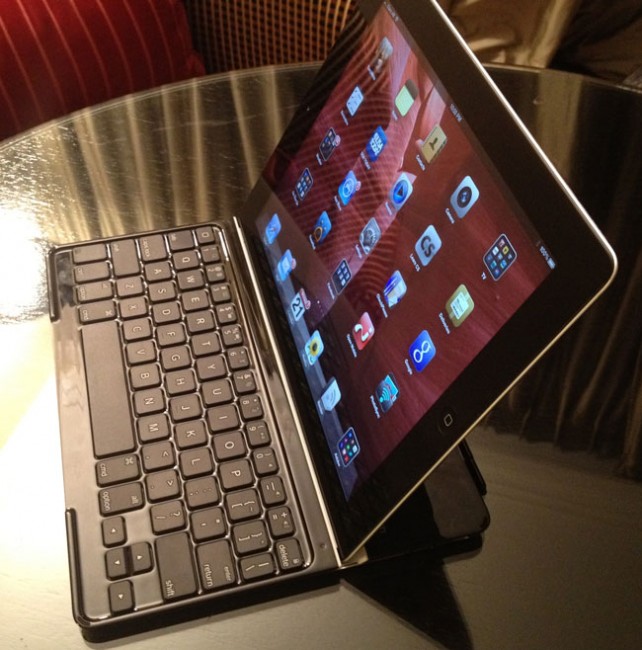
One of the reasons I’m hesitant to give up my full-sized iPad is that I absolutely love this Ultrathin (very light) Keyboard “Smart” Cover that Logitech has built. I use it ALL THE TIME and for those that argue you shouldn’t need/use a keyboard with an iPad have either never used this one or don’t type more than a few words at a time. The beauty of it is that like any other smart cover you can just rip it off when you don’t need it. (By the way only Sith deal in absolutes 😉 )

See my review here.

Get one here.


Top100

Also be sure to check out The Top 100 Apps of 2012 here

Light Dims Now Available in Silver

I originally reviewed Light Dims last year here. For those that know me, I’ve earned the nickname “vampire” because I love total darkness when it comes time for sleep. However, being a gadget guy also means that there is bound to be a few things in the room with annoying LEDs on them that can’t be turned off. Light Dims helped out quite a bit and this year they introduced a new silver color. There really isn’t anything new about how they work. They sell them in two different strengths, dim and blackout. It’s just that now you can get Silver to better match your silver or white gear. Also there are larger strips in the package so that you can cut them to fit a specific application. These are a lot more attractive than duct/electrical tape and in most cases will blend right in. I’m happy to see the new color and shapes. Check them out here. Now if someone would just invent “sound dims” for the paper thin walls in some hotels, I’d be totally set! 🙂

My 2012 Holiday Gadget Gift Guide is Here and it’s an iPad App!

Each year I put together my picks for the best Gadget Gifts to get that special someone on your Holiday Gift List. This year I decided to practice what I’ve been preaching and I’m releasing the guide as an iPad App as well as the web version. I built the App using Adobe InDesign CS6 and Adobe Creative Cloud. It’s interactive with videos, links and animation. The iPad App is a free download and while it’s focused on my top picks, you can access the full guide in the App as well.

Download it here:

iTunes

I’ll be releasing the full version of my 2012 Guide on the web next week.

Using Tether Tools in a way they never intended

Anyone that follows me and follows my photography knows that I’m a fan of shooting tethered. Last week I had the good fortune of meeting with a TetherTools rep. She showed me some samples of their newer products for mounting iPads to various things such as tripods and tables. As you know I recently reviewed the clamps from TripodClamps.com. A product that I’m quite pleased with. However, I try not to put on blinders and I’m usually willing to look at other solutions. I’ve followed TetherTools for some time now as they relate to Digital Photography, but it was neat to check out their iPad products too. I left that meeting with a few samples: Wallee iPad Case for iPad 3 – Black, Wallee iPad Connect Bracket, Wallee Connect Lite Bracket Rock Solid Mini ProClamp Rock Solid Articulating Arm with Center Lock 7″ and the Handstrap. Now keep in mind that a couple of these pieces have overlapping functionality. For example you wouldn’t use the Handstrap and Articulating Arm at the same time. Nor would you use the Connect Bracket and the Connect Lite Bracket at the same time. I left with solutions for mounting an iPad in a variety of different situations.

Using Tether Tools in a way that they hadn’t thought of

On the flight home I decided to test a theory that RC, Brad, Pete and I had during the meeting. I decided to use the Tether Tools Wallee iPad Case, Wallee Connect Lite Bracket, Rock Solid Mini ProClamp and Rock Solid Articulating Arm to mount my iPad on my tray table. The idea was to get the iPad up and at a comfortable viewing angle and freeing up the table for the in flight meal. It worked great! As a matter of fact, had I had these for sale the flight attendant would have bought one from me on the spot. Actually that brings me to the problem with using it this way. If you’re buying this gear as a professional photographer and plan to mount your iPad as part of your digital photography workflow, then this makes a great solution. However, if you were buying this just to mount your iPad for inflight use then it would be a tad bit pricy and cumbersome to travel with. This solution could work very well for mounting your iPad as an inflight entertainment system, but it would need to be streamlined a bit. It would need to be sold at a lower price and as perhaps a single kit. There’s no doubt that you could use this solution in a variety of settings. Just last week I used it to record the video on the Pocket Socket generator that I reviewed. Yep, that was an iPad video with the iPad mounted to my desk. However, for the personal looking for a single solution for iPad travel then it would be overkill unless Tether Tools repackages it for that audience.

Be sure to check out Tether Tools’ other solutions for digital photography and iPad mounting here at tethertools.com.

Charge Your Cellphone During a Power Outage

One of the lessons that Hurricane Sandy taught us is that Mother Nature can strike at any time and as a result you could be without power for days. My heart and prayers go out to those affected by the hurricane. To make matters worse another storm is bearing down on the northeast. While generators are great, there could be situations where there is no gas to run them. In those cases you are probably going to want to at least keep your cellphone going at a minimum.

K-TOR Pocket Socket Hand Generator Can Save The Day

Having a portable hand crank generator may be the difference between a charged cellphone battery and a dead one. The concept is simple. Plug in your USB charger in to the standard AC outlet on the Pocket Socket and plug in your phone. Then start cranking. Unfortunately there is no free lunch. If you stop cranking the handle, then you stop generating electricity and therefore you stop charging. You will definitely get a good workout for the time it takes to charge your battery, but I’d be willing to bet there were some folks out there that had no power and therefore a dead phone who would have had no problem cranking this handle for as long as it took to charge up there devices.

The K-TOR Pocket Socket generates 10W 120v DC at 2 cranks per second. How long does it take to charge your phone? The answer is the same amount of time it takes to charge your phone now. If you can get a decent charge in 10 minutes, then you will have to crank for 10 minutes.

You should definitely make one of these part of your emergency preparedness kit!

You can get the K-TOR Hand Crank Generator here.

I also keep one of these charged for shorter power outages.

UPDATE

Some of my readers were asking about or suggesting solar options. A solar charger is a great way to go too as long as you’ve got access to the sun 🙂 The nice part about this particular one is that you can charge it during the daylight and charge your phone each evening even if the sun has gone down.

Get a great one here.

Review: iPhone 5

Rather than do my usual 1st impressions post I decided to wait a bit and integrate the iPhone 5 (AT&T, 32GB Black) into my daily routine before writing a review.

What did I notice first?

The 1st couple things I noticed with the iPhone 5 was the fact that it definitely felt lighter than the previous iPhone models. The next thing I noticed was a definite feel of faster speeds overall. Apps ran faster, internet functions were faster, it just feels faster. After that It was great having a taller screen with a 5th row of App icons. When you do your restore your icons will be restored to their respective pages/folders, but on each page you’ll have an empty row at the bottom. Also folders can contain 20 Apps instead of 16 Apps. I quickly took advantage of this by consolidating App folders and screens.

What about the bigger screen?

Aside from the App management I mentioned above, it didn’t take long to get accustomed to the larger display. The Apps I use most have been updated or are being updated daily to take advantage of the taller display. Like speed, you get accustomed to more screen real estate pretty quickly. It wasn’t until a couple of days ago when I look at my sister’s iPhone 4 that it really dawned upon me how much larger the display actually is. I like it, it’s great.

What about battery life?

I’ve read mix reviews on battery life and it appears that I’ve lucked out in this area. Not only is my battery life good, but it’s noticeably better than my iPhone 4s. I have not problem getting through full a day on a single charge. Since I charge my iPhone, iPad, etc. every night, having a battery that lasts from the time I wake up til the time I go to sleep is all I need. One thing I will say is that I can see battery life sucking for those in either an area that doesn’t have 4G LTE or or weak coverage. Your iPhone 5 is going to constantly look for LTE service or try to connect to it unless you turn this feature off. Otherwise your iPhone 5 will work harder trying to connect and therefore drain the battery faster. So far I’ve been in areas with AT&T 4G LTE coverage so my battery life has been fine.

What about 4G LTE Speed?

Speedtest.net Mobile Speed Test - Ookla

My iPhone 5 is on AT&T and my new iPad is on Verizon. AT&T’s 4G LTE service in Detroit went live (much to my surprise) the day before the iPhone 5 was available. I was shocked to see my iPhone 5 display the LTE symbol at the top of the display. The speed is definitely FASTER than their faux 4G on the 4s. However, my iPad always tests faster on Verizon than my iPhone 5 does on AT&T. I tested both in Detroit and San Francisco and the speeds on Verizon were about double in both cities. Not sure if that’s a iPhone vs. iPad limitation, but those are the only two 4G LTE devices I have.

What about the new Lightning connector?

My 1st thought was “boy that’s small”. The new connection dwarfs the old 30 pin connector. Small is good the transition is going to be frustrating for a while. While Apple will undoubtedly use the new connector on everything mobile they make from here on out, I like many of you have a large connection of devices, docks, cables, etc. based on the old connector. As of the date of this review I hadn’t received my 30 pin to Lightning adapter yet. So I can’t speak to compatibility issues with that adapter yet (I’ll have to review it separately). At this point I’m going to need to have both cables with me for at least another 6 months to a year. I have no reason to upgrade my iPod touch to the new one and there won’t likely be a new full size iPad until 2013.

What about the cameras?

The rear camera is still an 8MP camera which is fine by me. However, Apple advertises that it does better in low light. Honestly I can’t really tell a difference between the two on my limited low light testing. IMHO smartphone cameras in general have a long way to go to please me with low light photography.

It’s mostly about iOS 6

If you look at most of the things that Apple touts when it comes to the iPhone, many of those benefits are iOS 6 benefits and not specific to the iPhone 5. Things like the new panorama feature, Passbook, etc. are available to users that upgrade their existing iOS devices.

Any problems?

The problems that seem to be making the news are: purple haze from the camera, Apple Maps, scratches and battery life. I’ve already addressed battery life above. I have yet to see a single one of my shots with any kind of purple haze. However, I don’t take a lot of shots directly at the sun 🙂 . I handle my devices with care most of the time. I put the iPhone 5 in a case as soon as I could and before that I carried in my holster and not in my pocket. To date no scratches. That doesn’t mean that it doesn’t scratch easily. It does, I just haven’t had any scratches yet. Lastly I’ve been burned by the new Apple Maps too, but that’s not really an iPhone 5 thing as much is it is an iOS 6 thing (See: iOS6 Maps Got You Down?). I also don’t use the built-in Maps app enough for it to be a problem since I use Navigon for my turn-by-turn voice GPS directions and it works great in iOS 6 and iPhone 5. My only issue initially was finding a decent case and having to switch holsters since the iPhone 5 with a case wouldn’t fit in my existing holster. More on my choices of case and holster in a separate post. Reason being, I bought a case that I’m not totally thrilled with and the one I really want hasn’t arrived yet. The only other problem that not many people seem to talk about is the fact that the iPhone 5 uses a new “nano” SIM instead of the “micro” SIM of the iPhone 4 and 4s. This means that you can’t just pop your pre-paid, international, etc. micro SIM out of your iPhone 4/4s and put it in an iPhone 5. Nor can you take your new iPhone 5 nano SIM and put it in a different phone without some sort of nano SIM to micro SIM tray. This will surely frustrate users that move their SIMs between devices until there are solutions out there that let you cut down/shave micro SIMs and trays that let you put the smaller SIM in a larger SIM holder. The good news about the Verizon iPhone 5 is that it has a nano SIM slot that is factory UNLOCKED! This means that you could take your Verizon iPhone 5 abroad and put in a local nano SIM to save money on international roaming.

The Bottom Line – Should you upgrade?

As usual these changes are “evolutionary”, not revolutionary. Faster processors, more ram, thinner body, better cameras, faster internet, bigger displays, better battery life are really what we would expect at this point. The iPhone 5 is a NICE upgrade, but not a game changer. All of these little enhancements make for a better iPhone than any of its predecessors. If you have an iPhone 4s then there’s little reason to upgrade (especially if you have to pay more because of your contract) to an iPhone 5. However, if you’re new to iPhone, on an iPhone 4 or earlier and you are eligible for upgrade pricing then the iPhone 5 is definitely worth upgrading to. Be prepared to also buy new cables/adapters, cases, etc. The combination of new faster hardware and iOS 6 makes the iPhone 5 a great choice.

Also see: “25 New Fun Things To Ask Siri in iOS6

The 25 Apps That I Use Most

Firewire 800 vs USB 3.0 – Which is Faster?

Now that both the MacBook Pro Retina Display and MacBook Air ship with USB 3 I was curious to find out which was actually faster? Going with my existing Firewire 800 drives and the Thunderbolt to Firewire adapter or USB 3 drives. I did searches online and really didn’t come up with much in the way of current data or test. Most of what I found was comparisons to USB 2 or tests done before Macs had USB 3 built-in. Since I couldn’t find the data I wanted, I decided to do my own tests.

Making it fair

I wanted this to be as fair as possible. That meant that I didn’t want to use two different drives. Ideally I would want to test the same drive that has both Firewire 800 and USB 3 built-in. That configuration isn’t as easy to find as you would think on a portable drive. I found two: LaCie’s Rugged 1TB (which I’ve used in the past with no issues) and the Oyen Digital Mini Pro. Since I was looking to have a smaller enclosure, I decided to give the Oyen Digital a shot. It was also a few bucks cheaper.

For the benchmarks I went with the Free App – BlackMagic Disk Speed Test.

Get it here .

I recorded my results in the video above.

How Many Shots Have You Taken With Your Nikon DSLR? Photoshop Can Tell You!

Every time you fire the shutter of your Nikon DSLR there is a built-in counter that keeps track of these actuations. Most people go on about their daily photography lives shooting away and never really thinking about this count. After all why would you care? As long as the camera is still working you just keep shooting. The only time that this count really comes into question is when you’re selling your camera. I had never heard of an “Actuation Count” until I sold my Nikon D300 way back when on eBay. The perspective buyer asked me for the count and of course I had no idea how to determine it as it’s not really displayed in any of the menus (go figure). I did some research back then and found a Windows only utility that would display the count. I was quite pleased to give the buyer the info he wanted and the transaction proceeded nicely.

No special utility required

This Actuation Count is not only stored in the bows of the camera’s electronics, but it’s also embedded in the metadata of every RAW file you shoot! Since it’s in the metadata that means that Photoshop can see it.

All you need to do is shoot one RAW file (sorry it’s not stored in JPGs according to the stuff I read on the interwebs). Set your Nikon DSLR to RAW, take one shot of anything. I did it with no lens and the body cap on. The image is irrelevant. Transfer the .NEF file to your computer and open it in Photoshop (or Bridge). Do a File Info on it and head all the way over to the Advance Tab. Twirl down the “Schema” folder and you will see your Nikon Actuation Count aka “Image Number”.

I’m selling my Nikon D700 here on eBay and now you know it has 71, 185 actuations 🙂

Shooting Tethered with the Nikon D4 via Ethernet

I’ve done posts here in the past showing various ways to shoot tethered to a computer or to an iPad. When I got my Nikon D4 I popped for the WT-5A Wireless Transmitter too. While it works perfectly, it’s not as fast as a wired connection. Since the D4 has a 10/100 baseT Ethernet Port built-in I decided to give it a shot and shoot tethered via Ethernet.

Understanding the difference…

Most Nikon and Canon DSLRs are supported natively by programs like Adobe Lightroom for USB tethering. That means you just connect the camera via a long USB cable and the software can bring in the images as you shoot automatically. However, when it comes to non-USB connections such as WiFi or Ethernet, this support is usually NOT built-in. Nikon’s Wireless Transmitter Utility will enable you to bring the images into a folder as you shoot, but then in order to get them in Lightroom you have to use the Auto Import feature in Lightroom. Keep in mind that this adds a second or two to each image import vs. native USB support. However, with that said Ethernet is still faster! With USB tethering my 16.2 MB RAW files typically take about 6-8 seconds to come in via USB. When shooting via Ethernet, they actually come in in batches of about 6-7 images within a few seconds. My guess is that there is some overhead from the time files get dumped into folder before Lightroom sees something new and then imports them all at once. Also the Ethernet connection is a lot less fragile than the USB connection I’ve used in the past. 😉

The D4 allows you to switch between a wired or wireless connection via the Network menu. This means that I can disconnect the 100′ Ethernet cable that I bought and go wireless via the WT-5A module without skipping a beat. Wired or wireless, the images are going to the same Watched folder that Lightroom is looking at.

The Bottom Line

If you use the D4 in a studio environment and you shoot tethered, you definitely want to give Ethernet a try. Rather than going through a switch/router, I have the ethernet cable plugged directly into my MacBook Pro for the fastest possible connection. It would have been nice to see a Gigabit Ethernet port considering what the D4 costs, but the 10/100 baseT connection is still pretty fast.

Gelaskins: The Terry White Collection :)

I’ve been using Gelaskins for a couple of years now to customize my various devices. As a photographer I’m always looking for ways to display my work. Put the two together and now my “Creative Portfolio” is on my MacBook Pro, iPad and iPhone.

P.S. I love it when the TSA agents are so busy looking at my photos that they forget to make me take off my belt! 😉

Check out Gelaskins here. You can buy existing designs or upload your own!