Finally! A 1TB 7200rpm 2.5″ Drive

1tb_7200rpm_travelstar_bare

Last August I wrote a post and created a video showing the speed difference between USB 3 and Firewire 800 and while that was fine, what I realized was that the real bottleneck was the drive itself. I typically buy 1TB portable drives for on the road backup and emergency use. Until now all 1TB 2.5″ drives were only rated at 5400 rpm. In other words, slow! This means that the interfaces like Firewire 800, USB 3 and Thunderbolt really didn’t matter much if they all outpaced the speed of the drive itself. I bought a Buffalo Tech 1TB Thunderbolt/USB 3 portable drive. I couldn’t wait to see how “fast” this new drive would be? I was disappointed as it was no faster than my Firewire 800 or USB 3 drives. The problem wasn’t Thunderbolt or something that Buffalo Tech did wrong, the problem was that 1TB drives didn’t spin any faster than 5400 RPMs.

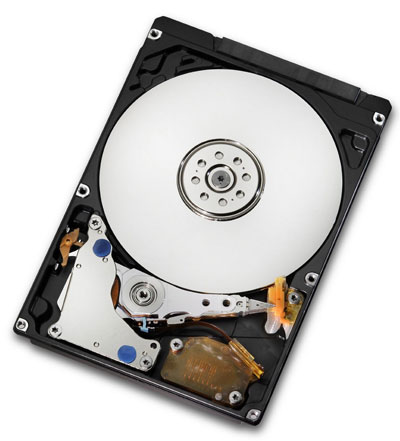
HGST shipped a 1TB 7200RPM Travelstar 2.5″ Drive!

1tb_7200rpm_travelstar

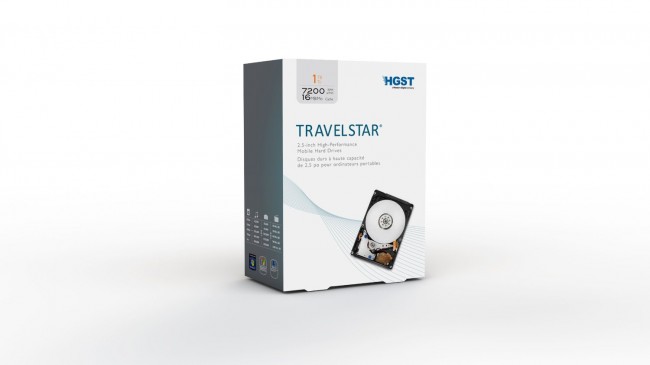
I noticed that I was seeing NEW Drives from OWC and G-Tech that stated that the drives were 1TB 7200 RPMs. This meant that there had to be a NEW 7200 RPM 1TB internal drive that I wasn’t aware of. I did some research and found that HGST (a Western Digital company) had in fact shipped a 1TB 7200RPM 2.5″ drive.


Upgrading my existing drives

Rather than run out and buy a couple new drives, I decided that there was nothing wrong with my enclosures. I figured I could just buy the new bare drive and swap out the slower drive in the enclosures that I already owned. Great idea, but it really depends on the enclosure. Some enclosures are really easy to open and others aren’t. Almost in ALL cases you’re going to void your warranty on the original drive/enclosure.

buffalo_tech_opened

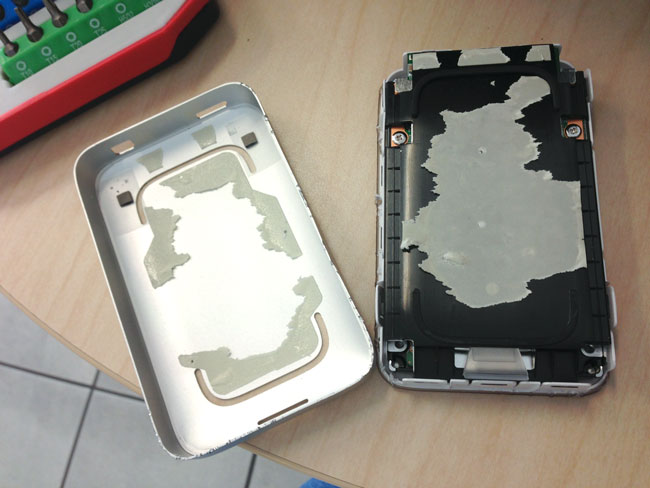
It was clear that the Buffalo Ministation Thunderbolt/USB 3 enclosure was NEVER intended to be opened by the consumer. This is probably one of the hardest cases I’ve ever had to open. You pretty much have to “pry” it open to get to the drive and it won’t look pretty when you’re done. Not only is the case secured by internal tabs, but the internal drive tray is “glued” in place. That makes it even harder to open because the glue is fighting against you to. I was determined to swap this drive out and I wasn’t concerned about the cosmetic appearance of the case once I was done. If you want it to still look pretty, don’t try to open this case. You will leave pry marks no matter what.

after_1tb_7200rpm_drive_install

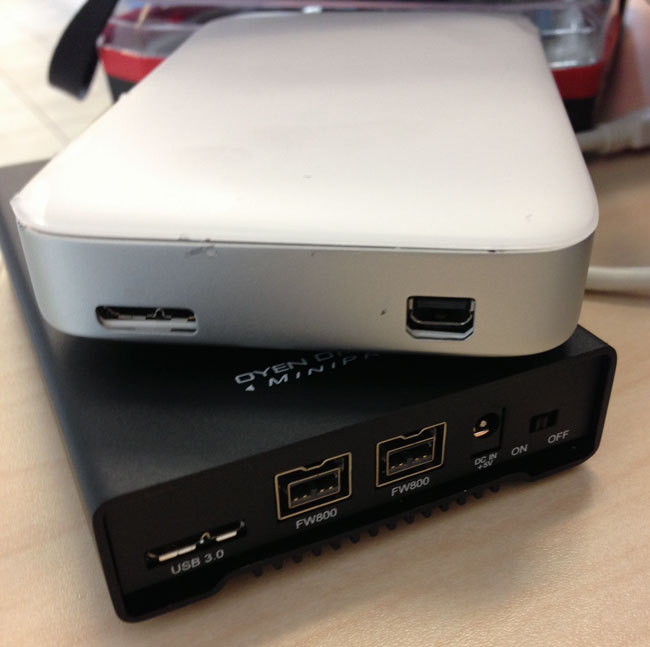
On the other hand my Oyen Digital Firewire 800/USB 3 case opened up very easily by simply removing the screws on the bottom and sides of the drive. I swapped out the drive and it went back together just as easily.
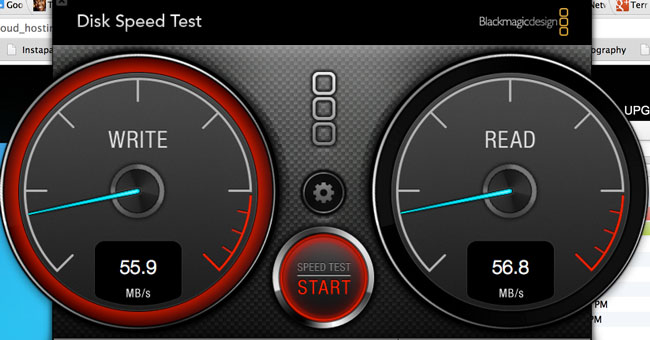
 

The Speed Tests

1tb_7200rpm_drive_speedtest
1TB 7200 RPM Drive Speed Test via USB 3

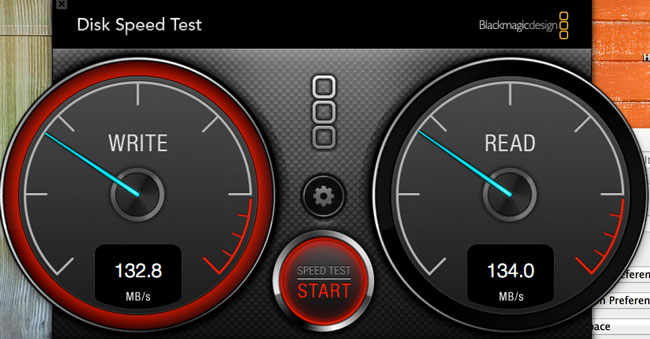
As I suspected, the new 7200 RPM drive was MUCH FASTER than the 5400 RPM ones. There was still virtually no difference in speed between the Thunderbolt and USB 3 interfaces. This could be due to several factors, but in all cases both drive enclosures tested faster than they did with the slower drives.

1tb_5400rpm_drive_speedtest
1TB 5400 RPM Speed Test via USB 3


The Bottom Line

Until SSD drives go up in capacity and come way down in price, these traditional hard drives are still going to be useful for backups and transporting large amounts of data. Now that this drive is out I expect all the drive manufacturers to start making it available in their enclosures. If you’re not a do-it-yourself kinda person, then I would either wait for the Buffalo Minstation to get an upgrade or I’d go with this G-Technology 1TB G-DRIVE mini Portable USB 3, Firewire 800 Drive. If all you need is USB 3, then you’re better off just ordering the bare HGST 1TB 7200 RPM drive and low cost portable enclosure like this one.

20% Off CrashPlan Now thru 9/8/12

CrashPlan is my offsite/cloud backup of choice! I love the service and it has even saved my bacon a couple of times since I’ve been using it. Now it’s on sale for 20% off through Sept 8, 2012. Check it out here.

There are two types of computers users: those who have lost data and those who are about to lose data – BACKUP!

What good is your backup if it’s sitting next to your computer and you have a tragedy (fire, flood, theft, etc.)?

Don’t Lose The Shoot

Over the weekend I was working with a model and during our casual conversation she expressed to me how disappointed she was that in one of her recent shoots with another photographer that she lost all but a couple of her images. She described the tale of receiving a CD of the images that he took of her. She was importing the images into her computer and it stopped after about the 3rd image. It seems that the disc was corrupted. At that point she contacted the photographer to perhaps get another disc and he informed her that he had lost the images too. I’m not really sure what that means, but I take it as either he had the same problem with disc corruption (relying on CDs as his method of archival) or some other form of data loss?

Data Loss Happens!

No matter what system you use, hardware you use, services that you use there is the potential for data loss. Physical media is susceptible to all kinds of failure. So the idea is to never ever ever ever ever trust your images (or any other important data) to one single device or thing.  To date I’ve been quite lucky. I’ve never lost a shoot. Nothing would be more frustrating than to spend hours or all day on location doing a shoot only to not have any images to show for it. I’ve been backup paranoid since my 1st hard drive crash in the early 90’s.

Let’s start with the shoot itself

Memory cards these days come in nice large capacities and while I love being able to shoot 1,000 RAW images to a single card, it’s not a good idea! You’re much better off breaking your shoot up onto multiple cards. At least if one card goes bad you haven’t lost ALL of your images. Keep in mind this is when you’re the most venerable. At this point your images only exist in one spot.

Immediately Backup The Shoot – If I’m out in the field and I’m shooting to a memory card then I’m going to backup immediately afterwards (usually while on location) to another device. I’m either going to backup to my iPad, my MacBook Pro or a portable media backup hard drive such as the HyperDrive Colorspace.

That way I still have the original images on the card AND on at least one other device. If I’m shooting in studio then I’m automatically backing up with each shutter release. I’ve been shooting either wirelessly with my Nikon D4 or via Ethernet. That means an image is being captured to the card AND then transferred to my MacBook Pro. That’s not enough for me! I still copy the folder of images to a backup folder on my server before I start working on the local copy that’s on my hard drive.

Yes, even on vacation! Not only do I backup the card via one of the methods above, but I will probably even upload the images to the cloud so that if my gear is stolen or damaged while I’m on vacation I would at least have the images to pull back down when I get home. Before cloud storage was so common I would mail myself a backup DVD.

Image compliments of iStockphoto.com

After it’s all over – even after the shoot is over, images have been retouched and delivered. I still backup EVERYTHING to CrashPlan.com. My computers are backed up locally to other drives via Time Machine, but at the end of the day I still prefer having at least TWO backups and at least one of them being offsite. CrashPlan has served me well thus far. An often overlooked feature of CrashPlan is that it allows you to also choose another location for backups such as a friend’s house or perhaps backing up your studio computer to your home computer or vise versa.

How to start thinking about your own backup strategy – The 1st time I ever backed up my hard drive was due to a total hard drive crash. I learned my lesson the hard way. However, even after that crash and learning the importance of backing up, I wasn’t doing it regularly back then. One day I looked at my computer and said to myself “what if your hard drive crashed RIGHT NOW? What would you lose? I started thinking about all the things that weren’t currently backed up and of course I did an immediate backup. Luckily times have gotten better and our backups are more automated with things like Time Machine and Crash Plan. That doesn’t mean that you can’t use the same method to determine what to backup. Just modify it a bit. Ask yourself if your computer crashed right now, what would you lose? Now ask yourself if your building burned to the ground overnight (no one was there, no one was hurt), what would you lose? If someone stole your camera bag, what would you lose? If someone stole your computer bag, what would you lose? For me, in each of those scenarios I’d lose gear and I’d be pissed off, but my data in each of those scenarios would be recoverable.

The Bottom Line

I’ve never lost a shoot! Sure it could happen some day, but I try to reduce my risk as much as possible using the methods above. I had worked with another model for a couple of years before she moved out of state. One day she sends me an email telling me that she had a small fire and lost all of her CDs (she put them on CD, not me) and was wondering if by chance that I had any of the images we had created together. I had ALL of them! I was able to send her all of our “finished” images that we had ever taken.

“You’ve either lost data, or you’re about to lose data!” BACKUP

If your important data is only in one place then you’re doing it wrong!

Elgato Thunderbolt SSD Portable Drive – Fast, Expensive


I’m always in search of the fastest portable external drive I can find and I think I found it. I got the Elgato Thunderbolt SSD 240GB drive. It is by far the fastest portable external hard drive I’ve ever used, rivaling the speed of my internal SSD drive. Typically I use an external drive to boot from while running beta software or beta OS’s. While I’m testing things like Adobe CS 6 I want it to perform as fast as it does when I’m booted from my regular internal drive.

The Elgato Thunderbolt SSD Portable Drive is FAST, but has a flaw

While this drive definitely has the speed I’ve always wanted, it doesn’t come cheap. It comes in two flavors. There is a 120GB version for $429.95 and the 240GB version for $699.95! Those prices are crazy, but they are what they are. While the price could be a big showstopper for many, the price is not the flaw I was thinking of. The one problem with this drive is that it only has ONE Thunderbolt port. That doesn’t sound like much of a problem except that Apple uses the Thunderbolt port on MacBooks to also connect mini-display adapters too. This means that I can’t have the drive plugged in AND a projector. That kinda kills it for me for using this drive when doing live presentations.

This and other Thunderbolt devices need to have two ports. You need the ability to be able to pass through to a second device or display. Apple did a good job in putting multiple ports in their Thunderbolt Display and Belkin is coming out with a $299 Thunderbolt hub (it also has Firewire 800 and other ports to help justify the price), but we shouldn’t need a hub just to hook up a display and a drive. Other than this flaw, there is no doubt that the Elgato Thunderbolt SSD drives is one of the fast bus powered portable hard drives that you can get.

You can check out the Elgato drives here and here.

How I use Lightroom and Dropbox Together


I use Lightroom everyday as I'm always doing something with my images. I have multiple catalogs for the various kinds of photography that I do. My images are temporarily captured and stored on my internal hard drive of my MacBook Pro until they've been reviewed, selected, retouched, shared and delivered. After that the keepers are moved to my Mac OS X Server (Drobo) where they are backed up each night to another Drobo and to the cloud via CrashPlan. Once the images are moved from the internal drive on my laptop to the server, i update the catalog with the new location of this folder of images. This way if I ever need to work with or output those images again Lightroom will do so over my network to the server. The catalogs themselves always remain on the laptop drive. That's where the problem comes into play. What if I want to access one of those catalogs from a different computer? Networked Catalog access is not supported or recommended.


My Lightroom Catalogs are on Dropbox

I saw the value in Dropbox long ago and signed up for their 100GB plan. Dropbox basically became my "documents" and "pictures" folder so that I would have cloud backup and access to my documents/pictures no matter which computer or mobile device that I use. That's been working out GREAT! One day it dawned upon me to try it with a Lightroom catalog. I figured if my catalog is sync'd to Dropbox, then I would be able to access that catalog from any of my computers running Lightroom. I put my most frequently used Lightroom Catalogs in my Dropbox folder and I have to say that I love it! I can now go to any of my computers running Lightroom and access my catalog. Also something else works that I wasn't sure if it would or not. The images themselves (except for the most current shoot/work in progress) are on the server, all I have to do is mount the server and Lightroom sees the images too. No relinking necessary. 


Could you put the images in there too?

Sure! I could also put the images from my most current shoot in the Dropbox folder for a true "work anywhere" scenario. The only reason that I usually don't is because of the time it would take to sync hundreds of RAW files relative to the initial time I actually need access to that folder from more than one computer. The other option and the one that I would lean towards would be to immediately copy the current shoot folder to the server when I get home. The only reason I don't do that is because it just works faster overall when the images are on the local drive for the initial edits. If I were to pick either of the above workflows, I would just copy the images immediately to my server right after the shoot. This way I could work on them from any computer in the house.


Side tip

Dropbox is also an easy way to share the final images. You can zip them up, put them in your public folder and then right click on them to get a public link. Simply email that link to your client and they'll be able to download the large file without having to have a Dropbox account or even know what Dropbox is.


The Bottom Line

I use Dropbox for lot's of things (see my 5 Ways to Take Advantage of Dropbox post here). Every time I think of a new way it makes me value the service that I pay for even more. You can get a FREE 2GB Dropbox account here.

I went with CrashPlan and it’s Finally Done!


A while back I did a guest post on Scott Kelby's blog about my photography workflow. In that post I also talked about backup and offsite backup. At the time my offsite backup method was simply rotating two external hard drives to/from my safe deposit box at the bank. While this method certainly works, it does require me to actually make the trip to the bank. As much as I would have liked to do this on a weekly basis it was turning more into a monthly or bi-monthly trip. Although an old backup is better than no backup I wanted something a little more automated. It was suggested in the comment section of that post that I look at cloud backup, so I did. The first company I looked into at the time was Carbonite. However, Carbonite was a non-starter for me because of their stupid policy (at the time) of not allowing you to backup an external drive from a Mac. Really? Seriously? What difference does it make if the data is on the internal drive or an external drive? Charge for the amount of data being backed up and be done with it! I confirmed this stupid policy with their customer service and ended up going with CrashPlan instead.


CrashPlan gets it right

My initial experience with CrashPlan was excellent. I had no problem getting setup with their CrashPlan+ Family Unlimited Plan. This allows me to backup every computer I own and there are no silly limits on which drives the data has to be on. I knew going in that backing up TERABYTES of data over the internet would take a long long long time and well it did! It took MONTHS to backup my two servers. These two Macs (with Drobos attached) contain all my photos, music, movies, documents, etc. In other words, my digital life. 


How long did it really take?

I signed up for CrashPlan on January 13, 2011. I set it to backup both computers, but I did limit the bandwidth that it uses AND I set it to only run at night while I was sleeping. This way it would have no impact on my day to day internet use. By having it run only half the day and at a limited bandwidth, it took about 6.5 months to complete the backup of 1.7TB. Now I have it backing up another computer now that the main backup is done.


There are other options for the initial backup and restores

I was in no hurry for this backup to complete because I already had an offsite backup solution in place. However, if you want your initial backup to not take weeks or months then you could pay for them to send you an external hard drive. This way you could backup your data in a matter of hours instead of days,weeks or months. Once you return the drive to them they will add your data to their servers and give you instructions on how to connect your account to that data for continued backup. 


What's the advantage of cloud backup?

Now that my initial backup is done, my new/changed files are backed up every night automatically and OFFSITE. If a disaster strikes my home (flood, fire, theft, etc.) I would be able to get my important data back once I'm up and running again on a new computer/hard drive Yes they offer the ability to send you a drive with your data on it so that you can be backup and running sooner). Another advantage is having web access to ALL of my files no matter where I am in the world. If I need an import file off my server at home I could of course access my server via the internet because I have remote access setup. However, even if I didn't have remote access available I could always log into my CrashPlan account via the web and download any file that I want. 


The Bottom Line

There is no such thing as being too backed up when it comes to irreplaceable files such as digital photos. I backup my computers internally with things like Time Machine and SuperDuper!, but I also like having a backup that is offsite too. CrashPlan offered the most bang for the buck with unlimited data plans and no restrictions on where my data had to be stored in order to back it up. You can find out more about CrashPlan here.

Review: Drobo FS


I've been a happy Drobo user since October 2008. My main Drobo 4 Bay Firewire 800 unit is being used as the main storage on my Mac OS X Server in my home office. My second Drobo 4 Bay Firewire 800 unit is being used on my dedicated media server (an iMac running iTunes) and it houses all of our music, movies, TV shows etc. I love Drobos because you can easily increase the storage capacity by swapping one or more drives for larger ones without having to start over and reformat. I also love the fact that the drives don't have to be the same capacity. While my Drobos have been relatively trouble free from a hardware standpoint, I did suffer from a directory corruption problem once back in February 2009. Luckily I knew better and had my data backed up. While Drobo is GREAT at protecting you against drive failures there's is no magical protection against accidental file deletions, viruses, or directory corruption. In my current setup I have each Drobo being backed up on a nightly bases to external large capacity drives via SuperDuper! This all works great, but it does still leave me exposed to one problem. 


An Oops Moment

We all have those oops moments. Those moments where we do something that we wished we hadn't. It could be deleting a file that you thought you no longer needed or doing a Save when you meant to do a Save As, etc. If that happens to me and I catch it right away, no problem I can restore from yesterday's backup. However, if that happens and I don't realize it right away then I could lose the file completely after the new file gets backed up during the next evening's backup. In this case Time Machine really shines. As a Mac user I have Time Machine right in the OS. I use it on my MacBook Pro and other computers around the house. So no worries if this problem happens on one of those computers because i can just go back in time and grab and older version. However, if the file is on my Sever then I don't have that protection. Same goes for my iTunes collection. If I delete something there without realizing it, it will be gone for good after the next backup. 


Drobo FS to the rescue

While I can pretty easily clone my Drobos to nice big 2TB and 3TB drives, it becomes more challenging using Time Machine for that much data on a single backup drive. The drives would fill up quickly and I would be no more protected than I was with a clone. In this case I wanted to use Time Machine but I would need something as large as the capacity of my Drobos and actually significantly larger if I want to go back further in time. The solution was clear – another Drobo. With another Drobo I could put large drives in it and it would not only have the storage I needed to backup one Drobo, but both Drobos. Since the two computers are not in the same room, I needed a network solution. This lead me to the Drobo FS. While I could have put another Drobo on my Mac mini server it would mean having to daisy chain it via Firewire and I also have limited space in that area of my office. The Drobo FS is a 5 bay unit that connects directly to your network via Ethernet. This means that it can be anywhere in my house including a closet or storage room. The 5bay FS doesn't cost that much more than a directly connected Drobo model.


Setting up the FS

I love it when all the instructions that you'll need to setup a new device fit on a single card. The Drobo FS is that easy to setup. install the software. Insert one or more hard drives (2 or more is best for protection) and they don't even have to be the same capacity. Plug in your Ethernet cable (gigabit ethernet if you want performance) and turn it on!

The Drobo automatically formats itself and in a few moments shows up in the Drobo dashboard of all your networked computers. At that point you change the administrator username/password and create the "Shares" you want to be seen on the network. Add your users/passwords and you're done. 


Using it for Time Machine

Since I already have a Fileserver that I'm happy with I didn't really need to setup any shared folders beyond the one for my network Time Machine backups. You create a share and then just enable the Checkbox so that this new Share can be used and seen by Macs as a Time Machine volume.

Unfortunately you do need to install the Drobo Dashboard on each of the Macs that you want to backup to it via Time Machine. It's not the end of the world, I just dont' like installing any more software than I absolutely have to. Once the Drobo Dashboard is installed on a Mac that you wish to backup, you mount the Share and then choose it in the Time Machine System Preferences. For now I've decided to use it for all of my Desktop Macs including both servers and another iMac and Mac Pro. I've completed the backup on a couple of these Macs as of the writing of this review. The big ones are going to take a day or two to complete because if you've ever tried to backup 1.5-2TBs of data you know that it can take a while.


The Bottom Line

The Drobo FS is a great solution for any home or small business looking to setup a File Server/NAS or Network backup that is painless and has built-in redundancy for protection against drive failure. If you are going to use one in a File Server capacity keep in mind that while Drobo protects against drive failure, you should still back it up too! That goes for any drive solution. Also if you are going to use it as a File Server you can enable the Drobo Apps so that you get File Server type features such as web serving, ftp, etc. I didn't enable these as again, this isn't my main server.

The fact that the Drobo FS connects directly to my network instead of requiring a host computer is huge for me! I would hate it if the day comes that I restore an entire Drobo from a backup because it would take a while. I would hate it even more if the day came that I needed to restore a large amount of data and I didn't have a backup at all.

You can get the Drobo FS enclosure for less than $615 from B&H Photo and Video

You can get 2TB SATA Hard Drives here for $75. The price of storage has never been cheaper!

You can use the Drobo Storage Calculator here to figure out how much storage you would have based on the drives that you put in it.

5 Ways To Take Advantage of Dropbox

I started out using Dropbox.com because someone shared a file with me using that service. I really didn't think much about it at the time and treated it like all the rest of the File Sharing over the Internet services out ther. However, the more I used it the more I got hooked on it. I'll also state for the record that I have no affiliation with Dropbox.com, don't know them, never have met them and get nothing from them other than great service. Now that I have that out of the way let me explain briefly what sets Dropbox.com apart from the rest of the services I've tried.


How does Dropbox.com work?

First off you head over to Dropbox.com and setup your FREE account. You get 2GBs for free and while that doesn't sound like a lot (it's really not, but…), it's free and will cover most people's needs for sharing documents. You can also earn an additional 250MB's of space (up to 10GB total), per each friend you refer that signs up for a free account.

At this point you haven't done anything special that you couldn't have done on a dozen file sharing sites out there. However, what you also get is the ability to download the Dropbox.com application for your Mac or PC (as well as mobile devices such as iPad, iPhone, Android, Blackberry, etc.). With the Dropbox App installed it sets up a "Dropbox" folder wherever you want it be on your drive. You can treat this folder like any other folder. You can create subfolders in it as well. The difference is that anything you put in this folder will AUTOMATICALLY and securely sync up to the "Dropbox" cloud. The files will still be on your local drive, but they will also be available online via the Dropbox website as well as accessible from any of your mobile devices and sync'd to any other computers you have Dropbox installed on. This is what really sets it appart from most similar services out there. The latest version even offers the ability to keep this folder sync'd with your other computers on your LAN, which is a lot faster. Now that we know how it works (if not, watch the video at the end of this post), here are 5 ways to take advantage of it:


Have the same files on your Laptop and Desktop computer

Because Dropbox will sync the contents of your Dropbox folder across ALL of your computers (Mac, Windows, Linux), it makes it really easy to have the same files on a work/office/studio computer and a home computer or a Desktop Computer and a Laptop. Every operating system out there gives each user account a "Documents" folder. Instead of putting your documents in the default "Documents" folder, put them in a Documents folder located inside your Dropbox folder. Now you can work as you always do and when you get home those same documents will be there waiting for you on your home computer or on your laptop. This same concept would work for photos, music and movies as well.  Syncing happens in the background once the document is saved and closed. 


Share a folder with your colleagues

The shared folder concept is how I got started with Dropbox in the first place. Someone shared a folder with me and the other people working on the project. When any of us would add things or make changes to the stuff in that folder, it would automatically sync those things to each of our computers. No more emailing files back and forth or using thumb drives. This is also useful for sharing photos with a group of if multiple people take photos at an event, they can all copy them to a shared Dropbox folder for everyone to have a set.


Create instant online, sharable photo galleries

I hadn't really discovered this feature until recently. If you stick a folder of JPGs in the default "Photos" folder, Drobbox will automatically turn it into a gallery and let you share a link to that specific folder for anyone to see even if they don't have a Dropbox account. Here's an example gallery that I created.

Continue reading “5 Ways To Take Advantage of Dropbox”

LaCie Rugged goes 1TB

It still amazes me when I think about the fact that we've reached a point where we can carry around 1TB drives in our pockets. I typically carry an external drive or two in my laptop bag for carrying extra files, Windows 7 Images for Parallels, bootable backups and to backup my shots after my shoots before I leave the studio. Until the 1TB 2.5" drives came out this meant carrying two or three drives to accomplish this. Now I can carry one! I got the LaCie Rugged 1TB to put to the test. I wanted one drive that I could partition into three partitions and of course I wanted one that was bus powered over Firewire 800 (and USB when needed).

The LaCie Rugged meets those requirements. It has a triple interface with Firewire 800, 400 and USB 2 ports on back. Although it's bus powered, they even supply a USB to power cable for those situations when your single USB port isn't providing enough power, you can plug this cable into a second USB port to power the drive. They also provide FireWire 800, 400 and USB 2 cables.
Although the bright orange color stands out (you'll have no problem seeing it in your bag or maybe even a dark room), I ordered the optional 3 pack of sleeves to change the color of the drive.

You get black, silver and purple in the sleeve pack. Even the purple/blue is a little more subdued than the orange.
 

So far so good

In my short time of using this drive it seems fast (5400 rpm speeds) and quiet. I had no problems cloning my boot drive to one of the partitions that I made and loading up the other two partitions with the files I need to carry. Also they call this drive "rugged" for a reason. It's meant to be traveled with. It has a rubber outer case (the sleeves) and it's one of the only drives I've ever seen that advertises a maximum "drop distance" although they clearly state that you should avoid dropping it while it's running (duh!).


Maximum Drop Height :  up to 2.2 meters in non-operating mode (dropping is not recommended in operating mode)

While this is not the first LaCie Rugged drive I've purchased (I got my daughter one for her Time Machine backups when she went off to college), it's the first one that I've gotten for me.

You can get the 1TB LaCie Rugged here for $199

You can get the 3 optional sleeves in Black, Grey, Purple here for about $17