How I Solved My WiFi Nightmare

I have 1GB Internet (1200Mbps down/35Mbps up), and when everything went downhill, this was the AWFUL WiFi speed I started getting.

I’m not an IT guy. I have had to learn about networking out of necessity, not out of desire or fascination. I view a home network as something that should just work, and you shouldn’t have to think about it day-to-day, just like your refrigerator. You open it and expect things to be cold. You close it and forget about it. You don’t spend hours trying to optimize it. You don’t look for Facebook groups looking for support because it either works or doesn’t. There isn’t much in-between. If it doesn’t work, you get it repaired, replace it, and then forget about it again. In my opinion, a WiFi network should be the same way. You never know how much you depend on your WiFi and internet until it dies!

One day my WiFi just went to hell

Continue reading “How I Solved My WiFi Nightmare”

No WiFi Dead Spots PERIOD. Linksys Velop WiFi 6 Mesh Router Review

Linksys Velop WiFi 6 Mesh Router

I can’t believe that it has been almost two years since I moved away from my Apple AirPort Extreme WiFi routers. You can see my original Linksys Velop review from May 2018 here. I grew my original three node Tri-band Linksys Velop network to five nodes that year and it worked pretty well for me. However, I’m a speed freak. I want the fastest possible network speeds that I can get and I zero tolerance for dead spots. I have a fairly large network with anywhere from 110 to 130 devices connected at any given time. I also have a smart home and stable fast WiFi is a must for a smart home to function successfully. This need for speed lead me to look at the NEW Linksys Velop WiFi 6 Mesh Router.

The Linksys Velop WiFi 6 Mesh Router is a BEAST!

It’s not only significantly larger in size, but it also improves upon the Velop Tri-band Mesh Router in every way. The specs are mouth-watering.

Continue reading “No WiFi Dead Spots PERIOD. Linksys Velop WiFi 6 Mesh Router Review”

Apple AirPort is Officially Dead! Now what? – Linksys Velop Review

three AirPort Extreme Base Stations

In case you missed it, Apple has officially announced the end of life of AirPort Base Stations. They will continue to sell existing stock, but the product will not get any new features and Apple will no longer develop this product line. What does that mean for existing users? If you have an existing AirPort WiFi network and it’s up and running with no issues, you’re probably fine for a while. I have three of the latest AirPort Extreme Base Stations and haven’t had any issues. They just work! However, I just replaced them. Why? Although I wasn’t having ANY issues with my existing WiFi network, I’m asked for recommendations all the time. I don’t like to recommend products that I haven’t actually used. Also I looked at this time as a opportunity to try something new. Apple AirPort Base Stations haven’t had any real new features in years. Now that they’ll no longer be selling them (once stock clears), I wondered what Apple would be recommending to customers? One of the systems they sell in the Apple Stores and online is the Linksys Velop system.

Linksys Velop has over 4,100 reviews on Amazon.com and has a 4.5 star rating

Linksys Velop in the family room

Any product that has that many reviews on Amazon and manages to still have a 4.5 star rating means that people must really like it. I got mine setup and I could easily give it a 4+ star rating, but it’s not perfect…

Continue reading “Apple AirPort is Officially Dead! Now what? – Linksys Velop Review”

GoPro and Periscope Sittin’ in a Tree…

Periscope GoPro camera

If you’re into Live Streaming (if not you should think about it), then you’ve heard of Twitter’s mobile App called Periscope. Periscope launched last March 2015 and already has over 25 million users. That’s huge! Until yesterday you could only broadcast using the camera on an iOS or Android device. For the casual scope (broadcast) that’s fine, but if you wanted to show something big or with a lot of action, your smart device’s camera may not always be best. We hoped that Periscope would open the doors to other cameras and it has started…

Continue reading “GoPro and Periscope Sittin’ in a Tree…”

I have Gogo Wi-Fi on my Long Haul International Flight – Finally!


I’m headed back to Atlanta from Amsterdam today. The flight time is just over 9 hours. I did my usual downloads from my TiVo DVR the night before so that I would have some shows to watch and of course I have my MacBook Pro so that I can get some writing done. The last thing I expected on this Delta flight was to have WiFi internet all the way home! Sure I get my hopes up each time I board an international flight by looking for the familiar WiFi stickers found on 99% of all Delta domestic flights and like always there were no stickers present on this flight. However, once we got up to 10,000 feet I noticed that my phone was asking me to login to my corporate IPASS account (a roaming partner of Gogo). I just figured someone on the plane was faking a Gogo hotspot. However, it worked! I was blown away because I figured I wouldn’t see this until at least 2016. I asked the flight attendant just to make sure and she confirmed that “some” planes have it now and that we were “lucky” today. Lucky indeed!


So what does it cost to enjoy this international benefit? Since I have a corporate plan from work that covers Gogo InFlight WiFi I didn’t even think that about a cost difference at first, but as I started writing this I figured my readers would want to know. I went back to the regular logon page and the prices are high indeed. $19.95 for one hour and $39.95 for the whole flight. While I appreciate this  being a work perk, I gotta say that I would gladly pay $39.95 for WiFi on this 9 hour flight. The amount of stuff that I can get done (including this blog post) is worth it to me. The next question is how fast is it? Gogo inlfight wifi in the states uses a celluar system (plane to ground) and from I can see it’s based on 3G technology. When it first came out the speeds were decent, but lately they have been slow to almost unusable. Still slow is better than nothing, so I use it all the time. 


Since connecting to the ground over the ocean is not feasible, any plane offering international service requires satellite connections instead. One of the first thing I did was run 4 consecutive speed tests to get an average speed and while it’s not screaming fast, it’s faster than the domestic service. I’ll take it!


The Bottom Line

I remember wishing for WiFi on long haul flights for years. It almost brings a tear to my eyes to see it finally making its way into my life and I commend Delta for making these investments to make air travel a little less painful. 

Use the Simplicam to monitor your home or office

simplicam

WiFi connected webcams are nothing new. When someone enters this category I quickly look to see if they’re adding anything new or if it’s just a me too product. In most cases there isn’t a whole lot that’s new, but companies do sometimes find a way to improve on an already crowded product category. The Simplicam + Closeli is a standard WiFi connected webcam with a nicer design than most. It has a well thought out base/stand as well as things like a 10 foot “flat” USB cable so that you can more easily hide it in your home. This camera can be monitored from your iPhone, iPad, Android device or web browser.

The setup process is pretty straight forward. Just plug the supplied “short” USB cable into your Simplicam and the other end into your Mac/PC. The software mounts in a volume on your computer that you can run from there. Once you’re in the setup utility you’ll use it to connect the Simplicam to your WiFi network. You’ll also create an account on Closeli.com where you’ll get a year of included cloud recording service. Closeli like others has different plans so that you can go back and review footage from your camera based on motion and sound detection. They also bring “face” detection to the table to distinguish between someone actually entering the room vs. the cat running by. You can get push notifications of any of the aforementioned types of activity. You can also schedule times when notifications need not be received (you’re home) or when the camera should be off. Notifications or not you can see what’s going on in the room on demand by just firing up the Closeli app on your mobile device or logging in with your web browser on your computer. You can export clips or still grabs as need. If you need to talk to the people in the room remotely you have two way audio. Yes there is also night vision.

Here’s a video review of the product.

The Bottom Line

simplicam-Face-Recognition-Manager

While I haven’t reviewed any of the newer cameras in this category lately, I would say that just looking at the specs alone Simplicam brings at least two things to the table over the competition and that’s face detection (a beta feature, which can also be set up to recognize specific faces and can tell you when an unrecognized face enters the room.) and a lower priced cloud storage/recording service. The 720p 107° view camera is also better than my older cameras.

You can get Simplicam HD + Closeli here.

An even smaller travel router – HooToo

HooToo-inmyhand

Late last year I declared that the Netgear Trek300 was my new favorite travel router. (that was sooooo last year 😉 ) However, it didn’t take long for one of my readers to point me to an even smaller travel router with many of the same features as the Netgear at half the price. I like the HooToo TripMate Nano for many of the same reasons that I like the Netgear:

  • Provides an 802.11n WiFi hotspot for all of your devices to connect to on the road.
  • Works with either Ethernet in your room or public WiFi
  • Powered via USB
  • Small lightweight and inexpensive

As I stated in the Netgear review, I was used to carrying around a bigger much more expensive AirPort Express Base Station, but the one thing the AirPort can’t do is allow you to share a public WiFi connection. In other words many hotel rooms now don’t have ethernet jacks anymore. This renders the AirPort Express pretty much useless because it requires an Ethernet connection to share. The HooToo has a small (everything) switch on the side that lets you toggle to either a wired connection or a wireless one. There is another feature that the HooToo has that the other ones I use don’t and that is the ability to plug in a thumb drive or other USB drive and share files wirelessly.

What’s it lack that the Netgear or AirPort has?

Well with a small size you do give up a couple of things. First off there is only one ethernet port. This means that you can only use it to connect to a wired connection (in wired mode) and not share to another device that requires a wired connection. This really isn’t an issue for me as I rarely ever need to plug in a second device that only has ethernet. The next thing is that the Netgear can be powered over USB or plugged directly into an AC outlet. The HooToo only has a micro USB port for power. Again I’m fine with that as I just plug it into my Anker 60W 6-Port Desktop Charger along with the other devices I’m charging at night. Lastly the HooToo can’t extend the range of an existing network. Again, not something I need on the road and this feature is more for home users.

Some other limitations: TripMate is Powerful, BUT:
– Cannot bridge an iPhone hotspot
– Cannot be used for IP camera FTP path
– Cannot work as a proxy server
– The Ethernet port can only be used as a WAN input port
– No app for Windows Phone OS
– Supports NTFS/FAT16/FAT32 formatted disks

The Bottom Line

The HooToo Tripmate Nano is the smallest, lightest most functional WiFi travel router that I’ve seen to date and it has officially kicked the Netgear out of my bag. I used it on my last trip with no issues (other than the bright blue LED that can keep you up at night). I stayed in an Embassy Suites hotel which only had WiFi. I was able to configure the HooToo via the iOS App or the web browser on my Mac. Once I connected I joined the hhonors hotspot and then from my Mac I got the regular Hilton logon screen to accept the terms and connect (the WiFi was free). From that point my devices were connected to my secure network in my room. Now if only Hilton would speed up their internet services across their hotel chains I would be even happier.

Get the HooToo Tripmate Nano here for a ridiculously low price.

Get the iOS app here from the .

I went with this color laser printer

brother-HL3170CDW

A few weeks ago I posted on my Facebook page asking for recommendations for a new printer. The requirement was that it had to be color and be ready to print when I’m ready to print. In other words I print very infrequently and my frustration with inkjet printers is that some models dry up when not used regularly and take lots of ink just to get the nozzles clean and printing again. My previous office printers had all been Xerox Phaser (dry ink) printers. While these printers have always served me well, it was going to be overkill to get another one as I just don’t print that often anymore. When it comes to photo printing I usually send them out (Mpix, Costco, etc.) So in house high quality photo printing was not a requirement either. I got lots of different recommendations about Canon inkjets, HP laserjets and others. I decided that for the cost of consumables and again the infrequent use, I would be better off this time with color laser. The other requirement was that it had to be wireless. I did look at the Xerox color laser printers, but it seems that Xerox just doesn’t get it when it comes to wireless. In order to go wireless with Xerox I’d have to go with their midrange Phaser 6600, which lists for $499 and still requires a $99 wireless add-on to do WiFi?? WTH! Really Xerox? Wake up! It’s 2014!

My research led me to the Brother HL3170CDW

Not only did this printer meet all of my requirements:

  • Color laser
  • Wireless (WiFi – AirPrint – Google Cloud Print)
  • Automatic Duplex (2-sided) printing
  • Low cost & low cost consumables
  • Quiet
  • Small

But it excelled at all of my requirements as well. Setup went perfectly because I never had to plug in a single cable besides the power cable. The first thing I did after installing the 4 supplied toner cartridges was to power it up and join my WiFi network from the built-in control panel. Next I added it wirelessly to my MacBook Pro and MacBook Air. Finally I did a print test from my iPad and iPhone, which both saw it over AirPrint. Yes, this was the out of the box “it just works”, experience that I was looking for. The print quality is good as well. No problems to date.

What’s the downside?

I would say the only downside is that it’s not as fast as I’m used to with my Xerox printers. When I’m talking speed, I’m talking from the time I hit print til the time the printer wakes up, receives the job and prints it. After that it prints at a speedy 23ppm. My only other concern was that while reading other reviews for this printer, people complained that once it goes into “deep sleep” that it falls off the wireless network for AirPrint. In other words you would have to walk over and hit a button to wake it up to print or print from a computer. I’m happy to report that I have not had this issue at all. As a matter of fact I’ve not printed for two days now and it still shows up and ready to print from my iOS devices via AirPrint. It says “deep sleep” on the LCD. Now there is an option to let it power itself OFF after a user defined interval. At that point I would assume that you would have to press a button to turn it back on and that wouldn’t bother me. However, that option is off by default and the deep sleep conserves power (using less than 1 watt of power). I will turn it off when I’m away on business.


The Bottom Line

If you’re looking for a good quality, color laser printer that supports all the latest and greatest wireless protocols as well as printing via USB, then this printer is definitely worth consideration. It fit the bill for what I was looking for at less than half the cost of a Xerox printer with similar features. It’s also less costly to run than typical inkjets.

You can get the Brother HL3170CDW Color Laser Printer here.


Harmony Smart Control Review

harmony_smart_control

It has been a while since I’ve looked at smart universal remotes. I’ve been happily using my Harmony One for years. However, it was time to setup a new room with HDTV, Apple TV and TiVo Mini. This means either using 2-3 remotes or just ONE! However, I didn’t want to go with another high-end Harmony, yet I wanted something that was still very good. This lead me to check out the Harmony Smart Control. This setup offers the best of both worlds. You get a regular remote control with physical buttons as well as a “hub” that allows you to control everything with your iOS or Android based smartphone or tablet. While I’ve used this hub before, I like the option of having a physical remote for those times when my iPhone is in use or not handy.


How to set it up

The setup was pretty straight forward. You plug in the hub to AC power and then download the Harmony Control app. Since there are no controls on the hub you first have to get it on your WiFi network either via your computer via a USB connection to the Hub or wirelessly to your smartphone via bluetooth. I opted to set it up via my iPhone 5s. The App found the hub and allowed me to key in the password to my WiFi network. Once it was setup on the network the App continued to allow me to set it up. The setup was very typical to Harmony remotes. You simply enter the brand and model names/numbers of the devices you wish to control. Believe it or not, that’s the hard part. Who remembers the model number of their TV? Once I tracked down the info I needed to enter, it was easily able to control each device. Then I setup “Activities” such as “Watch TV” and “Watch Apple TV”. Activities allow you one button options to turn on all the appropriate devices and switch to the appropriate inputs on your TV or receiver. Lastly I added my “Favorite” channels.


How does it work?

harmony_smart_hub

Once I set up the Harmony Smart Control, I now have the option of controlling my TV and components via the supplied physical remote OR via my iPhone or iPad using the Harmony Control App. It definitely beats having to have the TiVo remote, TV remote (to properly switch inputs) and the Apple TV remote. Either the App on my iPhone or Harmony remote can control it all. The App is pretty slick too. Not only do you have multiple screens for various controls, you even have a “gesture” screen that allows you to swipe up or down to control TV volume or left or right to change channels. I also like the one touch access to my favorite channels.


The Bottom Line

Logitech has hit the right combination of hardware and software with this combo. You have a physical remote that anyone can use AND the ability to use your mobile device to control it via WiFi from any room. I’m happy with this setup and I’m considering getting another one for another room of gear.

You can get the Harmony Smart Control here

You can also just go with the Harmony Ultimate Hub if you just want to use your mobile device.


Dropcam HD Review

DropcamHD_front_turned_HI-RES

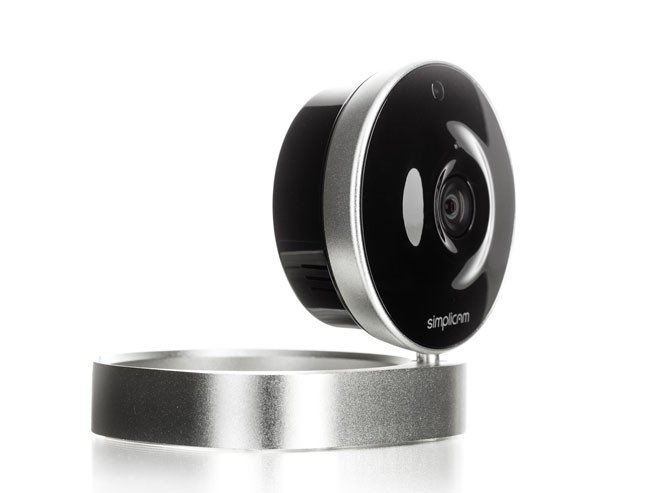
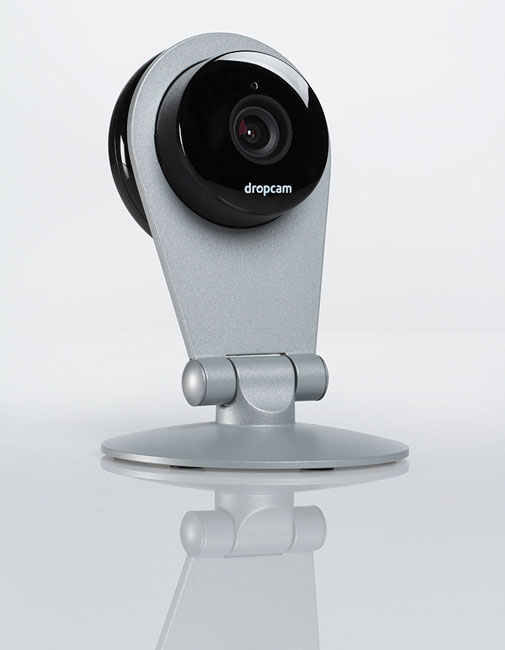
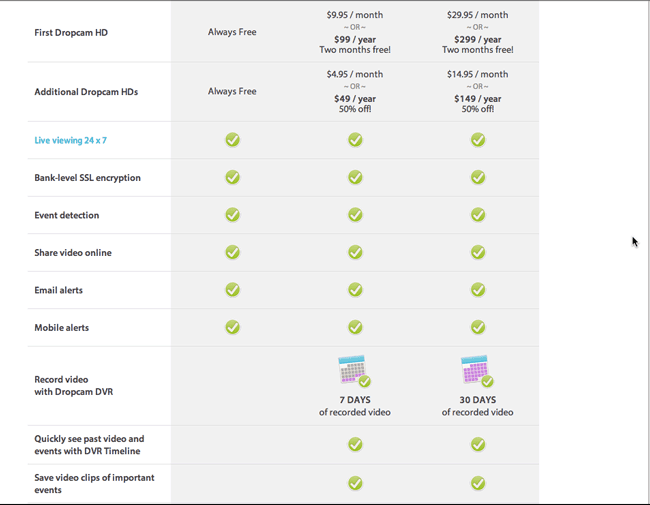
I’ve been using Panasonic IP webcams for years to keep an eye on things at home and at my studio. However, Panasonic has gotten out of this business and therefore it was time to look at newer cams to recommend to people that ask. I was intrigued by the Dropcam HD and finally got a chance to try one out. Dropcam HD is a 720p HD WiFi enabled video monitoring camera. It also broadcasts sound. Unlike the Panasonic cameras, Dropcam is both a hardware solution and service. During the setup process you configure a Dropcam.com account along with setting up the hardware. You have a choice of a “free” live viewing only account or a paid Plus or Pro account that not only allows you to view your Dropcam live, but also see either 7 or 30 days of recorded video respectively. The idea is that if you’re using it as a security camera that you’re not going to be watching it 24 hours a day. Therefore Dropcam will automatically record and keep the last 7 or 30 days of video so that you can review it if need. However, even with the Free account you can setup motion detection that can alert you that something is moving in front of your camera so that you can tune in immediately and watch.


The initial setup

drocam_setup

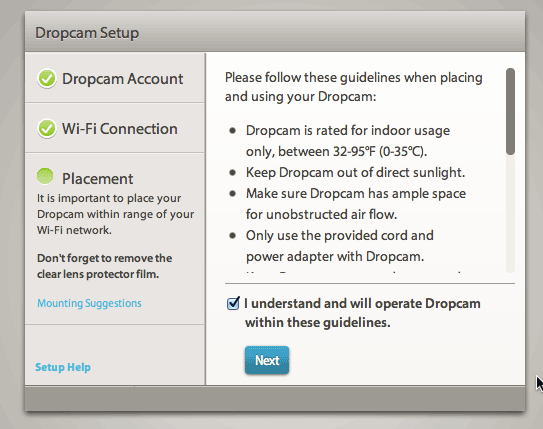
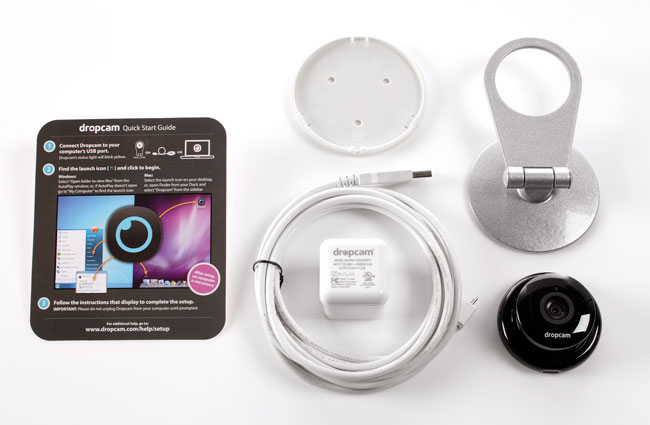
The initial setup couldn’t have been easier. Dropcam HD comes with a stand/mount, 10 foot long USB cable and USB power adapter. You plug the Dropcam HD into your Mac or PC initially and it mounts on your desktop as a volume containing the setup utility. No need to even download anything. During the setup you join the Dropcam HD to your existing WiFi network including password protected ones. You also setup your account on Dropcam.com during this process. Once you’ve got it setup, unplug it from your computer and place it where you want to monitor (indoor use only) and plug it into a AC wall plug. Once the camera powers up and connects to your network the setup completes. The mount can be either used on a desk, bookcase, etc. or you can wall/ceiling mount it. It even comes with the screws and anchors. Also the camera can easily be removed from the mount. It just pops in and out. Also the indicator light can be disabled for more discretion.


Image quality

dropcam_HD_studioview

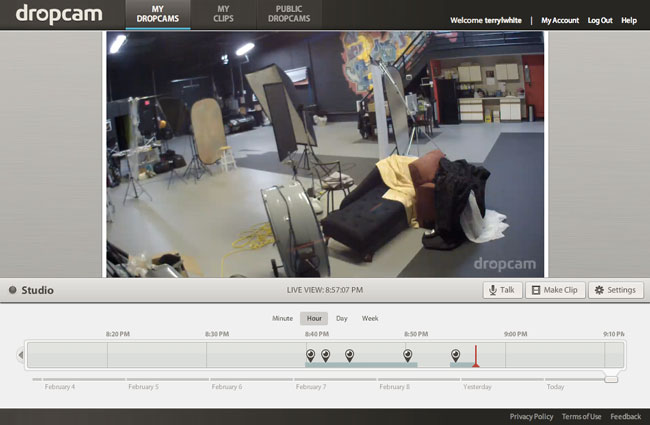
I was really impressed with the image quality. Definitely much better than the standard def/low def Panasonic cameras I’ve been using. You can watch the image in a Flash enabled web browser on your Mac or PC or you can download their mobile App and watch the stream live on your iOS or Android devices. See my review of the iPhone/iPad App here.


Works in the dark too

dropcam_hd_dark

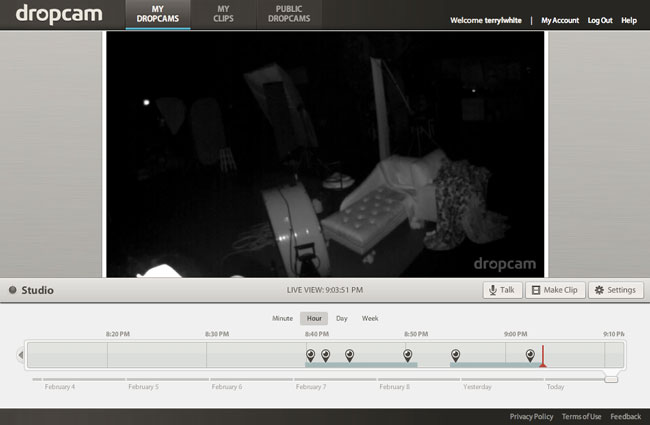
Unfortunately the room you’re monitoring may not always have the lights on especially if you’re not home. I was happy to see that Dropcam HD uses infrared technology to show you what’s going on even in the dark. It automatically switches to night vision when the lights go off and off again when the lights come back on.

dropcam_HD_rates

The Bottom Line

Dropcam HD is a very well thought out process and the company doesn’t rely on any other company or software to make their solution work. This is a good thing as many other solutions lack things like mobile apps or online recording. The image quality is exceptional and exceeded my expectations. You can setup multiple Dropcam HD units. You can do two way audio and it has digital zoom. While this hardware/service solution works as advertised there are a couple of things that would make it better. First off there’s no way to rotate/swivel the Dropcam. It’s a fixed camera and therefore can only cover the range that the built-in lens covers. With that said, the lens covers up to 107° field of view, so this may not be an issue for most. The next thing is that while it comes with a USB power adapter, it’s unnecessarily wide and you may have an issue plugging it in to an multiple plug outlet next to another plug. There’s no reason why it couldn’t be skinnier. The only other thing you might consider is that Dropcam uses about 60GB of bandwidth a month. Depending upon your ISP/plan this may be an issue. Comcast for example thinks anything over 300gb a month is excessive! As you can see I can’t find a whole lot wrong with Dropcam HD. I’m impressed and will look to replace my older Panasonic units with Dropcam HDs.

You can get Dropcam HD here.

You can also check out Dropcam on Facebook here.

DropcamHD_parts