OWC Creates a Better Thunderbolt Dock

OWC-thunderbolt-2-dock

In 2013 I got the Belkin Thunderbolt Dock and I’ve been quite happy with it. So what could change in two years? Well, a lot. The basic principle is the same. A Thunderbolt dock allows you to plug in a single Thunderbolt cable into your Mac and expand the ports giving you more USB 3 ports, Firewire 800, audio line in/line out, etc. The NEW OWC Thunderbolt 2 Dock does what you would expect but offers 5 USB 3.0 ports instead of 3. It offers 2 Thunderbolt 2 ports, and HDMI (with 4K support) in addition to Firewire 800, Gigabit Ethernet, Audio in/out. Two of the five USB 3.0 ports are also high powered for charging your bigger devices such as iPads. With they addition of HDMI this means that now I only have to plug ONE Thunderbolt 2 cable and one display port cable to my Cintiq 24HD into my MacBook Pro and ALL of my devices and displays are connected.

wpid14281-IMG_3522_sm.jpg

For those of us who use our MacBook Pros like a desktop computer when we’re at our desks, these Thunderbolt docks are indispensable. It makes coming home or back to the office so much easier by just having to plug in one or two cables to have all of your devices connected. Now if it could only cut down on the amount of clutter on my desk, I’d be even happier! 🙂

You can get/pre-order the OWC Thunderbolt 2 Dock here. Initial supplies are limited. I ordered mine the minute they announced it and was happy when it shipped.


Best USB 3.0 Hub for Travel

Satechi-USB3.0-hub

Back in 2012 I did a review of what I consider to this day to be The Best USB 3.0 Hub. I still have this hub on my desk to this date with zero problems with it. It just works! While this USB 3.0 hub is great, it’s a bit too large for my travel tastes. Yes they do make this 4 port version but it’s still larger than I wanted for travel. The big decision you have to make when going with a travel USB 3.0 Hub is whether or not you want/need a powered hub or not. Obviously a powered hub is the way to go when you have the ability to plug it in to a power supply and you don’t mind carrying yet one more power supply in your bag. However, USB 3.0 offers more juice than USB 2.0 does. Therefore you may be able to get by with a self powered hub especially for occasional use during travel. When I’m using my MacBook Pro or MacBook Air on the road, I’m usually in need of one extra port. I usually have my Wacom Intuos Pro tablet plugged in and an external USB 3.0 hard drive. At that point I may need to plug in a document camera/scanner or a Lightning cable to sync/copy something from my iPhone or iPad.  Or I could simply need to plug in a thumb/flash drive to copy a quick file. These are the kinds of things I need to do via USB 3.0 on the road from time to time. The hard drive can be plugged into Thunderbolt. That frees up the USB port if needed, but not all of my portable external drives are Thunderbolt equipped.

I went with this portable USB 3.0 Hub

satechi-USB_3.0_hub_with_harddrive

Although Anker makes this 4 port USB 3.0 Hub, I went with this Satechi 4 port USB 3.0 Hub. It seemed to have high ratings across the board on multiple sites. I havent’ been disappointed as the Satechi 4 Port USB 3.0 Hub has been GREAT!. It performs as advertised as long as you keep in mind that it’s NOT a powered hub. So let’s get the rules of using a bus powered hub out of the way. First off if you plug in too many devices that require USB power you will likely run into issues where the devices may not work or may not work at their top USB 3.0 speed. So when I want to use a bus powered USB 3.0 hard drive I plug the hub into my computer first and then I plug in the hard drive. Lastly I plug in any slower devices. If you stick to these rules (plug in the hub first, and the most power hungry devices next) then you’ll be more successful. I was able to easily plug in my USB 3.0 G-Tech hard drive, and my Wacom wireless module and lastly my Ziggy document camera with one port on the hub to spare. This is likely more than I will actually use on a regular basis, but I wanted to test my worst case scenario. Also keep in mind that I have one more available USB 3.0 powered port on my MacBook Pro/Air. With this Hub I could easily have two external bus powered hard drives  (one in the USB 3.0 hub and the other in the built-in port) and still have other ports available for less power hungry devices. Since I only travel with three external hard drives on a regular basis, this is exactly what I needed as I never need to plug in more than two at a time and If for some strange reason I need all three, I can plug at least one of them in via Thunderbolt.

The Bottom Line

If you need a powered USB 3.0 Hub for travel, then you should probably get this one. However, if you’re looking for a smaller one that can be used even if you don’t have an available AC power port nearby or you don’t want to carry one more power brick, then you could go with this Satechi 4 Port USB 3.0 Hub and get the extra ports you need.


G-Drive 1TB Thunderbolt / USB 3 Portable Drive Review

20140505-191031.jpg

Last month while out of town on business I had an urgent need for more storage. One of my colleagues wanted to give me some new demo material and in total it was going to take up almost 1 terabyte of space. I had no where near that much available space on my laptop drive or either of the other two external drives I had with me. There was an Apple Store nearby so I headed over to buy a drive. I had no particular drive in mind although another colleague showed me his new LaCie 1TB Thunderbolt/USB3 drive. At least I had that one in the back of my mind as a starting point. I also had no idea which drives Apple would actually have in stock. I was going to be at the mercy of whatever was on the shelves as I needed the drive that day. I got to the store and found that they did in fact have the LaCie Rugged 1TB drive, but upon a quick glance at the specs I was stopped in my tracks to see that it had only a 5,400 rpm drive inside. What a waste! After all you’re paying extra for a Thunderbolt port and the drive would be pretty much crippled by the relatively slow spinning drive. I kept looking. For a moment I was tempted by a 2TB external drive (can’t even remember the manufacturer), but again saw that it was a 5,400 rpm drive. However, the 2TB capacity did sound nice since I knew that I was going to be getting almost 1TB of files to start with.
Then I saw the G-Drive 1TB Thunderbolt/USB3 Drive and since I knew the G-Drives were usually good performers I wasn’t surprised to see that it had a 7,200rpm mechanism inside. Now my debate was a fast drive but at only 1TB or a slow drive at 2TBs. Decisions, decisions. I ended up going with two of the 1TB G-Drives. The price worked out to be only $100 more than the 2TB drive and I was getting the same total capacity, but with much better performance.

About the performance

g-drive-speedtest

I knew the drives would be fast, but I was actually a little blown away by how fast they actually were. They came with both USB 3 and Thunderbolt cables and since I have a Thunderbolt port on my MacBook Pro, I plugged it in via Thunderbolt. I was floored by how fast the data copied. I even handed one to my colleague Jason and said “here, choose a fairly large file on your computer and copy it to this drive.” As luck would have it he had a 4GB file that was handy and it copied in under a minute.
Having both a Thunderbolt Port and USB 3 port means that I have the option of connecting it to pretty much any modern computer and I’ll get good performance. Even if I have to connect it to an older computer I’ll get USB 2 speeds. I didn’t really expect to like this drive as much as I do. I was just running out to get a drive to fill an immediate need. However, it’s now my favorite portable drive.

You can get the G-Drive 1TB Thunderbolt / USB 3 Portable Drive here.

SAVE MONEY! If you don’t have a Thunderbolt port or simply don’t need the Thunderbolt connectivity then you can actually get the same drive in a USB 3 ONLY configuration for about half the price here. I’ve used the drive above connected via USB 3 and it was still plenty fast.

Belkin Thunderbolt Express Dock Review

belkin_thunderbolt_express_dock

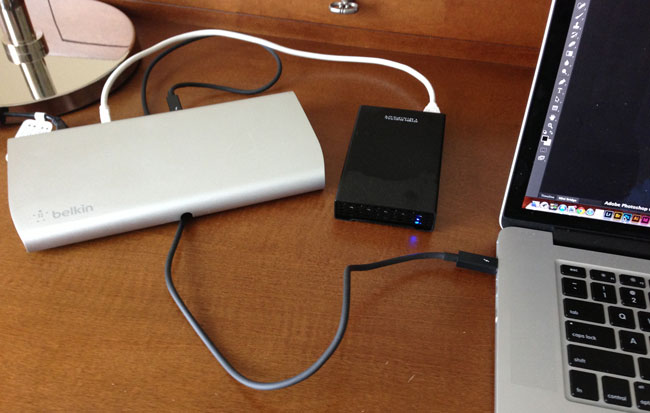
For the last few years I’ve used a MacBook Pro as my primary computer. I even sold my Mac Pro tower a few months ago as I just couldn’t justify hanging on to it for the few times I used it to do heavy duty video rendering. Sure it was faster than my notebook, but I just found that I was using my notebook more often than heading over to the Mac Pro. Now that I’m on the MacBook Pro most of the time, when I’m at my desk I want to connect all my peripherals. I’ve got a Wacom Cintiq 24HD display, Gigabit Ethernet drop, a 7 port USB 3.0 hub with a Logitech C920 webcam, Rode Podcaster Mic, Bose Speakers, Apple Wireless Keyboard, wireless Magic Mouse and an occasional external hard drive to transfer data from here and there.

What is the Belkin Thunderbolt Express Dock?

belkin_thunderbolt_express_back

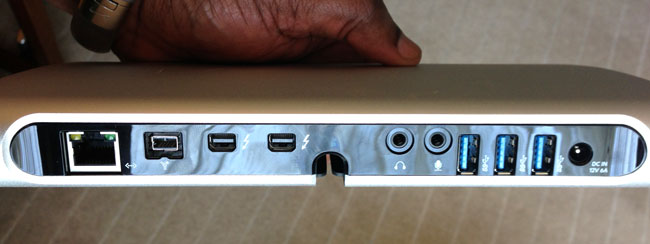
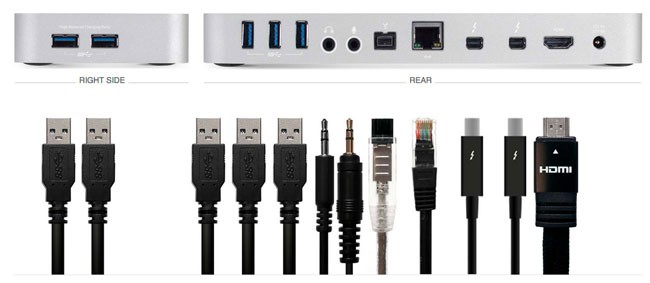
It’s an external piece of hardware that sits on your desk and connects to your Thunderbolt port on your computer. Once connected it adds 1 Gigabit Ethernet, 1 Firewire 800 port, an additional Thunderbolt port, an audio in and audio out port, and 3 high speed USB 3.o ports.

Before the Belkin Thunderbolt Express Dock I would have to plug in the power and four cables before waking my MacBook Pro up. The beauty of a dock is that it can give you not only the convenience of having all your peripherals plugged into one device so that you can just plug in one cable, but it also can give you ports that you didn’t have. For example, on the MacBook Pro 15″ Retina Display Apple has eliminated Firewire and Ethernet ports. While I have the Thunderbolt Adapters to add these ports back in, the Belkin Thunderbolt Express Dock has them built-in plus one that I don’t have an adapter for and that is a standard 3.5mm audio in jack.

The design of the dock is appealing to my eyes and it has all of the connections in the back with a pass through to the front for the Thunderbolt cable (which is not included). I was a little disappointed by the rather large power brick, but then I reminded myself that I won’t likely be traveling with this dock. It’s designed to sit on your desk with everything connected to it so that I just plug in the Thuderbolt cable to my MacBook Pro when I get to my office.

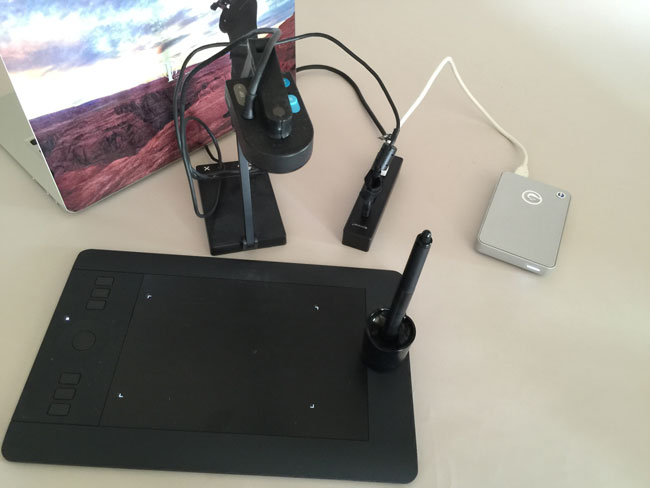
I’ve connected a couple of hard drives to it for testing and  noticed no difference in speed. The other ports seem to work as expected.

The Bottom Line

This dock has been a long time coming. For a MacBook Pro owner it’s nice to have. For a MacBook Air owner it becomes an even better accessory since MacBook Airs have even fewer ports built-in to them. I would have loved to have seen one more Thunderbolt port and for the price I feel that it should have included a Thunderbolt cable. Otherwise it’s a solid piece of gear that will make my MacBook Pro feel even more like a desktop computer when I’m at my desk.

You can get the Belkin Thunderbolt Express Dock here.

You can get the needed Thunderbolt Cable here.

Apple Thunderbolt to Firewire Adapter

The MacBook Pro Retina Display is the 1st “Pro” Mac to ship without Firewire. However, Apple also announced that they would ship a Thunderbolt to Firewire Adapter in July. Although the adapter did ship a few days late, it’s here and no surprises – it works!

I was shopping for USB 3 drives, but I kinda just stopped looking. I figured that I could get by with connecting my existing drives via USB 2 until the adapter shipped. I’m glad I waited, because out of the box I just plugged in my existing Firewire 800 drives and up they came onto the desktop. This makes my MacBook Pro Retina Display complete.

Bonus

One of the downsides with going with the MacBook Air in the past was that you’d be giving up high speed connectivity to external drives. The original MacBook Air only came with USB 2. The last two models included Thunderbolt, but Thunderbolt drive availability was far and few between. This adapter also brings Firewire connectivity to the MacBook Air for the 1st time! I plugged in my LaCie Rugged 1TB drive into my MacBook Air via the Adapter and it just worked.

Although I haven’t done any speed tests, the speed should be the same as Thunderbolt is faster than Firewire. It should therefore be able to keep up with Firewire drives.

You can get the Thunderbolt to Firewire Adapter here.

Elgato Thunderbolt SSD Portable Drive – Fast, Expensive


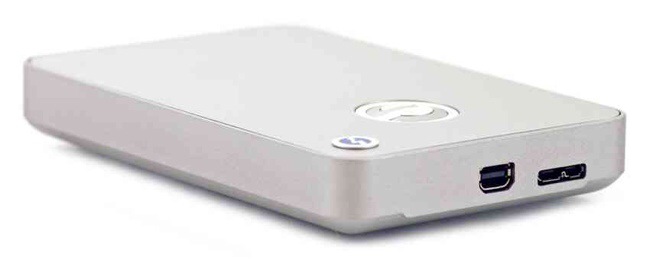
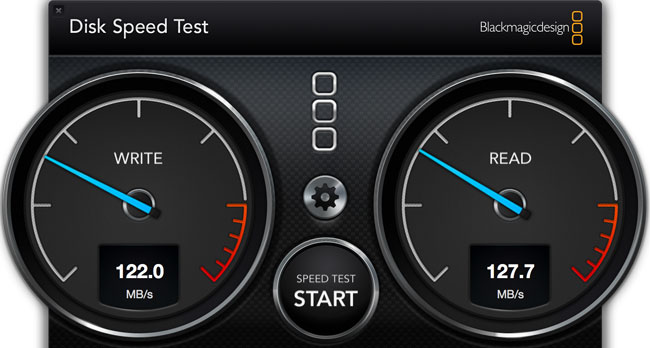
I’m always in search of the fastest portable external drive I can find and I think I found it. I got the Elgato Thunderbolt SSD 240GB drive. It is by far the fastest portable external hard drive I’ve ever used, rivaling the speed of my internal SSD drive. Typically I use an external drive to boot from while running beta software or beta OS’s. While I’m testing things like Adobe CS 6 I want it to perform as fast as it does when I’m booted from my regular internal drive.

The Elgato Thunderbolt SSD Portable Drive is FAST, but has a flaw

While this drive definitely has the speed I’ve always wanted, it doesn’t come cheap. It comes in two flavors. There is a 120GB version for $429.95 and the 240GB version for $699.95! Those prices are crazy, but they are what they are. While the price could be a big showstopper for many, the price is not the flaw I was thinking of. The one problem with this drive is that it only has ONE Thunderbolt port. That doesn’t sound like much of a problem except that Apple uses the Thunderbolt port on MacBooks to also connect mini-display adapters too. This means that I can’t have the drive plugged in AND a projector. That kinda kills it for me for using this drive when doing live presentations.

This and other Thunderbolt devices need to have two ports. You need the ability to be able to pass through to a second device or display. Apple did a good job in putting multiple ports in their Thunderbolt Display and Belkin is coming out with a $299 Thunderbolt hub (it also has Firewire 800 and other ports to help justify the price), but we shouldn’t need a hub just to hook up a display and a drive. Other than this flaw, there is no doubt that the Elgato Thunderbolt SSD drives is one of the fast bus powered portable hard drives that you can get.

You can check out the Elgato drives here and here.

Review: BlackMagic Intensity Extreme Thunderbolt HD Capture Device

Earlier this week I released a video showing the NEW Photoshop Touch for iPad 2. The video was recorded using the iPad Digital AV Adapter that allows you to connect an iPad 2 to an HDTV via HDMI and a BlackMagic Intensity Pro that is installed in my Mac Pro tower. While the Intensity Pro card works well it means that any videos that I want to produce directly from my iPad 2 have to be done on that computer. A few months back BlackMagic announced a new external verison, the Intensity Extreme! The difference is is that the Intensity Extreme is an external capture device that connects to your Mac via the super fast Thunderbolt connector. As a matter of fact this is my 1st Thunderbolt device. While Apple has been equipping their new Macs with Thunderbolt ports, the actual 3rd party Thunderbolt equipped devices and peripherals have been slow coming to market.

How does it work?

Before I could even get started I had to go get a Thunderbolt cable from the Apple Store, as it’s not included. As far as I can tell Apple is currently the only company shipping a Thuderbolt cable ($49). While I’m totally against overpriced cables, the Thunderbolt cable is more than just wire and connectors. The cable actually has some chips/processors in it. However, I expect that competition will bring the price. down.

Once I got back with the cable I installed the BlackMagic software/driver, connected the box and to my pleasant surprise the Intensity Extreme is bus powered via the Thunderbolt port. NO POWER BRICK! I was already used to the software as it’s the exact same software that the Intensity Pro uses. Once I set my preferences, the iPad 2 showed up in the capture window and I was ready to go (record)!

What about audio?

While HDMI does carry both video and audio, the problem is that I want the audio from my voice to be recorded along with the demo. There are a couple of options. The Intensity Pro also supports a breakout set of analog cables and even supplies all the female connections (pictured above). Just plug in your audio gear and you should be good. However, just like on my Intensity Pro, I don’t use this set of connections. The reason is I’m also going to want to be on camera and may integrate things/software demos from my computer too. In this case I record both my talking head image, whatever I’m doing on my computer and my audio simultaneously into Screenflow while I’m doing the demo on the iPad 2, which is being recorded into the Intensity Extreme. I put the two videos together in post using Adobe Premiere Pro CS 5.5 as well as adding the iPad “frame” as a Photoshop file on a layer below.

The Bottom Line

This new Intensity Extreme is a winner on all counts. While it took longer than expected to actually ship it, they got it right. It’s small enough to travel with and produces FANTASTIC uncompressed HD results so that you’re starting with the cleanest HD video possible!

UPDATE: this also works the exact same way with the iPhone 4s. You use the same Apple AV Adapter and plug it in and you can record video out from your iPhone 4s as well. Thanks blog reader “RF” for the tip!

You can get the BlackMagic Intensity Extreme here for about $285. You also get your Thunderbolt cable on the same order here.


Continue reading “Review: BlackMagic Intensity Extreme Thunderbolt HD Capture Device”