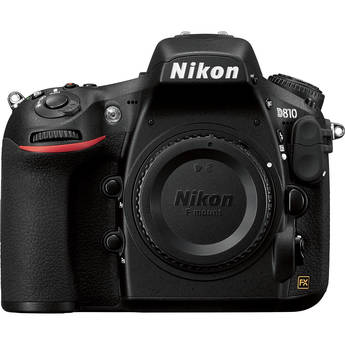
How To Shoot Tethered to Lightroom Mobile

wpid13647-14_0014_KandiceTurnbough1-121_sm.jpg

Lightroom has allowed for USB tethered capture from popular Nikon and Canon cameras for several years now. However, I can’t tell you how many people have asked me about tethering directly to an iPad pretty much since the 1st shipped in 2010. Four years later, while there are several shoot to iPad solutions out there, there still isn’t a way to plug your camera directly into an iPad and shoot tethered like you do with your computer and Lightroom.

wpid11042-TripodClamps-4

Here’s what’s in my Tripod Rig Setup Above

I personally use an Eye-Fi card when I’m out in the field and my iPad then becomes a nice big 10″ display to preview my shots. The Eye-Fi cards create their own ad-hoc network and therefore no hotspot is required. The images wirelessly transfer from my camera to my iPad. Now that Lightroom mobile is here, the question becomes can I shoot tethered into Lightroom mobile and the answer is yes! However, even though the answer is yes, it still involves your computer as there is still no way to connect your camera directly to your iPad via a USB cable and shoot tethered like you do with your computer. In studio I’m shooting either tethered directly to Lightroom via a USB cable, to my computer from my Nikon D4 via Ethernet or via the Nikon WT-5A Wireless Transmitter to a folder where the images are auto imported into Lightroom. There are two ways to shoot tethered to Lightroom mobile:

Before we get into the methods you’re going to need Lightroom 5.5 and a Creative Cloud membership. The Creative Cloud Photography program is affordable at only $9.99/month and includes Photoshop CC, Lightroom, and unlimited syncing to Lightroom mobile.

You can download Lightroom for iPad here:

.

I call the first method “Selective Tethering”

lightroom-set-target-collection

Recently Scott Kelby did a post “My First Studio Shoot Using Lightroom Mobile” during this shoot he was shooting tethered from his DSLR to his computer running Lightroom 5.5 desktop. However, he did a very clever thing. He had a collection marked to sync with Lightroom mobile and his creative director was holding his iPad. He made that collection the “target collection” (a Lightroom feature) so that as he saw images coming in from his camera that he really liked all he had to do was hit the letter “b” on his keyboard to add those images to the collection that was sync’d to Lightroom Mobile. Now the creative director could see the images on the iPad from any location and help direct the shoot, make changes to the wardrobe, etc. Since Lightroom mobile is a two-way communication between the iPad and the desktop version of Lightroom she could also flag or star rate images on the iPad and those flags and ratings would appear in Lightroom on the desktop for Scott to look at further and tweak if needed. This is an awesome way to work and it allows you to show only the BEST images to your client, director, assistant, etc. However, it does require more interaction on your part as you have to hit “b” for each image you want to be added to the collection. I had never thought of using the Target Collection in this way and it makes total sense. This got me to thinking if perhaps there was a way to automate this so that each image would just go into a collection as they come in to Lightroom via tethering? Currently Lightroom mobile doesn’t support Lightroom’s Smart Collections. So I began to look at 3rd party plugins….


The next method “Tethering to Lightroom mobile”

LRm-iPad-Thais

Like I said above, I wanted a way to bring in all the images I’m shooting so I wouldn’t have to touch the keyboard every time I wanted an image added to the iPad/Lightroom mobile. After looking at Scott’s method above this definitely has some downsides to it. As you know not every shot is good. Sometimes the strobe doesn’t fire or the image is out of focus. Sometimes the model isn’t ready or you capture an awkward frame. Chances are you don’t want your client seeing this frames. If that’s the case you’re better off using the “Selective Tethering” method above. However, if it’s you and say an assistant or other person on set that needs to be able to see what you’re shooting via the iPad then you probably don’t care as much if a few bad ones get in. As a matter of fact if it’s an assistant they could be helping by “rejecting” the bad ones for you! My search for a 3rd party solution started and ended with Jeffrey Friedl’s “Folder Watch” plug-in.

watchfolder-lr

This plug-in was originally designed as a more full featured alternative to Lightroom’s Auto Import (what we used before native Tethering) feature. Sadly after I downloaded it I realized it wouldn’t work with Lightroom’s Tether Capture feature because it needed to do the import before it could add the images to a collection.I reached out to Jeffrey and told him what I wanted it to do and guess what? He immediately added the feature for me! Now with this “donationware” plugin you can shoot tethered into Lightroom as you always do and designate a collection to add the images to as you shoot. All you do once you create the collection is sync it to Lightroom mobile.


Share with REMOTE viewers too. On ANY platform!

lightroom-web

One of Lightroom mobile’s best kept secrets is that it’s not just for iPad and iPhone. There’s also a web component. If you head to lightroom.adobe.com and sign in with your Adobe ID you can all of your Lightroom mobile collection right in a web browser. You can click on any of your collections and grab the link for it and share it with whomever you want to be able to view that collection. This means that you can have a large audience watching your shoot and they will see your new images as you take them (by hitting refresh in the browser) pretty much on ANY platform.

Lastly don’t forget that Lightroom is also on iPhone now

.

See my video here:


How To Get Free Add-Ons for Photoshop CC, Muse CC and more

creative_cloud_2014

In this episode of Adobe Creative Cloud TV, Terry White shows how to get FREE Add-Ons for your favorite Adobe Creative Cloud products such as Photoshop CC, Adobe Muse CC and more.

Are you missing out on my Bonus Content?

See more of my Adobe Creative Cloud Videos on my Adobe Creative Cloud TV and get the App below. It features EXCLUSIVE CONTENT that no one else gets to see. My iOS App is a Universal App for iPhone, iPad and iPod touch. I also have an Android version on the Amazon App Store:

.


Convert Your Aperture Library to Lightroom with this FREE Utility

Aperture3

Apple recently announced that they will no longer develop Aperture. While there have been no official plans announced to move Aperture users over to Lightroom, there is a developer (7822383 Canada Ltd) that has released a “beta” utility called Aperture Exporter to help you out. First you have to realize that there is no real way to transfer/translate the adjustments you made  to your images in Aperture to the Lightroom and have the images look exactly the same. So the next best thing is to bring over as much of your Aperture Library structure as possible over to Lightroom and render out adjusted files so that they do look the same in Lightroom (or anywhere else). I think this company has done a good job and took a logical approach in doing it and sense it doesn’t harm your original Aperture Library (make a backup anyway!) it’s worth a try.

Aperture-ExporterScreen
I tested it on an Aperture library and the results were as advertised. I created a sample Aperture Library and imported images my into it. Then I made adjustments, flagged, keyworded, star rated, labeled, organized, etc. the images. Next I fired up the Aperture Exporter and did the export. Before clicking the “Begin Export” button I went back and star rated my adjusted images as it uses star ratings to determine if your adjusted images should be exported as TIF or JPG with the adjustments rendered in. Once it was done I had folders and subfolders representing the structure I created in Aperture.

Lightroom5
Then it was time to import those folders into Lightroom. No issues there. The images came in with the metadata intact. Now keep in mind things like color labels don’t translate. So instead the utility takes any Aperture color labels and adds the appropriate keyword to the images ie. “GreenLabel”. Once in Lightroom it’s easy to filter on these keywords, select all and then actually apply the corresponding Lightroom color label. So yes there is some clean up necessary once you’re in Lightroom, but overall the this utility takes the major work out of moving your Aperture Library to Lightroom.
If you’re looking to make the conversion from Aperture to Lightroom sooner rather than later, you should head over and grab the FREE download here.

Also don’t forget that you can get the NEW Creative Cloud Photography Program which includes Photoshop CC, Lightroom 5 and Lightroom Mobile for only $9.99/month.


11 Things You Didn’t Know About Adobe Creative Cloud

creative_cloud_2014

IIn this episode of Adobe Creative Cloud TV, Terry White walks you through how to get started with the 2014 release of Adobe Creative Cloud as well as 11 things you probably didn’t know about Creative Cloud.

Are you missing out on my Bonus Content?

See more of my Adobe Creative Cloud Videos on my Adobe Creative Cloud TV and get the App below. It features EXCLUSIVE CONTENT that no one else gets to see. My iOS App is a Universal App for iPhone, iPad and iPod touch. I also have an Android version on the Amazon App Store:

.


Charge up to 5 USB devices at once

anker_5_port_USB

Charging USB devices at home is no big deal as I have charges around the studio, office, bedroom, etc. and even USB wall plates. However, on the road it’s bit more challenging as there are limited AC outlets in hotels and on stage during presentations. Once again I sought out a USB charger that could not only charge multiple devices, but also charge at least 2 iPads, which require a little more juice (2.1A). My search led me to the Anker® 25W 5-Port Family-Sized Desktop USB Charger Travel Power Adapter. This relatively small charger can handle charging up to 5 of your USB devices including 2 iPads at full speed. While I don’t travel with 2 iPads, I do want to be able to charge one iPad and my iPhone at the faster 2.1A speed as well as 2-3 other devices at the same time. If you’re an Android user you’ll even have a dedicated Samsung Tab port as well. Even if you don’t have the specific devices labeled on each port you can charge ANY 5 USB devices at the same time. Speaking of labeled ports that’s another thing I love about this charger. Many of the smaller chargers that have only 2 ports with one of them being high speed don’t always label which one in particular is the high speed one. Lastly another reason I really like this model over previous multiple port chargers that I’ve used is that it has a regular detachable AC cord on the other end with a decent length of 5 feet. This means that I can plug in the one cord into a power strip on stage or outlet behind a night stand and put the charger itself on the table top to connect all the cords too. I used it in LA this week at my event and it worked perfectly and to my surprise it also didn’t get warm to the touch like other charger tend to do.

anker_5_port_inmyhand

If you’re looking to charge 3-5 USB devices at the same time, this is your charger. You can get the Anker® 25W 5-Port Family-Sized Desktop USB Charger Travel Power Adapter here. Charge up to 5 USB devices at once.

Or get an even better model

anker_40w_USB

You could also go with the NEWER 40W version that had intelligent port charging! No need to plug specific devices in specific ports!

Before and After the Westcott Eyelighter

wpid13605-Aylla2-0125-Edit_sm.jpg

When I initially gave a first look at the NEW Westcott Eyelighter a couple of weeks ago (here), one thing I failed to do was to show a before and after comparison

wpid13599-Thais2-0204-Edit_sm.jpg

So I took some time away from my vacation last week and setup a beauty shoot with a few models to really give you an idea of what the Eyelighter really does beyond providing interesting catchlights in the eyes. In the two shots above you can see the affect of the Eyelighter not only in the eyes of my subjects but also under the chin.

wpid13601-Thais2-0205-Edit_sm.jpg

What a difference an Eyelighter makes. The shot above is the same model under the same Westcott Skylux and XXL RapidBox 48″ octa softbox, but without the Eyelighter.

wpid13593-Thais2-0064-Edit_sm.jpg

The shot above is a production shot showing the Eyelighter setup just in front of the subject with the Skylux LED light above subject.

wpid13595-Thais2-0074-Edit_sm.jpg

The results are AWESOME and pretty much night and day.

wpid13597-Thais2-0075-Edit_sm.jpg

Again here’s another look without the Eyelighter using the exact same main light, subject and camera settings.

But what about the background?

wpid13608-IMG_2362_sm.jpg

The background was lit using two lights shining through the Westcott Scrim Jim. This gave me the High Key look that I wanted by providing a nice big soft light source directly behind the subject that wrapped around the subject with beautiful rim lighting.


The Bottom Line

wpid13611-Thais2-0084-Edit_sm.jpg

I’ve always been a fan of this clamshell beauty look and the Westcott Eyelighter makes it much much easier to do now with one light. Adding another light or two behind with the Scrim Jim makes this accessory useful for in studio work as well as on location work. All of the images above were shot with my Nikon D600 and 70-200mm f/2.8 VRII lens.


3 Tips for Shooting Tethered into Lightroom 5

Lightroom_totem

In this episode of Adobe Creative Cloud TV, I’ll share at least 3 tips that will make your life easier while shooting tethered with Lightroom 5. Get a long USB tethering cable here.

Are you missing out on my Bonus Content?

See more of my Adobe Creative Cloud Videos on my Adobe Creative Cloud TV and get the App below. It features EXCLUSIVE CONTENT that no one else gets to see. This episode has a BONUS CLIP that is available only in the App! My iOS App is a Universal App for iPhone, iPad and iPod touch. I also have an Android version on the Amazon App Store:

.


Adobe Creative Cloud Market is Here

creativecloud_market

One of the features shown during the Keynote Address for the 2014 Release of Creative Cloud was the new Adobe Creative Cloud Market. These assets are licensed for Creative Cloud users to use royalty free in their design projects. All you have to do is run the update to your Creative Cloud desktop application and the new “Assets” tab will be there.

creativecloud_market_search_cake

You can either browse the assets there are featured or you can do a search for keywords. If you find a piece that you want to use, just click the sync button.

creativecloud_market_sync

The asset you choose will then be sync’d down to your hard drive in your Creative Cloud files folder in a new folder called “Market Downloads”. I downloaded a vector file for a cake. It arrived in .SVG format and I was able to easily open it in Adobe Illustrator CC and access the vector points and curves to alter it if needed or to save/export it out in a different format for use in other applications.


creativecloud_market_asset_vectorinAI

The selection is a bit limited on this opening day, but I expect it grow as more art is licensed along the way. This is a nice plus to the Creative Cloud membership.

Photoshop for Photographers Program

photo by Victoria Pavlov

One of the things you may have overlooked in the midst of all the Creative Cloud announcements on June 18th was the fact that the Photoshop for Photographers Program, which was a limited time offer that kept getting extended has now spawned a permanent offer (now called Creative Cloud Photography). That’s right, even if you never owned a license to Photoshop or Lightroom, you can get:

  • Adobe Photoshop CC
  • Adobe Photoshop Lightroom 5
  • Lightroom Mobile and Web with unlimited photo syncing
  • 2 GB of Cloud Storage to optionally to use anyway you want (LR mobile doesn’t use this storage).

for only $9.99 a month. This means you also get access to all the feature updates along the way at no additional cost. The original offer was such a success that it kept getting extended and Adobe just decided to go ahead and make it a regular plan of Creative Cloud.

You can learn more or sign up here.

Watch the Keynote for the 2014 Release of Creative Cloud


Logitech Ultrathin Keyboard Folio for iPad Air Review

wpid13517-IMG_2016_sm.jpg

Having been a fan of the Logitech Ultrathin Keyboard Covers for my previous generations iPads, I was more than just a little interested in their new additions. I didn’t even know that this new had come out until my buddy Jason Levine got one for his new iPad Air. I spent a few minutes with his and I could easily see how much of an improvement it was over the older design. While the older designed magnetically attached to your iPad, it really offered no protection to the back whatsoever. This new “folio design offers scratch protection to all sides of your iPad Air (or iPad mini) and gives you a nice Ultrathin Keyboard to boot. The reason I went with the Ultrathin Keyboards from the beginning is because I felt all other keyboard cases were just too bulky and unattractive. The Ultrathin Keyboard Folio feels nice in my hands and is not too thick.

wpid13519-IMG_2015_sm.jpg

How does it work?

You simply snap your iPad into the Keyboard Folio and turn it on. Mine showed up immediately in the iPad’s bluetooth settings and connected. That’s it. When you stand the iPad up it magnetically snaps to the keyboard and can begin typing. The keyboard keys are layed out about as comfortably as I would expect and gives me the all important Shift key on both sides that many iPad keyboard lack. The number keys also serve dual duty with the Fn button allowing you to do things like change the iPad volume and fast forward or rewind movies. You can even use the Command key as you would on a Mac for things like Command-C to copy or Command-V to paste.

wpid13515-IMG_2017_sm.jpg

I love the fact that you can lay it down on top of the keyboard for those times when you want to play a game or draw on the iPad and you don’t need a keyboard. With the old Ultrathin cover there was no way to do this other than disconnecting the keyboard and laying it aside. There’s even a holder for a stylus built right in. The battery life is rated at 3 MONTHS per charge! That’s with an average of 2 hours per day of use.

Good, but you can’t have everything

One thing I do miss with the older model is the ability to stand the iPad up on the keyboard in portrait/tall orientation. There’s no way to do that with this folio model.

Did Logitech address a potential design flaw?

If you go to Amazon and read the reviews you’ll find several that complain about the the upper left support cracking after a short amount of time. I noticed that on some the upper left support is “cut out” revealing the iPad power button (see the very first picture in this post). I’m guessing this is the “newer” model because it’s the one that Logitech features/pictures on their site.

logitech_ultrathin_keyboard_folio_crack

The older perhaps flawed model has a complete cover over the iPad power button. This is the one I have, so I’ll be monitoring it closely. Clearly there are two versions of this model and I’m guessing the one with the cutout (picture’d below from the Logitech site and at the very top of this post on a friend’s cover) is the newer one that solves the problem. There doesn’t appear to be a problem with the version for the iPad mini.

logitech-ultrathin-side

Note the stylus holder on the right in the image below.

wpid13523-IMG_2013_sm.jpg

They are available in multiple colors.

You can get the Logitech Ultrathin Keyboard Folio for iPad Air here.

You can get the Logitech Ultrathin Keyboard Folio for iPad mini here.