Towel Hub: A USB Charging Station for your Kitchen

towel_hub

Here’s a clever idea for a gadget that looks cool and serves multiple purposes. The Towel Hub is a standard paper towel dispenser. However, at the base you’ll find 4 USB ports to charge your devices. The kitchen seems to be the hub in many homes and now you have a cool way to charge your mobile devices while you hang out at the bar, kitchen table or breakfast nook. You probably have already guessed how this product works. just plug in the AC adapter to a wall outlet, put your roll of paper towel on it and you’re done. You can now plug in up to 4 mobile devices and they will charge. There’s enough juice to charge your smartphone and your tablet. If this was all it did I would be happy. However, there’s more. The decorative top also servers as a topper for your wine bottles. If you want to take things up a notch you can opt for the model that also has a built-in bluetooth speaker for music playback.

I’m really happy with this addition to my kitchen and it would also make a great gift for the holidays.

You can get the standard model here.

You can get the model that includes a built-in bluetooth speaker here.

You can also get SHORT Lightning cables here.

Making my own 1TB SSD Portable Drive

crucial_SSD_2

I was surprised to see how much the price of SSD’s (solid state drives) have dropped in price. I decided it was time to replace my slower portable drives with faster SSD ones. One thing I also learned a while ago is that many times it’s cheaper to buy the drive and buy external case to put it in, rather than buying a drive already assembled. I already a couple of generic USB 3.0 external cases that I picked up on sale at Micro Center. So I ordered this Crucial 1TB SSD drive.

Can the external hard drive case make a difference?

inateck-enclsoure

I put the SSD in my existing generic USB 3.0 external case. I formatted the drive and and copied the data to it from my existing external drive. All was well. Then I saw an ad for another enclosure by Inateck that claimed to be “Optimized for SSD”. I have seen firmware make a difference in the past with external drive enclosures, so I figured it’s possible that this enclosure could be faster. Since the price was only a few dollars more than generic USB 3.0 enclosures (under $20), I decided to try it and compare. The first thing I noticed that I really liked was the fact that you can install the drive without any tools. The cover comes off/unlocks by sliding it forward. Just plug your drive in and slide the cover back on. Then I saw the thing that I don’t like about this enclosure. I went to plug in my existing USB 3.0 cable that I’ve used on every USB 3.0 drive I’ve ever used only to see that for whatever reason they put a USB 3.0 A connector on the drive (the same one that’s on your computer). Granted they also give you the A to A cable, but it means that I would only be able to use that cable (or one like it) every time I use this drive. I’m still scratching my head over that one.

Next I decided to try a speed test. I had already tested the drive in the old case before taking it out and here are the results.

generic-USB3-enclosure

Then I plugged in the new enclosure with the same drive and and ran the same test and here are the results.

inetech-USB3-enclosure

The Bottom Line

Going SSD is definitely the way to go if you’re looking for speed and better reliability over spinning platter drives. While the Inateck enclosure is slightly faster, I’m not sure that it’s worth it because of the weird cable needed to connect the drive.

You can get the Crucial 1TB 6Gbs SSD here.

You can get the Inateck SSD Optimized enclosure here.

You can get a standard/generic USB 3.0 enclosure here.


My New Favorite Travel WiFi Router

wpid14051-IMG_3946_sm.jpg

I’ve traveled religiously with an Apple AirPort Express Base Station for years. It’s portable, it’s fast, and pain free in terms of setup. It just works. However, there’s one thing that made me look for a new solution. More and more hotel rooms and locations that I’m in on the road are now WiFi Only, meaning that newer hotel rooms are no longer equipped with wired ethernet jacks. Even those rooms that do have the wired ethernet ports are often disconnected. Sure I could just connect my devices to the WiFi network offered but that offers a set of challenges that I was avoiding by bringing my own router in the 1st place. When you connect to the hotel WiFi (free or paid) chances are each device has to go through a sign-in, login, accept the terms process. Usually this login is only good on average for up to 24 hours before having to repeat the process for each device each day. On the other hand if I connect my own WiFi router (hotspot) then I use one device to sign on/login etc. and all the other devices on my network can surf freely without the need to have to sign on/login individually.

Why the AirPort Express is no longer the solution

The AirPort Express is great and even the newer form factor has grown on me, however the AirPort Express requires a wired connection to the internet in order to work. If I’m in a hotel with WiFi only the AirPort Express has to go back in my bag. Sure the AirPort Express can be used to extend an existing “AirPort network”, but I have yet to see a hotel equipped with AirPort Base Stations, let alone the access needed to make that kind of configuration work.

Netgear built the WiFi Travel Router I was looking for

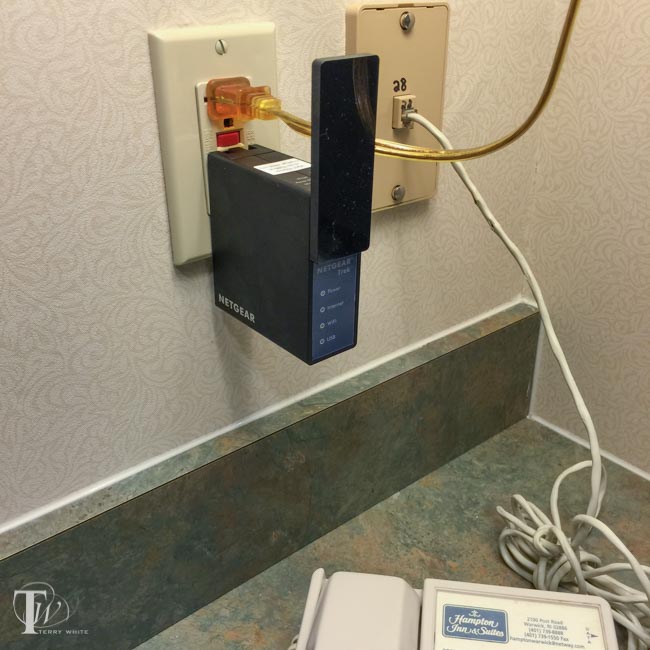
The Netgear Trek  N300 does the one extra thing I need. It allows you to connect to an existing WiFi network and then share that connection via the WiFi network that it creates. Having my cake and eating it too. It can work in either a wired or wireless setup. If there is an Ethernet jack in the room then the Netgear Trek N300 can plug into it and route it just like the AirPort Express. However, if there is only a WiFi network you can have the Trek N300 join it and share it creating your own private password protected WiFi hotspot for the rest of your devices/guests.

How does it work?

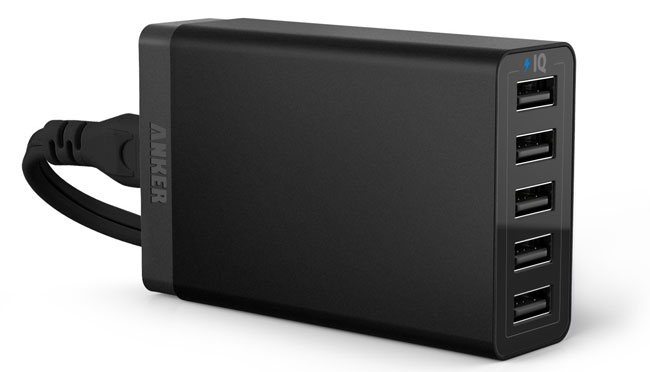
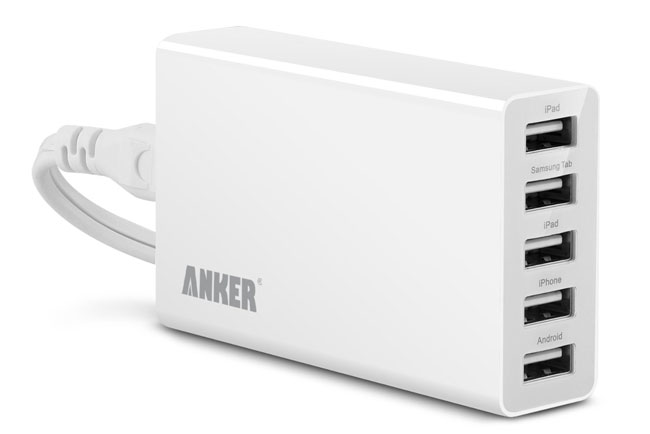
As you might expect the setup requires a couple of extra steps when connecting it to an existing WiFi network. The first thing you’ll do is simply configure it with a web browser to set up the wireless network for your devices to connect to. Let’s say for example you want to create a network called “Get off my LAN”. Once you set that up with a password you’re all set to travel. Once you get to your hotel room or other public WiFi area, just power the Trek N300 up using the built-in foldout plug or plug in a standard micro USB cable (it comes with it) and power it via USB. This is a very nice touch because I don’t have to have an extra free wall outlet available. I can power it using my Anker 40w 5 port USB charger/power source.

netgear_wifi_page

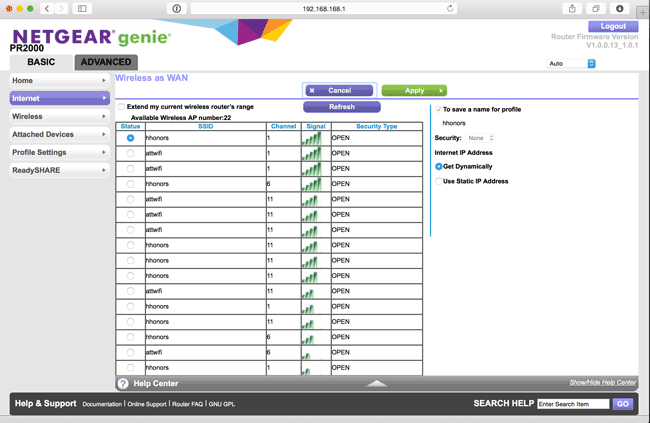
Now simply connect to it from any of your devices. Bring up your web browser and enter the address of your Trek N300. Signin with your admin password and from there you will see a list of the visible WiFi networks to choose from. Choose the public network that you wish to connect to and you will likely be prompted by the public WiFi’s login page. Login as you normally would if you were connecting to this network directly, but you are actually connecting the Trek N300 to it. Once you’ve successfully logged in or paid your Netgear Trek N300 will be online and able to route that WiFi connection to your private WiFi network “Get off my LAN” for all your other devices/guests to connect to.

This Router/Range Extender works GREAT, especially after I upgraded it to the latest firmware. Unfortunately it won’t speed up a painfully slow hotel WiFi connection, but it will make it less painful for you to use by eliminating device limits and multiple device logins. Also it will give you one more layer of security because all of your devices will be behind the Netgear firewall and not visible to the public WiFi network.

The Bottom Line

netgear_trek_n300

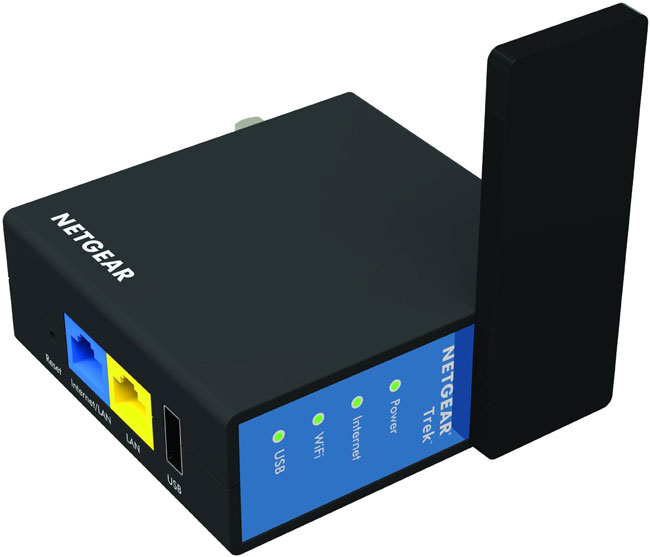
The Netgear Trek N300 didn’t disappoint. I’m using it this week on the road as I write this post from my room at a Hampton Inn. There are no ethernet ports here in the rooms and without the Trek N300 I would have had to connect each device to the hotel public WiFi and sign in each device separately. You get an extra Ethernet port on it to connect wired devices too.

Also when you compare the price to the AirPort Express it’s a no brainer.

You can get the Netgear Trek N300 on sale here.

They also have an iOS App to manage it that you can download here for iPhone:

.

Or here for iPad:

.


Don’t buy another USB wall charger for your phone!

no-charger

Your smartphone probably came with a USB wall charger. Chances are you probably need or at least would find it convenient to have more than one. Perhaps one at your desk, one by the bed and maybe one in your travel bag. A quick check shows that the retail price of an Apple USB wall charger is $19. Of course you could get ANY 3rd party wall charger for half that price or less. However, even at $9 for a good quality generic charger you might want to consider a different option. If you’re buying a charger that’s going to have a permanent home under your desk, behind a nightstand, etc. then why not just get a power strip that also has USB ports on it? This way you could plug in your lamp, computer, speaker, etc. and charge your smartphone and/or tablet as well.

power_strip_USB_ports

I just bought 3 of these for use around the home and home office. So far they’re working out GREAT! Unlike most power strips/surge protectors this one has a longer than average 6 foot cord. It has a lighted power switch as well as 2 USB ports that can provide up to 2.1A of power, which is enough to charge an iPad. Also the fact that it’s a surge protector as well doesn’t hurt. The only downside is that the 2.1A is shared between the two ports. This means that you can charge two devices or one device at the full 2.1A speed. Yes, you can charge an iPad (or other tablet) and iPhone (or other smartphone) at the same time, just not two devices that both require 2.1A each.

Here’s the best part: This power strip is on sale for only $14.99, which is less than the cost of a name brand single port USB charger. Get this one and you can use the charger that came with your phone as a travel charger.

My other favorite USB chargers

lenmar_USB_car_charger

For the car, I like this one.

anker_40w_USB

For charging several USB devices at once I like this one.

USB_wall_outlet

For a permanent installation I like this one.

plugbug_1

For charging while traveling to hotel rooms with limited outlets, I like this one.


Harmony Smart Control Review

harmony_smart_control

It has been a while since I’ve looked at smart universal remotes. I’ve been happily using my Harmony One for years. However, it was time to setup a new room with HDTV, Apple TV and TiVo Mini. This means either using 2-3 remotes or just ONE! However, I didn’t want to go with another high-end Harmony, yet I wanted something that was still very good. This lead me to check out the Harmony Smart Control. This setup offers the best of both worlds. You get a regular remote control with physical buttons as well as a “hub” that allows you to control everything with your iOS or Android based smartphone or tablet. While I’ve used this hub before, I like the option of having a physical remote for those times when my iPhone is in use or not handy.


How to set it up

The setup was pretty straight forward. You plug in the hub to AC power and then download the Harmony Control app. Since there are no controls on the hub you first have to get it on your WiFi network either via your computer via a USB connection to the Hub or wirelessly to your smartphone via bluetooth. I opted to set it up via my iPhone 5s. The App found the hub and allowed me to key in the password to my WiFi network. Once it was setup on the network the App continued to allow me to set it up. The setup was very typical to Harmony remotes. You simply enter the brand and model names/numbers of the devices you wish to control. Believe it or not, that’s the hard part. Who remembers the model number of their TV? Once I tracked down the info I needed to enter, it was easily able to control each device. Then I setup “Activities” such as “Watch TV” and “Watch Apple TV”. Activities allow you one button options to turn on all the appropriate devices and switch to the appropriate inputs on your TV or receiver. Lastly I added my “Favorite” channels.


How does it work?

harmony_smart_hub

Once I set up the Harmony Smart Control, I now have the option of controlling my TV and components via the supplied physical remote OR via my iPhone or iPad using the Harmony Control App. It definitely beats having to have the TiVo remote, TV remote (to properly switch inputs) and the Apple TV remote. Either the App on my iPhone or Harmony remote can control it all. The App is pretty slick too. Not only do you have multiple screens for various controls, you even have a “gesture” screen that allows you to swipe up or down to control TV volume or left or right to change channels. I also like the one touch access to my favorite channels.


The Bottom Line

Logitech has hit the right combination of hardware and software with this combo. You have a physical remote that anyone can use AND the ability to use your mobile device to control it via WiFi from any room. I’m happy with this setup and I’m considering getting another one for another room of gear.

You can get the Harmony Smart Control here

You can also just go with the Harmony Ultimate Hub if you just want to use your mobile device.


What’s In My Bag?

whatsinmybag2014

The good folks over a shotkit.com recently featured me on their site and the contents of my camera bag. You can see all the other photography gear that I use here. People are always asking what kind of gear I shoot with. On the flip side of that coin when I’m out on tour people are always asking about the gear I use on stage to do my presentations. So I thought it was time for a “What’s in my bag?” update. My backpack weighs a ton. Every now and then I take everything out and try to only put back in the things that I’m using on a regular basis. That time has come again and this past weekend while everything was out I decided to photograph it and detail it here:

  1. Let’s start with the bag itself. My FAVORITE computer backpack is the Tumi Alpha T-Pass. This backpack has really held up well with the load I put on it and shows no signs of wear. I was going through backpacks about once a year before this one. While it’s more expensive than I’m used to, it’s been worth it thus far. Also can beat the T-Pass feature for TSA checks at the airport. It unzips in half so that you don’t have to take out your laptop. Get it here.
  2. I shoot on the road and that means I need to retouch on the road. I couldn’t imagine retouching a picture in Photoshop without my Wacom Intuos Pro Small tablet. Get it here.
  3. In addition to the regular pen that comes with the Intuos Pro I have the Wacom 6D Art Pen for drawing in Illustrator. Get it here.
  4. My favorite international travel adapter. It covers most countries and has a smart design. Get it here.
  5. Nikon WU-1b Wireless Mobile Adapter. This allows me to transfer images from my Nikon D600/D610 to my iPhone or iPad wirelessly. Get it here.
  6. Adobe Ink & Slide – Pressure sensitive pen and digital ruler for drawing on the iPad. Get it here.
  7. Nikon D600 – I travel with either my Nikon D600 DSLR or my smaller Sony NEX 3 mirrorless camera. I love them both, but the DSLR is considerably bigger and heavier. Get the Nikon D610 here. Get the Sony Alpha NEX 6 here.
  8. Nikon ME-1 Stereo Micophone – You can’t have good video without good audio. The built-in microphone just doesn’t cut it. Therefore I use this one for those on the go interviews and recordings. Get it here.
  9. iPod touch – Although I have an iPhone and an iPad. I still prefer having a dedicated device on stage to play music and to run my presentation timer app. I’m usually using the iPhone and iPad in my demos. This way I have a dedicated device to do the tasks I need. Get it here.
  10. Oops – I left out #10. So let’s move on to number 11. 🙂
  11. Nikon 28-300mm lens. This is my main travel lens and while I do have better lenses, this one covers a nice range and it has a good quality. Perfect for travel. Get it here.
  12. I have to charge all these devices. My main cables are the 6 foot Lightning cable by Apple – Get it here and the nice and short Lightning cable by CableJive. Get it here.
  13. iPad Air with Logitech Ultrathin Keyboard Folio. I use my iPad Air all the time and now on stage to demo mobile apps. Get it here. I couldn’t imagine not having my Logitech ultrathin Keyboard Folio. Get it here.
  14. RavPower Battery – Sometimes my iPhone doesn’t make it through a long day of heavy use without another charge. I’m not always near an outlet. This RAVpower Battery can easily charge it twice. Get it here.
  15. I gave up fighting for additional outlets in hotel rooms and airports. Now I just bring this ultra compact 3 outlet powerstrip with me. Get it here.
  16. Charge 5 USB Devices at Once (including 2 tablets) with this slick 40w Anker 5 port charger. Get it here.
  17. Bose QuietComfort 20i Noise Cancelling Headphones. These need no explanation other than I gave up the full size pair for these because they do just as good of a job and take up a fraction of the space in my bag. Get them here.
  18. If I rent a car I want to be able to charge my iPhone and possible my iPad while I drive. This car charger gives me 4.2 Amps on BOTH USB ports. Get it here.
  19. Verizon 4G LTE Hotspot. I’m grandfathered into an unlimited data plan with AT&T on my iPhone and the only way to get the mobile hotspot feature on my phone is to give up that plan. I refuse to do that, so I have a separate hotspot to give me WiFi access in places where there is none or hotels where their internet is soooo slow that it’s unusable. Get it here.
  20. Apple Magic Mouse. It’s low profile, bluetooth, has a touch pad on it for smooth scrolling and gestures. It works. Get it here.
  21. Apple AirPort Express. I love creating my own WiFi network. This makes it easier to share a single connection on stage or in a hotel room and easily allows all my devices to talk to each other on the same subnet. Get it here.
  22. Apple MacBook Pro 15″ Retina Display Mid 2014 – This is probably the most important item in my bag. It’s my main work computer and it has enough power to handle everything I do. Get it here. The skin on top is a custom skin from Gelaskins. Make yours here.
  23. Wacom Bamboo Stylus Pen for writing and digital signatures on mobile devices. Get it here.

Not Pictured (forgot that these items were on my desk when I cleaned out my bag)!

Forgot the external hard drive that I always carry, but wasn’t in my bag at the time when I took everything out. I carry two G-Drive 1TB 7200 RPM External Thunderbolt, USB 3 Drives.

Also my favorite smartphone tripod mount.

My Hoodman USB 3.0 CF/SD Card Reader.

And my favorite cable bag to keep it all straight in my bag.


This Battery Came in Handy During the Last Power Outage

HyperJuice 2

There I am at my desk at 5PM on a Sunday and I can hear the rain outside. Next I hear the wind really whipping by and bam, there go the lights. After a few seconds the lights came back on and then after a few more seconds they went off for good! Sure my APS UPS Systems kept my Server and Internet Router going for a while before they eventually ran out of juice. Since I was headed out of town the next morning I just decided to relax and take it easy for the rest of the evening. However, the one thing that I definitely wanted to keep charged and running the entire night was my iPhone. I have a battery that I keep in my backpack which is good for a couple of charges, but I had never tried to go all night with it. Also while I was sitting at my desk I hadn’t plugged my phone in so it was already down to around 40% battery left. That’s when I remembered my HyperJuice battery that was also in my office and fully charged!

DTE-iPhone

I commend DTE Energy for having a nice App to not only report the outage, but get status updates and see what other areas are affected:

.

The HyperJuice  to rescue!

hyperjuice2-ports

This battery is really designed to power your MacBook for long periods of time when AC power isn’t readily available. However, it also has a USB port for charging/powering phones and tablets. I plugged my iPhone into the USB port and not only did I wake up fully charged 8 hours later, but the HyperJuice still had plenty of juice to top off my MacBook Pro as well! When I originally bought this battery it was for long flights and being at seminars where there were no plugs nearby. I hadn’t carried it in a while and never thought that I’d be using it to get me through the night because of a power outage.

You can get/find out more the HyperJuice here.

BTW, it’s 2014! Can’t we agree that power lines should be buried? Sigh…


Charge up to 5 USB devices at once

anker_5_port_USB

Charging USB devices at home is no big deal as I have charges around the studio, office, bedroom, etc. and even USB wall plates. However, on the road it’s bit more challenging as there are limited AC outlets in hotels and on stage during presentations. Once again I sought out a USB charger that could not only charge multiple devices, but also charge at least 2 iPads, which require a little more juice (2.1A). My search led me to the Anker® 25W 5-Port Family-Sized Desktop USB Charger Travel Power Adapter. This relatively small charger can handle charging up to 5 of your USB devices including 2 iPads at full speed. While I don’t travel with 2 iPads, I do want to be able to charge one iPad and my iPhone at the faster 2.1A speed as well as 2-3 other devices at the same time. If you’re an Android user you’ll even have a dedicated Samsung Tab port as well. Even if you don’t have the specific devices labeled on each port you can charge ANY 5 USB devices at the same time. Speaking of labeled ports that’s another thing I love about this charger. Many of the smaller chargers that have only 2 ports with one of them being high speed don’t always label which one in particular is the high speed one. Lastly another reason I really like this model over previous multiple port chargers that I’ve used is that it has a regular detachable AC cord on the other end with a decent length of 5 feet. This means that I can plug in the one cord into a power strip on stage or outlet behind a night stand and put the charger itself on the table top to connect all the cords too. I used it in LA this week at my event and it worked perfectly and to my surprise it also didn’t get warm to the touch like other charger tend to do.

anker_5_port_inmyhand

If you’re looking to charge 3-5 USB devices at the same time, this is your charger. You can get the Anker® 25W 5-Port Family-Sized Desktop USB Charger Travel Power Adapter here. Charge up to 5 USB devices at once.

Or get an even better model

anker_40w_USB

You could also go with the NEWER 40W version that had intelligent port charging! No need to plug specific devices in specific ports!

Logitech Ultrathin Keyboard Folio for iPad Air Review

wpid13517-IMG_2016_sm.jpg

Having been a fan of the Logitech Ultrathin Keyboard Covers for my previous generations iPads, I was more than just a little interested in their new additions. I didn’t even know that this new had come out until my buddy Jason Levine got one for his new iPad Air. I spent a few minutes with his and I could easily see how much of an improvement it was over the older design. While the older designed magnetically attached to your iPad, it really offered no protection to the back whatsoever. This new “folio design offers scratch protection to all sides of your iPad Air (or iPad mini) and gives you a nice Ultrathin Keyboard to boot. The reason I went with the Ultrathin Keyboards from the beginning is because I felt all other keyboard cases were just too bulky and unattractive. The Ultrathin Keyboard Folio feels nice in my hands and is not too thick.

wpid13519-IMG_2015_sm.jpg

How does it work?

You simply snap your iPad into the Keyboard Folio and turn it on. Mine showed up immediately in the iPad’s bluetooth settings and connected. That’s it. When you stand the iPad up it magnetically snaps to the keyboard and can begin typing. The keyboard keys are layed out about as comfortably as I would expect and gives me the all important Shift key on both sides that many iPad keyboard lack. The number keys also serve dual duty with the Fn button allowing you to do things like change the iPad volume and fast forward or rewind movies. You can even use the Command key as you would on a Mac for things like Command-C to copy or Command-V to paste.

wpid13515-IMG_2017_sm.jpg

I love the fact that you can lay it down on top of the keyboard for those times when you want to play a game or draw on the iPad and you don’t need a keyboard. With the old Ultrathin cover there was no way to do this other than disconnecting the keyboard and laying it aside. There’s even a holder for a stylus built right in. The battery life is rated at 3 MONTHS per charge! That’s with an average of 2 hours per day of use.

Good, but you can’t have everything

One thing I do miss with the older model is the ability to stand the iPad up on the keyboard in portrait/tall orientation. There’s no way to do that with this folio model.

Did Logitech address a potential design flaw?

If you go to Amazon and read the reviews you’ll find several that complain about the the upper left support cracking after a short amount of time. I noticed that on some the upper left support is “cut out” revealing the iPad power button (see the very first picture in this post). I’m guessing this is the “newer” model because it’s the one that Logitech features/pictures on their site.

logitech_ultrathin_keyboard_folio_crack

The older perhaps flawed model has a complete cover over the iPad power button. This is the one I have, so I’ll be monitoring it closely. Clearly there are two versions of this model and I’m guessing the one with the cutout (picture’d below from the Logitech site and at the very top of this post on a friend’s cover) is the newer one that solves the problem. There doesn’t appear to be a problem with the version for the iPad mini.

logitech-ultrathin-side

Note the stylus holder on the right in the image below.

wpid13523-IMG_2013_sm.jpg

They are available in multiple colors.

You can get the Logitech Ultrathin Keyboard Folio for iPad Air here.

You can get the Logitech Ultrathin Keyboard Folio for iPad mini here.

See the current flow as you Charge your iPhone or iPad

joltz_pulsating_lightning_cable

The last time I was in Atlanta for Photoshop World  I took an Uber car from the airport to the hotel. I couldn’t help but notice the cable the driver was using to charge his iPhone. The reason it stood out is because it had a stream of pulsating LEDs that animated from the USB power supply to the iPhone. This obviously doesn’t charge the device any faster, it’s just cool to look at. I had forgotten about it for a while and then I remembered the cable and found out who made it. Joltz makes a Lightning cable version of this. On the USB side the connector is longer than usual and I’m guessing it houses a chip to control the animation of the LEDs along the cable.

Here’s how it looks in action:

When the cable is not connected to the iDevice the LED light pattern just sits still and eventually turns off/goes to sleep. I like the cable a lot and my only wish is that Joltz would make a longer version. This one is only 3 feet long.  Charge your iPhone, iPad or iPod touch in style.

You can get the Joltz Pulsating Lightning cable here.