Adobe Creative Suite 6 Ships Today! Let me show it to you…

It is with great pleasure that I announce the shipping of Adobe Creative Suite 6 today! We’ve talked about it, we’ve sneaked it, we’ve announced it and now we’ve finally shipped it! That’s right, if you are upgrading to Creative Suite 6 you can download your copy today.

If you missed my webinar “Adobe Creative Cloud and CS6 for Designer”, where I showed the new CS6 versions of Photoshop, Illustrator, InDesign, Muse and Photoshop Touch you can check out the replay right here:

I look forward to seeing many of you in person on the Adobe Creative Suite 6 World Tour!

Join Me for a LIVE Online Webcast: Adobe Creative Cloud For Designers

Tomorrow (May 1st, 2012), I will be hosting two LIVE online sessions: Adobe Creative Cloud For Designers:

Tuesday May 1, 2012 at 10am Pacific and 5pm Pacific (GMT -7), 1PM and 8PM Eastern (GMT -4)

Join Terry White, Adobe Worldwide Design Evangelist, to see Adobe Creative Cloud and the new features in Creative Suite 6 in action. Learn how you can create at lightning speed thanks to new performance engines in Photoshop Extended and Illustrator. See how to quickly create multiple layouts from a single set of content in Adobe InDesign CS6. And discover Adobe Muse, for designing HTML websites without writing code including 400+ web fonts served by Typekit that make it a breeze to include distinctive typography in your site design.

It’s FREE, Register Here

Adobe Announces Creative Suite 6 and Creative Cloud

Today Adobe announces Creative Suite 6 and Creative Cloud. Watch the LIVE WEBCAST here TODAY (4/23/2012) at 10AM PT (GMT -7)!

There’s a lot to talk about and I’m sure we’ll spend the next few months here on my blog, on my Adobe Creative Suite Podcast and social media talking about all that’s new. I thought I would kick things off with my Top 6 Favorite Features in InDesign CS6, Illustrator CS6 and of course Photoshop CS6.

Adobe Illustrator CS6 – My Top 6 Favorite Features 

Adobe InDesign CS6 – My Top 6 Favorite Features 

Adobe Photoshop CS6 – My Top 6 Favorite Features (repeat) 

See more of my Adobe Creative Suite Videos on my Adobe Creative Suite Podcast and get the App here. It features EXCLUSIVE CONTENT that no one else gets to see.  My iOS App is a Universal App for iPhone, iPad and iPod touch. I also have an Android version:

Learn Adobe Creative Suite with Terry White - Wizzard Media

Lightroom to InDesign to iPad: Interactive Portfolios for Photographers

In this episode of the Adobe Creative Suite Podcast Terry White shows how to use a Lightroom Web Gallery from The Turning Gate in InDesign to make an Interactive Portfolio for your iPad or Android Tablet.

Grab the Photoswipe Gallery Plug-in that I used in the video here.

Are you missing out on my Bonus Content?

See more of my Adobe Creative Suite Videos on my Adobe Creative Suite Podcast and get the App here. It features EXCLUSIVE CONTENT that no one else gets to see. This episode has a BONUS CLIP that is available only in the App! My iOS App is a Universal App for iPhone, iPad and iPod touch. I also have an Android version:

Learn Adobe Creative Suite with Terry White - Wizzard Media

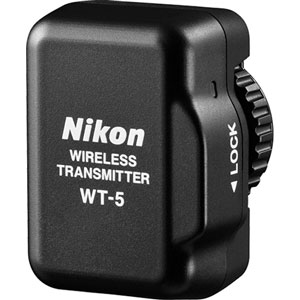
Shooting Wirelessly with The Nikon D4 and WT-5

You can find all kinds of reviews and sample images on both the Nikon D4 and D800 out there. My goal here is not so much to review this great new camera, but to put it to the test when it comes to shooting wirelessly with the New WT-5 WiFi module. The WT-5 currently only works with the D4 as it plugs into a special new port that only the D4 has. This was one of actually one of the deciding factors that pushed me to the D4 instead of the D800 (although the D800 should work with Eye-Fi cards).

Wireless Freedom

When I’m in studio I’m shooting tethered to my MacBook Pro and Adobe Lightroom 99.9% of the time. This means long USB cables and enviably tripping over them. The D4 has a USB port on it as well as an Ethernet Port! While the potential for fast Ethernet transfers intrigues me, it would still mean having a cable attached and potentially tripping over it regularly. While I had no doubts that the WT-5 would work, the question was would it be fast enough to allow me to cut the cable?

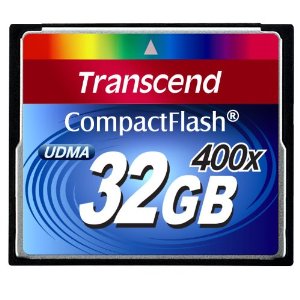
Last night I did my first shoot with the Nikon D4 and I did the entire shoot wirelessly with the WT-5! I configured the WT-5 to connect to my studio’s WiFi network and to send the images directly to my MacBook Pro on the same network. Keep in mind that I shoot in RAW and the images (16.2 MP NEFs) are also being written to the card when you use the WT-5. I stuck in one of my new Transcend 32GB 400x CF cards, configured a Lightroom 4 to Auto Import from the Nikon folder and began shooting.

The 1st image takes a while

From the time you press the shutter till the time you see the 1st image appear in Lightroom it can take an agonizing 30-60 seconds (wow we’re impatient). Much of this time is for the WT-5 to wake up, connect to your WiFi network and find your computer. However, if you keep shooting the subsequent images come in much much faster, usually 5-8 seconds for RAW. That’s much more acceptable and usable. While it wasn’t fun waiting for the 1st image to come in during my live shoot, it wasn’t the end of the world. Once I saw that the lighting was right I could just keep right on shooting knowing that the rest of the images would be transferring as I shot.

Here’s a video on how long it takes…


The Bottom Line

While shooting tethered via a wire is faster and cheaper, I’ll take the speed hit to shoot wirelessly any day! This solution also works great with the recently updated Shuttersnitch App on iPad. The WT-5 is way way way overpriced IMHO, but it works as advertised and the ability to add multiple profiles, setup an adhoc network, shoot directly to a PC/Mac via the Nikon software or to any FTP server makes it a killer solution for those that want/need wireless shooting. Next I’ll play with the remote control capabilities of the WT-5 and controlling it from any web browser including Safari on iOS.

You can get the Nikon D4 here

You can get the Nikon WT-5 here

Adobe Announces Photoshop CS6 Beta – See My Top 6 Favorite Features!

Today we are releasing a Public Beta of one of my all time favorite tools – Adobe Photoshop CS6 Beta is here!

New Features in Photoshop CS6 Beta

Photoshop CS6 beta demonstrates Adobe’s focus on huge performance enhancements, imaging magic and creativity tools that offer customers a new experience in digital imaging. Key features include new additions to the Content-Aware tools: Content-Aware Patch allows greater control by letting users select and duplicate an area of an image to fill in or “patch” another. Content-Aware Move lets users select and magically move an object to a new place in the image.

Customers will experience incredible performance, powered by the new Adobe Mercury Graphics Engine*, enabling near-instant results from popular editing tools including Liquify, Puppet Warp, Transform and Lighting Effects; and a refined, modern interface featuring dark UI options to make images pop. New and re-engineered design tools make creating designs faster and more efficient. Vector layers allow users to apply dashed lines and gradient strokes, searchable layers help quickly zero in on any layer you need, and new type styles let designers quickly apply type treatments to their designs.

In addition, the Photoshop CS6 beta offers all the features of Adobe Photoshop CS6 and Adobe Photoshop CS6 Extended, such as new 3D editing features and quantitative imaging analysis capabilities. These features will be included in the shipping version of Photoshop CS6 Extended when it becomes available.

My Top 6 Favorite Features of Photoshop CS6

As usual I’ve got my favorite features and I’m going to share them with you in this video:

Grab your copy of the Photoshop CS6 Beta here.

Are you missing out on my Bonus Content?

See more of my Adobe Creative Suite Videos on my Adobe Creative Suite Podcast and get the App here. It features EXCLUSIVE CONTENT that no one else gets to see. This episode has a BONUS CLIP that is available only in the App! My iOS App is a Universal App for iPhone, iPad and iPod touch. I also have an Android version:

Learn Adobe Creative Suite with Terry White - Wizzard Media

What I’m Teaching at Photoshop World DC

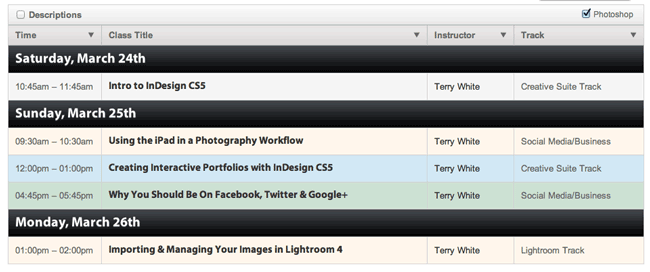
It’s that time of year again. It’s time to head out to one of my favorite shows – Adobe Photoshop World. This year’s east coast event takes us to Washington DC. As usual I have a slew of classes that I’m teaching on a variety of topics. Everything from using the iPad in your Digital Photography Workflow, to InDesign classes for Photographers and Designers, to Importing and Managing your Images in Lightroom 4. Also while I’ve got your attention, the class that I’m doing on creating Interactive Portfolios is based on using InDesign to create Interactive Portfolios for Tablets.

I look forward to seeing you there!

Today ONLY: Amazon offers the Transcend 32GB 400x Compact Flash Card for $51.99

I’ve been using the Transcend 16GB and 32GB SD cards for quite a while now in a variety of different cameras including my Nikon D7000 exclusively with no issues to date. Today (Monday, March 19, 2012) Amazon.com is offering the Transcend 32GB 400x Compact Flash card for $51.99! I just ordered two of these for my New Nikon D4, which is on the UPS truck to be delivered today!

Check out the Transcend 32GB 400x Card here.

Video Review: Wacom Intuos 5

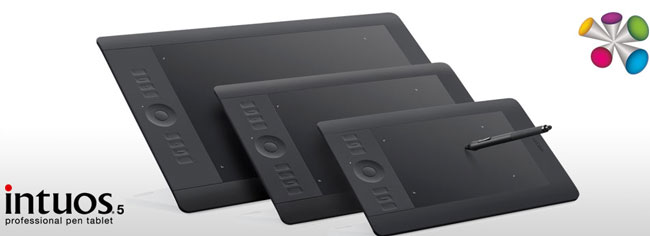
I’ve been a user and fan of the Wacom line of graphics tablets for years. The New Intuos 5 exceeds my expectations.

See why the NEW Wacom Intuos 5 Rocks!


You can get the NEW Wacom Intuos 5 starting at $212.99 (list $229) here

Get the OPTIONAL wireless kit here for $39.

Guest Review by Jason Lykins: Saberstrips

One thing that I’m always looking for as a photographer is new ways to stay ahead of the pack. Whether that is with a new lighting style, a new editing technique, or a new piece of gear that allows me to do something different, I’m always looking for that edge. Recently Scott from Saberstrip sent me a couple of his unique modifiers to try out, and I immediately knew I had to add a few to my speedlight kit. Not only do they do something different than any other light modifier that I currently own, but also it’s a look that not many people are getting with speedlights. The ease of use, durability, and unique design make them well worth the investment.

Immediately after receiving them I set one up and grabbed my closest subject, which happened to be my son who was playing a video game. Being my son, he’s used to standing in as a model while I test out new gear, so he was willing and happy (or at least he faked being happy). I brought the light in close and used it to light his face like I would do for a headshot, and I couldn’t have been happier with the light quality.  I gelled the flash to match the ambient in the room and the output was beautiful.


What You Get

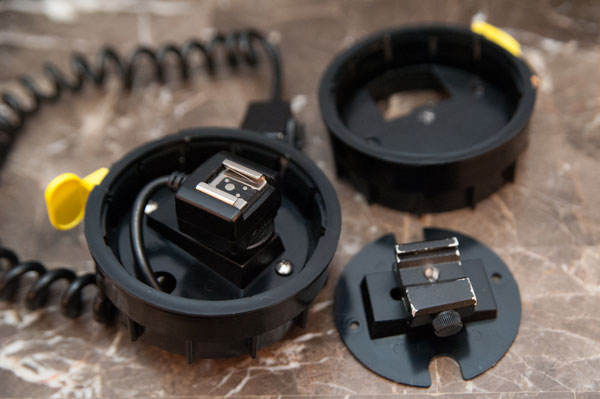
The Sabertrips arrives in a carefully packaged box, individually wrapped in plastic and bubble wrap. Each Saberstrip is a roughly 3foot long tube with a cap on each end. The middle section is cut out and covered with diffusion material. On the removable end you will see a wing nut type of fastener that allows you to loosen the cap to remove it.  Once the bottom cap is removed you will see two screws holding the mounting plate down and a ¼-20 screw protruding from the mounting plate. If you look into the tube you will see at the very top (the end away from the base plate that you removed) is a reflector plate mounted to the top cap.  That’s pretty much it. Other than a cold shoe or TTL cord (I’ll get to those in a minute) that’s all that you need to get started using your new Saberstrip. There are a few things that Saberstrip recommends to use when mounting your modifier, however they aren’t required. To see a list of those recommended items visit the Saberstrip website.
 

Setup

Setup is easy with the Saberstrip. Once the bottom cap is removed from the modifier you remove the two Phillips screws holding the base plate in place and the plate comes free. Once you have the plate removed you have access to the ¼-20 screw to mount your flash. Here you have to make a decision. Depending on how you’re going to trigger your flash units, you will need to attach one of two things to the mounting plate. If you’re using Pocket Wizard Flex units, or the Radio Popper TTL triggers, you will need to mount a TTL cable to the plate. If you’re using standard Pocket Wizards or any other kind of “dumb” triggers, you will need to attach a cold shoe adapter here. Personally I am using the Pocket Wizard Flex units so I attached the TTL cable to the base plate.  (One note here, at first I had a little trouble getting the TTL cable through the hole in the bottom cap but it finally went through with a little twisting of the connection part of the cable) Once you have your cold shoe or cable attached, you can reinstall the two Phillips screws to reattach the plate to the cap. Attaching your flash to the base plate is done by either sliding the hot shoe connection into the TTL cord, or tightening the screw on the side of the cold shoe like you normally would.  Once you have your flash attached, you need to remove the diffuser cap (if equipped) and zoom the flash to its maximum zoom. This causes the flash to bounce off of the reflector at the other end and distribute the light evenly across the diffusion material.  Mounting the Saberstrip itself is easy. The bottom cap accepts a ¼-20 screw/stud (like most common speedlight accessories) so you can attach it to most standard light stands and booms. I used them with all sorts of stands and never had a problem mounting them with no extra equipment needed.


Uses

I found a few different “favorite” ways to use the Saberstrip. Since the Saberstrip is similar in shape to a conventional strip box, the immediate thought is to use them as rim lights. I used them like this as well, but I wanted to try them out in different ways. In the shot I did of my daughter I placed the Saberstrip on a boom horizontally and lowered it until it was just out of the picture. I then placed a piece of Plexiglas below her arms on a posing table. The design of the Saberstrip allows the light to be feathered off of the subject, which is exactly what I did in this situation by simply rotating the whole unit so that the diffusion material was pointed more towards the ceiling than directly at her. The modifier worked really well for this shot because it kept an even source of light across the entire reflective area as well as her face. The quality of light was soft and made for a beautiful portrait.

The next way that I found myself using the Saberstrip quite a bit was as a hair light. I found myself placing it on a boom above and behind the subject’s head in a horizontal position. I liked it this way because it puts a nice soft light on not only the subject’s head but on the shoulders as well. It creates great separation from the background and really makes the model “pop”. I used it with Dawn in the shot above, but because you can see so far above her head in the frame it’s actually a composite. I had the camera on a tripod and I told the model to remain still after the first shot. After I took the first shot I removed the boom and hair light, returned and took a second shot without the hair light in the photo.  I then combined the two in Photoshop to make the image you see above. The main was a Qflash through a Zumbrella camera left.

The bottom Line

For me it comes down to creativity. I absolutely love the ability to control, contain, and shape my light to my liking. Adding speedlight powered strip lights to my mobile lighting kit is just one more way that I can separate myself from the pack making my images that are different than the rest. The Saberstrip is reasonably priced. For $135.00 you get a mobile strip light that can be used not only as a rim light, but also as a hair light, main light, fill light, and more!  It’s a great value and a great product! To find out more, or to order your Saberstrip visit http://www.saberstrip.com.