ExpoImaging RayFlash 2 Review

rayflash2_nikon_d600_sb910

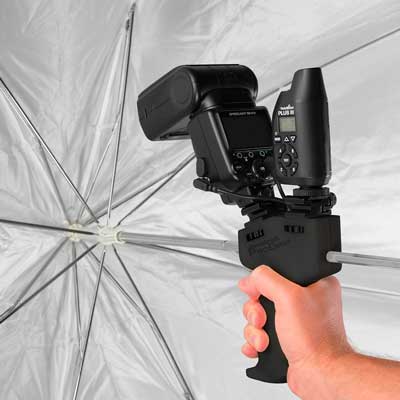
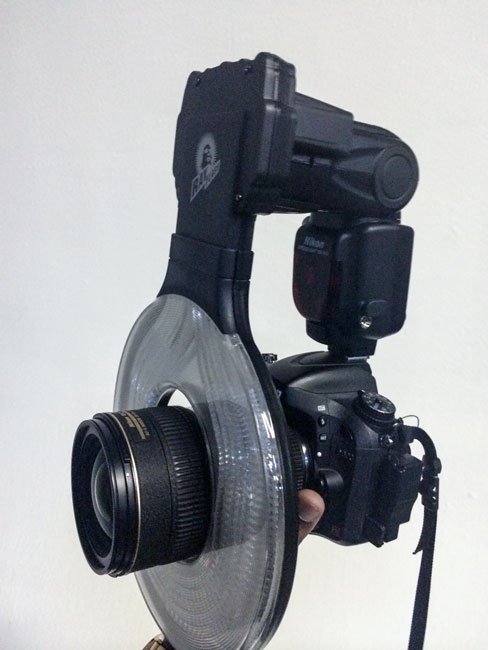
Ring lights are often used in fashion photography. However, unless you plan to use one on a regular basis they can be expensive and cumbersome. The RayFlash 2 is designed to work with your speedlight to provide a more attractive, flatter, shadowless feel to your images as opposed to just the pop-up flash or direct speedlight alone. Traditional ring light configurations come in all sizes and different specifications. Some of the newer LED based ones are lower cost. However, the professional ones tend to cost a few hundred to several hundred dollars. I like the looks of ring light photography, however not enough to invest hundreds of dollars in one. That’s why the RayFlash 2 is very attractive to me. It’s small enough for travel and low cost enough not to break the bank. You can see my original RayFlash review here that I did 5 years ago. Time flies. Since that time ExpoImaging has made some nice improvements on the RayFlash and introduced it as the RayFlash 2. The first enhancement is that it’s now much easier to attach and adjust. The head expands to fit around your speedlight easily. Also the channel slides up and down to accommodate the height of your DSLR and speedlight. Although it’s very adjustable it does come in two sizes. One for larger DSLR bodies like my Nikon D4 and D600 and a smaller model for smaller DSLRs. I wanted to try out the RayFlash 2 and here are my results:

wpid13167-DiorLoveJones2-0156-Edit_sm.jpg
This image of Dior was captured just using the on camera flash. NO RayFlash 2.

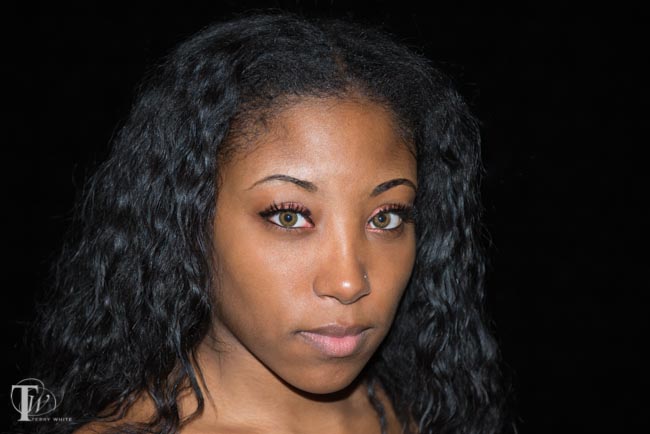
The image above was taken without the RayFlash 2 and just using on camera flash. As you can see there are definitely some distinct hard shadows under the chin. There’s a reason why so many photographers shy away from on camera flash. The results are usually less than desirable.

wpid13169-DiorLoveJones2-0164-Edit_sm.jpg
This image of Dior was captured using the RayFlash 2.

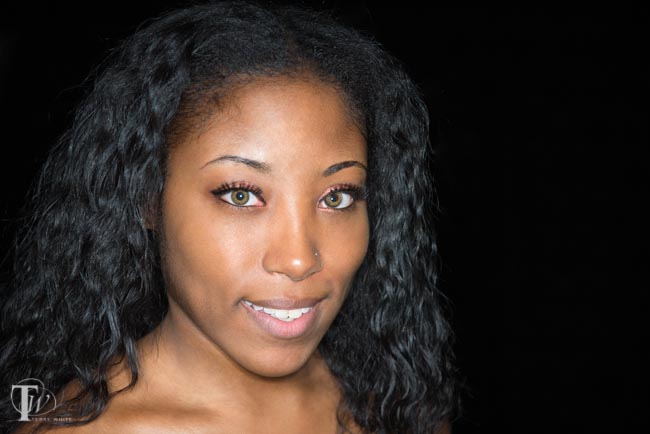
The image above was captured using my Nikon D600, SB 910 and the RayFlash 2. If you compare the shadows you can see that the RayFlash 2 produces a flatter more flattering result with softer shadows.

wpid13165-DiorLoveJones2-0007-Edit_sm-2.jpg
The RayFlash 2 produces a distinctive catch light in the eyes.


The Bottom Line

If you’re looking for the “ring flash look” and you have a speedlight then the RayFlash 2 is definitely worth considering. This is especially true if you don’t need to use a ring flash for every shoot. I also really like how portable the RayFlash 2 is and that it easily fits in either my backpack or regular luggage for travel. I would say the only downside is that it’s not as big as some of the more expensive units out there. It would be nice to have a bigger one that produces an even softer light and bigger catch light. Otherwise, I really really like it.

You can get the large RayFlash 2 here.

You can get the small RayFlash 2 here.


An Evening with Sting and the Sony Alpha NEX-3N

sony_nex3

I resisted buying a mirrorless camera until the prices came down on certain models and I could no longer resist. I ended up getting a Sony Alpha NEX-3N. The price was right and it came highly recommended from my colleagues at work. My main use of this camera will be for travel when I’m not traveling specifically to do a photoshoot and for concert photography. By no means do I consider myself a concert photographer, but I do enjoy it.

wpid13155-DSC0135_sm.jpg

A couple of nights ago I got a chance to shoot Sting and Paul Simon in concert. I decided that this would be a good chance to give the Sony NEX-3N a good workout.

wpid13147-DSC0031_sm.jpg

I love that I have the option of shooting in Manual mode as well as RAW with this camera. However, if you do shoot in JPEG you have the option of using digital zoom. In RAW the digital zoom seems to be disabled. I only took the 16-50mm lens.

wpid13151-DSC0108_sm.jpg

I was very pleased with the results as well as the low light performance at both 800 and 1600 ISO.

wpid13149-DSC0071_sm.jpg

Although I did buy an additional lens, the 55-210mm lens I didn’t want to run the risk of security viewing it as a “professional” camera and stop me from shooting. Maybe I’ll try it next time I go to a concert. In any case I’m really impressed with what this camera can produce especially for the relatively low cost. As far as camera settings go, I shot at f/5.6, 1/80th, 800-1600 ISO for most of the evening. I did start on Aperture Priority, however I wasn’t happy with the results especially in the bright lights.

wpid13153-DSC0111_sm.jpg

The Bottom Line

While I won’t be giving up my Nikon DSLRs anytime soon, I can certainly appreciate the Sony Alpha NEX-3N as my new “walk around with” camera. While the newer models offer built-in WiFi, I was happy using my Eye-Fi Pro X2 card for wireless transfers directly to my iPhone 5s during the concert.

Get the Sony Alpha NEX-3N here, it comes with the 16-50mm lens.

Get the 55-210mm lens here.


Nikon D4s Announced and Available for Pre-order

nikon_d4s

Seems like only yesterday that I announced that I was buying/upgrading to a Nikon D4 from my trusted Nikon D700. Believe it or not that was just over two years ago! Time flies… Well here we are in February 2014 and Nikon just took the wraps off the rumored Nikon D4s. At first glance it looks just like a Nikon D4. However, there are some new things going on on the inside that count.

  • 16.2MP FX-Format CMOS Sensor
  • EXPEED 4 Image Processor
  • 3.2″ LCD Monitor
  • Full HD 1080p Video Recording at 60 fps
  • Multi-CAM 3500FX 51-Point AF Sensor
  • Native ISO 25600, Extended to ISO 409600
  • 11 fps Shooting for 200 Shots with AE/AF
  • 91k-Pixel RGB Sensor and Group Area AF
  • 14-Bit RAW Files and 12-Bit RAW S Format
  • 1000 Base-T Gigabit Wired LAN Support

What makes the D4s better than the D4? Basically it boils down to a faster camera with better video support and better low light performance.

Will I be upgrading? While I may get a review unit to test, I most likely will not be upgrading to the D4s. This camera is more geared towards photographers who shoot sports or photographers that constantly work in low light situations (wedding photographers, etc.). Since I don’t focus on either one, I’ll probably be sitting this one out. Now if Nikon sends me one and forgets to ask for it back, I won’t complain either. hint hint, LOL

I’m actually waiting to see what they do with the D800 upgrade.

You can pre-order the Nikon D4s here.


Save $50 on Photoshop World with my Promo Code TWHPSW414

photo by Jason Lykins

My favorite training conference and expo is coming up soon! Photoshop World is coming April 8-10 in Atlanta Georgia. I’ll be there doing a series of classes. What makes this Photoshop World even better is that I get to give you $50 off your Full Conference Pass! That’s right, just register for Photoshop World here and enter promo code TWHPSW414 and $50 will be knocked off your price right on the spot. I look forward to seeing you all there!

TW_300x300


Bonus Deal

nikon_13302_d7100_dslr_camera_with_1005009

In the market for a Nikon D7100? Well now you can save $500 on the D7100 kit. Check it out here.

Low Cost Speedlight Softbox Option


wpid13077-Jimmy-Ward-Sr-0083_sm.jpg

Whenever I review a product it’s usually one that I use. I usually try to buy the best gear that I can. As we all know photography gear can range in price and it can be expensive getting the “best” gear. However, that doesn’t mean that you can’t get good results with gear that costs less. So I thought I’d take this opportunity to review a “lower cost” speedlight softbox. Impact makes some decent gear, typically at lower cost than the competition. Now keep in mind that you get what you pay for in most cases, but if you’re on a budget and not making a living from your photography then low-cost options may work out best.

Impact Quikbox

wpid13075-Jimmy-Ward-Sr-0082_sm.jpg

The Impact Quikbox is a 24″x24″ softbox for speedlights. B&H sells it in a kit complete with an Impact 8-foot stand and tilting bracket. The Quikbox is easy to set up. Just pop it open and put the inner baffle in and then the diffusion cloth on the end of it. Lastly mount the supplied speedlight bracket to it and you’re all set. The only thing I don’t like about their bracket is that it doesn’t tilt. This is why B&H includes an additional bracket that allows you to tilt the light. The 8-foot stand is very light — almost too light for the softbox setup. You may have to put a sandbag on it to keep it from falling over.

Putting it to the test

Impact-softbox-overhead

I had a regular commercial shoot this past weekend and decided to give the Impact kit a real world test. I mounted my Nikon SB 910 speedlight on it with a PocketWizard Plus X trigger.


wpid13079-RochelleJackson-0196-Edit_sm.jpg

I had the model hold a reflector to bounce a bit of light underneath her chin and I was pleased with the results and quality of light. With the size of this box, inner baffle and diffusion panel, the light was soft enough for my taste.

wpid13081-RochelleJackson-0472-Edit_sm.jpg


The Bottom Line

This Impact setup works as good as more expensive setups that I’ve used in the past. The quality of the materials used in the box is good. The only thing I don’t really like about it is that it doesn’t fold down nearly as small as my other boxes. So for travel this would not be my first choice. However, if you’re on a budget you can get this kit with stand and tilting bracket for less than others sell their boxes alone for.

You can get the Impact Quikbox Kit here from B&H Photo.


Bonus Deal

85mm-1.8

While you’re in the mood to save some $$$, you can save up to $400 on Nikon lenses now through 3/1/2014 here.

Have Another Look At Adobe Revel

adobe_revel_iPad

Adobe Revel (originally known as Carousel) got off to a shaky start. There were features missing that many saw as a show-stopper and originally the only way to use the service was to pay for it. A LOT has changed since then. First off, what is Adobe Revel? Adobe Revel is a photo sharing and storage service. Imagine having access to all of your photos no matter if you’re on your computer or your iPhone or iPad. With Adobe Revel you can upload an unlimited number of photos to the cloud. You can share them with others and have shared albums with family members and friends. Best of all (at least for me) you can use the Adobe Revel iPhone/iPad app to show your photos off.

How do I get my photos into Adobe Revel?

There are a couple of ways to do it. You can import photos using the Adobe Revel desktop App. You can import photos using the iPhone and iPad app or you can upload to Adobe Revel directly from Lightroom 4 or 5 using the Adobe Revel publish service (the method I use).

How many photos can I store on Adobe Revel?

adobe_revel_mac

Unlike other services, Adobe Revel doesn’t have a photo limit. You can upload as many as you want. This is important and makes Adobe Revel better than many other services because your photo library is only going to get larger, not smaller.

Once my photos have been uploaded to Adobe Revel how do I view them?

You can view your photos in the desktop app, iPhone App, iPad App or via the web. Since you’re logging in to each app and the web with the same Adobe ID, your photos are instantly available on all your devices.

What if I’m offline, can I still view my photos on my computer or iPad?

Yes, Adobe Revel caches your photos to your device and they are available even if you’re offline.

Terry, why do you like Revel so much?

adobe_revel_publish

Adobe Revel gives me the thing I’ve always wanted. An easy way to have my portfolios with me and always up to date. Once I hit the publish button in Lightroom 5 on any of my published collections, I don’t have to think about it anymore. The next time I fire up Adobe Revel on my iPhone or iPad those photos are there. Sure there are more full featured portfolio apps out there, but all of them are a pain in the butt to keep photos updated in. Also the Revel team did a great job in redesigning the iPad App. It looks very elegant now.

If I share an album with others can they add photos/videos to it?

Yes, if you share albums with others they can add photos/videos from their devices. This is great for families on vacations or event photos.

Sounds too good; this must cost a fortune right?

This is why I said it’s time to take another look at Adobe Revel. You can start off with a 30-day trial and during those 30 days you can upload as many pics as you want. After that you can keep using Adobe Revel for free and have a limit of 50 new uploads a month. However, if you want to continue to have unlimited uploads it’s only $5.99/month for Revel Premium.

OK how much are the iPhone and iPad Apps?

They’re free to download. Actually it’s a Universal App and you can get it here:

iTunes.

OK, I want to try it. Where do I sign up?

You can try out Adobe Revel here.

How To Combine Multiple Lightroom Catalogs Into One

Lightroom_5_box


In this episode of Adobe Creative Cloud TV, I’ll show you how to combine multiple Lightroom catalogs into one.

Are you missing out on my Bonus Content?

See more of my Adobe Creative Cloud Videos on my Adobe Creative Cloud TV and get the App below. It features EXCLUSIVE CONTENT that no one else gets to see. This episode has a BONUS CLIP that is available only in the App! My iOS App is a Universal App for iPhone, iPad and iPod touch. I also have an Android version on the Amazon App Store:

.


Review: Westcott Speedlite ProGrip

westcott-progrip

Just about any photographer will tell you that you’ll get better results from getting your speedlight up and off your camera. There are all kinds of ways to do it including full blown solutions like my “Westcott Terry White Travel Portrait Kit.” It seems that Westscott has done it again with a handheld solution that can also be mounted on a stand. The Westcott Speedlite ProGrip shows that someone was thinking about this problem and came up with a way to not just accommodate your speedlight, but also a modifier such as a softbox or umbrella and even a second shoe for your trigger. It’s also nicely angled downward to give you better results if you simply hold it straight up.  In the picture above I have the Westcott Speedlite ProGrip PocketBox Kit. I have a Nikon SB 910 Speedlight on it as well as a PocketWizard Plus X trigger. Of course the speedlight and pocketwizard are not included. I’ll be the first to tell you that while I think this is a great solution that I’m not accustomed to holding up a speedlight for my shoots. If I use a speedlight I’ll more than likely mount it on a stand or some other mount. The other thing you probably wont see me do very often is use such a small modifier because I typically like the much softer light achieved by using larger softboxes. However, I wanted to give this solution a shot since it’s so portable and even smaller and easier to travel with than my RapidBox. I was already doing a portrait shoot in studio over the weekend with my full sized regular strobes, but I decided to take a couple of shots with the ProGrip and supplied PocketBox. I handheld the ProGrip in my left hand while shooting the Nikon D4 with my right hand. Here are my results:

wpid13038-Kimberly_Brown-0248-Edit_sm.jpg
f/5.6, 125th sec, 28-70mm f/2.8 lens, ISO 200 and Nikon D4


I took a few shots to get the power just right. I ended up at 1/8th power on the SB 910 and probably could have taken it down a bit more to control the hotspots a little better.

wpid13036-Kimberly_Brown-0235-Edit_sm.jpg
f/5.6, 125th sec, 28-70mm f/2.8 lens, ISO 200 and Nikon D4

The Bottom Line

The Westcott Speedlite ProGrip has a great feel to it and solves a real problem by letting you either easily handhold a speedlight, modifier, and trigger or by letting you mount it all on a stand. It’s very lightweight and small enough to put in just about any bag. The sell these in three flavors. You can get just the Speedlite ProGrip Handle without any modifiers or you can get the Westcott Speedlite ProGrip PocketBox Kit or Westcott ProGrip Umbrella Kit.

progrip-umbrella


20140127-132513.jpg


Hey! That’s my work in the Westcott Catalog – Late 2013 Edition

westcott-catalog-v2

As we bring the curtain down on 2013 and as I look back on this year, one of the highlights for me was simply getting better at my photography hobby. One of the things that makes me really proud is to see my work in print with major lighting manufacturers. After all these are the folks actually selling gear to photographers and they are probably going to be pickiest about how their products are represented. I’ve had a good relationship with F.J. Westcott and I was thrilled to see my work represented once again in the Westcott Catalog. Check out their Late 2013 Edition here in PDF. Not only is my work in it, but it’s one heck of a catalog covering all of their gear. See more of my photography here. Also check out my Westcott Terry White Travel Portrait Lighting Kit Here.

Year End Deals

Also check out year end deals on their gear here.