It’s WWDC Day

keynote

It’s that time of year once again! Today kicks off the Apple World Wide Developer Conference (WWDC) in San Francisco. As usual, it’s anyone’s guess as to what Apple will actually introduce today. Here are the latest rumors and possibilities:

  • iPhone 3.0 software update
  • New 3rd generation iPhone 3g – hardware (16GB & 32GB models)
  • Mac OS X 10.6 Snow Leopard
  • Cheaper ($99 or $149) iPhones (4GB or 8GB)
  • Larger “tablet” sized iPod touch type device
  • More powerful MacBook Air (4GB RAM, integrated 3G wireless) to compete with netbooks
  • MacBook updates with 3G wireless capabilities
  • iPhone Movie/Videos direct downloads

As usual, this is only speculation/wishful thinking and nothing is definite until it actually happens. The keynote kicks off at 1PM ET. Popcorn in hand, let’s see what’s what?

Anti-Phishing Tip

We all get those emails that look legit, but aren’t! It could come from a bank or your credit card company. Usually there’s a “problem with your account” and they need you to log in and give them some information or reset your password. My favorite is when they claim that through a computer mishap that they lost all my information, yet miracously they still have my email address. Also another dead giveaway is the first line that says “Dear Valued Customer.” If I was really your valued customer, wouldn’t you know my name and address me directly.

Even though the signs are clear in some cases, people get tricked into clicking the links, winding up on an fake site and divulging tons of private information.

Here’s a tip for Apple Mail users

If you’re an Apple Mail user (the mail app built-in to Mac OS X), then you’ve got a way of quickly verifying where a link goes without actually clicking on it. Take this “Bank of America” email that I got yesterday. Although I wasn’t even remotely tempted to click on the link, I was curious as to where it led to. So I simply hovered my mouse over the link to reveal a popup display that actually shows the REAL URL that you’d go to if you clicked on it. Needless to say, it wasn’t bankofamerica.com.

boaphishing

Although I didn’t click the link, I’m sure if I had it would have taken me to a website that looks just like bankofamerica.com.

This tip also works in Mail on the iPhone

As I wrote in my iPhone Book 2nd edition. You can do this same tip by holding down your finger on a link in the Mail app on the iPhone/iPod touch to see where the link is actually going to take you.

mail-spamhover

What if you don’t use Mail or are on a PC?

Even if you aren’t an Apple Mail app user, there’s a simple tip for you. DON’T CLICK ON LINKS IN EMAILS! If I thought that this email was legit, the safer thing to do would be to fire up my browser manually and key in the URL myself or use a bookmark. That way I’d know for sure what site I was headed to. Even if you are a Mail user a clever programmer can create a link that spoofs the original site. So bottom line, don’t click the links. Chances are if you get an email requesting that you go to a website, login and give them information, it’s an attempt to gain access to your information, passwords, user names, etc.

Be safe!

MetaX completes me

In yesterday’s post I talked about my project to convert all of my purchased movie DVDs into MP4 format for streaming playback to any TV in my house (via Apple TV). I got lots of questions about the workflow and some of the questions revolved around Movie Poster artwork. When you rip your Audio CDs iTunes happily finds the missing album art for you and inserts it. It also looks up the track names and other info to help with the process. However, for movies iTunes doesn’t offer much help at all. I was quite content just having the name of the movie and the DVD artwork. I was manually looking up the artwork on the web and copying and pasting it in via the Artwork tab in iTunes Get Info area. It was working! However, the one thing I thought would be nice to have is the Movie Ratings (G, PG, PG-13, R, etc.). Even if I wanted to put these in manually, iTunes doesn’t allow access to this field. So I just decided to live without it.

MetaX rocks!

The one thing I’ve found out about blogging is that if you blog about a product or workflow, there’s usually someone out there reading that post that’s either done the same thing you’re doing or tried other products that do similar things. I’ve gotten some of my best tech recommendations from the comments area of my posts. Well my blog readers were very quick to offer suggestions to help with my project this time too. Blog reader “Noel” suggested an app called MetaX, which would pull in the Movie Poster art AND other data. Well of course I went to go check it out and I was floored by how well it works!

MetaX Interface, click to enlarge

MetaX polls a variety of databases to grab not only the Movie Poster art, but the description, ratings, actors/acrtresses, chapter names and more! You can go movie by movie and tell it what you want from each database by checking off the boxes in the interface and then let it batch write those tags into your movie files. Be prepared as this process can take 5 minutes per movie on average. I ran it on all the movies I had already ripped and it’s still going as of this morning (almost done though). Speaking of Movie Art, this app even has the ability to allow you to manually crop off the annoying white background that some Movie Posters will come in with.

click to make larger

As you can see above the top two movies have no extra metadata and the bottom two have been run through MetaX to grab the rating, genre, year, description and the movie art (which isn’t shown here).

Believe it or not MetaX is free to download. The author requests a donation via PayPal, which I will be happily making today! It also works great for TV shows. MetaX is a Mac only App. I don’t have a similar solution for Windows users. However, if one exists I’m sure someone will chime in in the comments and let us know.

Thanks Noel for the suggestion! You’ve helped make this project even better than I imagined it would be. My workflow now puts MetaX right in the middle. I go from HandBrake to MetaX and then into iTunes.

Apple iTunes

Apple iTunesApple iTunes Apple iTunes

My streaming problem has been solved by YOU!

mm-minimount

Last week I put my blog readers to the task of giving me a way to stream content from my DVR to another TV wirelessly. It didn’t take long for the responses to start streaming in. I’m happy to report that not only did you solve my problem, but you blew past my expectations with the stuff you guys came up with. It was actually the second response by “Ivan” that really turned the tables. Ivan suggested something that I hadn’t even considered. He suggested replacing my Apple TV with a Mac mini.

“I’d suggest replacing the AppleTV with a MacMini :).

Has WiFi and could technically stream whatever you want, at least I think. Add Boxee to the mix, and you’ve got ABC, Hulu, Joost, local movies, local tv shows and so on on your TV.” – Ivan

I was so stuck on adding another box to the mix to do the one thing that I was missing, that I never considered replacing the existing box I was using with one that was more capable! At first glance at Ivan’s comment, I dismissed it. I thought that Ivan was missing the point. He talked about streaming shows from the internet. Well that wasn’t the problem. The TV already has a CableCARD in it and I get live TV all day long. However, when I gave it a second thought the lightbulb came on! I already have a Slingbox Pro connected to one of my DVRs (the Comcast box in my office). I use the SlingPlayer on my MacBook Pro when I’m on the road to watch stuff recorded to my DVR. It was at that moment that I realized that if I used a Mac mini instead of an Apple TV, I’d be able to install the SlingPlayer app on it and stream content from my DVR to the other TV out in my pool/workout area. That was it! That was the missing piece of the puzzle. It was so simple and the beauty of it was that it wasn’t going to cost me a dime! That’s right, I already had a Mac mini just sitting in my home theater going to waste. 


Mac mini vs. Apple TV – Smackdown!

It’s no secret that I’m a fan of Apple TV! I like the concept of a box that allows me to wireless stream my content (photos, movies, music, podcasts, etc.) from my Mac to my TV with a very slick interface and simple remote. Also now that it has movie rentals, it’s even more useful. However, the downside of Apple TV is that that’s all it does. If you want other content, you’re pretty much out of luck. Now I can take shows recorded on my TiVo HD, transfer them to my Mac (thanks to Toast) and convert them into an Apple TV/iPod format and watch them on my Apple TV. The problem is that the process takes 4-6 weeks to complete. OK, I’m exaggerating. However, it does take a long time depending on the length of the show and whether or not it’s in HD or not. This means that you really have to plan ahead. If I recorded 30 Rock on my TiVo HD and plan to watch it later/the next day out in the other room, I’d have to remember to start the transfer before I go to bed that night. Then when I wake up, I’d have to start the conversion process. For a 30 minute HD show, this could easily take a couple of hours in total. Once it’s converted, then I’d still have to transfer it to iTunes so that it would be available to watch on the Apple TV. It’s certainly doable, but that’s a lot of planning ahead. 

Since the Mac mini is a computer, that eliminates a lot of these steps. For one, I could just install the Toast/TiVo Transfer apps right on the Mac mini and after the show is transfered I could just watch it! No conversions necessary. However, that’s still going to take time as the TiVo transfers take longer than real-time to happen. So a 30 minute show could easily take an hour or longer to transfer. That’s where Slingbox and the SlingPlayer come in. With the Slingbox connected to my office DVR (the one that’s used the least), I can record all my favorite shows and then run the SlingPlayer app on the Mac mini to stream those recordings wirelessly and full screen.


My original Mac mini

I bought the first Mac mini, which came out in 2005 (wow time flies!). I originally bought it for much of what we’re talking about today. I bought it put in my home theater so that I could watch my iTunes content (there was no Apple TV back then). I also wanted the ability to run Delicious Library (my DVD cataloging app) on the big screen. This Mac mini is a 1.25 GHz G4 (a dinosaur by today’s standards). It was the base model and I upgraded it to 1GB of RAM. Once the Apple TV came out in 2007, the Mac mini just sat there for the most part. Most times I would forget it was even there until happened to look over and see. In my home theater, the Apple TV does everything I need. I already have all the other boxes I need in that room doing everything else. So the Apple TV was a perfect fit. 

mm-frontrow

So when Ivan proposed using a Mac mini, I thought – “well gee, I already have one of those. Let’s give it a shot!” My initial concern was that it was going to be too slow to stream. I was concerned that it only had 802.11g wireless AND after I hooked it up I realized that this model didn’t have support for the Apple Remote. This meant that Front Row (Apple’s original Apple TV like interface that is built-in to the Mac OS) was going to be a problem. I then remembered that Apple included Front Row in Leopard. The first thing I did once I hooked it up was install Mac OS X 10.5 Leopard (with all the current updates). I remembered that even if you don’t have an Apple Remote you can still get into Front Row by hitting Command-ESC. It worked, but now that meant that I’d need a keyboard handy. I do have the newest Apple Wireless keyboard which is nice and small. I also still had my Bluetooth Trackball. While this was all fine, I really wanted ONE controller. A keyboard with an integrated pointing device.

airmouse1    airmouse3  

That’s when I remembered “Matt’s” comment about an iPhone/iPod touch app called Air Mouse Pro. PERFECT! This app was even better than I had hoped. It’s a trackpad and keyboard all in one and it even has a Front Row friendly mode with one button access to Front Row. This eliminates the need for the Apple Remote, separate keyboard and mouse. Air Mouse Pro totally rocks! It will definitely be my iPhone App of the Week! 🙂


What about TV resolution?

This is one advantage the Apple TV has over using a Mac mini. Out of the box the Apple TV already has all the right ports on the back. It has HDMI, Component, Optical and RCA audio jacks. Not only does it have the right connections, but it’s also geared to be connected to a TV at the various TV resolutions including 720p, 1080i and 1080p. Luckily I already had the right cables. I have a DVI to HDMI cable. I also had the necessary 3.5mm to stereo RCA cable for audio. When I connected the Mac mini to the TV and booted it, it detected the resolution and came right up. The problem was that the menu bar and dock were cut off. This is due to “overscan”! The Apple TV doesn’t suffer this problem because Apple was very careful to design the menus and interface so that they don’t go to the edge of the screen. On the Mac minis that came out later (like all the intel models), Apple added an Overscan option in the display preferences. This will slightly shrink the screen so that you can see the edges, but it will also potentially introduce black bars all the way around. No real way around this.

mm-fullscreen 

CSI Miami streaming from my DVR in the SlingPlayer running full screen at 720p


Since I don’t have the new Mac mini, I used a shareware app called SwitchResX. This app allows you to have custom resolutions and more importantly for me it also offers the overscan correction I needed. Once I turned that option on, I could see everything.


I shall call him Mini mount

mm_minimount2

The good folks over at H-squared wanted to help out so they sent me their Mini mount which allows you to mount your Mac mini on the wall. This was perfect for my set up as my TV is suspended from the ceiling and there is no where for the Mac mini to sit. In case you were wondering what became of my Apple TV? I moved it to my office and used H-squared’s tvTray to mount it on the wall as well. I love the LED glow (now standard on the tvTray and optional for the Mini mount).

mm-appletv

I even used the very cool MultiLevel iPhone app to make sure the mounts were level on the wall 🙂 Not only was H-squared very very helpful to my cause, they even want to offer all of you a discount on their products. You have from now to the end of February to save 15% off their stuff. Just use the code, wait for it………… “TERRYROCKS” at checkout.


My Gear

One of the comments I got requested that I post the actual components of my final solution. So here they are:

  • Toshiba 27″ LCD HDTV with built-in DVD player and CableCARD slot – this TV was discontinued ages ago. I bought mine on eBay because it was only model I could find at the time that had both a CableCARD slot and built-in DVD player.
  • Mac mini – I have the original model which is 4  years old. The new ones are faster and have an Apple Remote.
  • Apple Wireless Keyboard – it’s small and bluetooth wireless.
  • Bluetooth Trackball – I’m not crazy about this as it takes several click to get it to reconnect after a reboot
  • Air Mouse Pro – Freakin’ AWESOME iPhone app to control it all!
  • Slingbox Pro – connected to the crappy Comcast DVR in my office (see my review here). Wait? Why is my Slingbox connected to your Comcast DVR (which sucks) instead of my TiVo HD? Good question! I connected it to least used DVR in the house because when you’re watching your DVR via the Slingbox, you’re actually controlling that DVR, changing channels, etc. I didn’t want to interrupt any other family member’s viewing. So the Comcast Motorola DVR is the one that gets the least use 🙂
  • SlingPlayer  for Mac – a free download
  • Mini mount – Mounts the Mac mini neatly on the wall (get 15% off with the code “TERRYROCKS”)
  • SwitchResX – because I have the original Mac mini I need this to correct for overscan issues on the TV’s resolution
  • DVI to HDMI Cable – The Mac mini has a built-in DVI port. Most newer TV’s have HDMI. So you’ll need a cable or adapter
  • Audio Cable – Although I used a Monster cable, any old Radio Shack cable will work just fine and will be much cheaper.


The Bottom Line

mm-comcastremote

SlingPlayer running on the Mac mini with an onscreen remote that looks just like the physical Comcast remote for my DVR.


The Mac mini was a perfect fit for my needs in this situation! Granted it costs twice as much as an Apple TV, but it has more than twice the capabilities. If Apple were to ever build-in a Blu-ray player, it would be the ultimate set top box/computer. Now I’m only scratching the surface here because I really only needed it to do the one thing and that is allow me to stream my DVR content over to another TV. However, because the Mac mini is a computer, it can do so much more. At a minimum you could also surf the net as needed. You can also stream TV content from sites like hulu.com and although I haven’t yet played with Boxee, it looks very promising. It doesn’t stop there! Remember Netflix streaming is now on the Mac. So you could stream anyone of up to 12,000 movies. You could also turn it into a DVR as well with products like EyeTV. Although it doesn’t have a built-in Blu-ray player, it does have a DVD drive in it. This means that it can playback all your standard DVDs and Netflix rentals too. So the Mac mini can just about do it all.

Once again, THANK YOU to all my blog readers and especially those that offered up the very cool solutions that made this a reality!

2 Important Updates – iPhone 2.1 and Mac OS X 10.5.5

It’s bug fixing time at Apple!

On Friday Apple released the highly anticipated iPhone 2.1 update! I wanted to use it for a few days before passing judgment on what it fixed vs. what it didn’t fix. This was not a feature update. In other words it didn’t include Cut, Copy & Paste as some had rumored, it was mainly geared at fixes a boat load of small issues that were frustrating some users. One of the main things it was to fix was the high rate of dropped calls that some users were experiencing. Since I wasn’t experiencing a lot of dropped calls, I can’t speak to if this is better or worse now. My call quality has been good since day one and seems to be the same with 2.1. The other 2 important areas were App Crashes and Performance. Now those two areas I can speak to. As I’ve said in the past, I’ve got over 1,000 contacts on my iPhone. So when 2.0 came out the first thing I noticed was that the contact list was so slow that it was almost unusable. Each update made it faster, but 2.1 actually gives me about 98% of the performance I was seeing with 1.1.4. I don’t want to say 100% because it does still lag for about a second or two sometimes.

As far as App Crashes go, this is a mixed bag. The problem is that if an app crashes now, well it’s hard to say if it’s Apple’s fault or the fault of the app not being updated for 2.1 yet. I was still getting a few crashes in Safari on certain sites, but I haven’t had a Safari crash since 2.1 has been installed. However, my Facebook app (which has not been updated) locked up the whole iPhone (needed to reboot it) when I tried to use the camera function with it. So again is that the fault of the app or 2.1? Hard to say.

If I had to say, I would say that 2.1 is definitely a BIG IMPROVEMENT over all. The iPhone does seem more responsive and like I said, I haven’t seen any real crashes (except the one) all weekend.

If you have more than a few apps, you’ll love how much faster Backing up and syncing is. Also installing apps is way faster.

I also should mention that Apple plugged several security holes including the one that someone could gain access to your contacts using the emergency dial feature. So you should install 2.1 if for no other reason than to make your iPhone more secure.


Little things that have changed in the iPhone 2.1 update

Like I said, this is not supposed to be a new features release, but that never stops Apple from slipping in a small change here and there. One thing you’ll notice is that now when you receive an SMS text message, your iPhone will now sound the alert up to two more times after the first time in about 3 minute intervals. This is for those folks that complained that if they missed it the first time, they wouldn’t know they had a message waiting without looking at the screen. Unfortunately there is no preference for this. So everyone gets this feature whether you wanted it or not.

You can also create Genius Playlists now (a feature in iTunes 8) right in the iPod app on the phone. I didn’t see it at first and I knew it was supposed to be there. The reason I didn’t see it was because I sync my iPhone to two different computers. One for data and one for media (music, movies, etc.). It wasn’t until I sync’d it with the computer that holds my music, that that feature became active.

No more app updates screwing up your custom home screen configurations! This is a biggie! One of the things that frustrated me and several of my friends is that you spend time putting the apps in the order you wanted them in on your iPhone only to have that order screwed up when you did an update to one of your apps by sticking the update at the end on the last page. Now when you do an update, it does temporarily put it at the end until it’s done and then replaces the old app in the same spot! Yay!

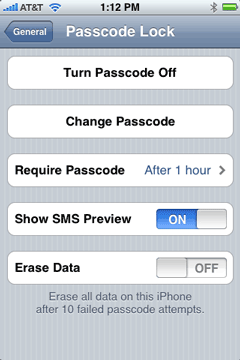
Wipe it automatically if someone tries to break in! Now there is an option that when you set a PIN on your iPhone you can optionally have it automatically wipe the iPhone if someone tries to enter the wrong PIN (guessing it) 10 times in a row. By the way I highly recommend setting a PIN on your iPhone. There some myths around this feature and let me clear them up now. The biggest thing people tell me is “hey I don’t want to have to enter a PIN to answer my phone!” OK good, because you don’t! Even if your iPhone is secured with a PIN you don’t have to enter it to answer a call. You only have to enter to make a call and only after the PIN has kicked in, which that interval is up to you. For example, on my iPhone I have it set to an hour. If I haven’t touched my iPhone in an hour, it automatically locks and requires a 4 digit PIN to use it again. You can go from immediately to 4 hours. When I’m on the road I change it to 15 minutes. This way if I lose my iPhone or if it’s stolen, I don’t have to worry about someone picking it up and just start using it and worse getting access to all my info on it. Because my iPhone is now setup to use Exchange, if it ever does come up missing, I can have my IT folks at work wipe it clean remotely. Once the wipe starts, there is nothing that can stop it. Not even turning it off or removing the SIM card. Once you turn it back on the wipe continues. Pretty James Bond’sy. The last myth is: “What if it’s an emergency and I need to make a call?” If you’re in an accident and someone needs to dial 911 on your iPhone but you’re unconcious and they can’t get the PIN out of you, there is an “Emergency Call” button that is accessible even when the iPhone is locked with a PIN. So there is no excuse, go Turn your Passcode on right now!


Cosmetic changes too. The 3G and EDGE display is different. Apple used to put a box around the “3G” and reverse it out, now the box is gone and it just says “3G”. Also now when you watch a movie (video, video podcast, etc.) and you don’t finish it, there will be a circle in front of it that is half filled in. So the blue dot means you haven’t watched it yet, no dot means you have watched it completely and a half dot means you started it but didn’t finish it.

It’s all good! Now Apple please return to adding more features that we want.


Mac OS X 10.5.5

Mac OS X 10.5.5 came out yesterday and fixed a slew of bugs. I read through the list saying, “oh that’s good, oh that’s a good one”, but in all honesty I haven’t really noticed a difference. Granted it hasn’t even been 24 hours yet, but I wasn’t really having any major problems with 10.5.4.

The one thing I would like to see addressed and I thought it was in 10.5.5, but I read it wrong, was the ability to sync subscribed iCals up to Mobile Me. It’s just lame that I can’t wireless sync my family and organization calendars to my iPhone because I use Mobile Me. If I sync them over USB I can! Apple also treats the Birthdays calendar as a subscribed calendar too. So no birthdays on the iPhone – LAME!

I do have a work around though. Since Birthday calendars, user group meeting schedules and Holiday calendars don’t change often, I exported those “subscribed” iCals out and then imported them back in as NEW iCals. That way the new ones are not subscribed to and therefore sync up to Mobile Me and my iPhone. This is a temporary work around as I’m hoping this issue will be fixed in the not too distant future.

NeatReceipts for Mac


Having become a fan of the Fujitsu ScanSnap for Mac, I’ve been interested in having a more portable solution. One that would be small enough to take on the road if need be. While Fujitsu does over a smaller model, it’s still costly at a list price of $295.

I was standing in Staples the other day looking at point and shoot digital cameras and the scanners were right behind me. I looked back and saw the NeatReceipts display. I was intoxicated by the small size of this scanner. Of course Staples was out of them and it was probably a good thing since there was a newer model available online anyway. When I got home I ordered the NeatReceipts for Mac version. Now make no mistake, this scanning solution is designed for DOCUMENTS, not photos. I already have a portable CanoScan scanner for photo scanning when I travel to see family. I wanted this scanner to serve as a portable filing solution.

When my NeatReceipts scanner arrived I unboxed it and installed the software from the CD. Of course there was a newer version available online and I downloaded that version and installed it. I then ran the simple calibration procedure and I was ready to scan. NeatReceipts for Mac won’t win any races for speed. I was spoiled rotten by the Fujitsu scanner which is the fastest scanner I’ve ever owned. The NeatReceipts scanner only scans one side at a time and takes several seconds to scan an 8.5″x11″ page. Although slower than I imagined, it is still very acceptable. Had I never used the Fujitsu ScanSnap I wouldn’t have given the speed a second thought. The bundled software is designed to be your electronic filing cabinet. Documents and receipts that you scan are neatly filed away in collections (which are in Libraries).

The NeatReceipts scanner scans everything to PDF on the Mac. So there is no need for any kind of interim format. Once the document is scanned it is automatically OCR’d which makes it searchable in Spotlight. You can also bypass scanning into the NeatReceipts library. Although the app must be running in order to use the scanner, you can press the PDF button on the scanner and scan right to folder of your choice. It just pops up a dialog box asking you to name and choose the location for your scan that you’re about to perform. However, even if you do scan into their library app you can drag and drop a scan (PDF) from it to anywhere else on your drive including right into an email.


Scanning receipts

It’s clear to me (even by the name) that NeatReceipts was designed to scan receipts for the busy traveler or business person. The interface is designed to scan a receipt and then automatically detect things from the receipt such as price, business name, type of credit card used to pay, etc. It does an OK job at auto detecting this info and then filling it in on the right. Even when it doesn’t guess right (leaving a field empty) you can drag and drop lines of type from the actual scan into the fields as needed. Since it OCR’d the receipt, this is live text. When I scanned a couple of receipts as a test it seemed to scan more area around the paper than was needed. Luckily there is a crop feature, but it is 2-3 clicks to get a scan cropped. I would like to see a better auto page edge detection in the upcoming version.


Scanning documents

I scanned a couple of 8.5″x11″ documents. One was a simple letter and the other was a photo copy of a flyer that had photos on it. When scanning both documents using the hardware button on the scanner, it produced grayscale images of both. Clearly the letter could have been scanned as a black and white document. By scanning it as a grayscale, the resulting PDF was 2.8MB in size. I scanned the same letter using the software which allows you to specify “Scan Black and White document” and the resulting PDF was only 976KB. So it seems that you’ll get the best results by picking the appropriate option in the software as opposed to using the hardware buttons. Also there doesn’t seem to be any command keys for choosing the various types of scans. You have to go up to the Scan menu and then choose the appropriate option based on your needs:


How is the Mac version?

Neat Receipts for Mac is an “Advance Release”. In other words, this version is not yet complete with everything they intend to include. For example, the Windows version includes software to automatically convert scanned business cards into text directly going into your PIM (personal information manager). The Mac version doesn’t have that yet. NEAT Receipts for Mac was developed in the Apple programming environment (Cocoa) to provide an easy to use, functional interface that looks and feels like the applications you use every day. Seasoned Mac users will feel right at home using the intuitive design and those who have recently switched from PC will get accustomed to the interface in no time. NEAT Receipts for Mac does not yet match the NEAT Receipts PC version feature-for-feature but it includes some new features available only on the Mac such as drag-and-drop functionality, Image Flow (their version of Cover Flow), Smart Collections and more. Therefore NeatReceipts for Mac ($179.95) is cheaper than the Windows version ($229.95). They are promising full feature parity in early 2009 as a free update.


The Bottom Line

If you’re looking for the smallest document scanner you can find that is USB powered, I think this is it! It’s easy to use and works cross platform on Mac and PC. While it’s not as fast as other scanners out there, it is smaller than everything else I’ve seen easily fitting into a laptop bag. It also costs less than the competition. NeatReceipts for Mac goes for $161.85.

Quiet! I’m trying to sleep!

Tis the season for power outages! Last year I invested in a whole-house natural gas backup generator. I work from home (and am spoiled rotten by power consuming technology) and therefore, I can’t stand prolonged power outages. Remember the blackout of 2003? Buying the generator was like buying insurance. Once you have it, you never seem to need it (and I’m ok with that). The power has not been off for more than 5 minutes since I had it installed. Figures right? Well that all changed a couple of nights ago. The power went off at 4:30 AM Saturday morning! How do I know the exact time you ask? Well when the utility power goes off, my generator kicks on within 10-15 seconds and powers the whole house. It’s located on the opposite end from by bedrooms so I never hear it. Normally I would have slept right through such a faint motor sound. However, I have APC UPS (uninterruptible power supplies) throughout my house to provide backup battery power for my gear for those few seconds that it takes the generator to fire up. It was on this night that I found out what it’s like to have 10 APC UPS systems go off at once!

APC Battery backups "BEEP" when there is a loss of power. The idea is is that this will alert you so that you can go to your computer, save your files, exit your apps and do a normal shutdown until main power is restored. In my case that should only be 10-15 seconds right? Well not quite. I found out the hard way that UPS systems are very sensitive to the actual quality of the power being supplied to them and it seems that generator power is not quite good enough when the APC units are on their default setting of "high senstivity". So my UPS systems continued to stay on an BEEP even though there was "power." Needless to say I wasn’t able to sleep through it. At this point I wanted to yank these things out of the wall, throw them in a pile and light a match! Even my larger ones that did not stay on continuously beeped every 10-20 seconds to let me know that line conditions were not ideal.

I remember after the initial installation and testing of my generator (the UPS’s were beeping then too) that my generator installer told me that I would need to change the settings on my UPS systems to make them less "sensitive." In fact I did just that on my larger units and didn’t know of any way to do this for my smaller units. However, it didn’t stop the beeping! Since I was awake anyway, I grabbed my laptop and Googled "turn off the APC beep" and the results lead me to various discussion threads (some really old) about how it could be done with the supplied APC Power Chute software. That’s where the fun began!


Windows to the rescue?

As most of you know, I’m a Mac guy. I have nothing against Windows or Windows users, I just prefer the Mac and have used the Mac OS since 1984. So let’s not get into that debate here. However, I also run Windows XP on my MacBook Pro via Boot Camp and Parallels. Why am I bringing up Windows? Well as it turns out, APC makes the Power Chute software for both Mac and Windows. However, the two versions differ as much as night and day. The Mac version is very basic and simply allows the Mac to communicate with the APC units and if there is a power outage the Mac will automatically do a shut down.

Here’s the interface to the Mac version of Power Chute:

Guess what? You don’t even need their software for this. Apple has built that functionality into the Mac OS via the Energy Saver System Prefs:

So if you’re a Mac user, don’t even bother installing the APC software. Just plug in the supplied USB cable into your APC and into your Mac and you can control it from the Energy Saver prefs.

As you can see from the above screen grab there is no other controls over the unit itself (nope, nothing under Options either). After doing a little digging, I found that the Windows version offers WAY MORE! So I rebooted my Mac into Windows XP (Parallels works too without rebooting, but I wasn’t sure if it would see the APC at the time. Later I tested it and it does.) using Boot Camp and popped in my APC CD that came with my latest unit. It had Power Chute 2.0 for Windows XP and I was floored by the available options:

There were two settings that I needed to change. The first one was under Notifications. I don’t want my APC units beeping EVER! If there is a power outage here, it won’t be for more than a few seconds because my generator will kick on. So therefore, I don’t need to hear any beeps ever! Especially at night. There was even the option to turn off the beeps in the evening and still have them on during the day. However, I don’t want them at all:

The next and most important setting was the magical "Sensitivity" setting. This allows the APC to be a little less sensitive and recognize generator power as being good enough to power my equipment.

I took my laptop around to each APC unit and set these settings for each one. I was back in bed by 6AM for another few hours of sleep. Of course this was on a Saturday when I didn’t have to wake up early! Arggghhhhhhhh!


Shame on you APC

I’m happy that I was able to solve my problem without a single call to APC. If my generator installer had never mentioned a "Sensitivity" setting I would have never known to look for one. I was initially going after disabling the beep sound when I found the Sensitivity section. So it all worked out. However, not all Mac users have Windows installed on their Macs. Since APC bills their units as for both Mac and Windows, I would expect the same level of control over the hardware on either platform. APC you need to provide these same options in the Power Chute for Mac version.

Apple releases Mac OS X 10.5.4 and it helps CS3

Yesterday Apple released an update to Leopard (Mac OS X 10.5). This is probably one of the most important updates to Leopard since the day it shipped because it fixes some long standing issues with Adobe Creative Suite 3. One of the apps that suffered the most under Leopard was Adobe InDesign CS3 with frequent random crashes. Thankfully this update (10.5.4) fixes this problem! This is a MUST HAVE Update to all Leopard and CS3 users!

Adobe has also responded with an update of its own to InDesign CS3 (5.0.3) that fixes other issues as well.

Don’t walk, but run to go do both of these updates!

My ScreenFlow issue has been FIXED!

I have to really hand it to Brian Novak over at Vara Software (the makers of ScreenFlow). I sent them a tech support email explaining my crashes upon export and Brian quickly responded. He requested the crash logs from my system and within minutes narrowed the problem down to a conflict with my Nvidia card/drivers. Turns out that the "Show Keys Pressed" feature was the culprit. As soon as I turned that off, the export went fine!


Now I really DO like ScreenFlow!

This App is amazing at what it does and is backed by a company that wants it to work properly. I’ll be using it again when I record my next podcast episode. Although I don’t like the fact that it has to export/render the finished video (which for my 28 minute video too 30 minutes to export), the extras such as callouts and simultaneous DV camera recording are worth it.

I want to like ScreenFlow

A couple of weeks ago while attending the ADIM conference my buddy Colin Fleming turned me on to a new (well new to me) screen recording app called ScreenFlow (sorry PC users, this is Mac only). As you know, I’m always recording tutorials, podcasts, online classes, content for instructional DVDs, etc. So I depend upon my screen recording software weekly. My current choices are iShowU, which has become my primary app and SnapzPro X which not only does screen recording, but also does screen grabs in various formats with pro level controls.

The thing I absolutely love about iShowU is that once you’re done recording, that’s it! There is no post processing/rendering. The QuickTime movie pops up instantly. So it’s going to be hard to get me to go back to an app that has to render the final movie out after you record it.


Then why would I consider ScreenFlow?

Although ScreenFlow does require post process rendering, it may be worth it because of all the editing capabilities it has. Unlike iShowU and SnapzPro, ScreenFlow allows you to do post process editing right in the app. It also has a major advantage in that it also allows you to simultaneously capture your video via your iSight camera or other camera source. While all the apps capture your audio and computer audio (if you like), only ScreenFlow captures your video too. I really like that feature. ScreenFlow also adds several other enhancements like being able to cut out mistakes! Last night I recorded my most recent Creative Suite Podcast episode and I made a mistake during the recording. Once I was done recording, I was able to scrub to the mistake on the timeline and cut it right out. Not only can you make edits, you can have multiple tracks. So you can add in graphics and other recordings after the fact. Let’s say you mention a URL during the recording, you can add that URL as a graphic the pops up in the lower portion of the screen during the time that you mentioned it.

While these features are great, the other thing that really attracted me to ScreenFlow was the fact that it allows you to put in "Callouts." Callouts allow you to do things like zoom in on your cursor during post editing. You can add a click sound so that people know when you clicked your mouse. You can even add a radar type flashing circle so that people can see your pointer on screen and know exactly where you clicked. With Callouts you can also have your keyboard shortcuts displayed automatically on screen at the point you typed them. Very cool!


Putting ScreenFlow to the test!

Like I said, I wanted to see if ScreenFlow would be worth the post process rendering (during export). So I recorded my latest Adobe Creative Suite Podcast episode using it. This episode is a little longer (ok, a lot longer) than my average ones. It was almost 30 minutes long. That’s OK, because that’s as real world as it’s going to get for me. The recording worked GREAT! Editing on the timeline worked great. I was able to do a Ripple Delete and cut out a mistake I made during the recording (something iShowU and Snapz, don’t allow). I even took the time to add in some of the Callouts. After I was done editing, I did an export and that’s where the disappointment came in. About 3-5 minutes into the export process, the app crashed! I fired it back up (luckily I had saved my work) and tried it again. It crashed again at the same spot. I tried changing my export options several times and it crashed each time. Now I was annoyed that I wouldn’t be able to get my beautifully recorded podcast episode out of this thing and worse I’d have to record it over again using iShowU. However, I was persistent. I thought to myself, "it must not like something that I’ve added to this video." So I started turning off the fancy Callouts. Eventually I must have turned off the right one, because the export finally worked! I was too tired to try and narrow it down to exactly which Callout was causing the issue. Each time you relaunch the app after a crash it offers to send the crashlog to the developer and I did. So hopefully he’ll be able to fix this little (super annoying) glitch.


All in all, it’s a great app! I’m still not a fan of rendering, but it’s the price I’ll have to pay for the features that I can now add to my recordings to produce better recordings in the end. Although I didn’t use a timer, I would say that my export took about 15 minutes to complete of my 30 minute recording on my MacPro. ScreenFlow goes for $99.99 and you can download the demo and try it for free. Also check out the ScreenFlow demo video to see what’s possible.