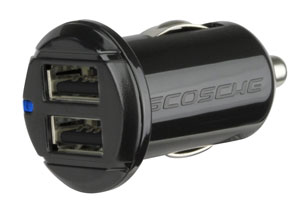
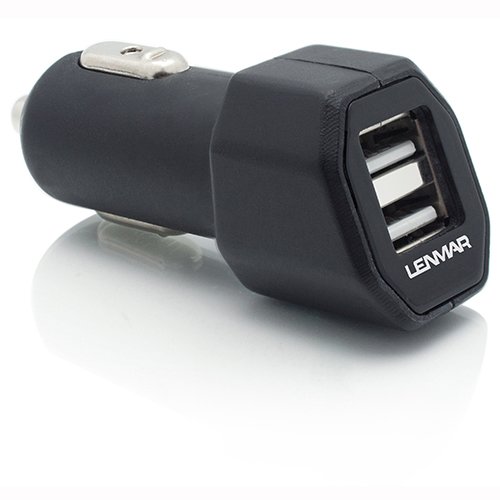
Every time I turn around there seems to be a new, better car charger than the one I’ve been using. I actually started with this Scosche Dual Charger over a year ago. It worked great, but the thing that I didn’t like about it was that only one of the ports charged at the faster 2.1A speed. Then I discovered this one by Lenmar. It gave me what I wanted, TWO ports both charging at 2.1 AMP/10 watts each. Perfect! Well it was perfect until I discovered that Schosche released a dual 12 watt charger! If you have a newer iPad 4th generation or iPad Air you might have noticed that Apple now includes a 12 watt wall charger instead of the 10 watt charger included with previous models. Now you can charge your iPad Air in car at full speed or speed charge a smartphone. Since we usually aren’t in our cars for hours at a time each day, speed matters. You might be able to get back up to a full charge faster on a shorter commute. I also figure why have just one port when you can have two? This way you can charge your phone and another device such as a tablet or a passenger’s phone.
I also like the low profile fit. The original Schosche I used back in the day stuck out of the socket quite a bit. This one almost fits flush with the 12V socket. Even if your car has a built-in USB port I’m going to go out on a limb and say that it doesn’t provide 12 watts of power. In most cases it’s probably a 5v 1A USB port. As far as I can tell this is one of the fastest car chargers on the market.
I’ve been doing iPhone reviews since the 1st one back in 2007 (if you want to see how far we’ve come, go back and have a glance at that one). So it’s become a tradition here on my blog and many of my friends and followers patiently wait for my take on the new mobile device. Normally I have these reviews done by the 1st Monday following the Friday release. However, my iPhone didn’t arrive until the following Wednesday (last week). I pre-ordered mine on day one, but apparently I didn’t make the 1st cut. Nonetheless, it did arrive a few days later and I wanted to have a few days with the new larger device anyway. The last couple of iPhones have been evolutionary with the things we’ve come to expect such as better cameras, faster processors, more memory and a design tweak here and there. Let’s face it, the original 2007 iPhone pretty much nailed it when it comes to form factor, size and functionality at that time. As a matter of fact the iPhone was blasted by several “industry experts” for it’s initial design by being a “touch screen” phone with no physical buttons. Seven years later all of the smartphones now look and act this way. However, this is not a comparison review of other devices. It never is! If you have a competing device and you’re happy with it, no need to read any further. Enjoy your _____ phone. Have a nice day. For everyone else, the question that we are always asking is “is this new iPhone worth upgrading or switching to?” That of course will always be up to YOU. I can only tell you what I’ve experienced with mine. So here goes…my iPhone 6 Plus review…
Which one did I get?
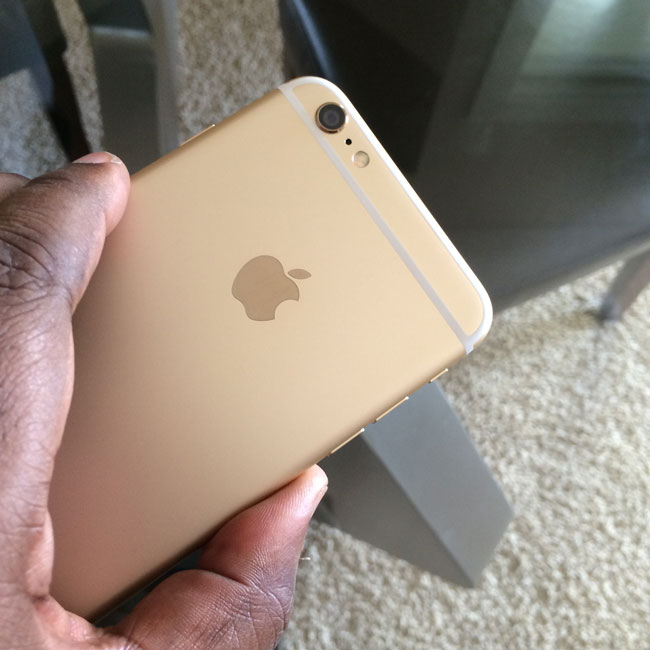
I went with the iPhone 6 Plus 64GB Gold Contract Free T-mobile version. This is the way to go even if you’re not a T-Mobile customer (I’m on AT&T) and you want an unlocked, contract free phone that will accept any GSM nano-sim from any carrier. I debated between the iPhone 6 vs. the iPhone 6 Plus and 64GB vs 128GB and I decided that it was time to try a larger iPhone. I could always go back down to a iPhone 6s (assuming that Apple sticks with the same naming convention for the next iPhone) next time if the iPhone 6 Plus was too big. Also I upgraded from 32GB to 64GB going from the iPhone 5 to the iPhone 5s and that was the right amount of storage for me. If I didn’t have an iPad, then I definitely would have gone with 128GB. However, the iPad Air serves as my entertainment device for movies and other large file tasks, so 64GB was plenty. Also all of my iPhones to date have been black/space gray. I wanted gold with the iPhone 5s, but they were sold out of that color when I got mine back then. This is my first white iPhone.
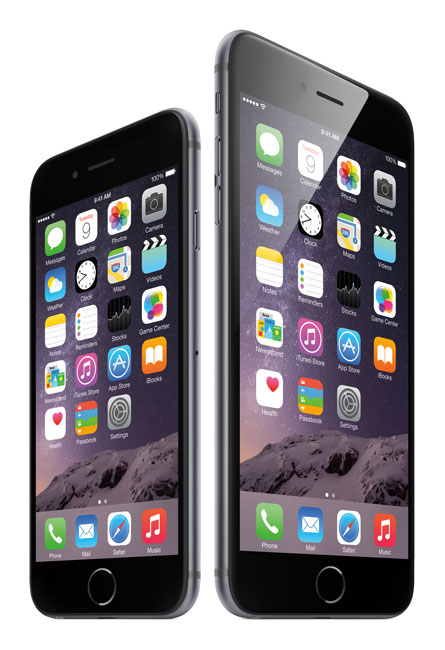
Yes it’s BIG!
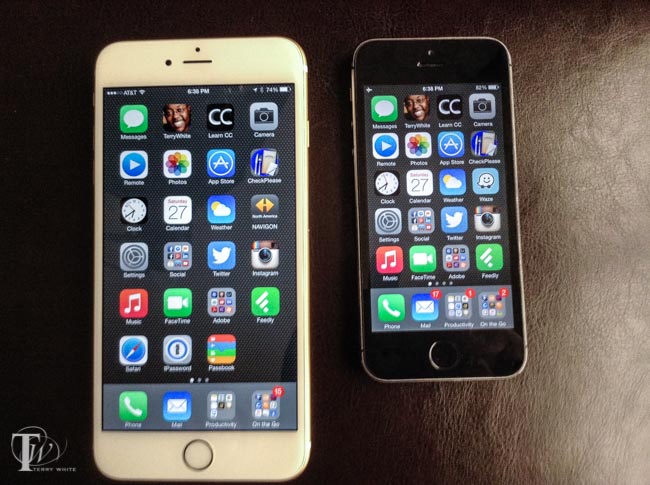
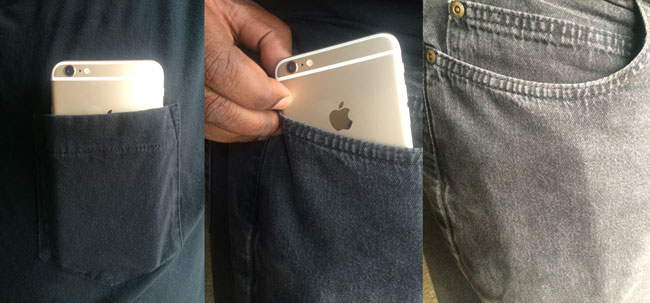
I gave my 1st Impressions last week. The first thing I thought when I took the box out of the shipping box was “wow, it’s big!” That was before I opened it. Luckily for my hands and pockets it’s not too big. I had no problems with putting it in a front pocket of my jeans. I was also pleasantly surprised that it wasn’t too bad in a shirt pocket either. Now keep in mind that the weight (which is pretty light for a device this size) will probably make your shirt sag a bit, but still in a pinch it’s not too much. Let’s see some comparisons
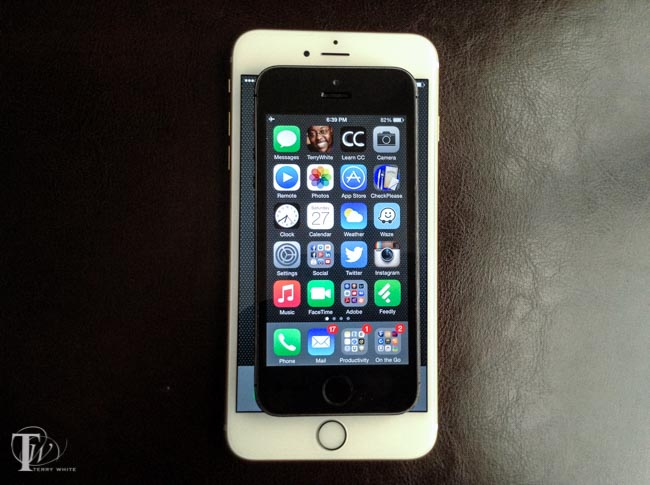
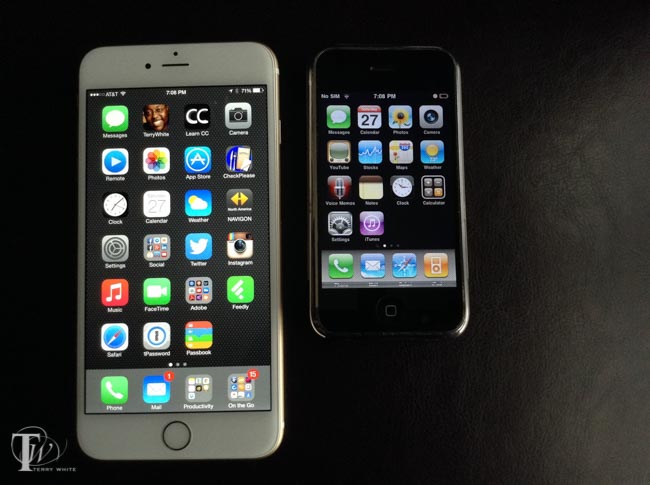
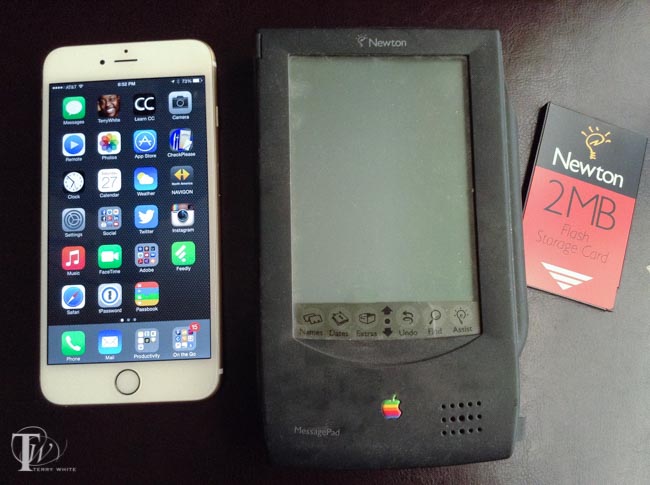
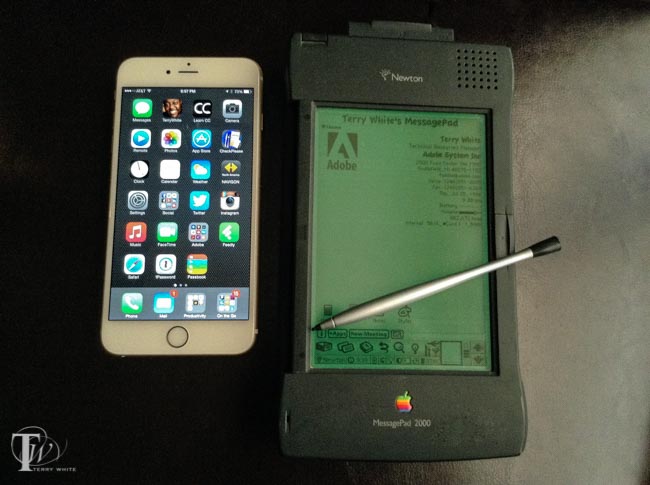
iPhone 6 Plus next to the iPhone 5siPhone 5s on top of the iPhone 6 PlusiPhone 6 Plus next to iPhone 4iPhone 6 Plus next to the Original iPhone (2007)iPhone 6 Plus next to the original Apple Newton MessagePad. Yes Apple had a big screen mobile device before now, even with expandable memory. 😉
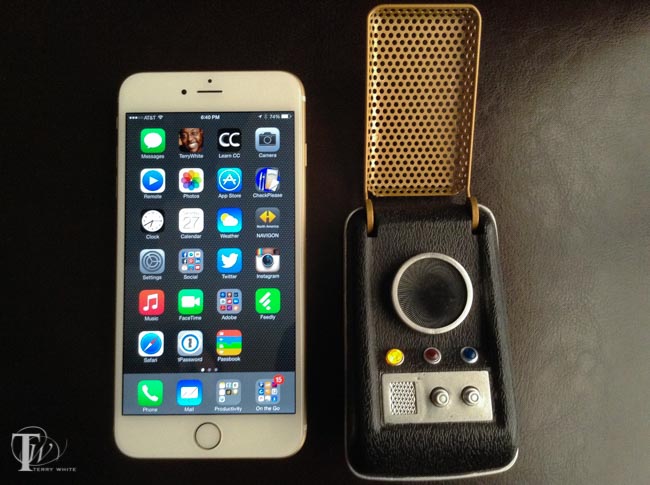
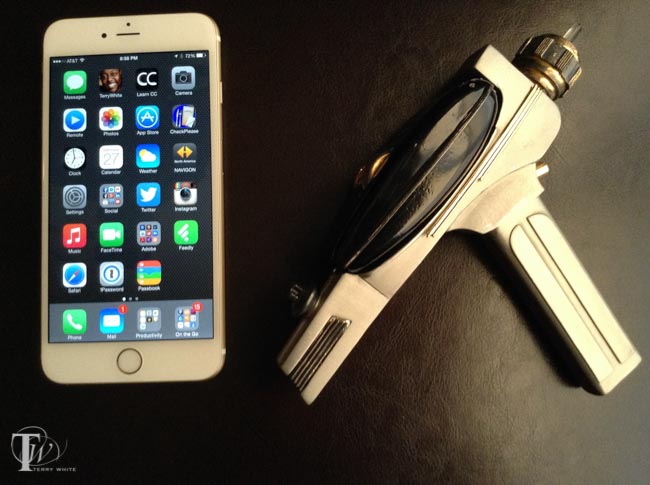
iPhone 6 Plus next to Newton MessagePad 2000. An even bigger mobile device from Apple and yes with a stylus 😉 Some users even tried to carry the Newton in their pockets.iPhone 6 Plus next to a Star Trek Communicator (T.O.S.)Sure, why not? An iPhone 6 Plus next to a Star Trek Phaser (T.O.S.) and yes it works 😉
Hopefully the photos above will answer your questions regarding the size compared to other devices 🙂
iPhone 6 Plus in my shirt pocket on the left and FRONT jeans pocket on the right
Ergonomics, fit and feel
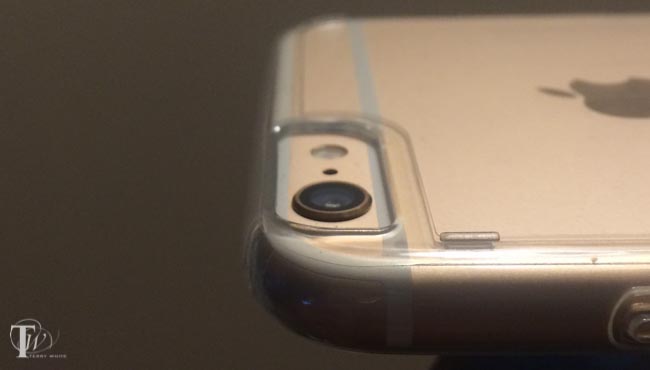
I’m happy to see Apple return to curved edges. It just feels better in my hand, especially for a larger device. It does take a little getting used to having the sleep/power button on the right side now instead of the top. For the first couple of days I was instinctively reaching for the top of the device to wake it or put it to sleep. When taking landscape screenshots I always hit the volume buttons by mistake. However, now I’m used to the new location and it isn’t a big deal. I would have expected the home button to be slightly larger, but it’s the same size as the one from the iPhone 5s. The touch-ID (fingerprint scanner) works flawlessly and now that iOS 8 opens it up to 3rd party apps, I’m using it all day long. For the first few days I used it without a case waiting for mine to arrive. This means that I was more careful than usual as I didn’t want any scratches. I did drop it once on a carpeted floor at home and it survived with no scratches or damage. As others have indicated, the camera lens does protrude from the back a little. This is the price we pay for a thinner iPhone.
However, had I not read about that first I’m not sure that I would have really noticed. Some are complaining that this prevents the iPhone from lying perfectly flat on a table. I agree, but once you put a case on it that problem goes away as your case is more than likely going to protrude out more than the camera does. My only problem to date with the new larger form factor is the width, not the height. Even with my large hands it’s difficult to thumb reach the opposite side of the screen if the icon or button I ‘m trying to reach is always up higher on the display.
Reachability brings the top of the display down so you can reach the stuff at the top without having to use your other hand.
Apple includes a “reachability” mode that you can access by double tapping the home button (not pressing it, but double tapping the touch sensor). This makes the whole screen slide down so that you can reach icons that at the top. Even with reachability it can be a stretch reaching the other side of the screen.
The Bigger 5.5″ Retina Display
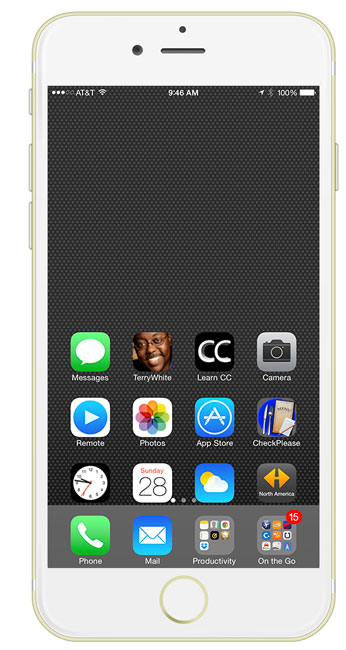
iPhone 6 Plus landscape home screen
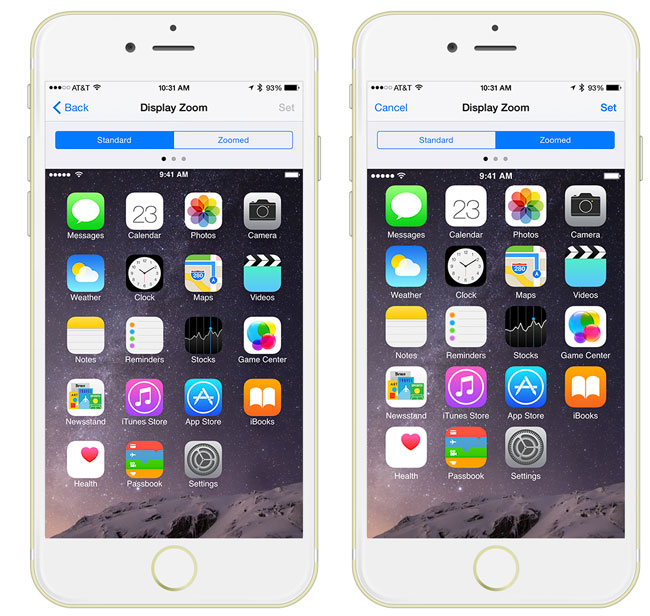
It’s gorgeous and probably the single biggest reason for going with an iPhone 6 Plus over an iPhone 6. Crisp, clean, high definition, 1920×1080 401 ppi of awesomeness. There are some exclusive features in the iPhone 6 Plus that aren’t on any other iPhone. The first one is a landscape home screen. While you’ve always been able to rotate your iPhone to see apps in landscape mode, the home screen was locked in portrait mode. Apple has finally freed up the home screen to have a landscape view on the iPhone 6. There is one choice you have to make. When you setup your iPhone 6 Plus for the 1st time you’ll be given a choice of Standard vs. Zoomed (yes you can switch it later). I chose Zoomed because it looked better to my eyes. However, with Zoomed enabled you don’t get the landscape home screen, extended landscape keyboard or the two column mail view. Also switching modes requires a reboot. I’m not happy about giving up Zoomed display for the other features I wanted. This is something that I wish Apple would address in the future. Perhaps a middle choice that gives a little more zooming AND the other landscape features.
Older apps on the bigger display – When Apple rolled out the iPhone 6 the promised that it had a very good “scaler” in it for apps that hadn’t been updated to the larger display sizes. Well I have to hand it to them. They did a MUCH better job than I expected. Keep in mind that iPhone apps zoomed up on the iPad kinda suck at the “2x zoom” and iPhone 4 sized Apps on an iPhone 5/5s just appear letter boxed in the middle of the display. However, older apps on the iPhone 6 Plus look, well, really good, especially by comparison. Sure Apps like CNN that have been updated look BETTER, but I don’t hate seeing the older Apps on the newer display at all.
Battery Life
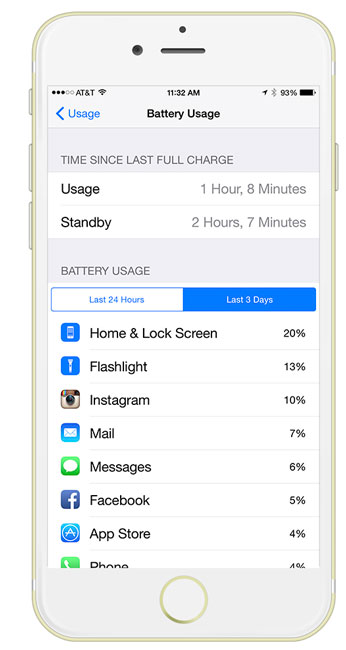
There is a mobile device user on the planet that wouldn’t welcome longer battery life. So when it was rumored that the iPhone 6 Plus had longer battery life than previous models, I said bring it on! After the 6+ was released and people started doing tear-downs of them it was shown that the iPhone 6 Plus battery is almost as large as the iPhone 5s itself, it was definitely a good sign that battery life would be good. I’m happy to report that I’m easily seeing 25%-40% better battery life over that of my iPhone 5s. While not a totally scientific test, I base this on the percentage of battery life that I have left at the end of the day. On Saturday I unplugged my iPhone from the charger at around 10 AM. I used my phone as I normally would throughout the day (social media, texting, phone calls and apps). At 4PM I noticed I was still at 82%. At 7PM I noticed I was at 72% (even after leaving the screen on for a while while taking the size comparison shots above). Finally at 10PM (12 hours later) the iPhone 6 Plus was at 57% battery life. My iPhone 5s probably would have been at around 20%-30% after 12 hours of use.
Keep in mind that there are many factors that affect battery life and I’m not saying that tomorrow that it won’t drain faster or last longer, it just depends not only on what you’re doing on the iPhone but also where you are. For example, if you’re in a 4G LTE area then it will probably drain faster. If you were in a 4G area but left it set on 4G LTE then it would drain even faster while searching for a 4G LTE signal. Screen brightness is another big factor. I keep mine down to around 30% on average. Making the display faster will definitely drain the battery faster. So your results can certainly vary. Y.M.M.V.
Performance
Yep is faster! We expect that each iPhone will faster than its predecessor. The iPhone 6 Plus is no different. It sports a new multiple-core A8 chip that’s faster than the A7 before it. Upgrading from the iPhone 5s to an iPhone 6 or iPhone 6 Plus will be a noticeable speed bump. However, upgrading from an earlier model will be even more noticeable. Apps launch faster and perform better. The biggest and most noticeable speed difference for me though is actually the WiFi performance. Since the iPhone 6 Plus supports 802.11ac and I have an AirPort Extreme Base Station that supports 802.11ac I can really really really see a big difference in internet speed and file transfer speeds.
I have 500 Applications on my iPhone 6 Plus and some of them haven’t had updates in years, yet the work fine. Some glitches in a few, but that’s no different than any other OS or phone upgrade that has ever happened.
Phone calls and Bluetooth Audio? Oh yeah, it is a phone too. Yep I’ve made and received them with no problems. I would say the only thing that took a little getting used to was center the speaker on my ear. At first I couldn’t hear the caller as loud as I was thinking it should be. Then I moved the iPhone 6 Plus over a little and bam, the sound was perfect. I paired it with my Jawbone bluetooth headset and the bluetooth built-in to my car and no problems with phone calls. The only App that doesn’t seem to work with bluetooth audio in my car is the Waze Social GPS navigation App. Both Apple Maps and Navigon give turn-by-turn directions over the bluetooth just fine. However, when Waze goes to broadcast a direction the music mutes and nothing else can be heard then the music comes back on. Hopefully Waze will address this as it seems to be the only one of my GPS apps not working. I deleted the pairing and set it up again and still Waze was a no go.
The Camera
Unretouched – ISO 64 ƒ/2.2 1/15
While I don’t expect the iPhone (or any smartphone) to replace my DSLRs and professional lenses anytime soon, iPhone photography is here to stay. The best camera is the one you have with you and I always have my iPhone with me.
Unretouched – ISO 125 ƒ/2.2 1/4
Therefore it’s probably my most used camera. If I want to capture a scene or movie, I pulling out iPhone and take the shot. Especially if I want to then turn around and share that photo on social media or via text.
Unretouched – ISO 400 ƒ/2.2 1/4
Therefore, ANY camera improvements are always welcomed. The iPhone 6 Plus sports an 8MP, f/2.2 aperture camera. It shoots 1080p video at 60fps and 240fps slo-mo as well as a new time-lapse feature.
Unretouched – ISO 32 ƒ/2.2 1/30
It also has Optical Image Stabilization. The big new thing here is faster autofocus for stills and continuous autofocus when shooting video. You should also get better selfies and Facetime with the new sensor allowing 81% more light.
Also now that iOS 8 opens the door for manual control over the camera it’s even more useful. There’s even a new App called “Manual” that let’s you have complete manual control over ISO, shutter speed and manual focus.
What could be better?
Apple doesn’t get everything right. Remember Apple Maps? The super buggy iOS 8.0.1 debacle was a recent reminder of this fact (iOS 8.0.2 came out afterwards and this review is based on that version). Most of my complaints are minor, but no device is perfect and the iPhone 6 Plus isn’t perfect either. The things I wish were better to fixed have more to do with long standing issues I’ve had with iOS vs the iPhone 6 or iPhone 6 Plus itself. For example, it’s 2014 and there are still several inconsistencies in iOS that continue to bug me. For example, I can setup groups of contacts in the Contacts app on my Mac. Those groups sync over fine to the iPhone and are even recognized throughout the OS like in the Do Not Disturb feature. Yet there still isn’t a way to create a group in iOS or manage the ones you already have. While I’m on my annual Group rant, there is still no way to assign a ringtone to a group of contacts. If we are truly in a PC Free era, then Apple needs to make have feature parity in iOS 8 for these kinds of features. Another one that bugs me is the lack of a “Select All” in many areas throughout the OS. For example, now in the Messages App you can tap on the “Details” for any conversation. You can see all the attachments that are still in that conversation. GREAT! Now lets say I want to keep the conversation text, but delete ALL of the images/videos. I have to tap them one-by-one to select them and then press delete. Why not let me select all? There is no warning when I tap delete. They’re gone. So if safety is the reason, then give the standard “are you sure?” a few times If I select all. Hell, even make me enter my passcode to confirm the deletion of lots of media at once. Speaking of deleting, now in iOS 8 when you delete pictures from the Recent Activity (formerly the Camera Roll), they aren’t deleted YET. They go into another album called “Recently Deleted”. From there (yes you guessed it) there is a “Delete All” button. I definitely want to turn this idiot proof feature OFF. If I delete a picture or video, I’m sure! Photo management is a mess. Photo albums that come from your computer can be viewed in iOS but not edited. Really? Why not allow me to rearrange/delete/add photos to these albums and have them sync back to my computer? If I do create Albums on my iPhone and add photos to them I must also keep those photos in the Recently Added album too. Delete them from Recently Added and they are deleted from the custom albums too. Another inconsistency has to do with the “Open In” command. If I receive a photo via text message I can tap the Share button on that photo and open it in any other compatible App on my iPhone. However, if I save that picture to the “Recently Added” album and then access it from the Photos App, sorry no way to access it from Apps that haven’t been updated to be added to the new Share sheets. Thankfully I can use Lightroom Mobile for my photo management needs and I don’t have to rely as much on the built-in Photos app.
It would also be nice to hide (if not delete) built-in Apps that we don’t use like Game Center. Yes I know it can be buried in a folder, but why not allow it be turned off completely?
As far as the iPhone 6 Plus hardware goes, I really don’t have anything to complain about. Everything from the fit and finish, to the curved case, to the buttons, to the Lightning port, to the speaker, to the cameras are really good to awesome! It’s not too heavy or too big for my day to day use. While no device is perfect, nothing comes to mind to complain about hardware wise.
What’s missing?
When Apple introduced the iPhone 6 and iPhone 6 Plus they also introduced Health Kit, Apple Pay and Hand Off. Because of a bug, Healthkit didn’t get turned on for 3rd party App support until iOS 8.0.2. I have one of my Apps to date that has been updated with Healthkit support. I’m waiting on Nike+ Fuelband, Withings Health Mate and Lose It to take advantage of it with updates hopefully soon. Apple Pay is slated for an October debut. While Apple may turn it on in October, it will still take a while for all the merchants out there to offer it at the register. Lastly iOS 8 offers the ability to hand off things that you start on one device to the other. For example, now when my iPhone 6 Plus rings it will also start ringing on my iPad. I can answer my phone with either device. However, the feature I was looking forward to the most is SMS messages (those green bubble friends) showing up in the Messages app on other devices. That feature has been held back until October as well. Most of the joy of working between your iOS devices with iOS 8 and your Mac is on hold until Apple releases Mac OS X 10.10 Yosemite. This includes the new iCloud Drive. Again Apple has really missed the mark on this one. Unfortunately software is ready when it’s ready and trying to coordinate TWO major OS updates is no small feat. This is the case with Mac OS X 10.10. Apple hasn’t said when it will be released. However, until it is the hand off features between the two OS’s won’t really be realized.
The Bottom Line
The iPhone 6 Plus is definitely a great upgrade from the iPhone 5s with a faster processor, bigger, sharper display, faster WiFi, thinner, and much better camera. With over 10 million sold (iPhone 6 and iPhone 6 Plus) in the 1st weekend breaking sales records across the board, Apple has another hit on their hands. As I was writing this close I asked myself “ok, now that you’ve had the iPhone 6 plus for a few days, if you could do it again would you still go with the iPhone 6 Plus or would you go with an iPhone 6?” The answer is YES, I’d get the iPhone 6 Plus again. Is the iPhone 6 Plus worth upgrading to if you’re still under contract with an iPhone 5s? Probably not. I check the status of my sister’s contract and if she were to upgrade now it would be an extra $250. However, if she waits until 10/8/2014 then she can upgrade at the regular prices. She has an iPhone 5 and I can imagine that the iPhone 5s would be a similar situation. If you’re on an iPhone 5 or below and you’re eligible for regular upgrade pricing then this iPhone is a no brainer. It should be better in just about every way over your iPhone 5, iPhone 4s or iPhone 4. To decide whether or not to go iPhone 6 Plus vs. iPhone 6, you really need to hold them in YOUR hands and see which one feels best for you. The larger iPhone 6 Plus is not for everyone. I’m sure Apple will sell more iPhone 6’s than iPhone 6 Pluses.
One more thing… Before someone asks “will it bend?”, perhaps you should check this out first. Hopefully that puts an end to NON-ISSUE of #bendgate.
Some of my favorite iPhone accessories
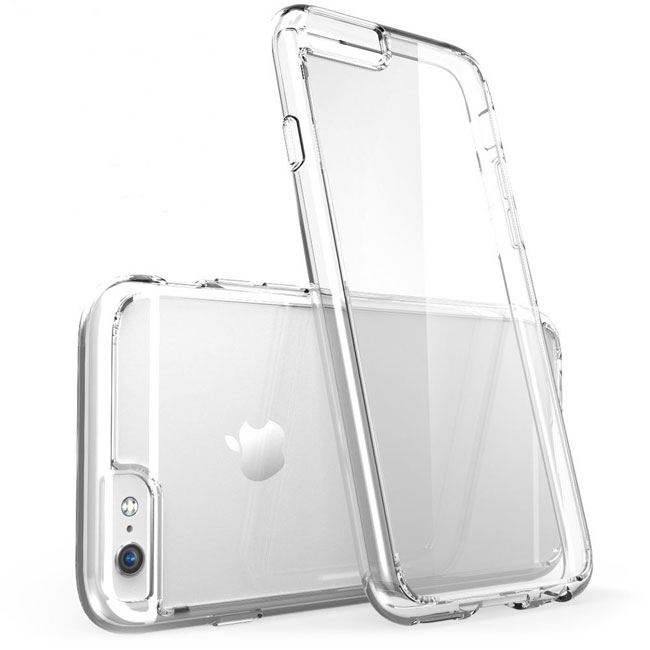
I went with this case
I like clear cases that offer scratch protection and basic protection from occasional drops, but still show the beauty and color of the device. I know that many of you need more protection, screen protectors, water protection, etc., however to date I’ve been pretty careful with my iPhones and have never broken a screen or severely damaged one. However, they can get scratched and that is something I look to prevent. This case does that for me.
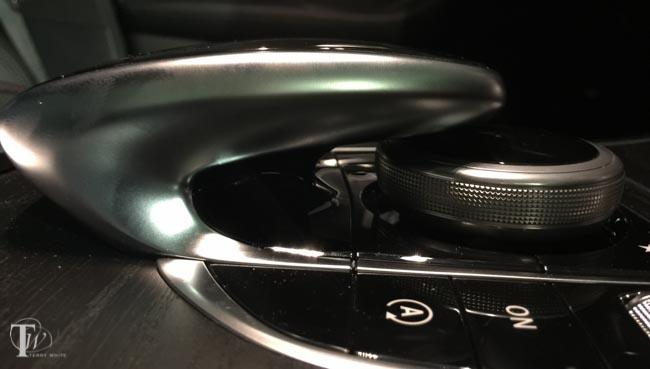
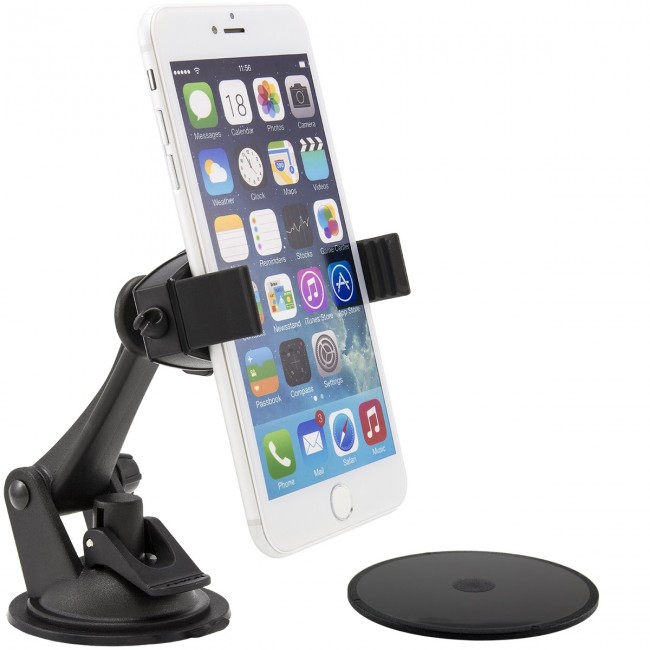
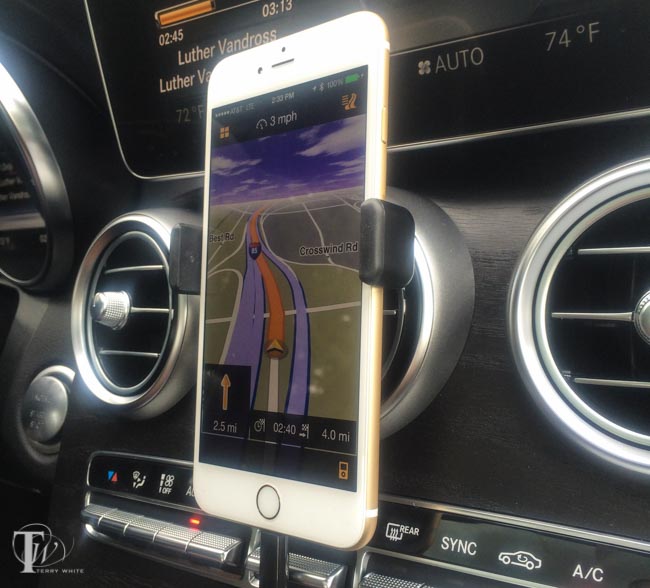
I like these two car mounts (both will work even with a case on your iPhone 6 or iPhone 6 Plus)
If you’re looking for a dash or windshield mount, the good folks over at Akron have you covered with this one. Unscrew the cable guide on the side and you get a standard tripod mount for photography/videography!
If you’re looking for a vent mount, then the only way to go is the NEW Kenu AirFrame+ (yes I said +). This is definitely my favorite mount for travel and regular use when a dashboard or windshield mount doesn’t do it for you.
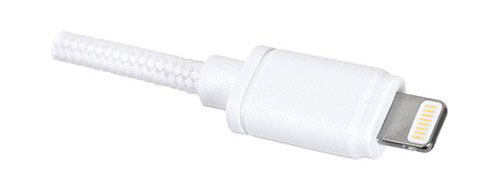
My Favorite 3rd party Lightning cables at different lengths
While this really has nothing to do with the iPhone 6 Plus itself, I think I finally found a DURABLE 3rd party Lightning Cable. I have been frustrated by the quality of 3rd party Lightning cables to date. They either don’t work out of the box, stop working after a while or worse they start to fall apart where the connector connects to the cable. NewerTech makes this cable and I ordered a couple of the 3 meter version. I’m impressed with the way they are constructed. Definitely the best I’ve found so far.
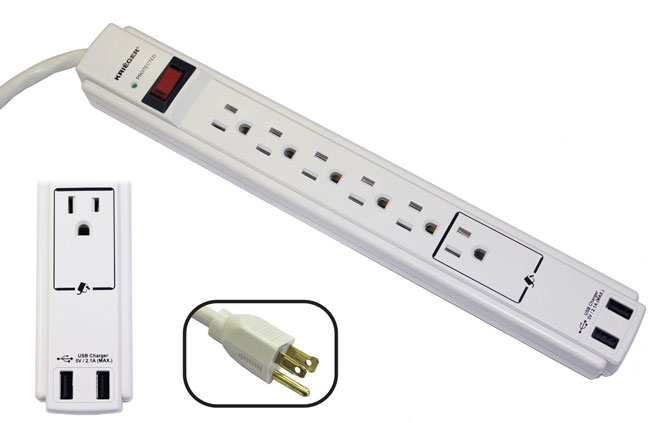
I just bought 3 of these for use around the home and home office. So far they’re working out GREAT! Unlike most power strips/surge protectors this one has a longer than average 6 foot cord. It has a lighted power switch as well as 2 USB ports that can provide up to 2.1A of power, which is enough to charge an iPad. Also the fact that it’s a surge protector as well doesn’t hurt. The only downside is that the 2.1A is shared between the two ports. This means that you can charge two devices or one device at the full 2.1A speed. Yes, you can charge an iPad (or other tablet) and iPhone (or other smartphone) at the same time, just not two devices that both require 2.1A each.
Here’s the best part: This power strip is on sale for only $14.99, which is less than the cost of a name brand single port USB charger. Get this one and you can use the charger that came with your phone as a travel charger.
My iPhone 6 Plus (64GB Gold Unlocked GSM) arrived late yesterday afternoon and everyone has been asking me “how is it?” So I thought I’d give a quick 1st impressions post now. I’ll have a full review on Monday after I have had a chance to really use the iPhone 6 Plus over the weekend.
Size
Yep, it’s BIG! However, it’s not too big. To my surprise using it with one hand and reaching things with my thumb from top to bottom isn’t the problem. Apple includes a new “Reachability” feature that with a double tap on the touch ID sensor (as opposed to a double press of the button, which invokes multitasking), the top of the display scrolls down so that you can reach stuff at the top. For me it’s more a “stretch” reach the opposite side of the display with my thumb. For example, when I’m holding it in my left hand I can barely reach the apps on the far right side of the display.Other than that I love the size.
The Pocket Fit
the shirt pocket and pants pocket test
Yes, I’ve seen all the #bendgate stuff and I just smile. First off ANY aluminum and glass gear is subject to damage in a pocket without a case. I only recently started carrying my iPhone 5s in my pocket over the past couple of months. Prior to that I was always a holster guy. I’ll carry the iPhone 6 Plus in my front pocket and remove it prior to sitting down if I think that there will be added pressure to it. By the way, if you apply enough pressure to ANYTHING, it will bend!
The Camera
The Camera seems awesome and as good as advertised. I’ll spend more time with it over the weekend capturing images. So far I love it.
Speed, Apps, etc.
The speed is noticeable, especially the 802.11ac WiFi. Downloads are MUCH FASTER! I haven’t found any of my 491 installed apps to have any problems so far. No freezes or weirdness. I haven’t had it on battery long enough to judge battery life so you’ll have to wait till Monday for that one.
One disappointment so far
When setting up the iPhone 6 Plus you have a choice between Standard and Zoomed. Apple even lets you preview them to decide. With Zoomed the icons look bigger and better to my eyes, so I went with zoomed. Great! Happy! However, I didn’t realize until a little later in the evening that you give up 3 things with Zoomed. You give up the new landscape display of home screens.
You give up the two column display in Mail and you give up the extended landscape keyboard. I switched back to Standard (which requires a reboot) to get these features back and I already miss the larger zoomed icons and display overall. I wish there was a middle ground.
The Bottome Line – So far, so good
Overall I’m happy that I went with the iPhone 6 Plus over the iPhone 6. My eyes definitely like the larger display. Check back Monday for a more detailed look.
On a side note – Finally a durable 3rd Party Lightning Cable
While this really has nothing to do with the iPhone 6 Plus itself, I think I finally found a DURABLE 3rd party Lightning Cable. I have been frustrated by the quality of 3rd party Lightning cables to date. They either don’t work out of the box, stop working after a while or worse they start to fall apart where the connector connects to the cable. NewerTech makes this cable and I ordered a couple of the 3 meter version. I’m impressed with the way they are constructed. Definitely the best I’ve found so far.
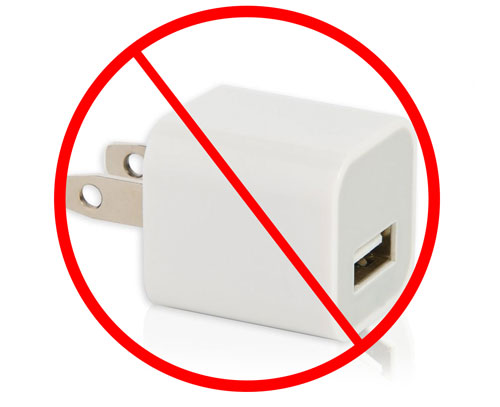
Your smartphone probably came with a USB wall charger. Chances are you probably need or at least would find it convenient to have more than one. Perhaps one at your desk, one by the bed and maybe one in your travel bag. A quick check shows that the retail price of an Apple USB wall charger is $19. Of course you could get ANY 3rd party wall charger for half that price or less. However, even at $9 for a good quality generic charger you might want to consider a different option. If you’re buying a charger that’s going to have a permanent home under your desk, behind a nightstand, etc. then why not just get a power strip that also has USB ports on it? This way you could plug in your lamp, computer, speaker, etc. and charge your smartphone and/or tablet as well.
I just bought 3 of these for use around the home and home office. So far they’re working out GREAT! Unlike most power strips/surge protectors this one has a longer than average 6 foot cord. It has a lighted power switch as well as 2 USB ports that can provide up to 2.1A of power, which is enough to charge an iPad. Also the fact that it’s a surge protector as well doesn’t hurt. The only downside is that the 2.1A is shared between the two ports. This means that you can charge two devices or one device at the full 2.1A speed. Yes, you can charge an iPad (or other tablet) and iPhone (or other smartphone) at the same time, just not two devices that both require 2.1A each.
Here’s the best part: This power strip is on sale for only $14.99, which is less than the cost of a name brand single port USB charger. Get this one and you can use the charger that came with your phone as a travel charger.
Today is iPhone 6 and iPhone 6 plus day as well as many of you upgrading to iOS 8. I though I’d share 8 of my favorite iOS 8 Tips and Tricks that may not be obvious to many.
Today is the day that many have been waiting for. You can pre-order a new iPhone 6 or iPhone 6 plus and have it shipped right to your door. I know that many of you actually prefer the experience of waiting in long lines with others. Also many of you have no interest in the iPhone or will simply stick with their current iPhone for now. Let’s see what you did by clicking the appropriate response below:
In this episode of Adobe Creative Cloud TV, I’ll show you how to use Adobe Photoshop Generator to make webclip icons for your website so that when people bookmark your website to their home screens on iPad, iPhone or iPod touch they’ll get your custom icon.
Are you missing out on my Bonus Content?
See more of my Adobe Creative Cloud Videos on my Adobe Creative Cloud TV and get the App below. It features EXCLUSIVE CONTENT that no one else gets to see. This episode has a BONUS CLIP that is available only in the App! My iOS App is a Universal App for iPhone, iPad and iPod touch. I also have an Android version on the Amazon App Store:
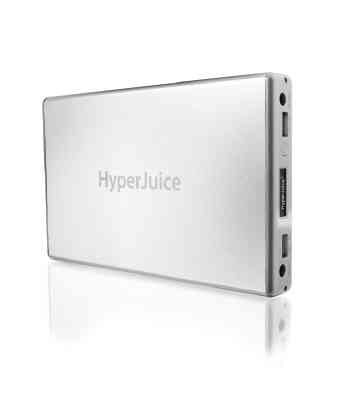
There I am at my desk at 5PM on a Sunday and I can hear the rain outside. Next I hear the wind really whipping by and bam, there go the lights. After a few seconds the lights came back on and then after a few more seconds they went off for good! Sure my APS UPS Systems kept my Server and Internet Router going for a while before they eventually ran out of juice. Since I was headed out of town the next morning I just decided to relax and take it easy for the rest of the evening. However, the one thing that I definitely wanted to keep charged and running the entire night was my iPhone. I have a battery that I keep in my backpack which is good for a couple of charges, but I had never tried to go all night with it. Also while I was sitting at my desk I hadn’t plugged my phone in so it was already down to around 40% battery left. That’s when I remembered my HyperJuice battery that was also in my office and fully charged!
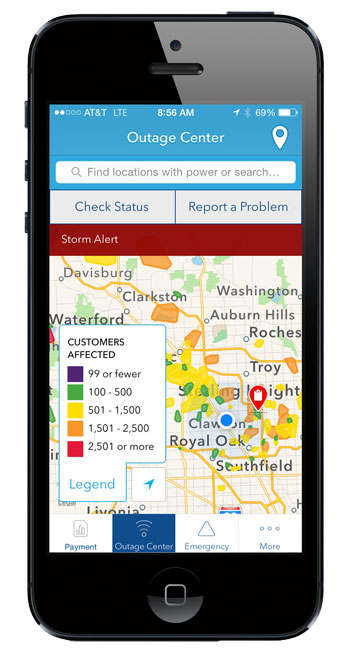
I commend DTE Energy for having a nice App to not only report the outage, but get status updates and see what other areas are affected:
This battery is really designed to power your MacBook for long periods of time when AC power isn’t readily available. However, it also has a USB port for charging/powering phones and tablets. I plugged my iPhone into the USB port and not only did I wake up fully charged 8 hours later, but the HyperJuice still had plenty of juice to top off my MacBook Pro as well! When I originally bought this battery it was for long flights and being at seminars where there were no plugs nearby. I hadn’t carried it in a while and never thought that I’d be using it to get me through the night because of a power outage.
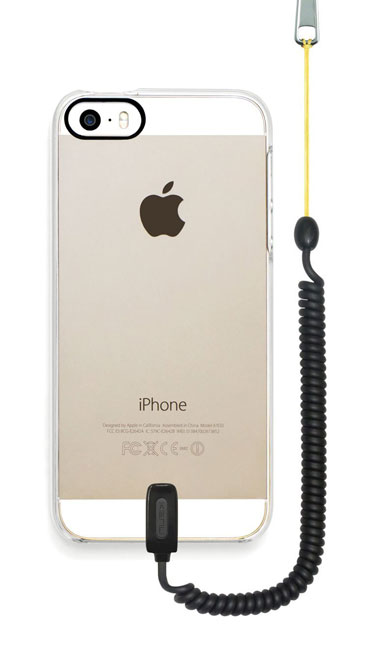
Chances are either you have dropped your iPhone or know some who has. Hopefully the case protected it and there was no damage. Unfortunately more often than not we know at least one person that has a broken screen right now. So far I’ve been lucky. I’ve had every model of iPhone since the original back in 2007 and I have dropped them all at least once, but no broken screens for me to date. Kenu, the makers of my FAVORITE smart phone car mount, the AirFrame have come out with a solution to cut down the chances of you dropping and breaking your iPhone or worse dropping it and not realizing you dropped it and you lose it. This product is called the Keuu Highline. It’s combination clear case (which I love) and a bungee cord that’s designed to attach to the bottom of the case. It has a quick release so that you can easily disconnect your iPhone/case from the cord. The cord can attach to anything from a belt loop to a zipper. Once attached you can drop your iPhone while in a standing position and the cord is short enough so that the iPhone won’t actually hit the ground. This is great especially if you’re going to be out and about, walking, taking pictures or sporting activities.
While I like the whole concept as a packaged product, what I found that I liked the most was the actually case. I love clear cases that don’t add a lot of bulk to the iPhone and this one has become my favorite. It’s just thick enough to add protection and yet then enough to not feel like your iPhone is in a case.
Lightroom has allowed for USB tethered capture from popular Nikon and Canon cameras for several years now. However, I can’t tell you how many people have asked me about tethering directly to an iPad pretty much since the 1st shipped in 2010. Four years later, while there are several shoot to iPad solutions out there, there still isn’t a way to plug your camera directly into an iPad and shoot tethered like you do with your computer and Lightroom.
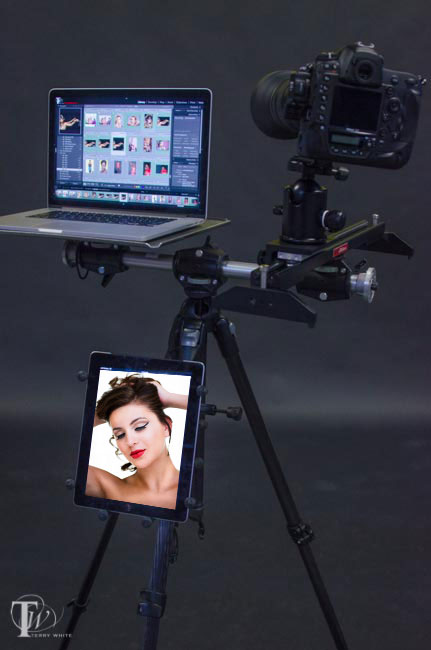
Here’s what’s in my Tripod Rig Setup Above
RAM-B-121-UN9U The RAM X-Grip Universal Clamping Cradle and Clamp
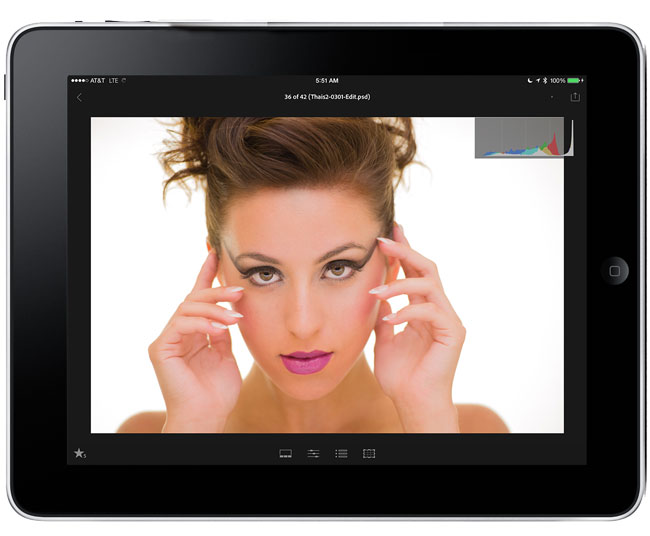
I personally use an Eye-Fi card when I’m out in the field and my iPad then becomes a nice big 10″ display to preview my shots. The Eye-Fi cards create their own ad-hoc network and therefore no hotspot is required. The images wirelessly transfer from my camera to my iPad. Now that Lightroom mobile is here, the question becomes can I shoot tethered into Lightroom mobile and the answer is yes! However, even though the answer is yes, it still involves your computer as there is still no way to connect your camera directly to your iPad via a USB cable and shoot tethered like you do with your computer. In studio I’m shooting either tethered directly to Lightroom via a USB cable, to my computer from my Nikon D4 via Ethernet or via the Nikon WT-5A Wireless Transmitter to a folder where the images are auto imported into Lightroom. There are two ways to shoot tethered to Lightroom mobile:
Before we get into the methods you’re going to need Lightroom 5.5 and a Creative Cloud membership. The Creative Cloud Photography program is affordable at only $9.99/month and includes Photoshop CC, Lightroom, and unlimited syncing to Lightroom mobile.
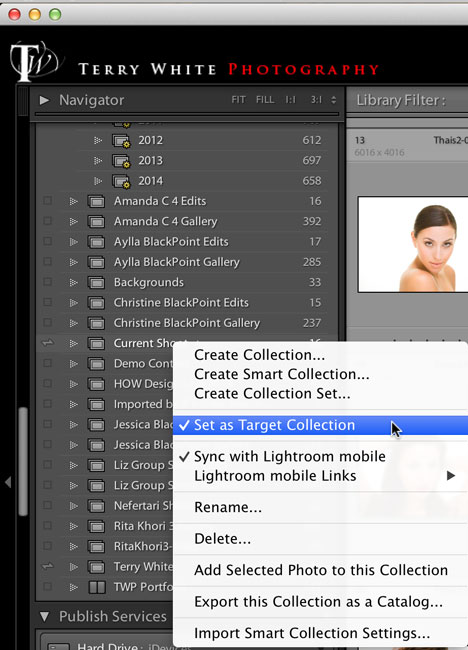
Recently Scott Kelby did a post “My First Studio Shoot Using Lightroom Mobile” during this shoot he was shooting tethered from his DSLR to his computer running Lightroom 5.5 desktop. However, he did a very clever thing. He had a collection marked to sync with Lightroom mobile and his creative director was holding his iPad. He made that collection the “target collection” (a Lightroom feature) so that as he saw images coming in from his camera that he really liked all he had to do was hit the letter “b” on his keyboard to add those images to the collection that was sync’d to Lightroom Mobile. Now the creative director could see the images on the iPad from any location and help direct the shoot, make changes to the wardrobe, etc. Since Lightroom mobile is a two-way communication between the iPad and the desktop version of Lightroom she could also flag or star rate images on the iPad and those flags and ratings would appear in Lightroom on the desktop for Scott to look at further and tweak if needed. This is an awesome way to work and it allows you to show only the BEST images to your client, director, assistant, etc. However, it does require more interaction on your part as you have to hit “b” for each image you want to be added to the collection. I had never thought of using the Target Collection in this way and it makes total sense. This got me to thinking if perhaps there was a way to automate this so that each image would just go into a collection as they come in to Lightroom via tethering? Currently Lightroom mobile doesn’t support Lightroom’s Smart Collections. So I began to look at 3rd party plugins….
The next method “Tethering to Lightroom mobile”
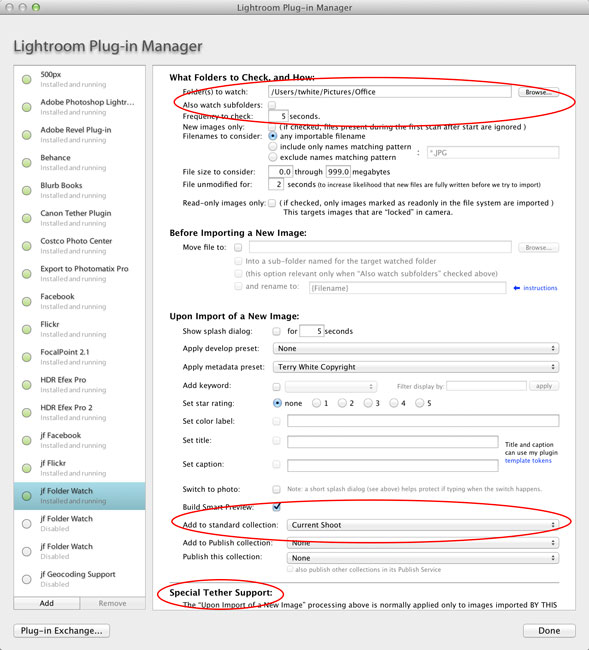
Like I said above, I wanted a way to bring in all the images I’m shooting so I wouldn’t have to touch the keyboard every time I wanted an image added to the iPad/Lightroom mobile. After looking at Scott’s method above this definitely has some downsides to it. As you know not every shot is good. Sometimes the strobe doesn’t fire or the image is out of focus. Sometimes the model isn’t ready or you capture an awkward frame. Chances are you don’t want your client seeing this frames. If that’s the case you’re better off using the “Selective Tethering” method above. However, if it’s you and say an assistant or other person on set that needs to be able to see what you’re shooting via the iPad then you probably don’t care as much if a few bad ones get in. As a matter of fact if it’s an assistant they could be helping by “rejecting” the bad ones for you! My search for a 3rd party solution started and ended with Jeffrey Friedl’s “Folder Watch” plug-in.
This plug-in was originally designed as a more full featured alternative to Lightroom’s Auto Import (what we used before native Tethering) feature. Sadly after I downloaded it I realized it wouldn’t work with Lightroom’s Tether Capture feature because it needed to do the import before it could add the images to a collection.I reached out to Jeffrey and told him what I wanted it to do and guess what? He immediately added the feature for me! Now with this “donationware” plugin you can shoot tethered into Lightroom as you always do and designate a collection to add the images to as you shoot. All you do once you create the collection is sync it to Lightroom mobile.
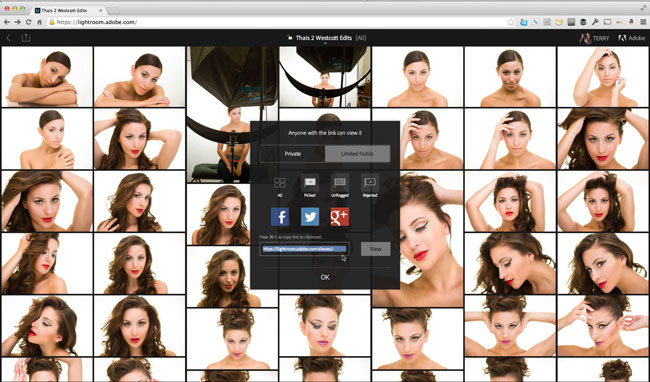
Share with REMOTE viewers too. On ANY platform!
One of Lightroom mobile’s best kept secrets is that it’s not just for iPad and iPhone. There’s also a web component. If you head to lightroom.adobe.com and sign in with your Adobe ID you can all of your Lightroom mobile collection right in a web browser. You can click on any of your collections and grab the link for it and share it with whomever you want to be able to view that collection. This means that you can have a large audience watching your shoot and they will see your new images as you take them (by hitting refresh in the browser) pretty much on ANY platform.
Lastly don’t forget that Lightroom is also on iPhone now