
The Camera Raw team would like the community to help verify the quality of the plug-in through normal usage as this will ensure that the plug-in is tested on a diversity of hardware and software configurations not available internally at Adobe. If you do experience an issue with this release candidate please report it within the Camera Raw discussion forum.
Download from here.
Adobe Camera RAW 8.5 Features for CC Users
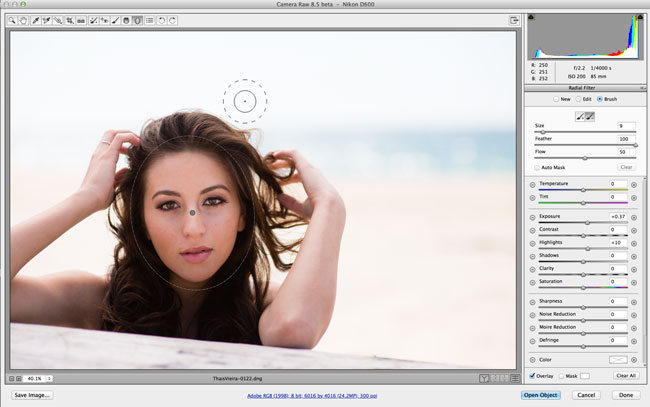
- Modify Graduated and Radial Filter masks with a brush:
- After adding or selecting a Graduated or Radial Filter instance, click the new ‘Brush’ mode (next to existing ‘New’ and ‘Edit’ mode buttons) to reveal brush controls that allow you to modify the selected mask.
- Use the ‘Brush +’ and ‘Brush -’ icon buttons in the brush controls pane to add to or erase from the selected mask.
- Press the ‘Clear’ button to remove all brush modifications from the currently selected mask.
- When a Graduated or Radial Filter instance is selected, Shift-K can be used to enter and leave brush modification mode.
- Mask visualization is now available for the Graduated and Radial Filters. Use the Mask checkbox at the bottom of the Local Corrections pane or press ‘Y’ to toggle the mask overlay.
- Added new Per-Panel Preview default toggle
- If the current panel’s settings are not the ACR defaults, clicking the new Per-panel Toggle Button will reset the panel to the ACR defaults.
- Clicking the button again will restore the previous settings.
- This is a standalone feature, separate from the new Preview controls
- The changes are applied to the main view; if you have both the Before and After panes visible, changes will appear in the After pane.
Bug Fixes
- Fixed issue with Fujifilm X-T1 raw images appearing too bright at high ISO settings when using Dynamic Range 200% and 400%. Unfortunately, this fix may affect the appearance of existing images captured with this combination of settings. It is recommended that you (1) purge the Camera Raw cache via the Camera Raw Preferences dialog, and (2) review images shot at ISO settings higher than 1600 for unexpected brightness changes.
- Fixed image quality issue (noisy result) when applying spot healing to floating-point (HDR) images.
- Fixed issue with reading lossless compressed Nikon raw files (NEF files) from the camera models listed below. Previously, some images could be read but would appear as random noise, whereas attempting to open others would result in an error dialog. You will need to purge your Camera Raw cache via the Camera Raw Preferences dialog.
- Nikon D1
- Nikon D1H
- Nikon D1X
- Nikon D2H
- Nikon D2Hs
- Nikon D2X
- Nikon D2Xs
- Nikon D100
- Nikon D200
New Camera Support
- Canon PowerShot G1 X Mark II
- Fuji FinePix S1
- Nikon 1 J4
- Nikon 1 V3
- Olympus OM-D E-M10
- Panasonic LUMIX DMC-GH4 (*)
(*) denotes preliminary support
Adobe Camera RAW 8.5 Features for CS6 Users
Download the RC build here.
New Camera Support
The following new cameras are now supported:
- Canon PowerShot G1 X Mark II
- Fuji FinePix S1
- Nikon 1 J4
- Nikon 1 V3
- Olympus OM-D E-M10
- Panasonic LUMIX DMC-GH4 (*)