A few days ago one of my readers left a comment on one of my posts and he was basically asking why I convert my camera’s RAW files into DNG (Digital Negative) format? He asked if I had a post that I could refer him to about my reasons. I realized that while I’ve talked about converting RAW files into DNG format for years at seminars, training classes and on my videos, I’ve never really done a blog post on it. So here it is – Why DNG?:
What is DNG?
DNG stands for Digital Negative format. The problem with the RAW files that your camera produces is that they are proprietary. Also since every camera manufacturer makes their own RAW format (Nikon .NEF, Canon .CR2, etc.) there is no real standard. Each camera manufacturer does whatever they feel like in their format. This also means that not all software can read every RAW format because with each camera manufacturer and each new camera the software companies have to update their software to be compatible with the slight changes in each RAW format. Notice how your software never has to be upgraded to read JPEG files. That’s because JPEG is a universal, non-proprietary standard. You never have to worry about a company going out of business and therefore not being able to access your JPEG files. Like JPEG, DNG is an open standard. Although it was created by Adobe, it’s an open standard with a published specification. If Adobe did nothing else with DNG the standard would still live on. Some cameras even shoot natively in DNG format now.
Why I convert my Nikon .NEF files into DNG
I’ve been converting my Nikon, Sony, and Canon RAW files into DNG format for several years now. However, as usual the question comes up – why? Why go through the extra step to convert your files to DNG. Here are a few reasons for me:
- My images are my memories and can’t be replaced. I never want to worry about a day when I can’t open them up because of a company going out of business or deciding to stop support of a format. With DNG I have that extra peace of mind.
- DNG saves me space. On average my DNG files take up about 1MB less space than my original .NEF files. Since there’s no loss of quality I’ll happily take the storage savings.
- No XMP Sidecar Files! Since software programs can’t really edit RAW files (it’s the non-destructive benefit of working in RAW), any changes you make are made to a small text file that accompanies the RAW file. These small text files are called sidecar files and it becomes one more thing you have to keep track of. Now instead of a folder of images, you have a folder of images and sidecar files. With DNG the changes you make are written non-destructively right into the DNG file.
- Backwards compatibility. DNG format has been supported since Photoshop 7, so I can hand off a DNG file from a camera that just came out to someone with an older version of Adobe Camera RAW or Lightroom and they’d be able to open it up and work on it.
How To Convert Your RAW files to DNG format
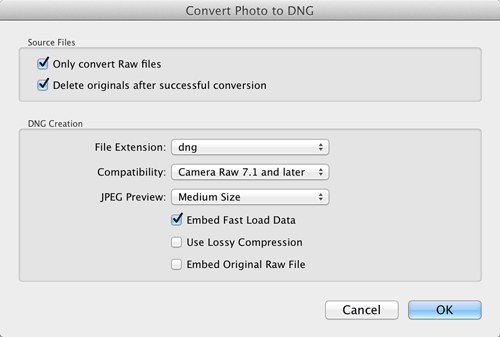
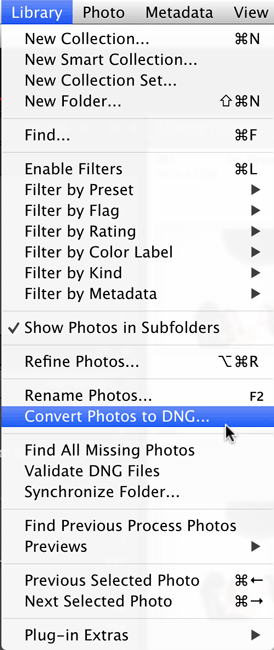
Like I said, I’ve been converting my RAW files into DNG for years now. I do it upon import into Adobe Lightroom. However, if you’ve already got images in Lightroom that are in your camera’s RAW format, you can convert them after the fact by selecting the ones you want to convert and choosing “Convert Photos to DNG” from the Library menu.
If you’re not using Lightroom, Adobe actually makes a FREE stand alone DNG converter. It’s always updated anytime there is a new version of Adobe Camera RAW or Lightroom so that it has support for the latest digital cameras and their RAW formats. You can learn more about DNG and grab the FREE DNG converter for Mac or Win here.
