I want to like ScreenFlow

A couple of weeks ago while attending the ADIM conference my buddy Colin Fleming turned me on to a new (well new to me) screen recording app called ScreenFlow (sorry PC users, this is Mac only). As you know, I’m always recording tutorials, podcasts, online classes, content for instructional DVDs, etc. So I depend upon my screen recording software weekly. My current choices are iShowU, which has become my primary app and SnapzPro X which not only does screen recording, but also does screen grabs in various formats with pro level controls.

The thing I absolutely love about iShowU is that once you’re done recording, that’s it! There is no post processing/rendering. The QuickTime movie pops up instantly. So it’s going to be hard to get me to go back to an app that has to render the final movie out after you record it.


Then why would I consider ScreenFlow?

Although ScreenFlow does require post process rendering, it may be worth it because of all the editing capabilities it has. Unlike iShowU and SnapzPro, ScreenFlow allows you to do post process editing right in the app. It also has a major advantage in that it also allows you to simultaneously capture your video via your iSight camera or other camera source. While all the apps capture your audio and computer audio (if you like), only ScreenFlow captures your video too. I really like that feature. ScreenFlow also adds several other enhancements like being able to cut out mistakes! Last night I recorded my most recent Creative Suite Podcast episode and I made a mistake during the recording. Once I was done recording, I was able to scrub to the mistake on the timeline and cut it right out. Not only can you make edits, you can have multiple tracks. So you can add in graphics and other recordings after the fact. Let’s say you mention a URL during the recording, you can add that URL as a graphic the pops up in the lower portion of the screen during the time that you mentioned it.

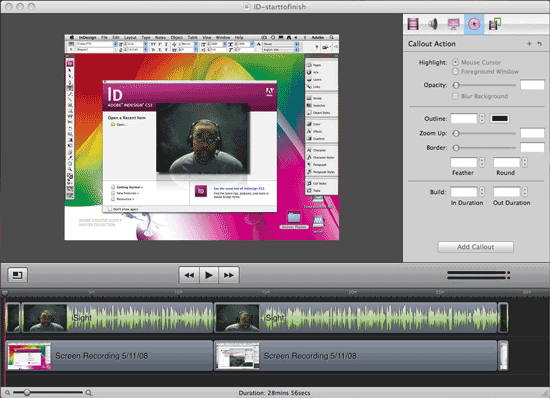
While these features are great, the other thing that really attracted me to ScreenFlow was the fact that it allows you to put in "Callouts." Callouts allow you to do things like zoom in on your cursor during post editing. You can add a click sound so that people know when you clicked your mouse. You can even add a radar type flashing circle so that people can see your pointer on screen and know exactly where you clicked. With Callouts you can also have your keyboard shortcuts displayed automatically on screen at the point you typed them. Very cool!


Putting ScreenFlow to the test!

Like I said, I wanted to see if ScreenFlow would be worth the post process rendering (during export). So I recorded my latest Adobe Creative Suite Podcast episode using it. This episode is a little longer (ok, a lot longer) than my average ones. It was almost 30 minutes long. That’s OK, because that’s as real world as it’s going to get for me. The recording worked GREAT! Editing on the timeline worked great. I was able to do a Ripple Delete and cut out a mistake I made during the recording (something iShowU and Snapz, don’t allow). I even took the time to add in some of the Callouts. After I was done editing, I did an export and that’s where the disappointment came in. About 3-5 minutes into the export process, the app crashed! I fired it back up (luckily I had saved my work) and tried it again. It crashed again at the same spot. I tried changing my export options several times and it crashed each time. Now I was annoyed that I wouldn’t be able to get my beautifully recorded podcast episode out of this thing and worse I’d have to record it over again using iShowU. However, I was persistent. I thought to myself, "it must not like something that I’ve added to this video." So I started turning off the fancy Callouts. Eventually I must have turned off the right one, because the export finally worked! I was too tired to try and narrow it down to exactly which Callout was causing the issue. Each time you relaunch the app after a crash it offers to send the crashlog to the developer and I did. So hopefully he’ll be able to fix this little (super annoying) glitch.


All in all, it’s a great app! I’m still not a fan of rendering, but it’s the price I’ll have to pay for the features that I can now add to my recordings to produce better recordings in the end. Although I didn’t use a timer, I would say that my export took about 15 minutes to complete of my 30 minute recording on my MacPro. ScreenFlow goes for $99.99 and you can download the demo and try it for free. Also check out the ScreenFlow demo video to see what’s possible.

Has my DirecTV account been hacked?

I happened to open my DirecTV bill this morning just because it was sitting there and well, I had nothing else to do in that moment. I expected to see the normal monthly charge and since my bill is on auto pay, I was about to toss it in the "to be filed" pile. However, I noticed a $34.95 PPV (Pay-per-view) charge on there for Boxing Chavez/Loriga – LIVE. The date was 4/26/08 (the day I was flying back from Portland). While I do enjoy a good boxing match every now and then, I haven’t ordered a PPV in a year or two (maybe longer). Even when I have done PPV’s in the past it was via my remote, never over the phone! So I hopped on the phone with DirecTV "customer service" to get this obvious mistake taken off my account. That’s when the fun began (NOT!):


Has my account been hacked?

Apparently when you call to order a PPV, DirecTV verifies account information. Things like the billing address, account holder’s name, etc. While I don’t think it’s too far fetched for someone to come up with this info, what makes this whole ordeal even more strange is that DirecTV then sends the signal to a specific receiver ID (the box in your house) to watch the PPV. So even if someone knew my account info, they wouldn’t be able to watch the event unless they were sitting in my living room OR unless they found a way to fake receiver ID’s in DirecTV’s system. So I asked for a supervisor and the supervisor came on the line and told me that the caller had everything they needed to place the order and she even gave me the phone number that the call was placed from (602)-575-2077. Well gee, that’s not even my area code, let alone my number. "Let’s call it now while I have you on the phone shall we?" Of course when I dialed the number, I got a recording saying that "the call could not be completed as dialed" which leads me to believe that this person/hacker did this intentionally. Even though I have been a loyal DirecTV customer for YEARS, and I’ve never called with any kind of account problem before. They still would NOT issue me a credit for this. After all, I must be lying because the person who called this in from a number not my own and not on my account had my information and therefore it must be legit! I went to my DirecTV TiVo and checked purchases and it doesn’t even show up there. I also verified the receiver number and it was the one used. The mystery continues…


Needless to say, I’m PISSED! For now, I have setup a password on the account and nothing else can be ordered or looked up without it. It would have been nice to see the fight that I’m having to pay for. Too bad the criminal/hacker didn’t have a way to record it for me on my box. DirecTV, I will be looking to move OFF of your system in the not too distant future (I almost yelled, “WELL CANCEL MY ACCOUNT THEN!”, right on the spot)! Thanks for the trust, customer service and the love you’ve shown me today. I’ll never forget it. I’ll also be sure to let everyone know how great you guys are (starting here and now!)

The best way to enjoy an iTunes movie rental

Although I usually find Apple’s hardware and services to be quite satisfying, I must say that I have been quite frustrated by the restrictions around the iTunes Movie Rental Service. It’s bad enough that you only have 24 hours to watch a movie once you start it. However, it’s even worse that you can’t start it unless you’re connected to the internet at the time. I’ve been burned just about every time I’ve tried iTunes rentals on my MacBook Pro. I either want to start watching a flick when I’m not able to get online to start it or I end up running into the 24 hour limit because I’m not able to finish it within the 24 hour limit.


So I’ve finally figured out that the best way to enjoy an iTunes Movie Rental is on an Apple device other than your computer

That’s right! Forget about your Apple computer for a minute. If you have a compatible iPod or an iPhone or an Apple TV, you’ll have a slight advantage. Here’s why: When you rent a movie on your computer and "move" it to your iPhone or iPod you only need to be connected to the internet at the start of the transfer. Once it’s on your iPhone or iPod you still have 30 days to start watching it. However, you don’t have to be connected to the internet anymore to START watching it. This is perfect for me! Sometimes I don’t know the exact moment when I’ll have the time and feel like watching a movie until that moment arrives. Unfortunately, that moment may arrive at 30,000 feet during a flight. If the movie is on my MacBook Pro and I didn’t start it before I left the ground (because once you start it, you HAVE TO watch it within 24 hours or it deletes itself), I’m hosed. However, if it is on my iPhone (or iPod) I can start it at any time. No internet connection required. So now I can rent and download a couple of movies ahead of time (days or even weeks), load them on my iPhone and then start them whenever the mood strikes me.


Apple TV?

With Apple TV the rules are a little different. You can use the same method above of renting/downloading on your computer and moving the movie to your iPod, iPhone OR Apple TV. However, if you rent/download the movie directly from your Apple TV then you have no choice but to watch it on the Apple TV because you can’t move it anywhere else. Also if you want to enjoy the HD version of the movie, you HAVE TO rent it from your Apple TV. Apple doesn’t allow HD movie rental downloads from a computer. These limits are OK because I just don’t download a rental on my Apple TV until I’m ready to sit down and watch it right then and there. Even HD rentals are ready to watch (streamed enough) within about 5 minutes after hitting the Rent button.


Apple this is cool, but Netflix is still king! When you loosen up your restrictions and offer a subscription model (I know it doesn’t make sense for music, but it absolutely makes sense for movie rentals), I’ll think about letting Netflix go, but not before then.


Apple, here’s a suggestion to make the computer rental watching experience better

Instead of simply deleting the movie from my drive once the rental period has expired, why not offer a "do you want to extend your rental period?" option that let’s me pay again for another 24 hours? The way it stands now if I did want to finish watching something I rented once the 24 hours is up, I not only have to pay again, but I also have to download the whole freakin’ thing again! That bites, especially when you’re traveling and have limited or slow internet access. Steve, think about it!

Adobe Digital Video Tools Showcase

Didn’t have enough time to explore everything showcased at the NAB? Well, don’t worry because Adobe invites you to an exclusive event that will enable you to check out the latest products from NAB as well as listen to Adobe solutions experts and partners as they demonstrate the many new facets of Adobe’s professional video solutions.

From planning to playback, Adobe® Creative Suite® 3 Production Premium drives video content creation. Combined with a diverse group of Adobe’s partners, including AJA, Blackmagic Design, CalDigit, Creative COW, Digieffects, GenArts, GridIron Flow, Matrox, Maxon, MOTU, Panasonic, and Wacom, Adobe offers solutions and workflows for getting today’s content out to air, tape, disc, or online faster than ever before.

With access to the latest tools to enhance your creativity, efficiency, and workflow and thousands of dollars in prizes, how could you afford not to attend?

Admission is free. Onsite attendees are eligible to win valuable software and other great prizes!


Thursday, May 29, 2008

First Session:
11:00 a.m. – 3:30 p.m.
Second Session:
3:30 p.m. – 8:00 p.m.


New Yorker Hotel
Crystal Ballroom, 2nd Floor
481 8th Avenue at 34th Street
New York, NY 10001


It’s FREE, so register today!

Monster Mash at ADIM 11

Yesterday we kicked off the ADIM conference here in San Jose California! ADIM is the Art Directors Invitational Masters Class. This annual event brings together some of the most creative minds in the world for 3 days of hands-on instructional courses dealing with photography, illustration, design and more. Each year there is theme and this year it’s Classic Monsters. The master mind behind this event is none other than Adobe’s Creative Director, Russell Preston Brown (pictured above to my right).

I had a great day teaching Acrobat 8 shared reviews, Acrobat Connect and retouching techniques in Photoshop CS3. I also want to thank all the great people I met in my class!

Instructors and attendees really getting into the theme 🙂

My favorite on location lighting setup

One of the most difficult things to do these days is travel with expensive photography gear. The problem is that you can only have so much carry on luggage and we all know that checking your expensive gear is like putting a sign on it that says "steal me now". So that means that I either travel with minimal lighting or rent my lighting gear once I get to my destination. Sometimes if the situations permits I can ship stuff back and forth, however, I’ve seen stuff disappear that way too leaving the hotel and the shipping company pointing fingers at each other.

My trusted travel light is the Nikon SB800. Any photographer that knows anything about lighting will tell you that the key is getting the light off of the camera. You typically want directional, diffused, soft light whenever you can get it. The Nikon SB800 speedlight system is great! With a couple of these, you can pull off plenty of jobs that you would have thought impossible. I love them because they can be triggered wirelessly from my Nikon D300 DSLR camera and I can even control the power output directly from the back of my camera without ever touching the speedlights themselves.

Although the SB800 can be fired wirelessly, the problem is getting it up off your camera and positioned over your subject. This requires either masterful use of "the Force" or a light stand. While there are some pretty compact inexpensive light stands out there, none of them were small enough to fit in my suitcase until my buddy Scott Kelby turned me on to the LumoPro 5-Section 6ft Stand. This puppy folds down to a mere 21.6 inches which fits perfectly in my carry on suitcase.

The next problem is you’ll need a mount for the speedlight itself. For this I use the LumoPro Umbrella Swivel w/ Hot Shoe Adapter.

The SB800 has a diffuser cap, but I want soft light whenever I can get it and while umbrellas are OK, I don’t really like bouncing light off of them. It’s light throwing a "light" grenade into room. However, I don’t mind shooting through a translucent umbrella (the next best thing to a softbox). For this I use the Westcott 43" Collapsible White Umbrella. This umbrella is small and takes up very little space in my bag. I could stop here, but I also like to have a fast recycle time on my flash as well as shooting for hours uninterrupted. For this I got the Nikon SD-8A Battery Pack, which takes 6 AA batteries reduces my recycle times by 60-75% and extends my shooting time.

Currently I have two of the stands, two of the mounts, one SB800, one SB600, and one umbrella. I like this setup so much that I’m going to get another SB800, battery pack and shoot-through umbrella.


The Results

With this setup I was able to take some nice shots of Marianne here:

Navigon 2100 1.2 Update

Although I’m a fan of Garmin GPS units I keep coming back to the one feature I like best about the Navigon 2100 and that’s the 3D Reality View (pictured above). With the Navigon there is no guessing about which lane I should be in.


Good just got better

Navigon quietly released their 1.2 firmware update which provides the following fixes/new features:

  • Improved routing
  • Updated ZAGAT SURVEY Ratings & Reviews
  • Improved user interface
  • Revised voice prompts for highway entrances & exit ramps
  • Improved accuracy of ETA information
  • Updated Maps

The 1.2 update weighs in at a hefty 2GB’s! However, it’s very worth the effort and time to download. I noticed right off the bat the Navigon 2100 is now more responsive and while I’ve used it this week while traveling in Portland, it’s been a real joy. You can download the 1.2 update by logging in to your My Navigon area of their website. Be sure to backup your existing SD card data first!


With the update and performance I’ve been getting so far this week, this little low cost GPS unit may just become my first choice when I travel!

You can buy the Navigon 2100 for $151.71 at Amazon.com.

JBL On Tour Rocks the House!

When it comes to gadgets I’m always looking for the smallest gear I can find that has the most impact or features. However, when it comes to speakers, usually smaller means sacrificing sound quality, bass and volume. Is it too much to ask to have a speaker system that’s small enough to fit in my laptop bag, yet loud enough or clear enough to enjoy from across the room? JBL doesn’t think so.

I was doing a seminar one day and one of my colleagues had the JBL On Tour Speaker System. I couldn’t believe how small it was, yet it was delivering enough sound for a room of about 100 people to enjoy. So I made a mental note and said to myself, the next time I need to take some speakers on the road with me, I’m going to have to try these out. That day came! I took the JBL On Tour Speaker System with me to California last week. I drove it with an iPod nano and the sound was better than I expected. It was certainly loud enough and clear enough. However, I’m a fan of bass and the bass just wasn’t as good as I would have hoped. Don’t get me wrong, very few if any small speakers have enough bass to satisfy me, so there wasn’t a whole lot of disappointment here. Other than that, this speaker system more than fit the bill for what I was looking for.


How small is small?

When you’re not using the speaker, it folds down to about half the size. VERY COMPACT to say the least. Although it’s not battery powered, the supplied power adapter is small enough that it fits into the sleeve with the speaker. Although I used it with an iPod, there is no iPod dock connector. So no iPod charging or line out audio. I simply connected the supplied cable to the headphone jack of the iPod nano. If you’re looking for an iPod only speaker, then you should probably look elsewhere. I got this speaker because it would not only work with an iPod, but also with my laptop.

It also works on batteries. I didn’t try it yet, but the On Tour works with 4 AAA batteries and is rated to play for 24 hours on a fresh set.

Dimensions Width: 7" (175mm) x Depth: 3.5" (88mm) x Height: 1.4" (35mm)
Weight 12 oz (350g)


The Bottom Line

If you need a SMALL travel speaker system for your presentations and personal enjoyment, you can’t go wrong with the JBL On Tour Speaker System. Amazon has it for $53.62.

OWC answers my storage needs

After my laptop debacle last weekend I started really thinking about having a backup WITH ME when I travel. Sure I backup religiously when I’m at home and now even automatically with Time Machine and Time Capsule. However, if something were to go wrong on the road I would be kinda screwed. So I decided that I should have a bootable backup with me. I was already carrying a mini G-RAID which houses all my demo files. It’s a very fast drive being a RAID and all, but it’s kind of bulky and not large enough to house a complete bootable backup AND my demo files. So I wanted something with more capacity and the timing was perfect!


Introducing the NEW OWC On-The-Go 500GB External Drive

I’ve always been a fan of OWC’s On-The-Go drives and have used them for years. They just started shipping the 500GB 5400rpm version. So I got one. This drive connects via Firewire 800/400 or USB 2.0. They provide a neat little carrying case, all the cables as well as a power supply if needed. I usually run on Firewire 800 bus powered, so I have a stack of these power supplies collecting dust. I partitioned the drive into two partitions. One to equal the size of my main boot drive and the rest for my demo and other misc. files. I used SuperDuper! to do the clone last night and all is well. Granted, this drive is only 5400 rpms (as opposed to 7200 rpms) and it’s not a RAID, however, it’s smaller in physical size and should still work out just fine for my needs. Oh and yes, I did label the drive too 🙂

The OWC 500GB On-The-Go drive goes for $360.

Take that Hi-Key shot the easy way

Because it opens on all four sides you can either use it in a portrait and landscape orientation.  I have one Interfit strobe pointed into on the right.


I got an early birthday present! The Lastolite HiLite Background totally rocks. Think of it as a giant 6×7′ wall of light to put behind your subject. Although I’m getting better with my lighting all the time, it’s still a pain to get a white background to be perfectly and evenly lit. Well that is no longer a problem for me. The HiLite Background is a collapsible, portable background that takes about 5 minutes to setup. Once it’s setup it’s about 1′ wide. All four sides can be accessed via zippers, but the idea is that you stick one or two strobes on the end(s) and fire right into it. The beauty is that the strobes don’t have to be that powerful or expensive. I even tried it with an Nikon SB800 speedlight and got good results. However, I did buy a dedicated low end Interfit strobe that I run on a very low power setting (I need to turn it down even more now that I look at the histogram/clipping warning of my latest shots).


Here’s the shot I got of Model Ada from the above setup


Lastolite also sells a vinyl train so that you can create a semi-seamless background. Although the HiLite background is 7′ tall, that may not really be quite tall enough depending upon your subject. So you may want to use it for portraits of people that are seated or on a posing stool.

Lastolite makes a smaller version of this background that is 5’x7′, but trust me, you’re going to want the bigger one. It’s interesting that I’ve now used it 3 times and the first and last times I was able to fold it down in about 2 minutes. However, the second time I wrestled with this thing for 15 minutes to get it back into the bag. Go figure!

If you’re looking to do easier Hi-Key, this is your answer! It goes for $473.99 at B&H Photo.