Photo Retouching is a large part of the digital photography portrait workflow. People have varying opinions on photo retouching and some will argue that you shouldn't retouch a photo at all. For those that feel that way you can probably stop here, move on to something else and have a nice day. The fact of the matter is that photo retouching happens everyday and I would dare you to pick up a cover of any magazine with a person on it and tell me that it came right out of the camera and went to press. As both a photographer and a Photoshop user I can tell you that portrait retouching is necessary. The reason that I feel that it's necessary is that when we see a photo of a person we see a image frozen in time and therefore our eyes have a chance to see and study every imperfection. However, when you see that same person in real life you would never sit there and stare at them for several minutes while they remained perfectly still. In a photo we see things that we would never pay attention to in real life. The goal of portrait retouching is to make the person look as good in the photo as they do in real life.
While I am a fan of portrait retouching, just like anything you can take things too far. I've learned over the years that less is more. I don't want to spend any more time retouching a portrait than I absolutely have to. I also don't want to do things to a portrait just for the sake of doing things.
My rule for removing things is that I remove things that either wouldn't be there in two weeks such as a pimple, or temporary bruise, etc. One of the last things I look at near the end of a portrait retouch is "Skin Smoothing." This is one of those topics that can easily get people up in arms and all of a sudden the pitch forks come out. This is also one of those areas in digital photography that can easily be and is often taken too far!
Skin is already smooth
The first thing to remember is that skin is naturally smooth. What makes it look not smooth in a photo is typically the way the subject is lit. Depending on the lighting you will see areas of the skin show more detail in the shadows which causes the skin to look less smooth. A professional retoucher will tell you that the only way to correct for this properly is to go in pixel by pixel removing the areas that are causing the skin to not look smooth. If you think about it, let's say there was an area of skin with 20 pimples on it. If you removed all 20 pimples the skin would be smooth. Your job would be done. This is the "professional" way to do it and the way I would recommend when you have a paying client or you're working on the cover of a magazine. In other words if your work is going to be judged, then take the time and go in pixel by pixel. Unfortunately for most jobs this kind of time doesn't exist. Nor is it justified for every single photo. This is where the arguing usually starts 🙂 I'm not telling you to do it one way or the other, I'm just pointing out the facts. In these cases there are other methods of "skin smoothing." These methods typically involve running filters on the skin and then reducing the effect to allow the original pores to show through. Professional retouchers (the ones that make their money doing this) will crucify you for this technique. At the same time, I would argue that it can be OK if done right. There are several methods for this and people will even argue which Photoshop filter does a better job. I have my own methods that I'm happy with, but I'm always looking at ways to make it better or faster.
Digital Heavens Automates Skin Smoothing For You
The guys over at Digital Heavens have come up with a set of Actions for Photoshop to automate the entire process of Skin Smoothing for you. This is great because they employ several different techniques within the set and let you try them before committing to one or the other. This presents kind of a non-destructive workflow because everything is done with layers and your original photo/background is never touched. If you don't like the look you can simply delete the layers it creates. You start off by doing exactly what I described above. Get all the flaws fixed/removed first. If you still feel the need for Skin Smoothing after you done you can then just run an Action. As always you can control the amount smoothing via Opacity. One of the advantages of Smooth Skins by Digital Heavens is that it's a series of Actions, not plug-ins. That means that it's using the native features of Photoshop and not dependent on having to keep a setup of plug-ins updated. You get 10 Actions in the set. This gives you a wide variety of different techniques to try out and to pick the one you like best for your image. They've also done a great job with providing samples and tutorials to show you how the Actions work.
Here's a sample tutorial video of just one of the Actions that ships with Smooth Skins:
httpv://www.youtube.com/watch?v=3Ej06FtGuIU
A bit of final advice
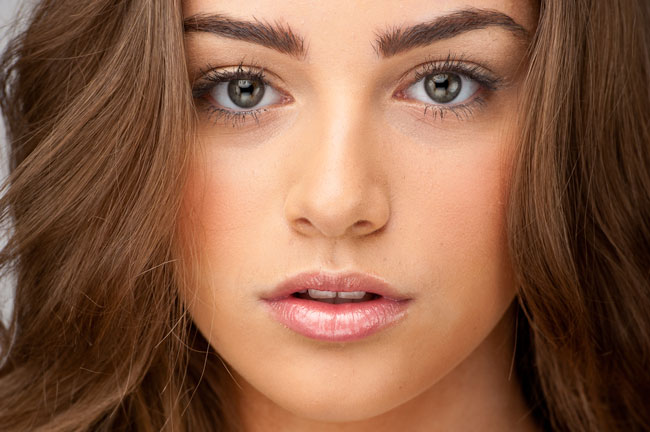
No matter what technique you employ keep in mind the age of your subject. I find that you people (kids/teenagers) rarely need any skin smoothing at all! It makes my day when I DON'T have to do it. For example, the very first photo at the top of this post of Amanda has absolutely ZERO Skin Smoothing applied. I removed 3 pimples. That's it. She's young and already has beautiful skin. With older people you need to show some restraint too. Don't make the person look unbelievably too young. These actions are a great way to save time, try different techniques and have a way out if you don't like it all without having to create them yourself or do it manually each time. We've all seen "bad retouching" I'm guilty of a few bad retouches in my past as well. Another piece of advice is after you're done, close the image and reopen it hours later. Look at it and see if you still agree that it's "done" and not too much?
Before Smooth Skins from Digital Heavens I only had 2-3 different techniques. Now I have 10 New ones!
You can find out more about Digital Heavens Smooth Skins Actions here as well as additional video tutorials and examples.


Looks like a nice set of actions. I wonder how these compare to the skin smoothing techniques found in Scott’s “Professional Portrait Retouching Techniques for Photographers Using Photoshop”.
Thanks, Terry, for this terrific lead. I just finished a publicity shoot for the Puccini opera Turandot — lots of heavy theatrical makeup — and my own skin smoothing techniques weren’t achieving the results I wanted. The Digital Heavens Actions were easy to use and produced beautiful results … the sharpening included in the actions also provides a big assist. Thanks for keeping your ear to the ground and sharing … ron.
Terry, love your blog. So informative! Just got myself a copy of these cool actions and going to try them out on some portraits I shot previously. 🙂
Wow. Awesome tips with an excellent post image. Thanks
The last action on the video was show by your college Katrin Eismann in the Photoshop User magazine March 2010 pages 052/053.