Hi Everyone! My name is Scott Diussa and I’m the Field Operations Manager for Nikon Professional Services. I want to thank Terry for the opportunity to share with you something that I have been talking to photographers about more and more in the past year or two. If you have been a DSLR still image shooter for a long time and you are making your way into the world of creating multimedia projects with your DSLR that shoots HD video then you have been experiencing quite a learning curve. Now, I’m not say that learning curve has been solely based around how to actually shoot the video footage with a camera that wasn’t originally designed for this purpose, I’m talking about the fact that now you have to be an audio expert just as much as a video expert! It’s sort of like when digital photography first came out, people could shoot the images but had no idea that they now had to be their own photo lab! But, things change and the more you learn the better you get so I’m going to talk to you today about some of the basics of audio and how they relate to DSLR video that I think will help you from here on out with any of your multimedia projects.
First of all, before I went to school for photography I went to school for audio engineering. There I learned a lot, actually too much to retain. But, even thought that was in the late days of analog audio the principles of things such as microphones and levels and editing still remain the same today. This isn’t any different than a photographer coming from film to digital photography. Camera bodies, apertures, shutter speeds and lenses still do the same thing as they did when film was king. So, as you can see there are ways of relating some theories about audio to photography and that’s what I plan to do here to make understanding the relationship between the two easier. So, let’s get started…
Microphones (Lenses)
There are just as many microphone choice and price ranges as there are lenses in photography or even more so… It can be a pretty overwhelming task to choose the right one. But, as any good photographer knows, you can’t just have one lens that does it all. Sure you can have one that does a lot but there isn’t one single lens that does it all. This is exactly the same for microphones as well. Also, when it comes to lenses… you get what you pay for. It’s the same with microphones. Of course, there’s always the thought of… get what you need to get the job done… within reason.
There are two main types of microphones available that you will need to understand some basic about, dynamic and condenser.
Dynamic mics are more durable, less sensitive and don’t require any extra power to work. They deliver what known as a “mic level” signal which requires a device such as a mixer at the other end to amplify the sound to “line level” which is what a DSLR camera mic input needs. So, most mics that hook up to a DSLR camera are not dynamic mics.
Condenser mics are a bit more fragile (but not too bad in some cases) and require either a battery or what called “phantom power”. “Phantom power” is delivered to the microphone by a mixer and DSLR cameras don’t work this way. So, mics that you will get that work well for a DSLR camera will require a battery. These mics deliver “line level” output that the camera likes in order to deliver good quality sound. There are other variables in play here, too, but let’s keep it somewhat simple today.
Now that we know we are most likely going to be using mics that require their own power source which type of mic will we need? Just like lenses, it all depends on the shooting situation. If you are going want a “wide angle” type of sound then you would want a stereo mic. If you want a more “telephoto” sound then you would want a shotgun mic. Those are the two main types of mics that you will use on a normal basis. So, if your multimedia piece needs to portray a sound moving from left to right then a stereo mic would allow the sound to go from left to right. If you are needing to capture the sound of a single voice then a shotgun mic will do a better job of picking up that voice and ignoring the competing sound off to the sides of the subject.
Another type of mic that is commonly used in any sort of video interview situation is a “lav” mic. You’ve seen these on every news person on TV. It’s the small mic clipped to the lapel of a shirt that is somewhat un-noticeable. You can have either wired or wireless versions of these microphones. Wireless versions can be expensive but there is a new one coming out by Samson that looks very interesting…
httpv://www.youtube.com/watch?v=So7mFX-fQdU
Just like in photography there are many other choices. Photographers can choose specific lenses such as micro lenses or extreme telephoto lenses, for example, and microphones can come in extremes too such as studio condenser mics (good for voice overs) and piezo mics (good for capturing sound in all directions). Like I said… stick to the basics first and see where you go with all of this. A good stereo mic and a good shotgun mic will do most of the jobs that you need…

Audio Recorders (Camera bodies)
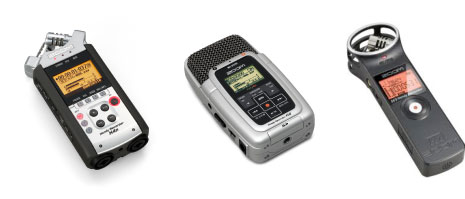
Now you have your mic choice (or lens choice) taken care of but what about your audio recorder (camera body)? Just like in photography you have many choices when it comes to audio recorders. I suggest that you keep it simple to start and there are a lot of great choices for keeping it simple. You have the ability with almost all audio recorders to connect your favorite stereo or shotgun mic but most audio recorders these days have their own built in stereo mics which can make things easier in a quick situation. Just like in a camera body choice, it’s all about what features you need to get the job done. If you buy the most expensive audio recorder you may never use all of the features it has. Start simply. If you need an audio recorder with XLR inputs then the Zoom H4n may be a good choice. If you have no idea what an “XLR” is, then maybe you only need the Zoom H2. The H2 has two sets of stereo mics that you can record from both sides of the recorder at the same time and either save them as separate stereo files or mix the two together as a single stereo file. If you still have no idea what I’m talking about then the Zoom H1 may be a perfect solution. It has a great stereo mic, an input for a different mic and is easy to use. If that sounds more like what you need then you just identified what recorder would be the perfect choice. Now, I only singled out the Zoom recorders because I know them well but other manufacturers make great stuff, too. You need to do your homework and also talk to a knowledgeable person about what would be good for your purposes. (I’ll share my contact for who I trust to help me with these decisions later in this post.)

WAV/MP3 (TIFF/JPEG)
Now we move on to file types. Yes, I said file types. You thought you could hide after figuring out the differences between JPEG, TIFF, NEF, etc. didn’t you??? Now you have to know about MP3, WAV, AIFF and all sorts of fun file types associated to audio! Yippee! By know you know that I like to keep it simple. So, let’s just take on WAV and MP3 file types here. The simplest way I can explain it is that a WAV file is like a TIFF file, uncompressed, great quality and a space hog. MP3 files are like JPEG files, smaller and easier to use but you sacrifice a bit of quality in return for them not being space hogs! How much quality do you sacrifice? Not much… It’s hard to tell a JPEG from a TIFF in most cases and WAV vs. MP3 is no different. This is one of those times where you have to experiment and find out what’s best for you.
Now for the next level of recording options. Cameras have different quality levels of how to record images… Guess what? So, do audio recorders! Go figure! Audio recorders generally have options for both the sample rate of the recorded audio as well as how many bits are used for the recorded audio. Normal CD quality recordings are typically 44.1 kHz/16 bit which means that they are recorded at 44,100 times per second and use 16 bits of data. This is very standard but video tends to use something higher than that. When recording for video purposes the norm is 48 kHz/24 bit. Some audio recorders have the ability to record at 96 kHz/24 bit which is overkill for most applications, especially DSLR multimedia pieces. Pretty much any audio recorder that is good will record up to 48 kHz/24 bit and will give you great quality. Got all of that? Don’t worry… you will!
Software – Photoshop (or… same learning curve)
Then we are left with the options of software to edit your audio files! (And you thought that getting better at Photoshop was the last thing you needed to do as a photographer!) Just like in photography, there are different audio programs for different audio scenarios! Now, if you record everything perfectly the first time around and the subject you are recording doesn’t make a single mistake, then you are in great shape! Yea, right. So, here are some places to start. If you use a Mac, then you have an array of audio options starting with Garageband that came with your computer! You can add audio to video pieces, record your own soundtracks and even do your own voice narrations (or voice overs) with something you’ve already paid for! If you want a simple program for getting into the nitty gritty of taking out “ums” and “ahs” out of an interview for example then you can download a free program called Audacity for Mac. If you have one of those USB turntables that you can put your vinyl (yes I have vinyl records) into digital versions then it probably shipped with Audacity. It’s does a great job at cleaning up the pops and crackles the come from vinyl record transfers. Apple also makes full blown audio programs that can do way more than most mortals would ever use such as Soundtrack Pro and the Logic Studio suite of software (http://www.apple.com/logicstudio/) . All really great stuff…
If you are a Windows person or a Mac person and you want to get into some medium to higher end programs then you should do some research. Adobe offers a program which looks very interesting to me called Soundbooth and they also have a program which I have done some audio editing in an earlier version called Audition. If you need to really get crazy then you’ll know what to get. I still suggest that you keep it simple when it comes to picking audio editing software.
As I continue to talk to photographers who are getting into the world of multimedia I stress to them that it’s not just about the still images and the video they capture. The glue that holds the entire story together is the audio portion, whether it be an interview or a musical soundtrack. If it doesn’t sound good, then people won’t pay attention to the awesome images and video you put together. These three pieces, photography, video and audio need to be treated as equals.
I wish you the best of luck in your experimentation with audio. It’s just like anything new that you may learn. It’s not easy at first but keep practicing! And, have fun learning something new!
I told you that I would share my audio expert with you… His name is Trent Thompson and he is available at Sweetwater Music in Ft. Wayne, Indiana. 800 222 4700 x 1393. You can tell him that Scott Diussa sent you! He’s been helping me with my audio choices for quite awhile now and is a great guy! Make his phone line light up!
You can also check out my blog at www.scottdiussa.com and my Concert Photography class at Kelby Training.
Good luck shooting and recording!


Audacity is available for PC and Unix/Linux as well:
http://audacity.sourceforge.net/download/