How To Use Adobe Photoshop Touch for iPhone and Android

PStouchIcon

In this episode of the Adobe Creative Suite Podcast, Terry White shows how to use the New Adobe Photoshop Touch for phones to composite images, remove a background and add a logo before sending it to the desktop version of Photoshop layers and all.

You can get Photoshop Touch for iPhone here
iTunes

You can get Photoshop Touch for iPad here
iTunes

Yes you can also get it for Android here.


Are you missing out on my Bonus Content?

See more of my Adobe Creative Suite Videos on my Adobe Creative Suite Podcast and get the App below. It features EXCLUSIVE CONTENT that no one else gets to see. This episode has a BONUS CLIP that is available only in the App! My iOS App is a Universal App for iPhone, iPad and iPod touch. I also have an Android version on the Amazon App Store:

Learn Adobe Creative Suite with Terry White - Wizzard Media


To make it even better, get one of these

Brushing with your finger is ok, but if you want more precision I highly recommend getting one of these Wacom Bamboo Styluses for touch screens.

You can get one here.


Traveling with an Apple TV

AppleTV-2010

Im quite fond of the Apple TV for streaming content, watching movies and displaying my photos throughout my studio. This little box does a lot and with each software update Apple adds more capabilities to it. Recently I saw a deal on a refurbished one and I decided to snag it and use it as my “on the road” Apple TV. The idea is that since I travel so much and it seems that most hotels now have flat screen HDTVs in their rooms that I could potentially use an Apple TV to stream my own content during down time. However, the thing you have to keep in mind is that the Apple TV was never really designed to be taken on the road.


It needs a network connection

AirportExpress_2012

Unlike the 1st generation Apple TV, the newer models don’t have hard drives in them. So there really is no effective way to load it up with content before heading out. You have to either stream to it from a computer/iOS Device or you have to stream to it from the internet. The Apple TV has both WiFi and an Ethernet port. That helps a lot! Although it has WiFi it was not really designed to connect to random hotspots. There’s no web browser and therefore no way to really accept the terms and conditions even if the WiFi is free. I have been traveling with an AirPort Express Base Station for years. If my hotel room has an ethernet port I can just plug the AirPort in and provide WiFi to all my devices, including an Apple TV. Also the newer AirPort Express Base Station has an additional Ethernet jack so that you can even plug in a wired device to share the connection, such as an Apple TV. However, if there is no Ethernet port in the room and the WiFi network isn’t wide open you would be pretty much out of luck. You could use a MiFi or tethering to a smartphone/iOS device. You could also share the hotel WiFi connection from your laptop using Internet Sharing to the Ethernet port on your Apple TV. Before I’d do the latter I’d have to really really want to use my Apple TV. Otherwise I could just plug the computer into the TV and bypass the Apple TV altogether.

Continue reading “Traveling with an Apple TV”

My Websites are Responsive and More Mobile Friendly

TW_all-screens

In case you haven’t noticed this site was updated with a “responsive” design a couple of weeks ago by the very talented web designer Erik Bernskiold. With the use of custom CSS he has made it so that the same site/content is displayed nicely no matter what screen you’re viewing it on. If you’re looking at this post on your computer go ahead and give it a try by simply resizing the window to be more narrow from the right. The page will respond and the content will scale or readjust as needed all the way down to a smartphone size. The same goes for my BestAppSite.com While I have the good fortune of Erik working on my terrywhite.com and bestappsite.com sites, I have other sites that I maintain myself. My Terry White Photography.com site is also now responsive thanks to an update to the The Turning Gate Lightroom Plug-ins that I use to generate my photography site. At last my photography site also looks even better on desktops, tablets and smartphones. The fun doesn’t stop there. I use Adobe Muse to author my MacGroup.org site and using Adobe Muse I was able to add both Tablet and Smartphone layouts to that site. Adobe Muse doesn’t currently offer responsive design, but it does offer the ability to create tablet and smartphone friendly layouts. There are pros and cons to both and here’s a great article that weighs in on the Responsive vs. Mobile Layout Debate. With that said, the MacNews blog (blog for MacGroup-Detroit) is now Responsive thanks to a template update by Page Lines.

twp_iPad

Like I said, I have Erik to work on my major sites that don’t require as much day to day design updating as my other sites and thanks to Adobe Muse, 3rd party WordPress plug-ins and The Turning Gate I can have a good mobile experience on all my other sites. I’m in no way a “professional” web designer/developer, but I do have websites to maintain. If you’re wanting to make your site Responsive and you don’t have an “Erik” you should check out the new Adobe Edge Reflow tool. If you want to build your own sites with mobile layouts, check out Adobe Muse.

New Lower Cost PocketWizard

20130301-103805.jpg

PocketWizard Plus X features:

• Auto-Sensing Transceiver: Easy to use. No settings to make.

• 10 Channels: 1-4 Classic plus 5-10 low-traffic channels

• Backlit Channel Dial: Easy to set channels in the dark

• Internal Antenna: Compact, more rugged design

• Auto-Relay Mode: Trigger remote camera & flashes simultaneously

• Transmit Only Mode: Positive operation in large groups

• Side View Design : Better subject view on camera

• PocketWizard reliability: PocketWizard compatibility

They are now in stock here

The Big Apple Showing Me Some Love on the Adobe Create Now Tour

wpid11750-2013-02-27-17.42.45_sm.jpg
Always great to be greeted with a line of fans waiting to see me!

I just wanted to give a quick shout out to all who attended my Adobe Create Now World Tour event in NYC last night at the NY InDesign Users Group Meeting. Thank you for attending the event and making me feel welcomed!

wpid11752-TLW4546_sm.jpg

A packed house, great crowd and great facility!

wpid11756-BEJeeiqCEAEi4kq.jpg-large_sm.jpg
Photo by Sandee Cohen

Thanks Sandee Cohen for taking this shot and tweeting it.


wpid11754-2013-02-27-17.54.48_sm.jpg

If you live in the NYC area and you’re into InDesign I can’t think of a better group of people that you should get to know and get involved with. Join your local InDesign Users Group here.

I look forward to seeing you tonight in New Jersey or on one of my upcoming Create Now Tour stops.

Adobe Photoshop Touch for iPhone and Android Smartphones

Photoshop_touch_iphone5

Just in case you missed my post over at bestappsite.com, I wanted to give you a heads-up that Photoshop Touch has just been released for iPhone and Android Smartphones.

 Adobe Photoshop Touch for phone offers powerful new capabilities for smartphone users:

·         Enhance images using popular Photoshop features such as layers, selection tools, filters, tonal and color adjustments

·         Apply effects and add graphical text for endless creative possibilities

·         Edit images as large as 12 megapixels with layers

·         Combine images together quickly using the Scribble Selection feature, and easily refine your selection with the Refine Edge tool

·         Automatically sync images to Adobe Creative Cloud™ with free 2GB of storage

You can get Photoshop Touch for iPhone here
iTunes

You can get Photoshop Touch for iPad here
iTunes

Yes you can also get it for Android here.


To make it even better, get one of these

Brushing with your finger is ok, but if you want more precision I highly recommend getting one of these Wacom Bamboo Styluses for touch screens.

You can get one here.

Lightroom 4.4 and Camera RAW 7.4 Release Candidates Posted

lightroom4

Lightroom 4.4  is now available as a Release Candidate  on Adobe Labs.   The ‘release candidate’ label indicates that this update is well tested but would benefit from additional community testing before it is distributed automatically to all of our customers.  The final release of Lightroom 4.4 may have additional corrections or camera support.

Bugs Corrected in the Lightroom 4.4 Release Candidate

The following bugs that were part the Lightroom 4 releases have been corrected. The team appreciates the very detailed feedback the community has provided on Lightroom 4 and we’re excited to correct a number of issues experienced by our customers. These issues have been FIXED:

  • The crop overlay tool resized incorrectly when used in conjunction with the “Constrain to Crop” checkbox in the Lens Correction panel
  • Background graphics were not correctly rendered within the Book Module
  • The supplied lens profile for the Sony RX-1 did not contain vignette information
  • Previews of photos in portrait orientation were blurry when viewed in the filmstrip in the Develop module. (Mac only)
  • Stack badges displayed the wrong count when creating new stack that included a preexisting stack.
  • The Filter scrollbar within the Library module was not rendering properly.
  • Auto-tone was not working properly when used in conjunction with the Exposure adjustment slider. (Win only)
  • The Black&White button was not creating a History state within the Develop module. (Win only)
  • RGB color readouts were specified in the Adobe RGB colorspace rather than the ProPhoto linear colorspace. This occurred when working in Soft Proofing within the Develop module.
  • Adding a page behaved inconsistently in the Book module depending on the method used to add a page.
  • The state of the “Remove Chromatic Aberrations” checkbox within the Lens Correction was not persistent between sessions of Lightroom.

Please provide feedback on your experience with the Lightroom 4.4 Release Candidate in our Feedback Portal (link – http://feedback.photoshop.com/photoshop_family)

New Camera Support in Lightroom 4.4 Release Candidates

  • Canon EOS 1D C
  • Casio Exilim EX-ZR700
  • Fujifilm X100s
  • Fujifilm X20
  • Hasselblad Lunar
  • Leica M
  • Nikon 1 V3
  • Nikon 1 S1
  • Pentax MX-1

Release Notes

Lightroom 4.4 RC includes a correction to the demosaic algorithms for Fujifilm cameras with the X-Trans sensor. This specifically impacts the following cameras:

  • Fujifilm X-Pro1
  • Fujifilm X-E1
  • Fujifilm X100S
  • Fujifilm X20

Camera Raw 7.4 and DNG Converter 7.4 Release Candidates are now available on Adobe Labs  This release includes bug fixes, new camera support, and new lens profiles.

New Camera Support in the Camera Raw 7.4 Release Candidate

  • Canon EOS 1D C
  • Casio Exilim EX-ZR700
  • Fujifilm X100s
  • Fujifilm X20
  • Hasselblad Lunar
  • Leica M
  • Nikon 1 V3
  • Nikon 1 S1
  • Pentax MX-1

New Lens Profile Support in the Camera Raw 7.4 Release Candidate

Lens Name

Lens Mount

Canon 24-70 f/4L IS

Canon

Canon EF 35mm f/2 IS USM

Canon

Nikon 1 NIKKOR 18.5mm f/1.8

Nikon

Nikon AF-S NIKKOR 70-200mm f/4G ED VR

Nikon

Sigma 18-250mm F3.5-6.3 DC MACRO HSM

Pentax, Sony

Sigma APO MACRO 180mm F2.8 EX DG OS HSM

Sony

Sigma 35mm F1.4 DG HSM A012

Canon, Nikon, Sigma

Sigma 17-70mm F2.8-4 DC MACRO OS HSM C013

Canon, Sigma

Sony E 10-18mm F4 OSS

Sony


These items have been FIXED in Camera Raw 7.4 Release Candidate:

  • The grayscale visualization associated with Noise Reduction Luminance was visible after mouse release. This occurred when positive Clarity was present.
  • The command/control + A “select all” keyboard shortcut did not select all photos.
  • Modifying the brush size using the Right-click + Drag method did not increase or decrease the brush size by the desired amount.
  • The crop overlay tool resized incorrectly when used in conjunction with the “Constrain to Crop” checkbox in the Lens Correction panel.
  • Hovering the mouse over a local adjustment pin would turn off the desired mask.
  • Horizontal artifacts occasionally appeared in DNG files.Improved interactive performance at intermediate zoom levels (e.g., 33% and 66%)

Release Notes

Camera Raw 7.4 RC includes a correction to the demosaic algorithms for Fujifilm cameras with the X-Trans sensor. This specifically impacts the following cameras:

  • Fujifilm X-Pro1
  • Fujifilm X-E1
  • Fujifilm X100S
  • Fujifilm X20

Thank You

Join me Tonight in LA and NYC on Wednesday for the Adobe Create Now Tour

AdobeCreateNowBanner

Hey guys! You can catch me LIVE at the Adobe Create Now World Tour Event in Los Angeles tonight (Monday 2/25) and New York on  Wednesday (2/27) . I’ll be covering the latest and greatest Adobe innovations and updates for our design products.

Register here for tonight in LA

Register here for NYC on Wednesday

Register here for New Jersey on Thursday


Where is the Create Now World Tour Coming to a City Near You?

If you want to check out the events happening in your town click the banner below:

createevent

Logitech Ultrathin Keyboard mini Review

logitech_ultrathin_mini_stand

If I think about my favorite iPad accessories, there’s no question that the Logitech Ultrathin Keyboard Cover is my favorite. The iPad is great and the on screen keyboard is fine for typing short messages or replies. However, when it comes to heavy text input or writing blog posts like this one, nothing beats a physical keyboard. The Logitech Ultrathin Keyboard Cover is the best one on market IMHO. It attaches magnetically and works just like an Apple Smart Cover. Read my original review here.


A physical keyboard for the iPad mini?

logitech_ultrathin_mini

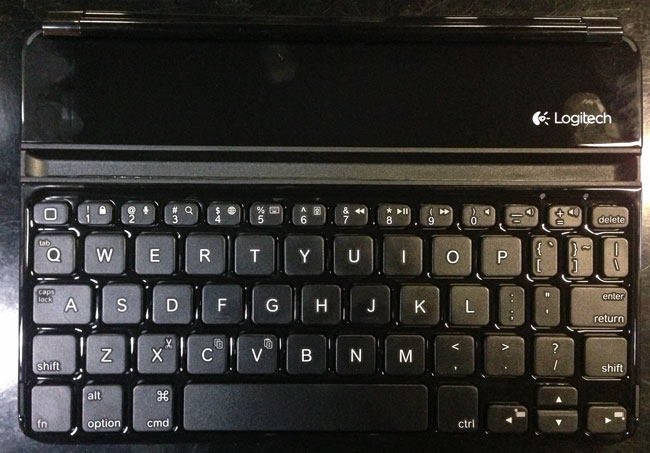
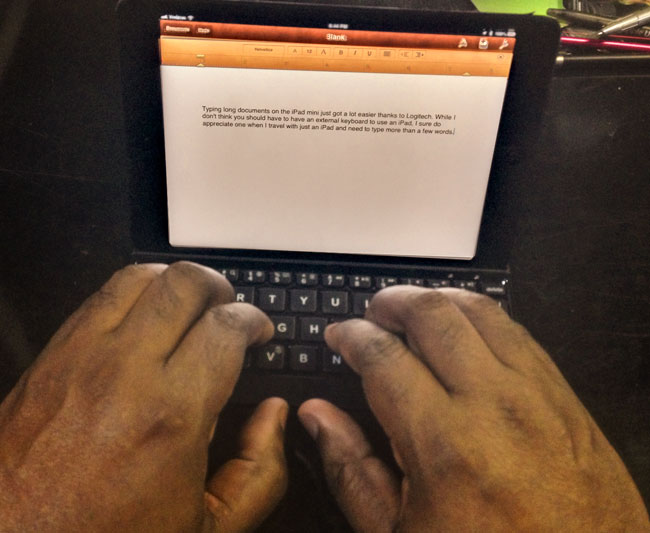
When I saw that Logitech introduced an Ultrathin Keyboard mini for the iPad mini, the first thing I thought was “no way! It’s going to be too small.” The thing I like best about the original Ultrathin Keyboard Cover for the full size iPads is that it doesn’t feel cramped. It feels like a full-sized keyboard. I figured that the iPad mini was just too small and that if someone made a keyboard, it probably wouldn’t be a good experience. Nevertheless I was tempted and had to try the new Logitech Ultrathin Keyboard mini. The first thing I did when I took it out of the box was put my fingers on the home row.

logitech_ultrathin_mini_my_hands

I was amazed! It felt fine. Sure it was a little smaller, but not bad at all. I was also pleasantly surprised to see Shift keys on both sides. Other keyboards I’ve tried for the 10″ iPads sometimes remove one of the Shift keys to make the layout fit better. I NEED BOTH SHIFT KEYS! However, Logitech did make a couple of compromises. The Caps Lock key shares the same key as the “A” key and you use the Function key to activate it. The Tab key also shares the same key as the letter “Q”. These were much smarter compromises than eliminating a Shift Key.


Great smart cover like design

logitech_ultrathin_mini_cover

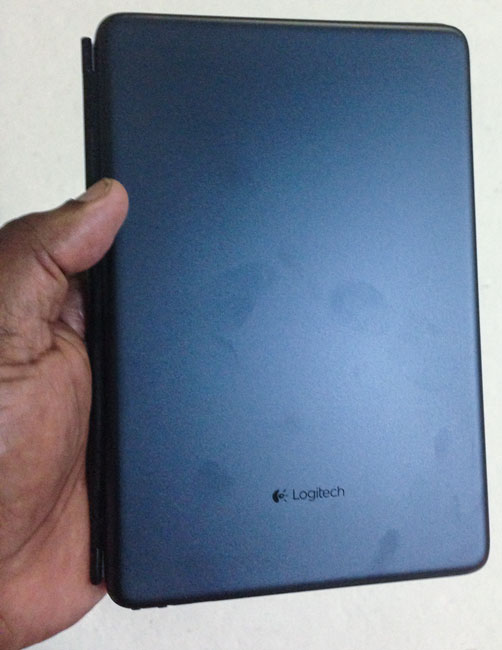
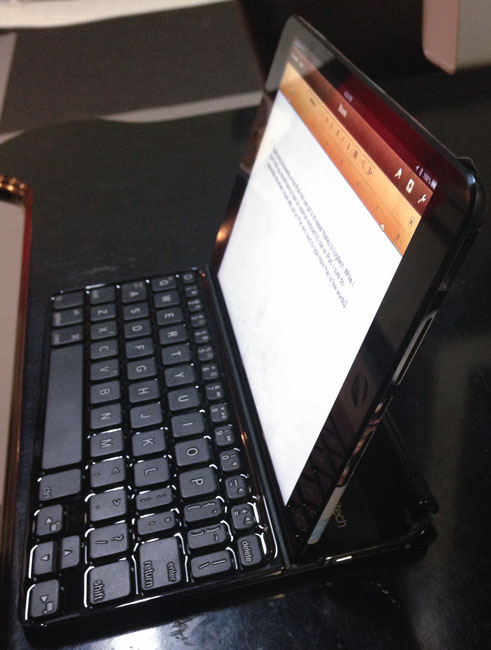
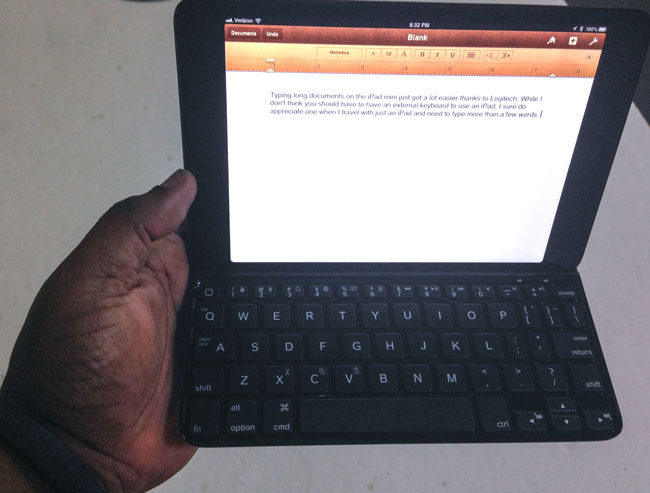
Like the regular Ultrathin Keyboard Cover, the Ultrathin Keyboard mini works as a smart cover and a stand for your iPad mini. As you can see in the photo, it shows off finger prints quite well too. It also has a “home” key that works like the home button on your iPad. Not to mention other iPad specific keys like volume controls, find, slideshow and text selection buttons. The Ultrathin Keyboard mini connects via Bluetooth and has a built-in rechargeable battery that lasts about 3 months between charges assuming you’d use it 2 hours per day!


The Bottom Line

logitech_ultrathin_mini_stand_in_my_hand

Many will jump to tell me that “If you use an iPad there is no need for a physical keyboard or a stylus” and to those people I would say that you’re right. “Need” is a strong word, but I would also say that while the iPad and iPad mini work perfectly with your fingers, that doesn’t mean that there aren’t times where a physical keyboard wouldn’t make things easier. Not to mention that only the Sith deal in absolutes 😉 The Logitech Ultrathin Keyboard mini and Logitech Ultrathin Keyboard Cover are great for those that want to travel with just an iPad/iPad mini and still get a lot of work done.

You can get the Logitech Ultrathin mini for iPad mini here in black or directly from Logitech in black or white.

You can get the Logitech Ultrathin Keyboard Cover for iPad 2 and higher here in black or white

Finally! A 1TB 7200rpm 2.5″ Drive

1tb_7200rpm_travelstar_bare

Last August I wrote a post and created a video showing the speed difference between USB 3 and Firewire 800 and while that was fine, what I realized was that the real bottleneck was the drive itself. I typically buy 1TB portable drives for on the road backup and emergency use. Until now all 1TB 2.5″ drives were only rated at 5400 rpm. In other words, slow! This means that the interfaces like Firewire 800, USB 3 and Thunderbolt really didn’t matter much if they all outpaced the speed of the drive itself. I bought a Buffalo Tech 1TB Thunderbolt/USB 3 portable drive. I couldn’t wait to see how “fast” this new drive would be? I was disappointed as it was no faster than my Firewire 800 or USB 3 drives. The problem wasn’t Thunderbolt or something that Buffalo Tech did wrong, the problem was that 1TB drives didn’t spin any faster than 5400 RPMs.

HGST shipped a 1TB 7200RPM Travelstar 2.5″ Drive!

1tb_7200rpm_travelstar

I noticed that I was seeing NEW Drives from OWC and G-Tech that stated that the drives were 1TB 7200 RPMs. This meant that there had to be a NEW 7200 RPM 1TB internal drive that I wasn’t aware of. I did some research and found that HGST (a Western Digital company) had in fact shipped a 1TB 7200RPM 2.5″ drive.


Upgrading my existing drives

Rather than run out and buy a couple new drives, I decided that there was nothing wrong with my enclosures. I figured I could just buy the new bare drive and swap out the slower drive in the enclosures that I already owned. Great idea, but it really depends on the enclosure. Some enclosures are really easy to open and others aren’t. Almost in ALL cases you’re going to void your warranty on the original drive/enclosure.

buffalo_tech_opened

It was clear that the Buffalo Ministation Thunderbolt/USB 3 enclosure was NEVER intended to be opened by the consumer. This is probably one of the hardest cases I’ve ever had to open. You pretty much have to “pry” it open to get to the drive and it won’t look pretty when you’re done. Not only is the case secured by internal tabs, but the internal drive tray is “glued” in place. That makes it even harder to open because the glue is fighting against you to. I was determined to swap this drive out and I wasn’t concerned about the cosmetic appearance of the case once I was done. If you want it to still look pretty, don’t try to open this case. You will leave pry marks no matter what.

after_1tb_7200rpm_drive_install

On the other hand my Oyen Digital Firewire 800/USB 3 case opened up very easily by simply removing the screws on the bottom and sides of the drive. I swapped out the drive and it went back together just as easily.


The Speed Tests

1tb_7200rpm_drive_speedtest
1TB 7200 RPM Drive Speed Test via USB 3

As I suspected, the new 7200 RPM drive was MUCH FASTER than the 5400 RPM ones. There was still virtually no difference in speed between the Thunderbolt and USB 3 interfaces. This could be due to several factors, but in all cases both drive enclosures tested faster than they did with the slower drives.

1tb_5400rpm_drive_speedtest
1TB 5400 RPM Speed Test via USB 3


The Bottom Line

Until SSD drives go up in capacity and come way down in price, these traditional hard drives are still going to be useful for backups and transporting large amounts of data. Now that this drive is out I expect all the drive manufacturers to start making it available in their enclosures. If you’re not a do-it-yourself kinda person, then I would either wait for the Buffalo Minstation to get an upgrade or I’d go with this G-Technology 1TB G-DRIVE mini Portable USB 3, Firewire 800 Drive. If all you need is USB 3, then you’re better off just ordering the bare HGST 1TB 7200 RPM drive and low cost portable enclosure like this one.