Navigon 2100 Portable GPS Review


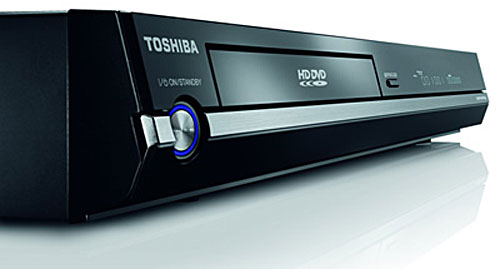
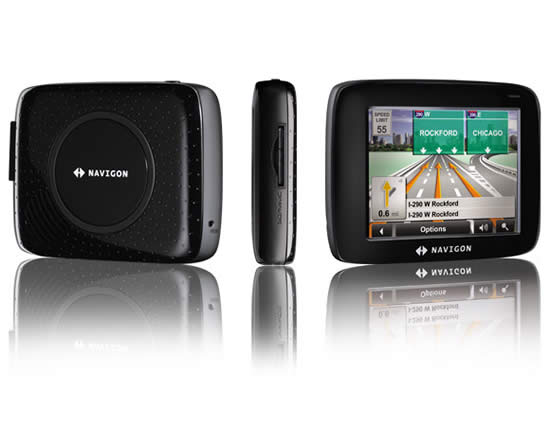
My dad dropped a subtle hint that he would like to have a GPS unit for his car. So being a good son, I began looking for one for him that will be his holiday gift this year. Keep in mind that my dad is 78 and not the least bit technical, so this GPS would have to be pretty easy to use. Although I’m a fan of the Garmin Nüvi line of GPS units, they would be overkill for his needs. So I started looking at other brands. I came across a reference for Navigon and they have a feature called "3D Reality View" This is a photo realistic view of complex highway lane changes and exits. So I stumbled upon a sale at Staples.com and snagged the Navigon 2100 for a mere $179.99 which was $45 off their regular price and the lowest price GPS I could find with the features I wanted. The Navigon 2100 arrived, but I got off to a rough start. I wanted to set the unit up before giving it to him (yeah, I wanted to play with it too) and it’s a good thing I did. Out of the box, when I turned it on I got an error that indicated that the map files were invalid/not compatible. The Navigon 2100 comes with a SD card loaded with all the maps and POIs (Points of Interests). I called tech support and got connected to an English speaking rep right away. I told him about the issue and he informed me that some of the units that went to Staples got "bad" cards. He took my info down and overnighted me a new SD card. He also told me that I could keep the old card and use it for whatever I wanted to. I decided to copy the new card onto the old one as a backup. That worked fine. With the new/proper card installed the Navigon 2100 powered right up and I was presented with an easy to follow menu. I keyed in my dad’s address so that he could use the "Take Me Home" button whenever he needed to and be routed to his house no matter where he was in the country. While I had the unit open, I decided to take it for a spin. I assembled the suction cup mount and took the GPS for a test drive. I was impressed with how fast it starts up and acquires a satellite signal.


Real world testing

One of the things that makes or breaks a GPS unit is how easy it is to input your destination. This was also going to be the determining factor as to whether or not I felt my dad would be able to use it. I really liked the fact that you have the option of keying in the city OR just the zip code! I also liked having the choice of entering the city, street and address OR the street, address and city. Unlike many units the Navigon 2100 remembers the last city you used so that you don’t have to key it in each time. Now on the down side and the thing I’m worried about the most is that the on screen text is kind of on the small side. If I had to guess I would say that some of the text is as small as 8pt type. Also on some of the displays the on screen buttons aren’t as large as they could be. The other thing on the down side is that there is no "bean bag" mount option. I’m not a fan of suction cup mounts, although the one they include stayed on my window the whole time with no issues.


Great features

It’s clear that the Navigon engineers looked at the other GPS units out there and tried to build a better unit. I had to keep reminding myself that this GPS is half the cost of others and has all the features you’d expect in a higher-end unit and MORE! Let’s get the basics out of the way. They 2GB SD Card includes the maps for the entire US and Canada. The Navigon 2100 features "Text-to-Speech" so rather than saying "turn right in 200 feet", it says "turn right on Woodward Avenue, turn here". There are also thousands of POIs and you can input your favorite destinations and save them. These are the features I would expect to find in any modern GPS unit. Where the Navigon 2100 steps ahead of the pack is in the little things. First of all the 2100 is about the size of my Nüvi 360 if not a little thinner. Most units in the $200-$300 range are much thicker. Not only does the 2100 show you where you are on the map it also shows the speed limit of the road you’re on. By default there are speed warnings built in (which you can change) that are set to 10 miles over on the highway and 5 miles over elsewhere. Of course I had to test this out, so I went over 75mph in a 65mph zone and the voice said "Caution" and displayed a little yellow triangle next to the speed limit sign in the upper left of the display. I was also impressed with the display of the POIs along the way. Rather than the typical gas pump logo on the side of the road representing a gas station, it actually displayed the "Mobil" logo as I passed near the station. Now of course they don’t have logos for all businesses/POIs, but it did display the names of restaurants as I passed near them. This blew me away. Imagine how helpful that would be if you’re driving in an unfamiliar area.


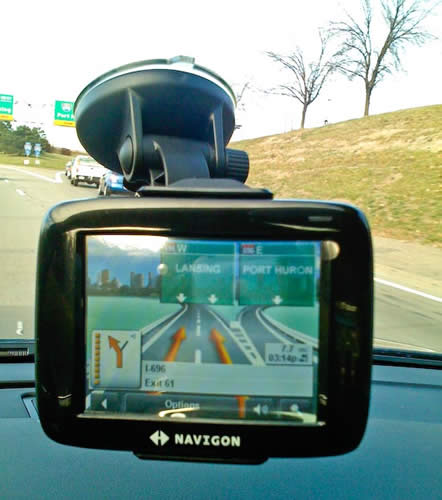
The killer feature was the one that caught my eye in the first place and that was the "3D Reality Viewâ„¢" This view automatically pops up when you’re approaching a complex interchange or exit. As you can see in the photo above I was instructed to stay on I-696 headed towards Lansing and the photo realistic display mimics the actual road signs that you can see in the upper left corner of the photo. The orange arrows on the display clearly indicate the lane you should be in so there is no way that you could take the wrong exit. This feature ROCKS! It totally takes the guess work out of navigating these kind of exchanges. I’ve never seen anything like this even on units that cost much more.


The Navigon 2100 includes the GPS unit, an SD card with maps and POIs for the lower 48 states (the 2120 is the same unit, but with maps for North America excluding Mexico), an Auto charger for charging the built-in Lithium ION battery, a suction cup mount and a quick start guide. For an extra $99 you can buy the Lifetime Traffic feature which is an antenna that plugs into the 2100 and a service that can automatically re-route you around traffic jams. You can also spring for the Zagat Survey Ratings and Reviews feature which includes 21,000 entries. Ratings of hotels, restaurants and entertainment in the area. This add on goes for $39.99.


The Bottom Line

GPS units don’t have to cost a fortune. The Navigon 2100 proves that. I was floored by the number of features that were included in this relatively low cost unit. I would like to have seen a wall charger included for charging the unit in the house, but hey for less than $200 what you do get is a great bargain. You can catch the Navigon 2100 for $179.99 while it’s on sale at Staples or you can get it for $209.94 at Amazon.com. This would make an EXCELLENT Gift!

Hey, I made Newsweek!


Speaking of GPS units check out this article in Newsweek where yours truly [I] was referenced on page 3.

#1 Editor’s Pick on Amazon for 2007

It’s one thing to write a book about a product you love and it’s another to have that book be picked as the Best of 2007 #1 Editor’s Pick for Books on Computers and Internet by Amazon! I co-authored The iPhone Book with my buddy Scott Kelby (number one selling computer book author in the world 3 years in a row!) and last night he called me to tell me that our book was selected as the Editor’s #1 Pick for 2007 of all Computer Books. I was elated and overjoyed (read: psyched out of my mind)! So thanks to all of you who bought a copy, thanks to Peachpit Press and the staff at Kelby Training for the wonderful job on the book layout and editing, thanks to the Amazon editors, and thanks for your continued support of this blog and my efforts. And if you haven’t bought a copy yet, well…


Blu-ray vs. HD DVD, why pick sides?

TiVo HD on the Bottom, Toshiba HD-A2 in the middle and Sony Playstation 3 on top. It’s an HD sandwich!


It’s no secret that I’m a fan of High Definition Television (HDTV). This means that I also want my movies in HD as well as my broadcast TV and cable stations. Well unless you’ve been living under an analog rock, you have probably heard that there is a format war going on between the major high-def camps. The two formats battling for your attention and money are Sony’s Blu-ray and Toshiba’s HD DVD.

As with any new technology, consumers tend to wait and see who comes out on top before making a major investment. Then there are the early adopters like me that live for today and worry about tomorrow, tomorrow. From what I could tell Blu-ray was going to be the winner so I started down that route with the purchase of a Sony Playstation 3 which could playback Blu-ray movies. Life has been good and I really haven’t given HD-DVD a second thought until recently. I read an article about how Toshiba was offering their Toshiba HD-A2 player for a mere $99.99 for one weekend only which amounted to a half-off sale. Even then I really didn’t pay any attention to it. It wasn’t until I read an article about how 90,000 players were sold in one weekend at that magic $99.99 price. That’s when it clicked that for $100 I could have BOTH formats. However, it was too late. The magical sale had ended. I headed over to eBay (of course) where I was sure some enterprising sellers would be selling new in the box units for slightly more than the $99.99 price. I was right and I picked up one for about $25 more.

The Toshiba HD-A2 arrived yesterday and I hooked it up in my theater last night. Of course I don’t own any HD DVD movies, so I headed over to my local Hollywood Video and rented a couple of titles to try out. I was stunned at how few titles they had in either HD DVD or Blu-ray. There was basically one rack dedicated to each. Both of these racks were together in a corner of the store. There were miles of racks for standard def titles. I watched Aeon Flux which was an OK movie, but looked really good in high-def (I also picked up Transformers in HD DVD). I didn’t expect much for $100 and I was right. The unit is pretty basic and comes with a remote and of all things standard composite cables. If you’re buying an HD DVD player, chances are you want to enjoy it in HD. You’ll never get there with the supplied cables, so that was a total waste. I went with HDMI and Optical Audio connected to my Octava HDMI & Optical Audio Switcher (which I love). To be honest I can’t really tell much of a difference (make that NO DIFFERENCE) between my Blu-ray movies and HD DVD movies. So when it comes to picking a format it will likely come down to available content. Right now Blu-ray is winning in the content game as 2 of the 3 major movie houses have gone Blu-ray and Blockbuster only rents Blu-ray in addition to standard def DVDs. My movie rental house of choice is Netflix. They offer both Blu-ray and HD DVD titles and even let you configure your queue to your favorite format first if the movie is offered in both. So now I have Netflix set to prefer Blu-ray first, then HD DVD, and then DVD.

The out-of-the-box experience was pretty good and pretty straight forward. I did connect it to my network via Ethernet (wish there was a Wi-Fi) option. There is a sheet in the box that suggests that you check for the latest firmware right away. I attempted to do so, but it couldn’t connect to the update server. I’ll try again another day. All-in-all, not bad for a little more than $100. The war can rage on and now I don’t really care if anyone wins or not. I’ve got both!

What a difference a card makes

On Friday, I did a review of the NEW Synchrotech ExpressCard PCIe Card Reader for ExpressCard slots found on MacBook Pros and other various PC laptops. Although the reader performed better than my USB reader in my initial tests, I was disappointed in the apparent lack of speed in the Lexar Professional media. So over the weekend I went out and bought two different CompactFlash cards. I bought the SanDisk (my usual preferred brand) Extreme III 2.0GB card and just for comparison I bought a PNY Optima Pro 2GB Compact Flash. Both cards are rated at 133x.

Using the same exact test folder from Friday of just over 1GB of images I began my tests with the new cards. The results were STUNNING! In my first test with the SanDisk Extreme III card in the Synchrotech reader was almost TWICE AS FAST as my USB reader. However, what was even more shocking was the results I got with the PNY card. I had always seen this brand card, but never tried it before. It seems that most of the pros I know either use SanDisk or Lexar. However, after my tests on Saturday I may be buying a few more PNY cards. Why? Because it was the FASTEST card I’ve tried yet. It copied the same data about 30 seconds faster than the SanDisk card! Now keep in mind that both of these brands come in even faster speeds. SanDisk makes an Extreme IV and PNY makes a UDMA 266x speed card. So the speed increase could even be more dramatic with the ExpressCard reader while over USB there would be no difference because the cards tested are already faster than the USB reader can do. I plan to get the faster versions of each card and do more tests.

In all of my tests the USB 2.0 reader seems to top about at just over 2 minutes to copy over 1.1GB of data from all of the cards I’ve tried. However, the Synchrotech ExpressCard Reader really started to rock with the SanDisk and PNY cards copying the same data in 1:10 and 40.9 seconds respectively.


Copying 1.1GB of data from each card Synchrotech ExpressCard Reader SanDisk USB2 12-in-1 Reader
SanDisk Extreme III 2.0GB Card
1:10.8
2:02.01
PNY Technologies Optima Pro 2.0GB Card
40.9
2.03.01
Best results in GREEN.    


In this world of Faster, Faster, Faster, the Synchrotech ExpressCard Reader ($65) will become a permanent addition to my camera/computer bag. If you have a notebook with an ExpressCard slot, I highly recommend this reader. It kicks the crap out of USB 2.0 readers. I also recommend that you give the PNY Optioma Pro CompactFlash cards a spin too.

True Express Card PCIe Speed for Photographers

As our images continue to grow with 10-12MP cameras becoming the norm in the pro world of digital photography, it has become even more important than ever to be able to download our images as fast as we can. When Apple introduced the MacBook Pro, they made one important change that had the photography community grumbling for months. They eliminated the PC Card slot that we had all become accustom to in favor of the new (smaller) ExpressCard|34 slot. The excuse was, "this is where the industry is going" and Apple likes to be on the cutting edge (most of the time). The biggest problem with this slot is that it’s not as wide as a Compact Flash card and therefore any adapters would require the card actually pert rude out of the side of the notebook.

As time went on ExpressCard adapters started to show up for all the various card formats. However, the one thing that these adapters had in common is that most, if not all of them operated at USB 2.0 speeds. Where was the promise of the super fast ExpressCard slot? So when I saw the CFExpressPro+ PCIe ExpressCard to CompactFlash Memory Card Adapter 2.5Gbps I was intrigued! This was the first adapter I had seen that promised to operate at the native PCIe speeds of the slot. So I ordered one.

The adapter arrived the day after I had upgraded to Mac OS X 10.5 Leopard and although I know better to install drivers that don’t specifically say that they are compatible with the OS I’m running, I did it anyway and that was a mistake. Come to find out that Leopard already includes the driver for this card. There was no graceful way to revert back from what I had done (although the manufacturer tried really hard to help me get back to a state before their driver), so it was Archive and Install Time of Leopard to get the native driver back. NOTE: If you’re on Leopard DO NOT install the drivers that come with the adapter!

I started my tests with a Lexar Professional CompactFlash 133x Speed 4GB card and the results were shockingly bad! I thought that there must still be a problem with the driver and the manufacturer went off to try to solve the problem. In my initial tests the card copied the data about ten times faster using my old SanDisk USB 12-in-1 reader. So today I decided to try a different approach. I used a different MacBook Pro that still had Tiger (Mac OS X 10.4.10) on it and installed their driver and the results WERE THE SAME! The problem seems to be with the Write Acceleration (or some other factor) that Lexar uses on this particular card. I tried a test of 2.72GB of data and the USB card reader copied the data in 6 minutes 8 seconds. I stopped the ExpressCard copy after 6 minutes because the Finder reported that there was still 49 minutes left!

When I reported these findings to the folks at Synchrotech, they asked me "which card" was I using? I told them, but this question prompted me to think that the issue may be with the Lexar card itself. This lead me to conduct more tests with my older (slower) SanDisk card which gave me results more in line of what I was expecting.


Speed Test Results


  ExpressCard USB 12-in-1
SanDisk Card/Leopard Driver (1GB of data) 1:58.0 2:22.7
SanDisk Card/Synchrotech Driver in Tiger (1GB of Data) 1:55.9 2:26.1
Lexar Card/Synchrotech Driver in Tiger (2.72GB of Data) Too Long! 6:08.3


Testing environment:

Both MacBook Pros are 2.33GHz Intel Core 2 Duos with 3GB of RAM. One running Mac OS 10.4.10 and the other running Mac OS 10.5. Both with 5400 rpm internal drives.


The Bottom Line

The Synchrotech ExpressCard PCIe adapter goes for $65 and seems to have about a 21% speed increase over my USB 2 Card Reader. However, the one thing that has to be ironed out is compatibility with the very popular Lexar Pro Compact Flash cards with Write Acceleration. I do plan to do another test as soon as I can get my hands on a FAST SanDisk card or a newer Lexar card. And I expect the speed difference with a high speed card to be even greater over USB. So stay tuned…

The 200th Episode of the Creative Suite Podcast

Time flies when you’re having fun! Not long ago I posted an entry to celebrate a major milestone of the Adobe Creative Suite Podcast hitting Over 5 Million Downloads. Well today I’m very pleased to announce that we hit our 200th Episode! That’s right, there are now 200 episodes of the Adobe Creative Suite Podcast (with yours truly as the host) available for your viewing pleasure. These episodes cover just about every aspect of the Creative Suite and with more episodes to come.

Today’s episode is done by special guest Kevan O’Brien, the rock star from the Creative Suite 3: Creative License Tour and he details "The Making of the Johnny L Episode" in which he uses the latest and greatest Panasonic P2 camera and new editing capabilities in Adobe Premiere Pro CS3.

I’ve had a blast doing this show and the response has been phenomenal. This grass roots effort has reached thousands and thousands of viewers world-wide and many of you have walked up to me at tradeshows and seminars to tell me how much it has helped you in some way. Truly it is your continued support that keeps me motivated in doing these. So thank you!

Subscribe via iTunes for FREE or watch on the web.

Time Machine not feasible over Wi-Fi

Now that I’ve been running Leopard (Mac OS X 10.5) for a week, I’m actually finding Time Machine to still be one of my favorite features probably with Quick Look being a close second. However, 7 days after installing Leopard on my home Macs I have abandoned the idea of backing up wirelessly using Time Machine. While it does work, it’s just too resource demanding. I could always tell when Time Machine was backing up my MacBook Pro to a shared hard drive connected to my Power Mac G5 because my internet browsing would slow to a crawl. I just couldn’t take it anymore and decided to outfit each Mac with its own external hard drive. Luckily I had some drives left over from upgrading to larger drives on my Server, so these drives worked out perfectly for Time Machine backups. I bought some external cases from Other World Computing and I was on my way.


Having a "regular" backup has already paid off!

Last week I screwed up iCal and Mail (two separate incidents) and was able to easily and quickly get back up and running by restoring the previous day’s files using Time Machine. It just works!

TiVo-to-Go on TiVo HD

The gift that just keeps giving. I love my TiVo HD boxes. I had always been a DirecTV TiVo user and therefore missed out on all the Series 2 coolness of things like TiVo-to-Tivo transfers and TiVo-to-Go. Well I came home from a business trip to find a message waiting on my TiVo HD indicating that the long awaited software update had been applied (automatically over my Wi-Fi network) and I now have TiVo-to-Go among other nice features.

TiVo-to-Go allows you to transfer recorded shows to your Mac or PC. From there you either watch the shows, burn them to a DVD or more importantly you can convert them for playback on iPods, iPhones, Apple TV’s and PSPs. This is what I was most interested in because it would be nice to take my favorite shows with me to watch on the plane or in other situations where I have time to kill.

So last night I did a couple of tests to see how it would all work. First off on the Mac, the solution is to use Toast 8 Titanium. It is the officially sanctioned software that enables TiVo-to-Go on the Mac. There are other shareware utilities out there, but since I already own Toast, I decided to start there.

Toast is the app that let’s you actually burn the content to a disc, but it comes with another component called "TiVo Transfer" that you can enable during installation or after the fact from the Setup Assistant under the Help menu. TiVo Transfer sees your networked TiVo Series 2 or Series 3/HD DVRs and will allow you to transfer the recordings of your choice to your Mac (if you’re a Windows user you can download TiVo Desktop). TiVo Transfer works exactly as advertised. It found both my TiVo HDs on my network and showed me a list of the current shows on the drives of each one. I could transfer the shows I wanted, to my Mac and even setup a "Auto Transfer" to automatically transfer a particular show and all of its future episodes. You might really want to do this considering how big these files can be and the time it takes to transfer them. The first show I did as a test was an episode of South Park which is 30 minutes in length and NOT HD. So it was 680MB in size on the TiVo. Not bad. It took about 15 minutes to transfer it to my iMac G5. However, an episode of The Unit which was in HD was 7.5GB and took close to 3 hours to transfer. Once this 7.5GB file was on my iMac it was still in HD format and can be watched at it’s full size and resolution which is cool, because you’ll get that full-screen super clear experience on your laptop provided you’ve got the extra space. Now of course the other option is to simply burn it to a DVD with Toast. There is a "Toast It" button right in the TiVo Transfer window which will launch Toast and add the show to your Video DVD window for burning. Toast will handle the DVD creation and encoding for DVD. In theory if you had a Blu-ray burner you’d be able to keep it in high-def and make a Blu-ray disc.

The next option is to not burn it to disc, but to "Export" it from Toast to an iPod/iPhone/Apple TV or PSP format. This is great, but there is a restriction here. You can only export at a resolution no higher than 320 pixels wide. Which is kind of a bummer since the iPhone and iPod touch have higher res screens. Also it takes time to convert the files into iPod format. However, once the conversion is done Toast automatically adds the shows to iTunes as TV shows with their complete descriptions so you’d be ready to sync with your device. The resulting size for South Park was 221.8MB and The Unit was 364MB as a 320 pixel wide iPod video.


The Bottom Line

I welcome this FREE update to a DVR that I was already enjoying. Now I have a few options to take my shows with me and as a person that is constantly on the go, this is very cool. I still wish the process were faster and it prohibits the last minute "I’m heading out the door and wouldn’t it be cool to take a couple shows with me to watch?" kind of situation. However, with a little planning the night before, I could have a MacBook Pro or iPhone loaded with a couple shows ready to go. TiVo HD simply blows away the Comcast supplied DVRs.

The road to Leopard – Part 3

A weekend with the new cat

I spent the entire weekend working in Leopard and the good news is that I had very few issues. I could go on and on about the stuff that just worked (like my older copy of Quicken 2006, and QuickBooks 2006), however, I think you’re here to hear about the stuff that may be an issue and my overall likes and dislikes about Leopard. So here goes:


Let’s start with the stuff that doesn’t work:

As reported earlier my Dymo Label printer and Adobe Photoshop Lightroom 1.2 aren’t fully compatible. The printer software will not even launch because it complains that the driver isn’t there (although it is and I reinstalled it). In Lightroom 1.2 I reported that I couldn’t switch the Print module. I still can’t, although one reader did report that he was able to. He did an Erase and Install of Leopard and installed Lightroom 1.0 and upgraded it to 1.2 and he can use the Print module. However, I have not been able to replicate this success on either Intel or PowerPC Macs. Also I use PhoneValet (a Mac based voicemail system) and although they claim Leopard compatibility my PhoneValet Anywhere Clients are no longer popping up visual caller ID alerts. I reinstalld the clients and made sure the Mac OS X Firewalls are off. They are checking into it for me. UPDATE I just got an email from Parlient to have me check the Bonjour names of my Leopard Macs which I do seem to remember getting conflict messages after each Leopard install stating that it was “changing the name”. That was the problem. Leopard for whatever reason resets the Bonjour network name of each Mac to “Macintosh” instead of whatever they used to me. Then when it sees another “Macintosh” name it just starts putting a number after each one. I went in and changed the names to reflect what they should be and added them back into PhoneValet and all is well!

My oldest Mac is an iMac G4 1.2GHz and I ended up doing an Archive and Install on that one after doing the first Leopard upgrade because it seemed to lock up either while attempting to sleep or when the screen would go black. I can’t tell which because the screen was black and wouldn’t come back on with the normal mouse movement/keyboard entry. So rather than continue to try to troubleshoot it, I just cut my loses and decided that it was probably over due for a fresh System. That brings me to a recommendation. If your Mac has been around for a while and you’ve constantly "Upgraded" from 10.1 to 10.2 to 10.3 and to 10.4, then you are running the risk of having more issues by doing an Upgrade to 10.5. You are better off doing an Archive and Install which produces a NEW System folder. Your settings will be copied over to the New System. Now of course this may mean that some of your apps may need to be reinstalled. However, it’s a lot cleaner to go this route and you’ll probably have less problems down the road.

That’s it! Everything else I’ve tried works. Even my Cisco VPN client works without the need for an upgrade which is VERY surprising.


There’s a lot to like about Leopard and some things are annoying as hell.

My Leopard Likes:

There’s a lot to like about Leopard and I’m sure I’ll discover more and tips along the way. Some of things that jumped out at me right away were:

The new DVD player ROCKS! Finally we have the ability to scrub a slider to get to any part of the movie without having to rely on chapters or fast forward/rewind.

Webclip is also pretty cool. This is the feature of Safari/Dashboard that allows you to select a portion of any web page and turn it into a Dashboard Widget. I’ve already set up a couple of these and they work great!

Mail’s data detectors are also pretty nice. For example, if someone emails you and they have their contact info at the bottom of the message you can add that contact info to Address Book without having to copy/paste line-by-line.

Sometimes it’s the little things. I used to keep the Activity window open in Mail to see what was going on. Now Mail has a little area in the lower left corner of the screen that shows your Mail activity such as messages being downloaded or sent.

Another biggy for me is the fact that Disk Utility now has the ability built in the change the size of Partitions/Disk Images non-destructively. For example, I have a encrypted disk image for private stuff on my drive and it was starting to get full. Rather than having to create a bigger one and then copy everything over, I was able to simply resize the existing one.

Lastly, I’m really liking the idea of Time Machine for doing network backups of my home Macs. See my notes below on some new discoveries.


My Leopard Dislikes:

I absolutely cannot stand the translucent menu bar. For those of you who have not gone to Leopard yet or seen it, now the menu bar is transparent which allows your desktop picture to show through. While it’s cute, it’s gets old after about 2 seconds.

It’s just simply harder to read and serves NO useful purpose. The drop down menus are semi-transparent as well, but those for some reason don’t bother me as much. I would very much appreciate an update or piece of shareware that lets me make the menu bar a SOLID color. Otherwise I may have to Photoshop all of my desktop pictures to have a solid bar across the top.

It seems that with this release Apple is trying to eliminate some of the redundancies in the OS. For example there were about 3 ways in Tiger to add a new printer. In Leopard the Printer Setup Utility is GONE. You now either add a printer from the Print dial box (which has also changed) or via the System Prefs. While I don’t add printers every day it seemed easier to just go to the Printer Setup Utility. Also the Internet Connect app is gone which makes it harder to do Certificate based network authentications. This one has thrown my company’s IT department for a loop.

Speaking of printing, now when you hit print you get a small print dialog box with very few options.

Now of course you can simply hit the down arrow to expose the rest of the options including a nice print preview, but this setting doesn’t seem to be sticky across applications. So I end up having to hit the down arrow in each app that I print from to get to the other options for my printer.


More on Time Machine and backing up over a network

Originally I setup a big external drive on my Power Mac G5 to serve as the Time Machine drive for the whole family. I figured that I "had to" partition it up for each user. After doing some research and watching the way Time Machine works, I found out that the partitioning is not necessary or practical. When you use Time Machine to back up to a shared disk (using File Sharing from another Leopard Mac), it backs up each Mac to it’s on Folder on the drive. So no need to make partitions. This way the space is used more effectively as subsequent incremental backups are done.

There seems to have been a lot of disappointment over the fact that Apple dropped using an AirDisk (hard drive connected to a New AirPort Extreme Base Station) for Time Machine as a feature from the release version of Leopard. After seeing Leopard backup over Wi-Fi, this is probably a smart move on Apple’s part. Two of my Macs are connected to the network wirelessly and backing up several gigs over Wi-Fi just brings the whole wireless network to it’s knees. Also since Time Machine backs up changes every hour this could cause a lot of network traffic jams. For example, I use MS Entourage for work email. It has one giant database for all of it’s mail. My database is anywhere from 3-5GB in size. So when I open Entourage it changes the database and therefore it would be backed up every hour throughout the day while I’m working. That would chew up a lot of bandwidth and storage quickly. Also it appears that while Time Machine is backing up wirelessly it really hogs most of the bandwidth for itself and makes it hard if not impossible to do much of anything in the way of surfing until the backup is done. Until there are more options for using Time Machine, backing up lots of data wirelessly will be painful.


The Bottom Line

There is nothing in Leopard that I absolutely could not live without. That doesn’t meant that it’s not a great upgrade with some really nice feature enhancements (which it is). I do like Leopard and I’m glad I’m an early adopter. So far it’s been the most compatible version of Mac OS X to date. One more thing I might add is that Leopard eliminates support for the Classic environment (Mac OS 9). While most of you probably haven’t touching Mac OS 9/Classic in years, there are a few people out there that still need it. I ran into a teacher today that has to run a Mac OS 9 app once a week that her school is still using. So if Classic is important to you, you better keep a bootable drive around with Tiger/Classic on it. If your workflow/livelihood is tied to certain apps or devices, then you definitely want to proceed with caution, backup and TEST before fully committing to Leopard! If you keep pretty current with your apps and like the new toys as fast as they come out as well as living on the bleeding edge, then jump right in the water is fine.

The road to Leopard – Part 2

I’ve been installing and testing Leopard since about 10AM this morning and I’m happy to report that compatibility and stability seem to be very high. So far I’ve only run into one peripheral (driver) that simply will not work on Leopard and that is my Dymo Labelwriter 330. Now keep in mind that I haven’t tested every little thing, but what I have tested has worked surprisingly well. As a matter of fact I would say that this has been the smoothest Mac OS X upgrade since the original Mac OS X. I’m having far fewer initial issues than I did going from Panther to Tiger.

Now for the news that many of you have been waiting for: Adobe Creative Suite 3 compatibility is GREAT! A few of the apps (Acrobat 8 Professional, Premiere Pro CS3, After Effects CS3, Soundbooth CS3 and Encore CS3) will need dot releases and those dot releases are in the works. The dot releases are mostly to fix minor issues. For Adobe’s official Leopard statement complete with timelines for the updates click here. You’ll be happy to know that the rest of the CS3 products have no known Leopard issues.

Does Adobe recommend running Production Premium or Master Collection before its updates are available?

A. Yes, we are comfortable recommending this. Our testing revealed a few issues in specific workflows when running the video professional applications on Mac OS X Leopard. Many video professionals would not encounter these issues on a day-to-day basis, but we want to provide updates in December 2007 to address these issues and meet our standards of quality. You can evaluate the issues by visiting www.adobe.com/go/support and searching the online knowledgebase for more information.

So for right now I officially give Leopard a GREEN LIGHT! I still highly recommend that you follow my upgrade strategy from Part 1 earlier today (below). I can’t possibly know about all the apps, utilities and peripherals that you rely on every day, so you’ll need to test Leopard for yourself.

UPDATE: If printing from Lightroom is critical to your workflow, then you might want to hold off a bit until the Lightroom dot release is available. Currently under Leopard switching to the Print Module in LR 1.2 is not possible!


What’s improved so far

Like I said, it’s been a day of mostly watching progress bars. So I haven’t had a lot of time to explore the new features. I wanted to get in and test compatibility first. However, there are a few things that I couldn’t help but take notice of. The first one is how much easier it is to set up FileSharing between multiple Macs. Each of my family members has their own Mac here and I do have a Mac OS X Server running. However, I wanted to set up my older Power Mac G5 as a networked "Time Machine" backup server for the rest of the Macs (not the server, it already has its own nightly backup routine). So I took two 500GB drives that I had from a previous upgrade and put them in a dual bay enclosure. Then I partitioned them to match the drive sizes of each of the Macs that I wanted to backup. Next I shared each partition to its respective user and this was as easy as it can get. Then I simply went to each Mac and selected the networked partitions as the Time Machine drive for each user. Now each Mac is backing up REGULARLY and automatically behind the scenes. Before this I was using ChronoSync to just sync their Users folders to the server. Now I’m getting their whole drive with incremental changes every hour.
The next area of improvement seems to be around performance. Everything seems much snappier. I know that it’s usually perception, but I would swear that Leopard is faster than Tiger in most operations.

I’ll have more to report on Monday after I’ve actually had some time to do my day-to-day tasks, but Leopard is looking like a winner!