The 2007 hottest holiday gadget gift

For the past few years, the Apple iPod has been the hottest holiday gadget on just about everyone’s wish list. While I still think the iPod and iPhone will be hot sellers this year, I think an even bigger seller will be portable GPS navigation units. I wrote a review of one that I bought as a gift, the Navigon 2100 and the response to that review has been overwhelming. It’s taken a life of its own and the number of comments dwarf my very popular iPhone review. Now that GPS units have fallen well below the $200 mark, they are much more attractive to casual buyers. I plan to give away at least 3 this year. Everyone I know (or at least one ones on my list) are all set with iPods. So it’s all about GPS’s.


My top picks in this category are the:

Garmin Nüvi 660 (for the one you REALLY love 🙂 )

Garmin Nüvi 360

Garmin Nüvi 200 (great entry level unit)

Navigon 2100

TomTom One 3rd Edition


There are deals to be had out there! So do some shopping around.

Eye-Fi is cool but has limited uses

I first read about Eye-Fi Wi-Fi enabled SD card over a year ago and anxiously awaited its arrival. Eye-Fi is an SD card with built-in Wi-Fi capabilities for wirelessly transferring your shots from your SD based digital camera either to your computer or to an online photo service such as flickr, facebook, smugmug, shutterfly, kodak, etc. Although I requested to be on the beta program, I never got the call. So a year later I bought one of the 2GB cards to try out.

The card arrived and setup was very straight forward. You get a card reader with the card that you plug into the USB port of your Mac or PC to set it up. You configure the card with a web browser (although Safari on the Mac wasn’t supported). I used FireFox to get mine going. Once I got it setup (which only took a few minutes), I was snapping away and the images automatically downloaded to the designated folder on my computer. After the first batch I took some more and didn’t see a way to start the new picts transferring again. After a few minutes of scratching my head I just turned the camera off and on again and that started the transfer process. Since your camera doesn’t know anything about the Wi-Fi abilities of this card, there is no way to control the cards functions from the camera. It’s all automatic.


It works, but I question its usefulness?

OK, now what? I have this wireless SD card that can transfer the images to my computer or directly to a photo service. This sounds cool and I’m sure some will love this idea. However, here are the issues I have with this card. Like I said, it works as advertised! However, here’s the thing, rarely would I ever want my shots transferred to an online service without first reviewing/editing them. Secondly, even if I opt to have them transfer to my computer, the process is not speedy and drains the camera’s battery more. It takes several seconds for each shot to download over 802.11g/b. Even a USB2 card reader is MUCH FASTER (and doesn’t require the camera’s battery power)! The next problem is that there is no way to use this card where you might have public Wi-Fi access that requires you to accept usage terms via a web page first. So while this card is cool and works, what would it save you from doing? I guess if you want direct upload to a photo site from your camera without having to go through your computer first, then this is your answer. And a good answer at that. However, for me it has limited appeal in it’s current format. Perhaps if they come out with a Compact Flash version that operates at 802.11n speeds, I’ll want to take another look.

The 2GB Eye-Fi SD card goes for $99. Post a comment on how you would use this card!

Nikon D300 + N2 di-GPS = FUN!

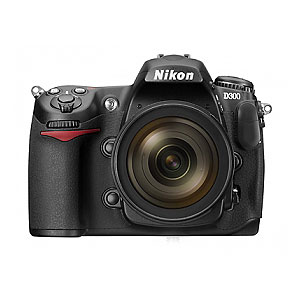
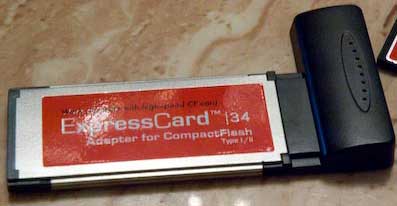
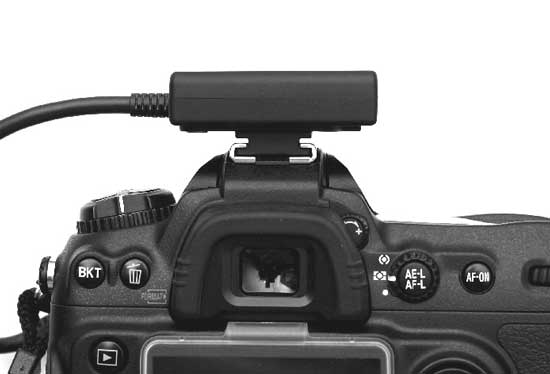
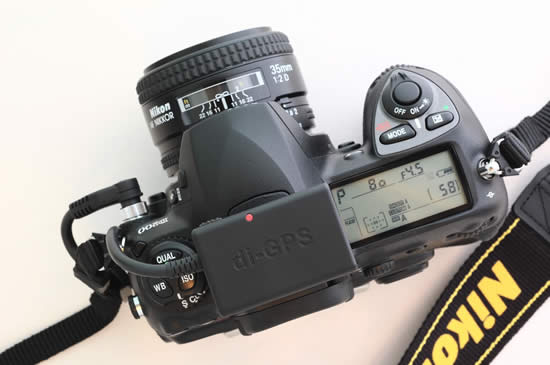
I have really been enjoying my New Nikon D300 camera and there really isn’t anything that I don’t like about it. It’s FAST, takes incredible shots and has all the bells and whistles that I’ve always wanted. Although the Nikon D300 doesn’t have a GPS unit built-in, it does now feature direct support for one and there is even a GPS menu on the camera itself. I bought the N2 di-GPS which works directly with select Nikon & Fuji DSLRs. It arrived this week and it wasn’t until yesterday during lunch that I got a chance to take it out for a spin. The first thing I said to myself when I opened the box was, “wow, this is much smaller than I imagined!” It’s not much bigger than a pack of gum. Very lightweight and easy to travel with. Although it’s designed to sit on the hot-shoe, it’s doesn’t have to. The integrated mount will also attach to the camera strap. There is no battery in it as it gets its power directly from the camera via the cable that attaches to the D300’s 10 pin remote terminal.

GPS menu built-in to the New Nikon D300 and D3


Once you connect the cable, there is only one switch on the device and it switches from OFF, to Auto, to ON. Do I need to explain OFF? Didn’t think so. In the Auto position the GPS unit will turn on and off with the camera. This will probably yield the best battery life. However, each time the unit is turned on with the camera in this mode it will have to potentially acquire the satellite signal again. In the ON position, it stays on and connected to the GPS satellites regardless if the camera is on or not. Of course this will ultimately drain the camera’s battery faster. I recommend the ON position if you are shooting, then moving then shooting again. If you’re going to use it off and on throughout the day, then Auto is probably best. From a cold start it took about 15-20 seconds to acquire a GPS signal. There is a clear indicator right on top that flashes red when it is searching and stays solid red when it has locked on (Sony could learn from this!).

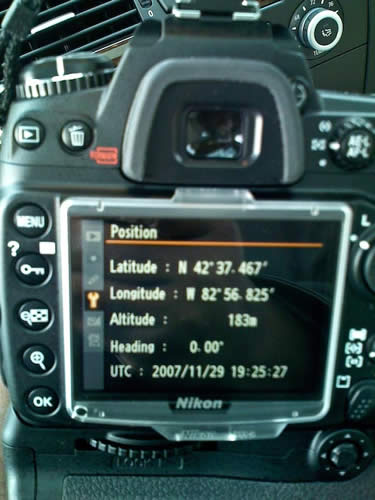
After connecting the N2 di-GPS and turning it on I was ready to shoot. The beauty of this unit is that the GPS information (longitude and latitude) is inserted right into the metadata of each shot as you take them. No need for post processing when you return to your computer. Since I use Adobe Photoshop Lightroom I can take advantage of this data instantly by clicking the little GPS button in the metadata panel which will automatically take me to the location that I was shooting in on Google Maps.


I took this shot at the New Partridge Creek Mall here in Michigan.


When I look at the image above in Adobe Photoshop Lightroom, I can see the GPS coordinates in the metadata panel

When I click the little arrow to the right of the GPS coordinates, Lightroom takes me to my browser and automatically loads those coordinates in Google Maps for me (you can click the image above for the same experience).

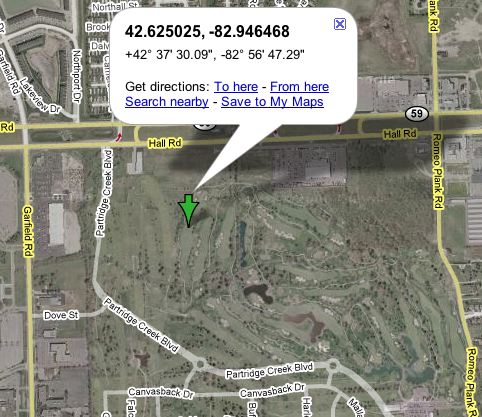
The interesting thing here is that apparently this map hasn’t been updated yet because it doesn’t show the mall on the satellite view 🙂 The mall was just completed and opened in October 2007.

I found the accuracy to be decent, but not great. What I mean by this is that it seems to take few moments to update once you’ve moved. I took some shots just walking around my yard and when I got back to the computer, although I had moved, a couple of the shots were still showing the coordinates from shots taken a few moments earlier. One shot showed that I was in my neighbor’s yard.


Here’s a shot I took in my backyard. OK, I’m kidding, this was taken at the Partridge Creek Mall. Normally I would have stepped back to get the whole tree, but there were two security guards waiting to tackle me if I even thought of pointing my camera at a store display (which is frowned upon at most malls).

This shot was taken maybe 50-60′ from the Apple store shot above.


Bottom Line

If you want to do some geotagging and map all the places that you shoot and you have one of the supported cameras, you can’t go wrong with this GPS unit. It’s painlessly simple to use and integrates beautifully. The N2 di-GPS goes for $238+$45 S&H. So it’s not cheap (neither are the cameras it supports), but if having GPS data automatically inserted into your images is your thing, this is the one for you.

Supports Nikon D3*, D300*, D2XS, D2X, D2HS & D200, Fujifilm S5 Pro.
*Nikon added new GPS function to D3 and D300. The new function resolved the battery drain issue. The new option in the menu let the user to select the metering system to stay on or auto off when GPS data is received to reduce the power consummation.

Also see my review on the NEW di-GPS Pro!


v-moda vibe duo nero for iPhone

Like many of you, one size doesn’t fit all. Although I have big ears my ear canals are relatively small which makes me not a fan of in-ear anything. So the standard Apple ear buds (although the more recent ones are a lot better) tend to be uncomfortable after extended use. Now this isn’t a problem for the iPod because there is a dizzying array of choices for iPods, there aren’t as many for iPhones. The two big obstacles are for one the iPhone’s headphone jack is recessed and most standard ear buds don’t fit without an adapter and two, most standard 3rd party ear buds and headphones don’t have an integrated mic and control for accepting calls.

So I was intrigued when a friend was telling me about the v-moda vibe duo headset. This headset was designed with the iPhone in mind and works perfectly with it right out of the box. It comes with, count them, 6 different sets of ear cushions (2 sets of 3 sizes in black and white for your style preference). The small white set come pre-installed and those were the most comfortable for me right off the bat. After getting a good fit, the next test was using them while I was on the phone. So I returned a call and carried out my entire conversation without the person on the other end asking, "are you on a headset?" Sound quality is GREAT! While phone call clarity passed the test, the next biggest area was sound quality while listening to music. Keep in mind I’m not an audiophile, so your mileage may vary. I fired up a few of my favorite tunes and while the sound was great, I can’t say that it was leaps and bounds better than the stock ear buds. There was good base response (considering that these are ear buds) and the sound was crystal clear. I also checked out the integrated remote and was able to pause/start my music as well as advance to the next track without having to touch the iPhone. This remote also allows you to answer calls too without touching the iPhone itself. I was also happy to see that they include a carrying case. This is often overlooked by some manufacturers and since I plan to carry these in my coat pocket, it’s great to have a case.

I got these on sale during Apple’s Day After Thanksgiving Sale. The regular price is $99.95 ($99 at Amazon.com). That seams a bit steep for ear buds (and it is), however, if you’re looking for optimum comfort and sound quality and out of the box iPhone integration, you can’t go wrong with the vibe duo nero headset.

Nikon D300 Review – first impressions

I picked up my new Nikon D300 last Wednesday from the good folks over at Adray Camera (who assured me that I would be one of the first kids on the block to get one, Thanks Kevin!). It was great having the holiday weekend to put it through some initial tests. I’m coming into this new camera body from a Nikon D80 and my main motivation for upgrading (the D80 is great camera) was to be able to shoot at higher ISO settings with less visible noise. In brief, the new Nikon D300 does just that. Now for those of you who currently have D200’s there’s probably not as much of a need to upgrade to the D300.

The first thing I noticed was how smooth the camera operated and especially the 51 point focus system is killer. This camera also has several more ways to customize it compared to my D80. It took me a while to figure out where the options were located for some of the things that I had setup on my D80. For example, something as simple as turning on the image review (after you take a shot, the LCD displays the last shot you took for a few moments), took me several minutes to find. Everything I wanted to set was there, it was just that some of these options were buried and had obscure names. I like to think that I should be able to pickup a new Nikon (now that I’m on my 3rd one) and be able to set it up the way I want without having to refer to the manual. Sadly, that was not the case this time. One setting I gave up on was the setting that allows you to use the Command Dial to quickly thumb through your shots. I just couldn’t figure out what Nikon would call this feature or where it was located in the menus. So I called my buddy Scott Kelby who shoots with a Nikon D200 (his D300 is on the way too) and he walked me through to the right menu which was Custom Settings Menu -> Controls -> Customize command dials -> Menus and playback = ON. Maybe that seems straight forward to some, but my brain just never saw that as being the option I was looking for.


On to the noise tests

Once I got all my settings set I moved on to the noise testing which again was my main motivation for upgrading. I want to be able to shoot in lower light situations at a higher ISO setting with less Christmas tree like noise. My first round of tests was to use natural light coming from a nearby window to shoot a floral arrangement on a black Westcott background. I was very happy with my results!

I shot the flower above at a full range of ISO settings and I’m happy to report that shooting at ISO 800 was extremely acceptable. I could even go higher before starting to cringe.

Zoomed in 1:1 in Adobe Photoshop Lightroom on a shot at ISO 800


zoomed in 1:1 in Adobe Photoshop Lightroom on a shot at ISO 1600


Here’s a link to 4 of my shots (39MB download) at ISO 200, 800, 1600 & 3200 shot in Camera RAW and then converted to Adobe .DNG format using Lightroom.


The higher the ISO setting the more noise/grain you’ll see. However, compared to my D80 this is a night and day improvement. The other thing that I’m totally addicted to is the speed of this puppy. While the D3 would probably be better suited for sports photography, this camera would be a great second choice at less than half the price of the D3.


My setup

Nikon D300 (shooting in RAW)

Tamron 28-75mm f/2.8 lens

shot at f/4.5 in Aperture Priority mode

Westcott reversible background

Adobe Photoshop Lightroom 1.3 running on Mac OS X 10.5.1 Leopard


Bottom Line

While I’ve only had this camera for a few days, I’m very happy. I’ve also ordered a di GPS unit that attaches directly to it. Look for that review here. The Nikon D300 goes for $1,799.95. If you would like to read a full review and see all the specs, check out these two: dpreview and Steve’s Digicams should have one up soon.


Hey, I’m selling my Nikon D80 gear! Check it out here on eBay

.

Black Friday 2007 Deals

I gotta admit, I’m not a fan of standing in line outside in the cold/rain/snow to "possibly" get a deal. Don’t get me wrong I get all giddy saving money just as much as the next guy. Especially on tech gear. I’m just not a morning person. However, if you like this sort of thing and you don’t mind getting out this Friday, check out this site which offers a pretty comprehensive listing of Black Friday 2007 Deals.

The fastest card!

I was ready to declare the PNY Technologies card the winner in my recent Compact Flash Card Speed Tests when my buddy Scott Kelby reminded me that it’s not only about how fast the card reads data, but also how fast the card writes data. So this lead me to do some more testing.

For those of you who haven’t been following along, this all began with my recent purchase of the CFExpressPro+ PCIe ExpressCard to CompactFlash Memory Card Adapter 2.5Gbps. This ExpressCard Compact Flash Card Reader boasts the ability to operate at the ExpressCard slot’s true PCIe speeds. My first tests with Lexar Pro media yielded horrible results in that I either have a bad card or their write acceleration is just not compatible with this reader. So I went out and bought some different cards. I bought a couple of SanDisk’s Extreme III and IV cards and I bought the PNY Technologies Optimal PRO and Optima PRO UDMA cards. These cards were rated at 133x and 266x by their respective manufacturers. I was shocked that the PNY cards were much faster than the SanDisk cards on READING my 1.1GB test folder. Like I said, I was ready to declare PNY the winner until I ran some WRITE tests. The results put SanDisk back on top. Using the Sychnrotech ExpressCard PCIe Reader, here’s what I got:

Card Read 1.1GB Write 1.1 GB
PNY Technologies Optima Pro 133x 2GB Card 40.9 seconds 56.9 seconds
PNY Technologies Optima Pro UDMA 266x 2GB Card 35.7 seconds 45.2 seconds
SanDisk Extreme III 133x 2GB Card 70.8 seconds 71.1 seconds
SanDisk Extreme IV 266x 2GB Card 41.6 seconds 29.4 seconds


While the PNY card did win the Read tests hands down, what really matters to a digital photographer the most (besides reliability) is the speed at which images can be written to the card and the SanDisk Extreme IV edges out the PNY card by 18% margin!

Also no matter how you slice it having the Synchrotech ExpressCard Memory Adapter ($65) blows away USB card readers. In all of my tests the fastest time I could achieve with my USB card reader was just over 2 minutes whereas with the ExpressCard adapter I achieved 35.7 seconds and 41.6 second read times. If you’re a pro digital photographer and have a notebook with an ExpressCard slot, this is a must purchase. Time is money.


Adobe Photoshop Lightroom 1.3, Camera RAW 4.3, Photoshop CS3 updates

The Adobe Photoshop engineering team has been quite busy over the past few weeks (months) and has just released a slew of updates:


Adobe Photoshop Lightroom 1.3

This is the update you’ve been waiting for if you are on or going to Mac OS X 10.5 Leopard or if you were in the market for one of the hot new DSLR Cameras. Not only do we get improved Leopard compatibility but we also get native camera RAW support for the following cameras:

Canon EOS 1Ds Mark III
Canon PowerShot G9
Nikon D3
Nikon D300 <- OK sign me up!
Olympus E-3
Olympus SP-560 UZ
Panasonic  DMC-L10

Adobe is first to market (again) with support for the RAW format of the Nikon D3 and D300! The applications also now support the sRAW format produced by the Canon 1D Mk III, 1Ds Mk III, and 40D.

Also Adobe has released a Preview of the Lightroom Export SDK (available on http://labs.adobe.com). This will allow developers to create some really cool workflows. Think direct export to Flickr, Smugmug, FTP Hosts, etc.


Adobe Camera RAW 4.3 and the DNG Converter 4.3

If Lightroom is not your thing, but you are a Photoshop CS3 user then you’ll get the same camera RAW support as Lightroom in these updates.


Adobe Photoshop CS3 10.0.1& Bridge CS3 2.1.1

The most significant fixes in the Photoshop 10.0.1 update include the following:

A crash that could occur when Microsoft Intellipoint software is installed has been fixed.

  • The speed of moving objects contained within multiple layer sets has been improved.
  • The speed of closing large documents has been improved.
  • Converting images to CMYK using certain profiles no longer results in black files.
  • A crash that could occur when saving a 4-bit BMP file with 16 or fewer colors has been fixed.
  • The Save for Web feature now includes an option to “Include XMP” (metadata) in the settings menu within the main Save for Web interface, making the existing capability easier to access.
  • When using Save For Web with “Include XMP” enabled, all XMP data is now included in the optimized file.
  • A problem that could cause the incorrect printer to appear within the print dialog box has been corrected.
  • Images no longer print with odd-sized margins on various Epson printers, or print smaller and off-centered.
  • Printer settings in Windows® are saved with a document while that document is open. If a document has not had Page Setup settings applied to it, the document will get the previous page setup used during the current session of Photoshop.
  • Photoshop now turns off Windows ICM (system color management) when “Photoshop Manages Colors.”
  • Print color matching has been improved.
  • A problem that caused certain laser printers to show distortions when printing to a nonsquare resolution has been fixed.
  • Images saved as DICOM and reopened in Photoshop CS3 are no longer corrupted on PowerPC® based Mac computers.

The Adobe® Bridge CS3 2.1.1 update includes the following fixes and enhancements:

  • A new preference to enable High Quality Preview has been added to Bridge’s Preferences > Advanced panel. When enabled, the preference addresses the problem of a soft or blurry preview appearing in the Preview panel and in Slideshow mode.
  • Data loss that could result from replacing a folder with another folder by the same name has been prevented.
  • Issues that could cause Bridge to crash (for example, when encountering a PDF or AI file) have been corrected.
  • A problem that could cause Bridge to lock up when using arrows to navigate has been fixed.
  • XMP data is now handled correctly when added to CR2 files.
  • A problem that could cause the Loupe tool not to be available after exiting from Slideshow mode has been corrected.
  • Rapid clicks to select multiple files are no longer interpreted as a double-click, so unintended opening of multiple files is now reduced.

All of the updates above are available for download from adobe.com and should be available through the Adobe Updater.


Hey! I made it into Newsweek

It may not be a feature article on me (yet 🙂 ), but when writer Daniel McGinn was researching for an article that he was writing on Garmin and GPS units he came across my blog and tracked me down at work. Needless to say that when my admin passed me the message I was stunned. I called Dan back and we talked about GPS units and where I thought the industry was headed. He wrote a pretty elaborate article and you can see my "small" quote on the bottom of page 3.

Speaking of GPS units, be sure to check out my review of the Navigon 2100 below.