I couldn’t be happier that Adobe Photoshop Lightroom 2.0 has shipped! As many of you know Lightroom 2 has been in public beta since early Spring. This new version boast several features that make Lightroom (LR) much more approachable and powerful. When the beta first came out I did a video on the NEW features. There have been a few new features and refinements added since the public beta. I just created a NEW video showing how you can now do some basic portrait retouching right in LR with the New Adjustment Brush! This brush allows you to do localized corrections (corrections on specific areas of the photo utilizing automasking). It’s really amazing! The good folks over at NAPP have launched a Lightroom 2 Learning Center! Be sure to check it out. It’s free!
Â
What’s cool?
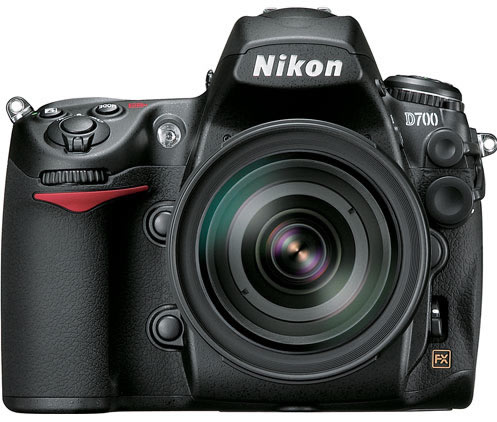
LR 2.0 remains a completely non-destructive editing app. You can work with JPEG, RAW, TIFF and PSDs. Speaking of RAW, there is (unoffcial) support for the hot new Nikon D700 which just shipped! How’s that for timing?
New in Lightroom 2.0
Library Module
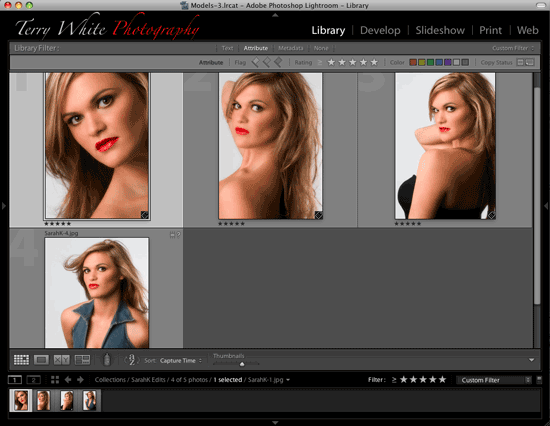
Streamlined Organization and Worfklow
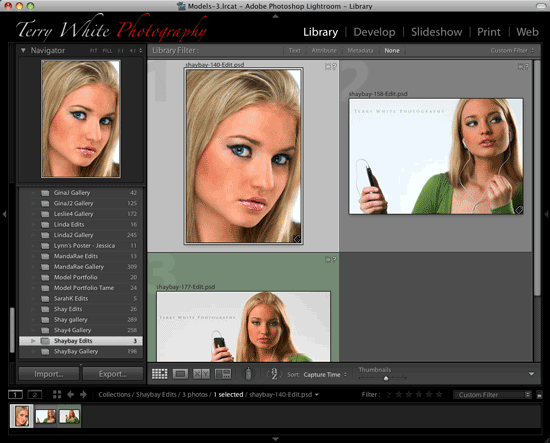
Layout: The entire Library layout has been revisited to provide a more intuitive image organization experience. Â The left hand panel of the Library has been streamlined to include only the most relevant image sources: the folders the images are physically stored in and collections of images that the photographer creates. Â
Folders:  Photographers working across multiple hard drives will find that the enhanced volume and folder layout will make it a much more intuitive experience to manage images on one or many hard drives.  The volume indicators clearly indicate the hard drive that you’re working with and provide the option to show the online/offline status, the amount of space available, the number of photos you’re working with and there’s an indicator light that migrates from green to red as your hard drive fills up. Now it’s visually much easier to move your images from hard drive to hard drive and understand where your images are stored when a external hard drive is no longer connected.
Collections: The Collection panel has received significant attention with the addition of improved iconography and collection sets that allow photographers to create a hierarchy while maintaining collection-specific sort order. (Hierarchical collections have been removed in order to support the new organization model and will be migrated appropriately from 1.0 to 2.0 libraries)  There is also the ability to save output specific collections for Slideshow/Print/Web.  This can be accomplished by creating a new collection item while in the specific output module.  The subsequent icon in the collection panel will provide a quick reference and link to the images and output settings you created.  Collections still maintain their auto-save capabilities when it comes to on-the-fly output creations that don’t require a persistent entry in the Library. Â
Smart Collections are now available. Â Specify the criteria for a smart collection and images will be automatically added to the collection if they meet the criteria. An expert user tip: Try alt/option clicking when adding a new search criterion.
Target Collection functionality allows you to specify any Lightroom collection as the destination of the quick collection shortcut key, B.
Filter Bar:  With the source location of the images clearly defined in the left hand panel, the top of the grid view provides a panel that will filter the content.  Use the ‘\’ key to hide or show the filter functionality and expand one section at a time to filter the content.  Each category below can be toggled on or off by clicking on the name and multiple filter categories can be shift-selected to provide additional control.
Text: Search across your images using text search field
Refine: Filter your grid view by flags, star ratings, color labels and the type of file, Master or Virtual Copy. This functionality was previously located only in the right hand side of the filmstrip.  It still remains in that location now labeled ‘Filter’ as a quick tool that can be used in any module.
Metadata: A wide range of metadata is now presented in easy to browse filter columns that can be added, removed and customized per your organization workflow. Â Choose the field to filter on by clicking on the column header and select menu icon at the right side of each column to add or remove a column. Â Â The column arrangement and selection can be stored as a preset that is defined in the upper right hand corner of the filter bar. Â Note that the Date and Location fields contain the option to show hierarchical or flat representations of the data. Â The Date field also includes the day of the week in addition to the numerical date.
Â
The Keywording pane has a new Keyword Set called “Suggested Keywords.†Keywording is simplified through Lightroom’s ability to suggest keywords for the current image based on existing keywords applied to that image as well as keywords applied to images that are close neighbors in terms of capture time.  For example, if a number of images in a catalog contain the keywords dog and beach, an image assigned the keyword ‘beach’ will cause the suggested keyword panel to automatically update to show ‘dog’ as a suggested keyword. The Keywording panel also includes a dedicated keyword entry field below the larger box that displays all of the assigned keywords. The Keyword List provides a convenient filter to help find and manage your keywords. Checkboxes are available to quickly apply additional keywords to the selected images and arrows to the right of each keyword are a link to view all of the images tagged with that keyword.
Multiple Monitors: Lightroom 2.0 beta offers a dual monitor solution that can adjust to fit your particular monitor set up. Â Â The main Lightroom window that includes the Module picker can be positioned on either monitor and the following views can be provided on an additional monitor. To activate a multiple monitor environment, choose the monitor icon in the lower right hand side of Lightroom, just above the filmstrip. Â If a second monitor is not attached, a second window will appear on a single display.
- Grid: Place the grid on a secondary monitor for quick image selection while the develop module is displayed on the other monitor. Â Or use the grid to reorder images while creating slideshow, print or web output.
- Loupe: Â Allows an image at a preferred zoom level display on an alternate monitor. Â
- In Normal mode, the image displayed on the alternate monitor is changed when the selection is changed in the primary Lightroom window.
- Live mode is continually updated based on the image and area of an image the mouse is currently hovering or passing over. Â Zooming to a 1:1 view allows for quick focus checking across a number of images displayed in a grid view on the primary monitor.
- Locked mode fixes the image displayed on the alternate monitor until you wish to change the selection by selecting alt/option-Enter to make the current selection visible.
- Compare: Offers the same powerful compare functionality previously in the Library but can now be used to compare images while selections are made in the grid view in the Library or while adjustments are made in the Develop module.
- Survey: Â View multiple images at once while organizing or adjusting in another display.
Photoshop Integration:  Lightroom can now open images directly in Photoshop without writing out TIFF or PSD files first. The previous ‘write file to disk first’ behavior was inefficient and the new behavior enables a faster a more functional workflow that includes:
- Open files in Photoshop as a Smart Object: Utilize the non-destructive smart object workflow by opening the image as a smart object directly into a Photoshop document.
- Select multiple images to merge as a Panorama utilizing Photoshop CS3’s incredible new panorama functionality
- Merge multiple exposures into a single Photoshop HDR image
- Load multiple files or virtual copies into Photoshop as separate layers in a single document.
- Important Note: Â This integration is only available with Photoshop CS3 (10.0.1)
Export Functionality: Managing and organizing exported images is much easier now with the following capabilities:
- Export files automatically to the same folder as the original or a subfolder of the original
- Add the exported images to the Lightroom catalog with the option of stacking the export file with the original
- Sharpen images on export for Print or Screen usage utilizing an adaptive algorithm that takes into account the intended use and resolution.
- Send exported images directly to another third party application selected in the export dialog
More notes on Library functionality:
- The 10k pixel limit has been lifted and now images with up to 65,000 pixels per side or 512MP total may be imported into Lightroom. Â This is particularly useful when utilizing the new Photoshop integration for panorama creation.
Develop Module
Localized Correction: The develop module now provides the ability to correct specific areas of an image without affecting other areas.  A common example of this in traditional photography would be the dodge and burn experience in the darkroom.  Lightroom provides brushes that a photographer can ‘load’ with different types of corrective techniques that were previously only available globally including exposure, brightness, clarity and saturation.  Images can also be tinted locally using specific hue and saturation values that can provide an excellent way of counteracting mixed lighting environments.
The tools previously available in the toolbar have been relocated to the right hand panel just below the histogram. (Crop, Clone/Heal, Red Eye and the new local correction brush) Â Selecting a tool from the panel will reveal the options for that tool. Â Click on it again to hide those options and return to the standard develop panel.

Adjustment Brush
The controls available for the local correction brush are segmented into three basic areas: Mask, Effect and Brush. Â A quick walkthrough of the correction technique is below:
- On entering the local correction panel the brush will become active. Â
- The type of desired correction should be selected from the Effect section. Â A photographer can paint in a positive brightness effect for the shadows and a negative exposure effect for a bright sky.
- Combinations of effects can be selected and saved as presets by showing the effects sliders. (Horizontal toggle in the upper right area of the effect panel)
- The brush size, feather and opacity can be set before applying the correction. Â An Auto Mask option is available to help confine the brush strokes and subsequent mask within an area of similar color. Â The airbrush option provides a diffused correction application relative to the standard painting mode. Â
- Once a brush stroke is applied, a circular point or pin will appear on the image where you first applied the brush stroke. Â Additional brush strokes can be applied that will add to the current correction area. To refine the area hold down the Alt or Option key to begin erasing with the brush.
- To adjust the amount applied to the entire area click down on the circular marker or pin and move the cursor to the left or the right to decrease or increase the amount setting.
- To refine the correction settings, click on the pin and detailed adjustments are available in the right panel and will be applied to the selected pin. Â
- Create a new correction mask or brush stroke by selecting the New option.
- The pins can be hidden or shown with the H shortcut key.
- Use one of the tint presets provided to apply a color tint or use the Lightroom color selection dialog by double-clicking on the rectangle to the right of the presets. Â Change a preset by selecting a color in the dialog then click-and-hold on the preset box to be populated by that selection.
- There are two brush presets represented by A and B in the brush section. Â After modification of the brush controls, a preset can be updated by clicking and holding on the specific preset letter to be associated with the settings.
Graduated Filter
Recreating the effect of a graduated neutral density filter, this tool goes even further allowing the ability to modify all of the effect parameters in a single graduated effect. Â Select the effect and click and drag the gradient onto the image. Â Rotate and adjust as necessary. You can also return to the specific effect settings and modify them after the filter is applied.
Â
Shortcut Keys
Local Adjustment Keyboard Shortcuts
- Toggle Adjustment Brush – K
- Toggle Graduated Filter – M
- Graduated Filter Scale from Center – Alt/Option + Drag
- Hide/Show Pins – H
- Always Show – Shift + Command/Control + H
- Show Selected/Never Show – Shift + H
- New Adjustment Pin – Enter/Return
- Switch Brush – /
- Increase Amount – Right Arrow
- Decrease Amount – Left Arrow
- Erase – Alt/Option
- Increase Brush Size – ]
- Decrease Brush Size – [
- Â Increase Feather – Shift ]
- Decrease Feather – Shift [
- Set Flow Amount – Number Keys
- Auto-Mask – A
- Show/Hide Mask Overlay – O
- Cycle Mask Overlay Colors – Shift + O
- Constrain brush stroke to straight line – Shift
- Invert Gradient – ‘
Vignette: The previous lens correction vignette effect was only applied to the entire image frame and as an artistic effect could be obscured after an image was cropped. Â An additional framing vignette effect has been added that will apply a vignette to an image, respecting the cropped borders.
Â
Basic Panel Keyboard Shortcuts: Â Photographers who prefer to utilize their keyboards for basic image adjustments will find that the +/- keys are linked to the Exposure adjustment in the Develop module. Â Adding the Shift key will boost the increment amount, the comma and period keys will cycle through the basic panel controls and the semi-colon will reset the control currently in focus.
Improved Auto Adjustment: Â The Auto adjustment has been modified in response to feedback that previous adjustments were too bright.
Â
Improved profiles for Raw data: Â An enhanced set of profiles has been released on Adobe Labs in order to provide an improved default rendering of raw data. Â In addition to the improved Adobe default profile, there are additional profiles for each camera that emulate the results that would be obtained were those settings chosen in the camera manufacturers software or if the photographer chose to shoot JPEG.
Â
Print Module
Picture Package: The print module now provides the ability to create multi i-page layouts for a single image arranged in multiple sizes. This allows photographers to quickly and easily print a package of images quickly and easily. Â
- Choose Picture Package from the Layout Engine in the top right corner of the print module and a blank page will be presented.
- In the Cells panel click on one of the preset size to add an image cell to the page or use the drop down option to edit and create your own custom size. Â Cells can be added to the page until the page is filled and a new page will be added to the layout automatically. Â Up to six pages can be included in a layout. Â
- After all of the required cells have been added, choose Auto Layout to automatically create an efficient, easy to cut print layout or manually move the cells to your liking.
- To move a cell, click on the image and move the cell to the desired location.  To delete an image cell, click on the image and choose delete.  A page can be deleted by mousing over the page and clicking on the ‘X’ in the red circle.
- When an image aspect ration is much different than the cell aspect ratio, the image can be moved within the cell by holding the CMD/CTRL key down and clicking on the image and dragging it.
Print to JPEG: Â Many photographers have asked for the ability to send their Lightroom print layouts directly to a lab that will print JPEG files. Â Choose JPEG as the option in the Print Job dialog to specify your print output as a JPEG file for lab delivery. (Select a custom ICC profile for your lab in the color management area)
Print Sharpening: Â Lightroom previously provided three levels of print sharpening. Â Impressive new algorithms have been added to automatically determine the correct amount of print sharpening required based on the output media and resolution of the file.
Â
Lightroom 2 SDK
The Lightroom SDK allows you to customize and extend certain Lightroom features by creating plug-ins. In the current release these features are extensible:
Â
Export functionality: You can create an export plug-in, which customizes the behavior of Lightroom’s
Export dialog and export processing. You can add or remove items from the Export dialog, alter or augment the rendering process, and send images to locations other than files on the local computer.
Â
Metadata: You can define customized public or private metadata fields for Lightroom. Public or
private metadata can be associated with individual photos.
Â
Web engine functionality: You can create an HTML web-engine plug-in, which defines a new type of
HTML photo gallery. The engines you define appear in the Gallery panel at the upper right of the Web
module.
Â
A Lightroom plug-in consists of Lua-language files (scripts) that define the plug-in functionality, and an information or manifest file that describes the contents of the plug-in. The information file must have a specific name, and be placed in a folder with the Lua source files and resource files; the folders may need to be in specific locations.
Â
Lightroom 2 beta vs. Lightroom 2
Changes from LR2 beta to LR2 below:
- Hierarchical Dates and locations in the Library Filter. (Including days of the week for the date)
- The Volume Browser in the folder panel. (Volume name plus several ” The volume indicators clearly indicate the hard drive that you’re working with and provide the option to show the online/offline status, the amount of space available, the number of photos you’re working with and there’s an indicator light that migrates from green to red as your hard drive fills up.  Now it’s visually much easier to move your images from hard drive to hard drive and understand where your images are stored when a external hard drive is no longer connected.”)
- Â Improved iconography for folders, collections, collection sets and output collections
- Dedicated keyword input field in the keywording pane. (Always awkward to enter keywords when there are already a number in the field already)
- Ability to add or remove metadata filter columns
- Improved Keyword List interface. (Including filter by keyword to manage and organize keywords)
- Repositioned and refined dual monitor support location and experience. (Moved from right to left and the ultimate dual monitor experience is much more polished in terms of performance and stability
- Ability to set target collection for quick collection shortcut(b). (Target any collection as the target when you hit the B key)
- Lightroom Web, Metadata and Export SDK available on the Adobe Dev Center
- Local control improvements
- Complete list of local controls including, Exposure, Brightness, Contrast, Saturation, Sharpness, Clarity and a color toning option available for the brush or gradient adjustment tool
- Additional gradient adjustment tool
- Improved auto-mask functionality
- Improved brush performance
- Additional post crop vignette options: roundness, feather
- DNG Profiles Concept
- DNG Profile Editor available on Labs
- Profiles for our current raw support list available
- Match camera JPEG looks in the Calibration tab by selection Camera Standard profile
- Export to JPEG functionality in the Slideshow Module. (Intermediate format for additional authoring tools)
- Enhanced output sharpening based on feedback
- 64-bit memory handling improvements
Â
A New Camera RAW for Photoshop CS3 and Elements 6
Camera Raw 4.5
Camera Raw has been updated to 4.5 at the same time to work with the new adjustments in Lightroom 2. Â It will provide exactly the same rendering obtained in Lightroom 2.
CR/DNG Macintosh/Windows
Â
Pricing
- Price: Lightroom 2 is priced at $299 with a $99 upgrade for 1.x users.
- 30 Day Trial Available
- Cross-Platform Mac/Win