iPhone Photo Contest!

I’m happy to announce that my NEW iPhone Book (co-authored with my buddy Scott Kelby) is on press and days away from hitting store shelves. The original iPhone Book was chosen by Amazon as their #1 Editor’s Pick for Books on Computers and Internet for 2007! Needless to say, I was floored and humbled by such an honor. So that made me work even harder on the The iPhone Book 2nd Edition. I’m very pleased with the way this new book came out! We took it to a “whole ‘nother level.”

To celebrate the new edition we’re kicking off an iPhone Photo Contest! That’s right, you could win valuable prizes by submitting your best photos taken with your iPhone’s built-in camera.


  1. You can enter up to three photos (total) taken with your iPhone (doesn’t matter if it’s the original model, or the new 3G).
  2. There are five different categories; Friends, Pets, Family, Fine Art, and Office. The winner in each category gets a $100 iTunes Gift card and a copy of “The iPhone Book” 2nd edition.
  3. The Grand prize winner gets a $500 Apple Store Gift Card, and a copy of “The iPhone Book” 2nd edition.
  4. From the photos submitted by the deadline of Oct. 24, 2008, Scott and I will choose three finalists in each category, and then the public gets to vote for the winner in each category (the one getting the most votes wins). Then, from those Winners Scott and I will choose a Grand Prize Winner on November 3, 2008.
  5. This may seem obvious, but of course, the photo has to be taken with your iPhone’s built-in camera.
  6. You can edit your photos using any iPhone application available from the iTunes Apps Store, or any other image editing application, but no other non-iPhone photos may be included in your entry (so you can’t take your iPhone photo and composite it with a photo taken with your DSLR, point-and-shoot, or a stock photo).
  7. You may not give your iPhone to Jay Maisel, Joe McNally, or Moose Peterson. Not even to make a phone call.
  8. There is no entry fee, and the contest is open to everyone; You do not have to buy “The iPhone Book” to enter, but it certainly wouldn’t hurt. 😉
  9. Whining of any kind, about anything, is strictly prohibited.
  10. You can submit your photos, and learn more about the contest at the official contest site (here’s the link).


I can’t wait to see all of your cool shots. Good luck and happy shooting!

iShowU Pro HD


I use a variety of apps that record what I’m doing on my screen. I use these apps to produce my Creative Suite Podcast, online training, tutorials and training DVDs. Although I recently became enamored with ScreenFlow, I found myself drifting back to my old favorite iShowU. When I want to do something longer and have the ability to edit it, there’s no question that ScreenFlow is the best choice. However, when I want to do something quick/down and dirty my favorite app is iShowU!

So needless to say when I saw that there was a new version of iShowU I was very excited to check it out. This NEW version of iShowU, dubbed as iShowU HD Pro offers some of my favorite features of ScreenFlow. The biggest feature of interest to me is the ability to have webcam video floating over the screen as needed. Sometimes I need a minute to explain something in more detail. I’m just talking and not really showing anything during that time. So it’s nice to be able to pop up a window of my "talking head" video and then when I’m done I can hit a key to make it go away.

Another feature that I like is the ability to show keystrokes automatically on screen. So for example, If I’m recording a tutorial on how to do something in Adobe Photoshop, I may say, "hit Command-J to duplicate the layer." As I hit that key sequence it’s displayed on screen. One cool thing that it also does is it shows an animation of each time you click so that the viewer can easily see where your mouse pointer is and where you clicked it.


Actually there are now 3 versions of this app

So far I’ve only been talking about iShowU and iShowU HD Pro. There are actually 3 version. There’s the original iShowU "classic" that we all know and love. Then there is iShowU HD and iShowU HD Pro. To see the differences between these versions, check out this handy Comparison Chart. The Pro version offered a couple of features that I wanted that the HD version didn’t offer, so I popped for the Pro version. Those features were the ability to Embed Watermarks and as I mentioned earlier, the ability to Record Keystrokes. The ability to Embed Watermarks helps me by allowing me to have my logo superimposed over the video during recording. This eliminates the need to do it in post production.


How well does it work?

I recorded my latest Creative Suite Podcast episode using iShowU HD Pro. While the app worked as advertised and I’m pleased with the end result, there are a couple of interface quirks and oddities. When I first launched iShowU HD Pro, I noticed that there is a fairly large LIVE Preview window. I still haven’t figured out what benefit it provides. You don’t see the window while you’re actually recording and I just can’t see why it’s there. Nor does there seem to be a way to turn it off. Another thing that threw me for a loop on the first day was that they include a sample Watermark. Of course they tell you this in the manual, but I usually only resort to the manual as a last resort. This was one of those times. I just couldn’t figure out that first, it was a watermark and then once I realized what it was, it took a quick peek in the manual to figure out how to turn it off/delete it.

Although I was really pleased to see the addition of recording keystrokes, the current implementation is flawed! It shows ALL keystrokes. Even the ones that you use to control iShowU HD Pro. For example, to show and hid your webcam window, you hit Command-Shift-C. Well, I don’ want that recorded as a part of my recording. Yet, it does show and record every keystroke. I finally just stopped fighting it and turned that feature off.

Lastly, I wanted to set my recording window to a specific size of 1280×720. My display preferences were set to 1280×800. While I could manually size the window to whatever size I wanted to, there was no indicator to show me what size I had just set it to. Nor was there a way to simply key in the size of the recording window that I wanted. In the standard version of iShowU, the pixel dimensions are shown in the lower right corner of the recording window as you drag it.

Although these quirks were annoying, the product performed well! Also the main reason that I like iShowU over any other product out there is that there is no post rendering process. The iShowU HD Pro version also renders in real-time as it’s recording. That’s HUGE for down and dirty recordings that you need to get done quickly! Once you stop the recording there is a Quicktime Movie of your recording sitting there waiting for you.

What about editing? Although iShowU HD Pro doesn’t have any built-in editing capabilities like ScreenFlow does, they have made it much easier to set it up so that it can be easily edited in apps like Final Cut Pro.


The Bottom Line

If you’re a Mac user and you need to record your screen, you should look at iShowU PERIOD. If you need more then check out iShowU HD or iShowU HD Pro. There have already been a couple of free updates for the app since I’ve had it. I would really like to see the quirks I’ve listed above worked out in the very near future.

iShowU goes for $20. iShowU HD goes for $29.95 and iShowU HD Pro goes for $59.95. If you have iShowU and you want iShowU HD or iShowU HD Pro you’ll be able to upgrade for basically the difference in price. Buy it here.

TiVo HD XL is here

I’m a TiVo junkie! There’s just no other way to say it. I’ve had TiVo service for years and years now. Originally I had DirecTV TiVo units (and I still have a few), sadly though DirecTV and TiVo parted ways (they are coming out with a new box in late 2009 though). So I never got the benefits of TiVo Series II. Luckily TiVo came out with TiVo HD for Cable Customers and I was all in! Technically TiVo HD is TiVo Series III (outrageously expensive and I refused to buy it!), which has all the benefits of TiVo Series II including TiVo-2-go which allows you to transfer your TiVo recordings to your computer, take them with you, burn them to DVD or transfer them to your iPod/iPhone. With TiVo HD you also get the benefit of transferring your shows between TiVo boxes.

I was all set with two TiVo HD boxes. I had one in my Theater room and one in my bedroom. There was one more place that I wanted to put a TiVo box and that was in the living room. I had a Comcast (Motorola) DVR there along with the original DirecTV (non-HD) TiVo box there. Redundant I know, but I couldn’t wean my family off the TiVo interface. They would rather watch their recordings in standard def, than use the Comcast box, which supports HD. I always intended to replace both of those boxes with a TiVo HD, but just never got to it until now. I saw the announcement for TiVo HD XL. This is basically a TiVo HD with 3 additional features: you get a 1 Terabyte hard drive (as opposed to 250GB), THX certified sound and a fancier backlit remote control. Since I use Harmony One remotes, I could care less about the better remote that’s just going to sit in my drawer anyway. I was more interested in the better sound and the larger storage capacity. I don’t really keep a lot of shows on my DVR, but I have been burned a couple of times wanting to watch a show again that had already been deleted to make room for new recordings. So having a larger drive means that the shows I record will stay on the drive longer before being deleted to make room for new content. Of course you can always mark a recording not to delete until you say so, but that means that you have to think about it ahead of time.

I bought the TiVo HD XL to actually replace the one in the Theater. I moved the Theater TiVo to the living room. Since they are all on the same network, this means that if there is a recording on one that I want to watch in another room, I can simply transfer it from one TiVo to the other.

Looking at the New TiVo HD XL from the outside you’d be hard pressed to tell the difference. The case is identical with the same connections as before. However, the startup sequence is new as you can see from the picture at the beginning of the post you get a nice THX startup surround sound sequence just like in the movies. Also the longer startup movie of the TiVo character jumping from TV show to TV show has been replaced by a shorter one with the TiVo icon just taking a couple of bows before you’re presented with your main menu.


Why TiVo?

One of my buddies asked me, "why did I like TiVo so much?" After all, your cable or satellite provider will in most cases throw in a FREE DVR just to get your business. Why would I pay hundreds of dollars for a TiVo box (let alone 3 of them) plus the fees for the TiVo service? It’s one of those things that’s hard to explain in writing. It’s all about the User Experience! I still have one Comcast box left in my office. I don’t watch TV in that location that often, so I’ll probably just keep it. However, there is NO COMPARISON when it comes to the user interface between TiVo and generic DVRs. It’s like asking a Mac user, "why do you like the Mac? Isn’t it just a computer?" Or like asking an iPhone user, "isn’t it just a phone?" Until you’ve used one, you wouldn’t understand. Could I get by with the generic DVR provided by Comcast? Sure. I just wouldn’t want to! With the Comcast box, I can’t transfer shows (easily) to my computer, I can’t transfer shows from one box to another. I can’t schedule a recording via the web (which surprises me!). I can do all of this with TiVo HD and more. Here’s a more detailed comparison.

TiVo has also partnered with Amazon. So you can not only record shows from your cable provider, but you can also download movie rentals and TV shows directly to your TiVo’s hard drive. You can also subscribe to Podcasts directly on your TiVo as well as stream music. I do all of this via Apple TV for a better experience, but it’s nice to know that it can be done all from the TiVo HD.


The Bottom Line

Should you upgrade to TiVo HD XL? If you already have a TiVo HD, there would be very little reason to replace it with the XL model. You’re not going to gain enough to make it worth while. You can already attach an external hard drive to the TiVo HD to increase the capacity (or even install a larger drive inside if you’re willing to void the warranty) and if you wanted a backlit remote, there are better options out there. However, if you’re looking to add a TiVo to your setup, then the TiVo HD XL is worth considering. If you do decide to go TiVo HD or the HD XL, it will require that your Cable company come out and install a CableCARD in your TiVo HD box. This will decode your digital/HD and premium channels. This is actually the main reason I hesitated getting a 3rd one. My first two CableCARD installs by Comcast required multiple visits and was quite frustrating. Luckily this time the multi-stream CableCARD worked the first time! The Cable Installer and I were both floored!

TiVo HD gives you 20 hours of HD recording (or 180 hours of standard def) and goes for $299.99

TiVo HD XL gives you up to 150 hours of HD recording and goes for $599.99

Currently there is no support for Cable Video on Demand.

Now bring on LOST, 24, and Battlestar Galactica! I’m ready!


My favorite TiVo hack – Enable a 30 second skip button

We all hate watching commercials on our recorded shows. Although TiVo doesn’t currently allow you to automatically skip them during recording, there is a way to enable your skip button to skip 30 seconds (the average length of a commercial) at a time.

  1. Play any recording
  2. Press Select – Play – Select – 3 – 0 – Select
  3. You’ll hear 3 dings

Now your Skip button on your remote will skip 30 seconds ahead each time you press it.

iPhone App of the Week – ToDo

todo listsOne of the things that I’ve wanted since day one, last year for my iPhone was a To Do feature. I always thought that it was odd that Apple included To Do’s in both iCal and Mail on the desktop in Mac OS X, but not in the iPhone. I still think it’s strange. However, now that the iPhone is open to 3rd party apps, I no longer have to wait.


There are several choices out there

What I thought would be a rather simple app to buy/download, turned out to be more challenging. What I mean is that there are at least a half dozen To Do apps for the iPhone (probably more), and they range in price from FREE to $9.95. What I found is that not everyone thinks of To Do’s the same way that I do. What I wanted was an app that would let me create multiple lists, QUICKLY add items to those lists, and then check them off as they were done. I look at To Do lists in a couple of ways. I might create a To Do list for the things that I need to get done on a given day: ie. go to the cleaners, call my sister, get a car wash, record a podcast episode, etc. Then I might want a list of things not to forget before I leave for a trip. Such as a packing list for a photo shoot. I might also want to put a task on a certain day when it’s actually due and give those items a priority. Pretty basic stuff! No rocket science here. What I found was that most of the apps out there were either “too basic”, which means they didn’t offer the features I wanted or they were WAY OVER COMPLICATED! Amazingly over complicated in some cases. It shouldn’t take 50 taps to enter a To Do item.

I finally found the right one

After trying two different To Do apps, the 3rd one was a charm. It’s called….wait for it…….”ToDo”! Genius! This app shouldn’t be confused with the other one out there called “To Do”. ToDo does EXACTLY what I want it to do (wow, that was bad). It’s by a company called Appigo. Not only does it do what I want, it’s also got a great UI (user interface) too. Very clean and graphically neat.

Two ways to enter your To Do’s

Like I said, it shouldn’t take 50 steps to enter a To Do item. Luckily, ToDo has a “Quick Add” task entry feature. This allows you to quickly add a task and just the task itself. If  you want to get really specific about due dates, priorities, repeating, etc., then you can use the regular task entry method (pictured above) and even that one is well thought out and doesn’t take too long to complete.

Once your list is entered, there is also a very neat selection of “done/strike out” graphics. So when you check things off, you get a nice graphical display (of your choice) to distinguish between the completed items and the ones still left to do.

If you have one or more tasks due “today” then you will see a numeric banner on the app’s icon indicating that something is due today. However, until Apple turns on background processing for 3rd party apps (rumored to be in the upcoming iPhone/iPod touch 2.2 update), this feature will only work, if you actually go into the app at least once on the day that something is due or while the apps is running.


The Bottom Line

There is a feature in ToDo to allow you to sync your ToDo’s to the web or to your desktop. I have not tried this feature as I simply don’t need it. I need my lists on my iPhone while I’m running around. Having them on my computer would be nice, but not necessary. Sure, there are free ones and cheaper ones out there. However, this one does things EXACTLY the way that I want to work and therefore it was worth the $9.95 to me. Although ToDo satisfies my immediate needs, there is room for improvement. For example, if I create a task “Call Steve”, then it would be nice to actually be able to dial Steve’s number right from the ToDo app.

Update: Blog reader Jan pointed out to me that you can in fact setup a task to do a call directly from the app by using the longer entry method and changing the Type from Normal to “Call” and then you’re prompted to choose a Contact from your Contacts. When you actually tap the task when you want to make the call, you’re then presented with a popup of all the numbers you have for that contact to dial. Very slick! Thanks Jan! The other types are “Email a contact” and “Visit a website”. Email a Contact brings up your contacts to choose and Visit a website allows you to enter a URL. I’ll be using that one a lot as I always see ads for websites that I want to visit later and of course forget the URLs by the time I’m able to visit the sites.

Also, I’d like to see a permanent list feature. I’m not sure (I need to do more testing), but it seems that once you complete the items on a list, that list eventually clears itself of all tasks. I’m not 100% sure of this, but one of my completed lists was blank when I went back to it days later. I would like to keep the items on some lists so that I can use the list (say a packing list) over and over again. As a work around you could always keep one item on the list that is not done. Again, I need to do more testing to see how this actually works. I may have lost the items on that particular list due to an update of the app.

An example of one of my packing lists


You can get ToDo from the App Store by going here. ToDo works on the iPhone or the iPod touch.

Adobe TV 2.0 is here!

With all the buzz around Adobe Creative Suite 4, you may have missed the roll out of Adobe TV 2.0. Adobe TV is a FREE resource that features all kinds of content from experts all over the globe. When Adobe announced CS4, over 10 hours of tutorial and demo content also went online via Adobe TV. For example, here’s a CS4 Design Premium overview:


Some of the highlights of the new user interface include:

  • Improved site load time
  • Improved site navigation (deep linking to any page via the address bar, all pages can be bookmarked, browser behavior such as back and forward buttons functional, ability to sort clips alphabetically)
  • “Products” menu on homepage enables users to to navigate to content based on which product/suite they’re interested in
  • Users can filter videos based on product, version, skill level, and topic. When you click to a Channel or Product from the homepage, you will see a pick-list on the right of the UI where these selections can be made
  • Closed captioning (not yet available on all videos)
  • Ability to download associated tutorial assets (when available)
  • TRT of clips appear in thumbnails – a widely requested feature from users that have a limited amount of time available and want to find content that they can watch in that time period
  • Ability to present content up to 880 pixels wide at native size – makes presentation of tutorial content much higher in quality

You can can check out Adobe TV here. Adobe also launched French and German versions.

You can also catch the CS4 Launch Event if you missed the web cast, now on Adobe TV:

You can also catch Adobe TV (and a ton of other cool content) via the FREE Adobe Media Player.

Adobe Launches Creative Suite 4!

Adobe launches Creative Suite 4 today! I’m here in San Francisco for the Live showing of Creative Suite 4 to some of our top customers. You’ll be able to catch it via the web by going here. I must say that this is a very strong release of the Creative Suite! There are hundreds of new features across the whole suite. The live audience was blown away by what they saw.

Adobe’s SVP of the Creative Business Unit, Johnny L. was the host and after setting the stage for what CS4 was all about he actually invited some key customers to come up and show off what they had been working on with the various (pre-release) CS4 apps.

There were customers representing Video, Web/Interactive and Print workflows. This was really impactful as it wasn’t just Adobe employees showing off the features, it was customers showing real-world work that they had created using the new toolset. Johnny L then wrapped things up with a demo of Photoshop CS4.

I got a special treat by meeting the legendary Bill Atkinson. For those of you who are too young to remember, Bill Atkinson was one of the original Macintosh developers. He was the guy who wrote MacPaint! That’s right, the first graphics application that I had ever used. Had it not been for Bill’s revolutionary work, I probably wouldn’t be where I am today in the graphics world. It turns out that Bill is a photographer and a huge fan of Adobe Photoshop!


Want more on CS4?

As you read this post there is tons of content going live on Adobe.com and various partner sites so that you can explore all that’s new in CS4. There’s over 10 hours of CS4 video content on Adobe TV alone. Adobe Product Manager John Nack has posted some juicy details. Layers Magazine has put up a CS4 Learning Center as well as NAPP. I’ve even posted my first CS4 episode on my own Creative Suite Podcast. So if you want to learn more, there’s content out there for ya. I’ll be doing new CS4 tutorials on my CS Podcast from here on out.

The New Westcott Spiderlite TD5 Bulbs

I’ve been a fan of the Westcott Spiderlite TD5‘s for a while now. Although I have two of these wonderful lights, there has been one single thing that has kept me from using them more often. That one thing is that they just weren’t bright enough for all the situations that I shoot in. Well Westcott has been aiming to change that by working on brighter bulbs. You would think it would be a no brainer right? Just make ’em brighter! What’s the big deal? The big deal is that brighter alone is not enough. The catch is that these lights are “daylight balanced.” So you just can’t make the bulbs brighter without rigorous testing to make sure the bulbs are also still daylight balanced to 5500K. So a lot of work went into these new bulbs.

They also grew in size. The New bulbs are at least twice as big as the old ones and man are they bright! However, just like the old ones, they’re not hot. So your subject won’t melt after being under them for a while. The new bulbs are 50 watts each (old ones were 30 watts each, and 26 watts each before that) for a total of 200 watts. You get 4 bulbs plus a small modeling light that goes in the center of the TD5 head (pictured above).


How do they perform?

I’ve had 3 different occasions to use these new bulbs. I used them for the first time recently at Photoshop World right in the Westcott booth doing a lighting and Lightroom demonstration. I also used them recently at a friend’s wedding reception doing some portraits for the newlyweds and their family. My most recent experience was in studio, which is where I got this shot:

The above shot with was taken with 1 Westscott Spiderlite TD5, medium size softbox (skip the medium box and go for the large one!), shot with the Nikon D300, f 5.6, 1/30th sec, ISO 400, 70-200mm f/2.8 lens at 105mm, RAW. I shot tethered in to Adobe Photoshop Lightroom 2.0. No exposure adjustments were made and only minor retouching and a white balance adjustment. I was very pleased with the results.

With the new bulbs you easily gain a full stop. The beauty of working with the Spiderlites is that there is no guess work. What you see is what you’re going to get! If you own a Spiderlite TD5, then you owe it to yourself to upgrade to the bulbs. I’ll certainly be using my lights more now!

iPhone App of the Week – Dashbuster

My pick for this week’s iPhone app of the week is Dashbuster! Dashbuster is an app for the iPhone and iPod touch that allows you to manage either your Netflix or Blockbuster (or both) movie queues. I’ve been a Netflix junkie for years! I usually have no less than about 80-90 movies in my queue at all times. Netflix just makes it so painless to rent movies and they started the whole “keep it as long as you want with no late fees” thing, which was perfect for me.


Why use this app to manage your queue?

Since I’m into to movies, the conversation usually comes up at some point when I’m talking with friends, family and colleagues about favorite movies or movies that they’ve recently seen that were good. The problem is, I’m never gonna remember the names of those movies. Now I can whip out my iPhone and add the movie to my queue right there on the spot. Now this isn’t the first Netflix iPhone app I’ve tried. There was one that I was using called iFlix (which seems to have been removed from the App store) and I really like iFlix, but there was one thing that pushed me over the edge to buy Dashbuster and that was the way they handle “Saved” movies.

A “Saved” movie is one that you add to your queue that isn’t actually out on DVD yet. I LOVE THIS FEATURE! Although I do a lot of movie renting, I also actually go to the movies from time to time. It never fails that while I’m sitting there watching the previews, I think “wow, that looks like a cool movie, but I may not get to see it in the theaters.” So I want add it to my Netflix “Saved” queue while it’s fresh on my mind. Now I can sit there and add them right after I view the Preview. iFlix allowed this too, but it didn’t break out the “Saved” movies from the “Queued” movies the way that Dashbuster does. That little feature was enough to make me buy and download Dashbuster even though I already bought iFlix.


Complete queue management and more

You can not only add to your queue, but you can also change the order in which they will be shipped. Of course you can also remove a movie from your queue with a swipe of your finger. There is also a really good search feature to find the movies you want to rent. Can’t think of a movie to rent? Use the RSS Feeds feature to see the Top rentals in each genre including the Top 100 rentals overall. Although I’m a Netflix customer, this app works for either Netflix or Blockbuster accounts or Both! This app is also quite stable and works as advertised.


Dashbuster goes for $3.99 there is a FREE Dashbuster version, but the free version doesn’t allow you to add movies to your queue. Dashbuster works on the iPhone or iPod touch.


Joy of Tech
Joy of Tech

Canon came out swinging in this round

Let me start with a disclaimer: Having been in the world of digital photography for a few years now, I have met some great photographers. I have also met some fanatics. These are people that treat their camera brand like a religion and no one is going to tell them they are wrong. It reminds me of the Mac vs. PC days back in the 80’s and 90’s. Although I’m a Nikon shooter, it’s not my religion. I can certainly appreciate when one manufacturer does something cool vs. another. I’m not paid by Nikon, it’s just the camera brand I picked at the time based on the models that were out at the time. Once you buy a camera body and start buying lenses, it’s very hard (financially) to just up and switch because another manufacturer comes out with something that is tempting. So if this is your religion, that’s great for you, but I really don’t care. I’m just reporting on what interests me. So spare me with the comments on how one is so much better than the other (I am glad that you feel so passionately about it). Now that I got that out of the way, let me go on with my post:

Canon’s New EOS 5D Mark II SLR Kicks Butt

Yes, I said it! I’m a Nikon shooter, but I can certainly appreciate when I see a camera that has outstanding specs and that’s exactly what I woke up to this morning. The 5D Mark II had been rumored and leaked for months now. I’ve been watching the rumors as many of my friends are Canon shooters (yes I associate with both Nikon and Canon users, call me crazy). However, when I saw the specs this morning, all I could say was WOW! What caught my eye was: 21.1 megapixels, Full Frame, Full HD 1920 x 1080 video (Woah), 3 in LCD with Live View, 3.9 fps burst for unlimited JPEGs or up to 14 RAW images when using a UDMA CS card all for only $2,699 (body only price)! Based on the specs and price point, this camera is going sell WELL!


My take on DSLRs shooting video

One of my blog readers asked if I would perhaps do a post on the Nikon D90? I thought about it at the time and I didn’t really feel comfortable doing a review of a camera that I didn’t have or plan to get. However, now that both Nikon (with the D90) and Canon (with the 5D Mark II) have released models that shoot video, I thought I would at least weigh in on this topic. I haven’t actually used either model yet, so this is only my opinion/feeling at this point. I think that having an DSLR that can shoot video is an interesting concept. It will certainly appeal to the “dads” and “moms” out there. Think about it, you’re at the little league game and you can capture your kid as either high res great quality digital stills or as a video, when they slide into home base. I also think it’s going to open up a whole new world for seeing “different” kinds of video because now you have a camera shooting video using the dozens of different lenses available to DSLR cameras. What I’m not sure of is how well this will appeal to professional photographers. Most professional photographers that I talk to, never show any interest in doing video. So I’m not sure if they will care about having a DSLR that can shoot video. However, on the other hand most professional videographers I know DO SHOOT STILLS more and more now. So these cameras will definitely appeal to them.

Usually when you have a multi-function device, it tends to be really good at one thing and suck at the rest, or worse, it’s not really good at any one thing. I think these new cameras are probably going to be much stronger at taking stills than they will be at taking video. So therefore it won’t be the “only” camera that a video professional could carry. I think it will be good for occasional video use. There are all kinds of things that we don’t think about when it comes to video. The first thing that comes to mind is, “what kind of microphone do these cameras have?” Sound is the most important aspect to good video. People will forgive you for having crappy video with great sound, but they will not forgive you for having great video  with crappy sound!

Here’s a Sample Video my buddy Bruce found on the web, that was shot with the 5D. Video shot at 600 iso with 70-200 lens:


So the bottom line is that I think it’s an interesting idea that will appeal to the hobbyists out there. I don’t think the pros will latch on just yet or at least not to this first round of cameras, for their video needs. It’s going to be interesting to watch though!


My purchase plans?

I’m set! I’m very happy with my Nikon D700 and D300. I’m getting all that I want out of them and more. So I have no plans for any of the above at this time. I’m just sharing my thoughts on what I see out there. Sorry to disappoint the fanatics (actually I’m not sorry – dude, you need to get over it. Use that energy on taking better pictures) 🙂

2 Important Updates – iPhone 2.1 and Mac OS X 10.5.5

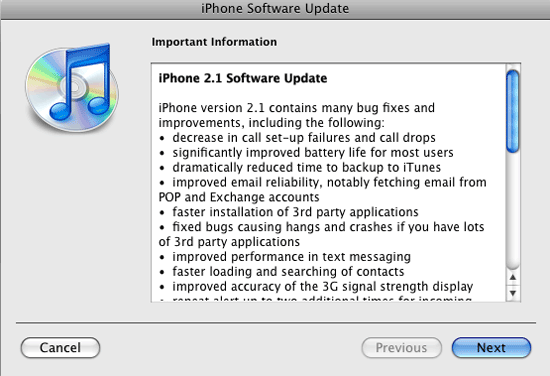
It’s bug fixing time at Apple!

On Friday Apple released the highly anticipated iPhone 2.1 update! I wanted to use it for a few days before passing judgment on what it fixed vs. what it didn’t fix. This was not a feature update. In other words it didn’t include Cut, Copy & Paste as some had rumored, it was mainly geared at fixes a boat load of small issues that were frustrating some users. One of the main things it was to fix was the high rate of dropped calls that some users were experiencing. Since I wasn’t experiencing a lot of dropped calls, I can’t speak to if this is better or worse now. My call quality has been good since day one and seems to be the same with 2.1. The other 2 important areas were App Crashes and Performance. Now those two areas I can speak to. As I’ve said in the past, I’ve got over 1,000 contacts on my iPhone. So when 2.0 came out the first thing I noticed was that the contact list was so slow that it was almost unusable. Each update made it faster, but 2.1 actually gives me about 98% of the performance I was seeing with 1.1.4. I don’t want to say 100% because it does still lag for about a second or two sometimes.

As far as App Crashes go, this is a mixed bag. The problem is that if an app crashes now, well it’s hard to say if it’s Apple’s fault or the fault of the app not being updated for 2.1 yet. I was still getting a few crashes in Safari on certain sites, but I haven’t had a Safari crash since 2.1 has been installed. However, my Facebook app (which has not been updated) locked up the whole iPhone (needed to reboot it) when I tried to use the camera function with it. So again is that the fault of the app or 2.1? Hard to say.

If I had to say, I would say that 2.1 is definitely a BIG IMPROVEMENT over all. The iPhone does seem more responsive and like I said, I haven’t seen any real crashes (except the one) all weekend.

If you have more than a few apps, you’ll love how much faster Backing up and syncing is. Also installing apps is way faster.

I also should mention that Apple plugged several security holes including the one that someone could gain access to your contacts using the emergency dial feature. So you should install 2.1 if for no other reason than to make your iPhone more secure.


Little things that have changed in the iPhone 2.1 update

Like I said, this is not supposed to be a new features release, but that never stops Apple from slipping in a small change here and there. One thing you’ll notice is that now when you receive an SMS text message, your iPhone will now sound the alert up to two more times after the first time in about 3 minute intervals. This is for those folks that complained that if they missed it the first time, they wouldn’t know they had a message waiting without looking at the screen. Unfortunately there is no preference for this. So everyone gets this feature whether you wanted it or not.

You can also create Genius Playlists now (a feature in iTunes 8) right in the iPod app on the phone. I didn’t see it at first and I knew it was supposed to be there. The reason I didn’t see it was because I sync my iPhone to two different computers. One for data and one for media (music, movies, etc.). It wasn’t until I sync’d it with the computer that holds my music, that that feature became active.

No more app updates screwing up your custom home screen configurations! This is a biggie! One of the things that frustrated me and several of my friends is that you spend time putting the apps in the order you wanted them in on your iPhone only to have that order screwed up when you did an update to one of your apps by sticking the update at the end on the last page. Now when you do an update, it does temporarily put it at the end until it’s done and then replaces the old app in the same spot! Yay!

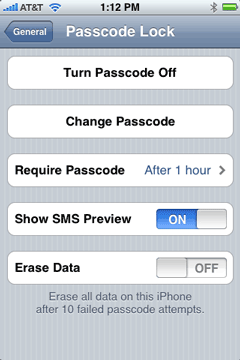
Wipe it automatically if someone tries to break in! Now there is an option that when you set a PIN on your iPhone you can optionally have it automatically wipe the iPhone if someone tries to enter the wrong PIN (guessing it) 10 times in a row. By the way I highly recommend setting a PIN on your iPhone. There some myths around this feature and let me clear them up now. The biggest thing people tell me is “hey I don’t want to have to enter a PIN to answer my phone!” OK good, because you don’t! Even if your iPhone is secured with a PIN you don’t have to enter it to answer a call. You only have to enter to make a call and only after the PIN has kicked in, which that interval is up to you. For example, on my iPhone I have it set to an hour. If I haven’t touched my iPhone in an hour, it automatically locks and requires a 4 digit PIN to use it again. You can go from immediately to 4 hours. When I’m on the road I change it to 15 minutes. This way if I lose my iPhone or if it’s stolen, I don’t have to worry about someone picking it up and just start using it and worse getting access to all my info on it. Because my iPhone is now setup to use Exchange, if it ever does come up missing, I can have my IT folks at work wipe it clean remotely. Once the wipe starts, there is nothing that can stop it. Not even turning it off or removing the SIM card. Once you turn it back on the wipe continues. Pretty James Bond’sy. The last myth is: “What if it’s an emergency and I need to make a call?” If you’re in an accident and someone needs to dial 911 on your iPhone but you’re unconcious and they can’t get the PIN out of you, there is an “Emergency Call” button that is accessible even when the iPhone is locked with a PIN. So there is no excuse, go Turn your Passcode on right now!


Cosmetic changes too. The 3G and EDGE display is different. Apple used to put a box around the “3G” and reverse it out, now the box is gone and it just says “3G”. Also now when you watch a movie (video, video podcast, etc.) and you don’t finish it, there will be a circle in front of it that is half filled in. So the blue dot means you haven’t watched it yet, no dot means you have watched it completely and a half dot means you started it but didn’t finish it.

It’s all good! Now Apple please return to adding more features that we want.


Mac OS X 10.5.5

Mac OS X 10.5.5 came out yesterday and fixed a slew of bugs. I read through the list saying, “oh that’s good, oh that’s a good one”, but in all honesty I haven’t really noticed a difference. Granted it hasn’t even been 24 hours yet, but I wasn’t really having any major problems with 10.5.4.

The one thing I would like to see addressed and I thought it was in 10.5.5, but I read it wrong, was the ability to sync subscribed iCals up to Mobile Me. It’s just lame that I can’t wireless sync my family and organization calendars to my iPhone because I use Mobile Me. If I sync them over USB I can! Apple also treats the Birthdays calendar as a subscribed calendar too. So no birthdays on the iPhone – LAME!

I do have a work around though. Since Birthday calendars, user group meeting schedules and Holiday calendars don’t change often, I exported those “subscribed” iCals out and then imported them back in as NEW iCals. That way the new ones are not subscribed to and therefore sync up to Mobile Me and my iPhone. This is a temporary work around as I’m hoping this issue will be fixed in the not too distant future.
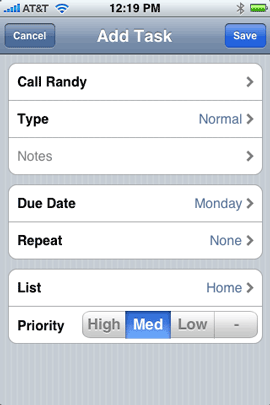
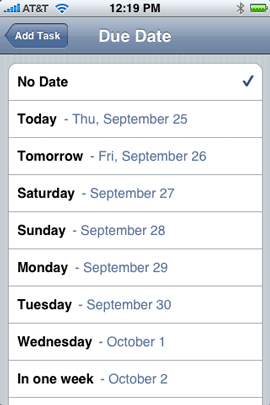
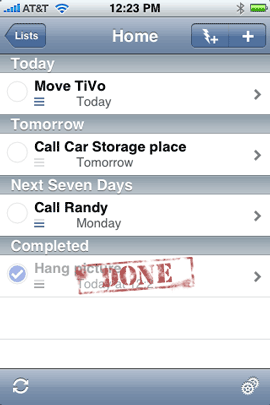
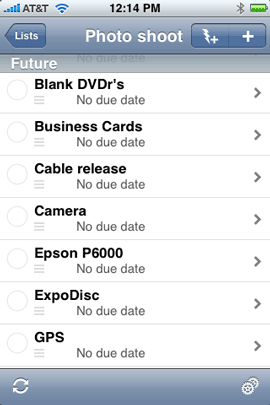
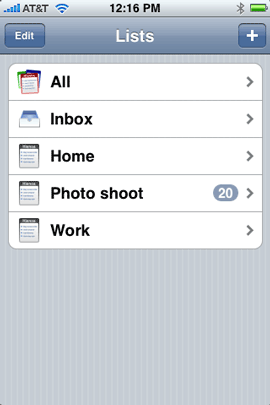