I went with this color laser printer

brother-HL3170CDW

A few weeks ago I posted on my Facebook page asking for recommendations for a new printer. The requirement was that it had to be color and be ready to print when I’m ready to print. In other words I print very infrequently and my frustration with inkjet printers is that some models dry up when not used regularly and take lots of ink just to get the nozzles clean and printing again. My previous office printers had all been Xerox Phaser (dry ink) printers. While these printers have always served me well, it was going to be overkill to get another one as I just don’t print that often anymore. When it comes to photo printing I usually send them out (Mpix, Costco, etc.) So in house high quality photo printing was not a requirement either. I got lots of different recommendations about Canon inkjets, HP laserjets and others. I decided that for the cost of consumables and again the infrequent use, I would be better off this time with color laser. The other requirement was that it had to be wireless. I did look at the Xerox color laser printers, but it seems that Xerox just doesn’t get it when it comes to wireless. In order to go wireless with Xerox I’d have to go with their midrange Phaser 6600, which lists for $499 and still requires a $99 wireless add-on to do WiFi?? WTH! Really Xerox? Wake up! It’s 2014!

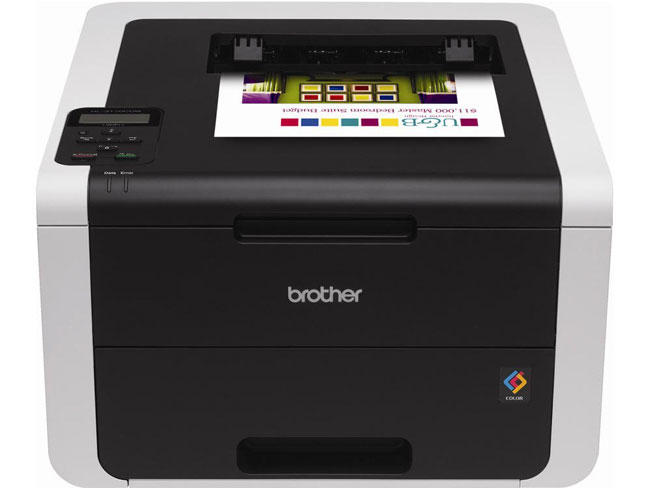
My research led me to the Brother HL3170CDW

Not only did this printer meet all of my requirements:

  • Color laser
  • Wireless (WiFi – AirPrint – Google Cloud Print)
  • Automatic Duplex (2-sided) printing
  • Low cost & low cost consumables
  • Quiet
  • Small

But it excelled at all of my requirements as well. Setup went perfectly because I never had to plug in a single cable besides the power cable. The first thing I did after installing the 4 supplied toner cartridges was to power it up and join my WiFi network from the built-in control panel. Next I added it wirelessly to my MacBook Pro and MacBook Air. Finally I did a print test from my iPad and iPhone, which both saw it over AirPrint. Yes, this was the out of the box “it just works”, experience that I was looking for. The print quality is good as well. No problems to date.

What’s the downside?

I would say the only downside is that it’s not as fast as I’m used to with my Xerox printers. When I’m talking speed, I’m talking from the time I hit print til the time the printer wakes up, receives the job and prints it. After that it prints at a speedy 23ppm. My only other concern was that while reading other reviews for this printer, people complained that once it goes into “deep sleep” that it falls off the wireless network for AirPrint. In other words you would have to walk over and hit a button to wake it up to print or print from a computer. I’m happy to report that I have not had this issue at all. As a matter of fact I’ve not printed for two days now and it still shows up and ready to print from my iOS devices via AirPrint. It says “deep sleep” on the LCD. Now there is an option to let it power itself OFF after a user defined interval. At that point I would assume that you would have to press a button to turn it back on and that wouldn’t bother me. However, that option is off by default and the deep sleep conserves power (using less than 1 watt of power). I will turn it off when I’m away on business.


The Bottom Line

If you’re looking for a good quality, color laser printer that supports all the latest and greatest wireless protocols as well as printing via USB, then this printer is definitely worth consideration. It fit the bill for what I was looking for at less than half the cost of a Xerox printer with similar features. It’s also less costly to run than typical inkjets.

You can get the Brother HL3170CDW Color Laser Printer here.


The New Smaller 2014 Jawbone Era Bluetooth Headset

Jawbone_Era_2014_TW

It’s been a while since I looked at Bluetooth headsets. After all my Jawbone ICON has been working just fine. However, I ordered the new 2014 Era by Jawbone because I thought I had lost my older model. I keep my Jawbone along with a couple of misc. adapters and wired Apple EarPods in a small vinyl pouch that I carry in my pocket. That pouch went missing for a week.  I couldn’t find it in all the usual spots that I normally leave it or drop it in. I figured that it was gone for good and that I had to replace the contents. I ordered the NEW 2014 Era by Jawbone. Although I hate buying things to replace lost, stolen or broken things, I wasn’t going to go without one any longer. When the new Era arrived I was immediately taken aback by how small it was. Oh by the way, I found the pouch containing my old gear one day after I placed the order for the replacement gear. It was at the cleaners, probably in one of my pants pockets. They returned it to me with all the contents intact. Anyway, I now have this new Jawbone Era (yes I could have returned it, but then you wouldn’t be getting this review 😉 ) and like I said, I was really taken aback by how small it was compared to almost all other headsets I had used. The only other small one that came to mind like that was the Apple Bluetooth Headset. Yes, Apple made their own for a while and then quietly discontinued it. The new Era is very sleek looking. Jawbone did away with the former cheese grate design and this one has smooth lines. It comes in four colors and rather than going with my default (black), I decided to live a little and get the bronze one.

Jawbone_era_vs_Era_2014
Jawbone Era 2014 (Bronze) next to my Jawbone ICON

Setting it up

It came with four ear gels. You get  left and right small and medium size ones. I like to wear it on the right side and the small size was the best fit. After the initial charge I then made sure I had the latest version of the Jawbone updater on my MacBook. The software integration is what really sets the Jawbone headsets apart from the competition. Not only was there a firmware update waiting, but I also configured it with the more sexy “Bombshell” voice as well as set up about 14 out of my 20 allowed caller ID names. If you add in the names and numbers of up to 20 contacts your Era will announce their name in your ear when your phone rings. These are the kinds of bonus features that make using the Era fun and more elegant.

jawbone_voices

Sound Quality and Battery Life

This is what really counts with any Bluetooth headset. If you can’t hear your callers or if your callers can’t hear you then what’s the point? I have yet to use any Bluetooth headset that made me say “wow” when it comes to sound quality. In most cases the quality is “good” or as expected. For me the new Era is “good”. The Jawbone Noise Assassin is designed to help cut down or eliminate background noise and it does a good job of it. As far as battery life goes the smaller size means a smaller battery. Therefore your battery life will be about 3-4 hours of talk time. For many that may be a step down from the larger units. My older, larger Era got 4-5 hours of talk time. If you talk a lot throughout the day you will either want one of two things. You’ll either want the new Era charging case, which extends the battery life up to 10 hours of talk time, or you’ll want a different headset. I didn’t go with the charging case because I simply don’t spend that much time talking on the phone throughout the day. If I ever find that my talking on the phone is increasing I could always order the charging case separately.

Apple’s Siri and Google Now Integration

There are only two controls on the Jawbone Era. There is the physical on/off switch and the multifunction button on the end. When your phone rings you press the multifunction button once to answer the call. Press it again when it’s time to end the call. While the headset is idle and you’re not on a call you can press it once to hear the remaining battery time/status. However, if you press and hold it will activate Siri on the iPhone and Google Now on select Android devices. This is pretty cool as it gives you a more discrete conversation with Siri. I enjoy using Siri this way without having to physically pick up my iPhone to hold down the home button. Speaking of iPhone integration, you’ll also like the fact that the Jawbone Era’s battery indicator shows up next to the iPhone’s battery indicator on the iPhone display.

Jawbone_battery-iPhone5

The Bottom Line

If you looking for the smallest, arguably the most stylish Bluetooth headset then look no further, the New 2014 Jawbone Era will fit the bill nicely. If you can live with the relatively short talk time of 3-4 hours then I would say save $30 and go with just the Jawbone Era here. However, if you want a full day of hands-free conversation, then go with the Jawbone Era with Charging Case here.

Chromecast – Stream web content to your HDTV wirelessly

chromecast-dongle

If you’ve followed my reviews you probably already know that I’m a fan of TiVo and Apple TV. Between the two devices I pretty much have all my TV watching needs covered. TiVo is definitely the best DVR experience for recording and watching TV shows and Apple TV is great for streaming all my media content, watching Netflix, YouTube, HBO Go, iTunes rentals, podcasts, etc. With Apple TV I can even stream/mirror any content from my iOS devices OR my Macs. The latest Macs and Mac OS X has AirPlay built-in. Even with all these capabilities I was intrigued by Chromecast. The low $35 entry price was low enough to give it a shot.

What’s Chromecast?

Chromecast is a small “dongle” that attaches to your TV via HDMI. However, don’t let the picture deceive you as it did me. You not only connect it to your TV via HDMI, but you also need to supply power to it. You can either use the supplied power adapter and plug it into the wall or you can use the USB cable and plug into an available USB port on or near your TV for power. This freaked me out at first because my TV is on the wall and I didn’t want any wires hanging down. However, I was lucky to have a USB port on my TV right next to the HDMI ports in the back. I was able to plug in the Chromecast and power it right off the USB port on the TV as well. No visible wires!

chromecast-setup

Once it’s plugged in and you turn your TV on to that HDMI input you’ll be presented with a setup screen. Head over to your computer and download the setup app. You computer should see the Chromecast wirelessly. During the setup process you’ll give it access to your WiFi network and enter your WiFi password. Mine needed to download a firmware update then I was up and running. After the Chromecast install on the TV, you’ll need to download (Google Chrome if you don’t already use it) the Chromecast extension for Chrome. This extension lets you broadcast from any browser tab you have open in Google Chrome to your TV.

settingupchromecast

How is this better or worse than Apple TV?

First off it’s not direct competition to Apple TV. Apple TV does way more and costs more. Chromecast only works with whatever you can display in Google Chrome or from a Chromecast compatible app on your computer or mobile device. So no streaming of other things on your computer unless they are Chomecast aware. However, that’s probably the one thing I like about it over Apple TV. While I can use AirPlay to stream ANYTHING from my MacBook Pro to my Apple TV, it’s a direct mirror. I cant’ say stream a slideshow in Lightroom and then go work on another photo in Photoshop. It’s a mirror of whatever I’m doing on the computer. (UPDATE – with Mac OS X 10.9 Mavericks you can AirPlay to an Apple TV and use the Apple TV as a second display/extended desktop and NOT mirror.) However, with Chromecast I can stream content from one browser tab and go work on anything else while that browser content is streaming in the background. That’s what I like about it most and I think that’s what people that are trying to cut the cable/satellite bills out of their lives will like too. You can stream Netflix, HBO Go, YouTube or any other site to your TV while not tying up your whole computer. There are times that I watch my Slingbox via my web browser. Now I’ll be able to stream that content to my TV.

What about audio? This is the tricky part. If your content is either Flash based or coming from an App that is compatible with Chromecast then your audio will also stream to your TV. However, if the content is not Flash based then the audio will play through your computer.

The Bottom Line

If you want to stream content from the web to your TV, this is your easiest most cost effective way to do it wirelessly. The playback rate is “decent”, not great or perfect, but certainly watchable without dropping too many frames. The picture quality was very good. It’s a one time cost with no monthly fees. I’m tempted to get another one for travel/hotel room use.  You can get one here for $32.88. If you want to MORE, then I’d still recommend getting an Apple TV.

chromecast-nowshowing

Logitech Ultrathin Keyboard Cover for iPad Air Review

logitech_ultrathin_ipad_air

Hands down the Logitech Ultrathin Keyboard Cover has been my choice for iPad keyboards. I had one on my 3rd generation iPad and even one on my iPad mini. When the iPad Air came out I decided it was time to upgrade and of course replace the iPad 3rd generation. The one piece I had already begun to miss was my keyboard. Don’t get me wrong, the iPad’s onscreen keyboard is fine for typing quick, short things. However, I often use my iPad during travel and in flight instead of my MacBook Pro. This usually means I’m responding to email and writing. For these longer sessions, I’m spoiled by a physical keyboard. Logitech wasted no time in getting out the Logitech Ultrathin Keyboard Cover for iPad Air. Just like the previous models it connects wirelessly via bluetooth, but it’s also a smart cover that magnetically attaches to the iPad itself. Once you disconnect the iPad from the keyboard you can stand the iPad Air up in the keyboard in either horizontal or vertical orientation.

logitech_ultrathin_ipad_air_h

Logitech made some refinements from the original model that I had. The first one is that they got rid of the shinny plastic on top. It now has a more matte feel/look to it that will definitely not be as much of a fingerprint magnet. On the bottom they’ve attached very small rubber feet that should help prevent the back from getting scratched up so easily. Unfortunately the cover isn’t any thinner. This means that it will add some thickness to your nice thin iPad Air. It pretty much doubles the thickness when attached and closed.

logitech_ultrathin_ipad_air_v

Overall I’m quite happy with this new version and glad to have a physical keyboard again. I did read some of the other reviews out there that complained about things like the magnet not being strong enough and I’ve no issues so far. As a matter of fact the magnet seems stronger than the previous model I had. My 3rd generation iPad would easily slide apart from the keyboard in my bag, but this one seems to stay in place. The battery life of the keyboard is insane. You can easily go weeks if not months between charges. It’s the best keyboard for iPad period.

You can get the Logitech Ultrathin Keyboard Cover in Black/White for iPad Air Here.

You can get the Logitech Ultrathin Keyboard Cover in Black/White for iPad 2, 3 and 4 Here.

You can get the Logitech Ultrathin Keyboard Cover in Black/White for iPad mini Here.

FaceTime Over AT&T 4G Cellular For All In 2013 – Finally!

facetime-ATT-cellular

Last November I wrote a post about how AT&T was hinting at allowing those of us who were grandfathered in to unlimited data plans to be able to use FaceTime over cellular. It seemed like a pipe dream as the feature worked for a few, but not for most including me. Yesterday, I saw the news that AT&T was FINALLY going to allow all customers to use video calling features over 4G by the end of 2013. Just for the heck of it, I checked my settings and to my surprise it was already enabled! Just to be sure I turned off WiFi and attempted a FaceTime call over 4G. It worked!

I’m glad that AT&T finally came to their senses on this one. It didn’t make much sense that I could use Skype, Google+ Hangouts, etc, but not the built-in FaceTime. I’m on a corporate dataplan via my employer, however, if I had to buy my own plan I would have definitely considered other carriers. AT&T has restored a little (very small amount) of faith with this move. Thanks!

Dropcam HD Review

DropcamHD_front_turned_HI-RES

I’ve been using Panasonic IP webcams for years to keep an eye on things at home and at my studio. However, Panasonic has gotten out of this business and therefore it was time to look at newer cams to recommend to people that ask. I was intrigued by the Dropcam HD and finally got a chance to try one out. Dropcam HD is a 720p HD WiFi enabled video monitoring camera. It also broadcasts sound. Unlike the Panasonic cameras, Dropcam is both a hardware solution and service. During the setup process you configure a Dropcam.com account along with setting up the hardware. You have a choice of a “free” live viewing only account or a paid Plus or Pro account that not only allows you to view your Dropcam live, but also see either 7 or 30 days of recorded video respectively. The idea is that if you’re using it as a security camera that you’re not going to be watching it 24 hours a day. Therefore Dropcam will automatically record and keep the last 7 or 30 days of video so that you can review it if need. However, even with the Free account you can setup motion detection that can alert you that something is moving in front of your camera so that you can tune in immediately and watch.


The initial setup

drocam_setup

The initial setup couldn’t have been easier. Dropcam HD comes with a stand/mount, 10 foot long USB cable and USB power adapter. You plug the Dropcam HD into your Mac or PC initially and it mounts on your desktop as a volume containing the setup utility. No need to even download anything. During the setup you join the Dropcam HD to your existing WiFi network including password protected ones. You also setup your account on Dropcam.com during this process. Once you’ve got it setup, unplug it from your computer and place it where you want to monitor (indoor use only) and plug it into a AC wall plug. Once the camera powers up and connects to your network the setup completes. The mount can be either used on a desk, bookcase, etc. or you can wall/ceiling mount it. It even comes with the screws and anchors. Also the camera can easily be removed from the mount. It just pops in and out. Also the indicator light can be disabled for more discretion.


Image quality

dropcam_HD_studioview

I was really impressed with the image quality. Definitely much better than the standard def/low def Panasonic cameras I’ve been using. You can watch the image in a Flash enabled web browser on your Mac or PC or you can download their mobile App and watch the stream live on your iOS or Android devices. See my review of the iPhone/iPad App here.


Works in the dark too

dropcam_hd_dark

Unfortunately the room you’re monitoring may not always have the lights on especially if you’re not home. I was happy to see that Dropcam HD uses infrared technology to show you what’s going on even in the dark. It automatically switches to night vision when the lights go off and off again when the lights come back on.

dropcam_HD_rates

The Bottom Line

Dropcam HD is a very well thought out process and the company doesn’t rely on any other company or software to make their solution work. This is a good thing as many other solutions lack things like mobile apps or online recording. The image quality is exceptional and exceeded my expectations. You can setup multiple Dropcam HD units. You can do two way audio and it has digital zoom. While this hardware/service solution works as advertised there are a couple of things that would make it better. First off there’s no way to rotate/swivel the Dropcam. It’s a fixed camera and therefore can only cover the range that the built-in lens covers. With that said, the lens covers up to 107° field of view, so this may not be an issue for most. The next thing is that while it comes with a USB power adapter, it’s unnecessarily wide and you may have an issue plugging it in to an multiple plug outlet next to another plug. There’s no reason why it couldn’t be skinnier. The only other thing you might consider is that Dropcam uses about 60GB of bandwidth a month. Depending upon your ISP/plan this may be an issue. Comcast for example thinks anything over 300gb a month is excessive! As you can see I can’t find a whole lot wrong with Dropcam HD. I’m impressed and will look to replace my older Panasonic units with Dropcam HDs.

You can get Dropcam HD here.

You can also check out Dropcam on Facebook here.

DropcamHD_parts

Review: Shooting Wirelessly with the Nikon D600 and WU-1b Module

WU-1b

I’ve been a fan of shooting wirelessly to my iPad since the early days when I got my Nikon D7000 using an Eye-Fi Pro X2 card. After that I configured my Nikon D4 and WT-5a module to shoot either wirelessly to my MacBook Pro or my iPad and now that I have a Nikon D600 (and loving it!) I was interested in seeing how the new Nikon WU-1b module works. The idea in all of these scenarios is to use the iPad or iPhone for review of what I’m shooting with my DSLR and sharing with email or social media of quick event photos.

The Nikon WU-1b is a narrowly focused solution

WirelessMobileAdapterUtility

With the Eye-Fi and WT-5a module for the D4 you can wirelessly transmit your photos to a variety of Apps. However, the WU-1b seems to be narrowly focused by Nikon to shooting wirelessly to your iPhone or Android Smartphone. They provide a Free App (Wireless Mobile Adapter Utility) for both platforms (see my review of the iPhone version here). Once you download the App it’s pretty easy to get started. Just plug in the module into your D600’s USB port and turn your camera on. The WU-1b will start broadcasting its own WiFi hotspot. Connect to that hotspot via your smartphone and launch the App. Once you’re in the App you can either set it to wirelessly fire the shutter (with Live View on your smartphone) of your D600 and then transmit the image to your smartphone or you can switch the App to the mode that allows you to shoot normally with the camera and the images will be transferred to your smartphone as you take them. Whether you shoot in RAW or JPG the module will send JPGs to your smartphone. I normally shoot RAW to the 1st card and Basic JPG to the 2nd card (my Eye-Fi) card. When I’m in this RAW+JPG mode the WU-1b seems to send the smaller basic JPG. However, when I’m in just RAW mode it sends a larger full-sized JPG and of course that takes a lot longer. Speaking of time, the smaller JPG (about 500kb) takes about 5 seconds to show up on my iPhone. The larger JPG (about 1.6-2MB) takes about 10-15 seconds to show up on my iPhone.

Wireless Mobile Adapter Utility - Nikon Corporation

It works as advertised, but…

WirelessMobileAdapterUtility-transfer

While the WU-1b works as intended it really falls short in the review department. Unlike other tethering solutions you don’t actually see the images as they come in to their App. Instead you see a progress bar and once the images are there you tap to review them. Also while the camera settings are displayed, there is no way to change them in the App. Look at this is merely a transfer utility and remote shutter. Also there is no native iPad support. Yes the app works on an iPad, but in the smaller phone size.

Shuttersnitch saves the day AGAIN!

shuttersnitch-WU-1b_iPad

Shuttersnitch is the App I use for All my wireless tethering to iPad needs. It works with the Eye-Fi cards and it works with the Nikon WT-5a module. The good news is that it also works with the WU-1b module. Unlike the bear bones Nikon Utility, Shuttersnitch gives you a great way to review your images as you take them, star rate them, geotag them and share them via email, social media and cloud storage such as Dropbox or any FTP/WebDAV location. It’s a professional App! I remembered that a recent update of the App mentioned support of the WU-1b module and sure nuff it works great! I had to simply turn on support for the module in the settings and just start shooting. The images came in as usual.

Shuttersnitch for iPhone and iPad

ShutterSnitch - 2ndNature


The Bottom Line

For the price, there’s really no reason not to get the WU-1b module if you have a Nikon D600. It provides a pretty painless way to get images from your Nikon D600 wirelessly to your smartphone and it can work anywhere since it creates its own ad-hoc network. Add the Shuttersnitch App and you’ll be even happier with it. Oh yeah, one more thing: Nikon can you please explain why the Nikon WT-5a (for the Nikon D4) costs $500 more than the WU-1b (for the Nikon D600)? Is there really $500 more technology in the WT-5a? I’m thinking not! Yes I see the price is coming down on it from the outrageous $877 that I originally paid, but really? c-mon!


Use a Nano SIM Cutter to Cut Your Micro SIM down for iPhone 5 or iPad mini

I remember when the iPhone 4 came out and it required a NEW SIM format (for GSM based iPhones). It required a Micro SIM. This wasn’t a problem if you were buying a new iPhone because it would have a new Micro SIM already installed. However, if you wanted to use a different SIM from another phone or carrier then chances are it was a full sized SIM that you would have to cut down to Micro SIM size. There were several good Micro SIM cutters on the market and I own a couple of them. I even traved with one in my suitcase in case I got to a country that I wanted to buy a pre-paid local SIM and needed to cut it down for my iPhone 4 or 4s. Once again we are faced with a new SIM format. Now the iPhone 5 and iPad mini uses a Nano SIM. This SIM is even smaller AND thinner than the Micro SIM. That of course poses a problem for those that want to move SIMs between devices. As to be expected there are now a few different Nano SIM cutters on the market. Some even come with sandpaper to sand the back of the SIM down to make it slightly thinner. I used one to cut down my AT&T Micro SIM down to Nano SIM size to use in my new iPad mini. My AT&T SIM is originally from my iPad 2 and is grandfathered in to an unlimited data plan. This is GREAT for streaming video on the road, so I wanted the ability to use this SIM in my iPad mini as well. Although this is not the cutter I used in the video, this is the one I’d recommend here.
Here’s a video on how the cut went:

AT&T May Allow FaceTime Over Cellular For All

I’ve been beating up on AT&T a bit lately for their practices that basically punish users (early adopters) of their Unlimited Data Plans. The most recent punishment was when iOS 6 was introduced, Apple finally allowed for FaceTime calls over Cellular on iPhone 4s, iPhone 5 and iPad 3 (or higher). However, once again AT&T said NO to this if you were one of the original iPhone users still grandfathered in to an unlimited data plan. This is the 3rd time in recent history that AT&T has crippled a feature that the device or os could do, just because you weren’t on one of their “newer” ie. non-unlimited data plans. The first one was when iOS supported tethering. Unlimited data plan users still can’t access or add this feature even if they are willing to pay extra for it without leaving their unlimited data plan. The 2nd one was when the iPad allowed tethering and once again AT&T was silent on this issue for all users. Lastly there was the FaceTime over Cellular feature that once again AT&T said NO to all but those on their newest Shared Data Plans. I get it. AT&T wants users to move off those Unlimited Data Plans and they are trying to force the issue by basically crippling the features that your device can do. Is it fair? NO. Do you have a choice? Yep, you can switch plans or switch carriers and that’s exactly what I did with my iPads. Any cellular capable iPad I buy, I now buy the Verizon version. The irony is that back in the day Verizon was the carrier that played these games by disabling features like bluetooth on certain handsets. However, Verizon has changed their ways somewhat and now they say come on it.

AT&T may have changed their tune too

It appears that at least for some, starting yesterday AT&T has quietly been turning on FaceTime over Cellular for All users (iPhone 4s, iPhone 5, iPad 3, etc. on iOS 6). There are several reports that users simply turned their iPhones off and back on again and either the feature was already turned on or they were able to enable it without the familiar blue message I still get above. These users that have it working are all claiming that they are on a grandfathered Unlimited Plan. However, there are just as many users like me where the feature still isn’t enabled yet. So perhaps it will take time for it to roll out to all or perhaps it was a mistake, fluke or still not available for “all” users (ie those on Corporate Unlimited Data Plans), but time will tell. If this feature does roll out to all, It will change my attitude towards AT&T to be a bit more favorable than it is right now, and it truly would be a Happy Tech Thanksgiving.

Does it work for you? Did you power your iPhone down and back on again? Are you on the original Unlimited Data Plan? What state are you in? (keep in mind you have to be on iOS 6 and an iPhone 5, iPhone 4s or iPad 3 or higher).


Do you really “need” unlimited data?

If you’re an early iPhone adopter like me, then chances are you are grandfathered in to AT&T’s “Unlimited” data plan. AT&T has taken a lot of heat (and deservedly so) over playing games with this plan and doing things like throttling users back that use a lot of their “unlimited” data and holding back features ie. Data Tethering and FaceTime over Cellular, from users still on these plans.

Never gonna give it up!

Like many of you I have no plans of giving up my unlimited data voluntarily. Actually I don’t have a choice as my AT&T plan is through work. I do use a lot of data when I travel. I’m on this plan until they take it away (cold dead hands) or until work changes to something else. However, I also have a family plan with family members on it. Many of those iPhones and iPads were on unlimited plans too. A couple of months ago I decided to look not only at my bill, but to also look at usage and I found that most of these family members don’t use a lot of iPhone 3G/4G data at all. They are on WiFi most of the time either at home, work or school. I also had 3 iPads on various monthly pay-as-you-go plans. I decided to bite the bullet and move everything over to one of AT&T’s Shared Data Plans. Doing the math it would save me about $30/month and everyone (but me) would get the benefits of tethering and FaceTime over 3G/4G. I went with the 10GB/month plan because for 5 iPhones and 3 iPads the math you don’t really save anything by going with a lower plan as the cost per phone goes up!

How’s it going?


iTunes

This is my first full month after the switch and as I suspected they didn’t go anywhere near the 10GBs of allotted data. Again remember this is for 5 iPhones and 3 iPads.

The Bottom Line

While I like the idea of buying data and using it anyway that I want, I still don’t like AT&T’s tactics here of not allowing you to use your device to fullest if you were an early adopter on an unlimited data plan. If you use the data (especially video streaming) then by all means stick to your unlimited plan. Stick it to the man! However, if you could save a few bucks and you’re not using that much data you might be actually better off on one of the new shared data plans. These plans also include unlimited voice and unlimited texting.

Check your usage in the My AT&T App

iTunes